本文主要是介绍Network - Wireshark decrypts SSL Traffic,希望对大家解决编程问题提供一定的参考价值,需要的开发者们随着小编来一起学习吧!
Step one – set up an SSL-protected server to use as a testbed
To illustrate the process, we’re going to use OpenSSL to generate a certificate and act as a web server running HTTP over SSL (aka HTTPS) – it’s quite straightforward.
To begin with, we need to get ourselves a self-signed certificate that our HTTPS server can use. We can do this with a single command:
┌─[lab@core]─[/tmp/ssldemo]
└──╼ openssl req -x509 -nodes -newkey rsa:1024 -keyout testkey.pem -out testcert.pem
Generating a 1024 bit RSA private key
......................++++++
...............++++++
writing new private key to 'testkey.pem'
-----
You are about to be asked to enter information that will be incorporated
into your certificate request.
What you are about to enter is what is called a Distinguished Name or a DN.
There are quite a few fields but you can leave some blank
For some fields there will be a default value,
If you enter '.', the field will be left blank.
-----
Country Name (2 letter code) [AU]:XX
State or Province Name (full name) [Some-State]:XX
Locality Name (eg, city) []:XX
Organization Name (eg, company) [Internet Widgits Pty Ltd]:XX
Organizational Unit Name (eg, section) []:XX
Common Name (e.g. server FQDN or YOUR name) []:XX
Email Address []:
┌─[lab@core]─[/tmp/ssldemo]
└──╼ ll
total 8.0K
-rw-r--r-- 1 lab lab 924 Oct 18 06:19 testcert.pem
-rw-r--r-- 1 lab lab 916 Oct 18 06:19 testkey.pem
OpenSSL will ask you for some input to populate your certificate with; once you’ve answered all the questions, the output of this command is two files, testkey.pem (containing a 1024 bit RSA private key) and testcert.pem (containing a self signed certificate). PEM (Privacy Enhanced Mail) format files are plaintext, and consist of a BASE64 encoded body with header and footer lines. You can look at the contents of your key and certificate files in more detail like this:
┌─[lab@core]─[/tmp/ssldemo]
└──╼ openssl rsa -in testkey.pem -text -noout
┌─[lab@core]─[/tmp/ssldemo]
└──╼ openssl x509 -in testcert.pem -text -noout
We need to perform one tiny tweak to the format of the private key file (Wireshark will use this later on, and it won’t work properly until we’ve done this):
┌─[lab@core]─[/tmp/ssldemo]
└──╼ openssl rsa -in testkey.pem -out testkey.pem
writing RSA key
Now we’re ready to fire up our HTTPS server:
┌─[lab@core]─[/tmp/ssldemo]
└──╼ openssl s_server -key testkey.pem -cert testcert.pem -WWW -cipher RC4-SHA -accept 443
Using default temp DH parameters
ACCEPT
bind: Permission denied0 items in the session cache0 client connects (SSL_connect())0 client renegotiates (SSL_connect())0 client connects that finished0 server accepts (SSL_accept())0 server renegotiates (SSL_accept())0 server accepts that finished0 session cache hits0 session cache misses0 session cache timeouts0 callback cache hits0 cache full overflows (128 allowed)
The -key and -cert parameters to the s_server command reference the files we’ve just created, and the -WWW parameter (this one is case sensitive) causes OpenSSL to act like a simple web server capable of retrieving files in the current directory (I created a simple test file called myfile.html for the purposes of the test).
The -cipher parameter tells the server to use a particular cipher suite – I’m using RC4-SHA because that’s what’s used when you go to https://www.google.com. The RC4-SHA cipher suite will use RSA keys for authentication and key exchange, 128-bit RC4 for encryption, and SHA1 for hashing.
Having got our server up and running, we can point a browser at https://myserver/myfile.html and retrieve our test file via SSL (you can ignore any warnings about the validity of the certificate). If you’ve got this working, we can move on to…
Step two – capture some traffic with Wireshark
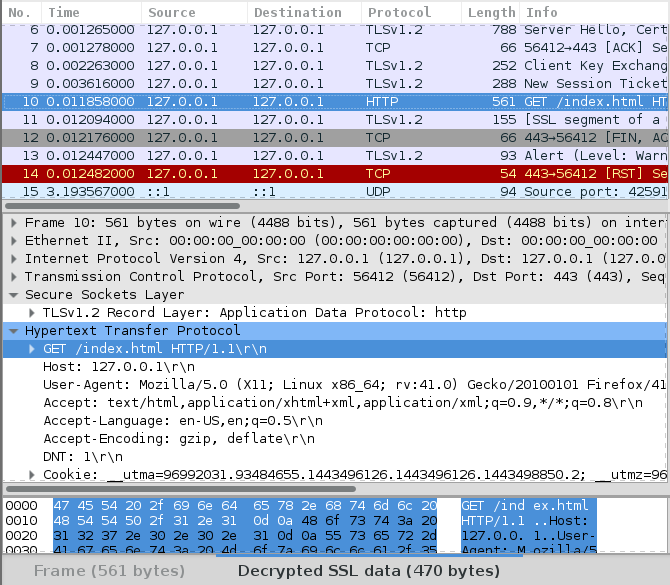
Fire up Wireshark on the server machine, ideally with a capture filter like “tcp port 443” so that we don’t capture any unnecessary traffic. Once we’re capturing, point your browser (running on a different machine) at https://myserver/myfile.html and stop the capture once it’s complete.
Right-click on any of the captured frames and select “Follow TCP stream” – a window will pop up that’s largely full of SSL-protected gobbledegook.
configuring Wireshark for decryption
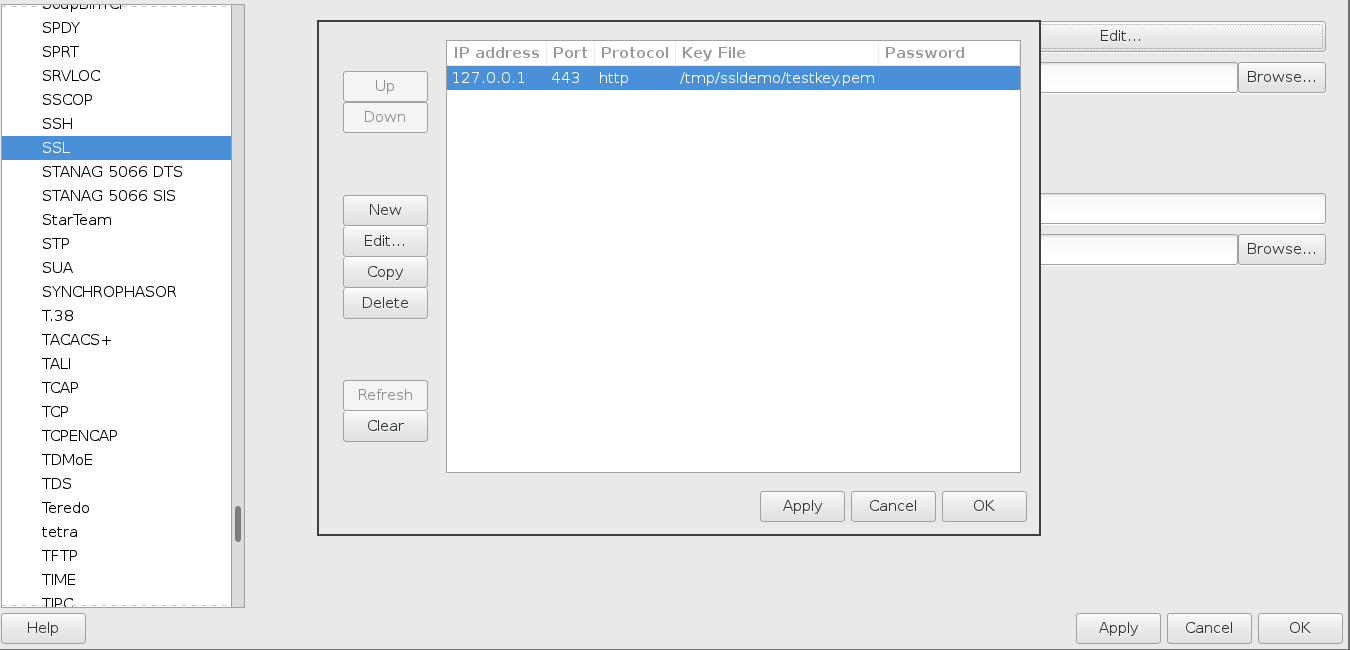
Close the TCP Stream window and select Preferences from Wireshark’s Edit menu. Expand the “Protocols” node in the tree on the left and scroll down to SSL (in newer versions of Wireshark, you can open the node and type SSL and it will take you there).
Once SSL is selected, there’s an option on the right to enter an “RSA keys list”. Enter something like this:
References
https://wirewatcher.wordpress.com/2010/07/20/decrypting-ssl-traffic-with-wireshark-and-ways-to-prevent-it/
http://support.citrix.com/article/CTX116557
这篇关于Network - Wireshark decrypts SSL Traffic的文章就介绍到这儿,希望我们推荐的文章对编程师们有所帮助!


