本文主要是介绍学习Uni-app开发小程序Day10,希望对大家解决编程问题提供一定的参考价值,需要的开发者们随着小编来一起学习吧!
前面学习了局部组件的创建和简单使用,今天学习了slot(插槽)和组件之间的传值
1. 插槽的使用
在components中,创建一个组件,给组件设置头部布局、内容布局、底部布局,例如:
<template><view class="layout"><view class="header">头部布局</view><view class="main">内容布局</view><view class="footer">底部区域</view></view>
</template><script setup></script><style lang="scss" scoped>
.layout{.header{height: 50px;}.main{min-height: 200px;		}.footer{height: 120px;background: orange;}
}
</style>
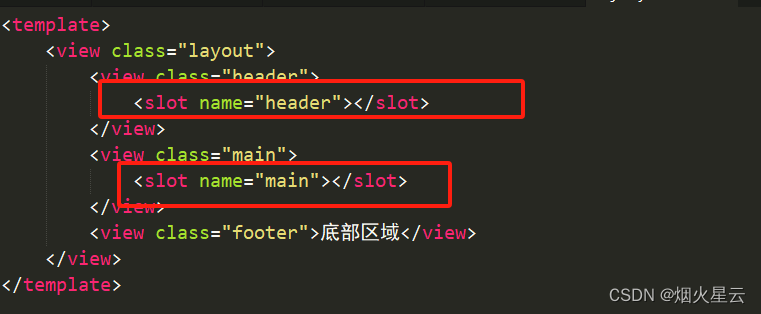
在父组件中引用的方式就是在父组件的template中根据子组件的名称进行引用。在父组件中,要给各个位置添加具体的数据的时候,就要用到插槽了,例如:

这里添加slot,这里出现两个,并且定义名称,这是具名插槽,如果在子组件中有多个插槽,就需要用具名插槽,不然父组件不能明确是给哪里设定的数据

这里在引用子组件中,因为使用了slot,只能是使用template这个标签,
v-slot:header:这是定义的插槽,在父组件中要用到这种方式,才能定位到要在那个插槽中编辑内容,简便方式是:#header
这里穿插一个:uni-app点击跳转页面,
我这里给一个button,点击后跳转到其他页面,
@click="goto(‘/pages/demoCom/demo-slot’);这是给按钮一个点击事件,点击后进入方法goto中,里面是需要跳转的页路径
function goto(url) {
uni.navigateTo({
url: url
})
}
这里使用的是uni的api,navigateTo,具体的可以查看uni-app的api文件
2. 组件之间传递值
当设置了父组件、子组件,有时要从父组件给子组件传递值,这里就要使用Props,
在子组件中设定接收的参数名,父组件传递过去,例如:
这是父组件,可以传递文字、数组、对象
<template><view class="box"><!-- <userInfo :userName="uname" ></userInfo> --><userInfo :obj="obj"></userInfo></view>
</template>
<script setup>import { ref } from 'vue';const uname=ref("王五");// const avater=ref("../../static/pic1.png")const obj=ref({name:"王五",avater:"../../static/pic1.png"})</script>
下面是子组件接收
<template><view class="userInfo"><!-- <image :src="avater" mode="" class="avater"></image><view class="userName">{{userName}}</view> <view class="userName">{{uName}}</view>--><!-- 这里是直接传递个对象,这是在测试的过程中,进行的显示 --><!-- <view>{{obj}}</view> --><!-- 要显示对象的时候,就直接用接收的对象,然后获取对象的值 --><image :src="obj.avater" mode="" class="avater"></image><view class="userName">{{obj.name}}</view></view>
</template><script setup>import {computed} from "vue";//这是接收父组件传递的参数,使用的方法是defineProps,// const props = defineProps(['userName', 'avater'])// 如果要给传过来的参数进行定义,就是定义穿过来的参数的类型; 例如:// const props=defineProps({// 	userName:String,// 	avater:String// })// 如果要加上默认值,就是当不传的时候,就给一个默认的值// const props=defineProps({// 	userName:{// 		type:String,// 		default:"匿名"// 	},// 	//这里做个记录,当组件设置了默认值,但是在父组件中,有传当前值,只是类型错误的时候,控制台会报警告,// 	// 如果在父组件不加入这个参数,则不会报警告,设置的默认值也会显示出来// 	avater:{// 		type:String,// 		default:"../../static/logo.png"// 	}// })// 传递对象// defineProps(["obj"]);// 传递对象的时候,添加默认值//在传递对象的时候,添加校验,这里需要使用default方法,然后所有的参数需要使用return的方式,定义默认值defineProps({obj:{type:Object,default(){return {name:"匿名",avater:"../../static/logo.png"}}}})//如果要打印父组件传递过来的参数,就需要将参数设定一个变量,然后根据变量名得到传递的参数// console.log(props.userName);//如何要修改传递过来的参数,不能直接修改,接受过来的是一个只读的数据,可以使用计算属性,然后更改获取值,//在template中,就使用定义后的计算属性显示// const uName=computed( ()=>props.userName+"@")</script><style lang="scss">.userInfo {width: 100vw;height: 200px;align-items: center; //设置子节点对齐方式justify-content: center; //设置在父组件中的各个子节点的排列方式display: flex; //设置元素是否被视为块或者内联元素及子元素的布局flex-direction: column; //内部元素在flex容器中布局定义的方向image {width: 100px;height: 100px;border-radius: 50% ; //设置设置元素的外边框圆角。当使用一个半径时确定一个圆形,当使用两个半径时确定一个椭圆。}.userName {padding: 10px 0;font-size: 15px;}}
</style>
上面是子组件如果接收各种类型的方式,有详细注释,这里不在做过多的描述了。这就通过父组件给子组件传递参数的办法,这里只要是对defineProps()的使用,
当从子组件给父组件传递,就不能是这种方式了。下面是从子组件到父组件之间的传递:
<template><view><!-- <button @click="$emit('add',Math.random())">子组件按钮</button> --><button @click="onClick">子组件按钮</button><view >=============</view><!-- 如果子组件有两个或者两个以上的需要传递参数的组件,使用方法类似 --><input type="text" @input="onchange" maxlength="3"/></view>
</template><script setup>import {ref} from "vue"// 这里就是在组件中,传递两个参数,是用数组的形式,const emit=defineEmits(["add","onchange"])function onClick(){emit('add',Math.random())}// 这是传递子组件输入的值到父组件中function onchange(e){emit("onchange",e.detail.value)}
</script><style lang="scss" scoped>input{border: 1px solid #cfcfcf;height: 30px;}
</style>
这是子组件定义的方法,主要使用的$emit的方法,还有就是defineEmits();
下面是父组件接收的办法:
<template><view class=""><lxj-child @add="onAdd" @onchange="onchange"></lxj-child><!-- 下面是接收子组件传递的值,这里是进行style的设定,这里记录下,在接收子组件传递的值后,不能再tmplate中进行更改 --><view class="child" :style="{background:colo,fontSize:inputValue}">num:{{num}}</view></view>
</template><script setup>import { ref } from 'vue';const num=ref(0)const colo=ref("#fcf")const inputValue=ref("");// 这是接收子组件传递的值,在template中不能做更改,只能是在这里做修改const onchange=function(e){inputValue.value=e+"px"}const onAdd=function(e){num.value=e;colo.value="#"+getRandomChar()+String(e).substring(3,8)console.log(colo.value);}function getRandomChar() {const randomNumber = Math.floor(Math.random() * 6); // 生成0-5的随机数const charCode = 97 + randomNumber; // 97是字母a的ASCII码const randomChar = String.fromCharCode(charCode); // 将ASCII码转换成字符return randomChar;}// 使用函数// console.log(getRandomChar()); // 输出可能是 'a', 'b', 'c', 'd', 'e', 'f' 中的一个
</script><style lang="scss" scoped>.child{width: 200px;height: 70px;}
</style>
这就是从子组件到父组件之间的传递,这里做个记录;
穿插一个点:
function getRandomChar() {
const randomNumber = Math.floor(Math.random() * 6); // 生成0-5的随机数
const charCode = 97 + randomNumber; // 97是字母a的ASCII码
const randomChar = String.fromCharCode(charCode); // 将ASCII码转换成字符
return randomChar;
}
这个方法是获取从a-f直接的随机数,一般的颜色前面都有字母,这里就把获取颜色的字母作为一个随机数显示出来,让颜色更丰富些。
以上就是今天学习的内容,不足之处还有很多,革命尚未成功,同志仍需努力!!!
这篇关于学习Uni-app开发小程序Day10的文章就介绍到这儿,希望我们推荐的文章对编程师们有所帮助!


