本文主要是介绍1天搞定SpringBoot+Vue全栈开发 (8)前端路由VueRouter(进行组件切换),希望对大家解决编程问题提供一定的参考价值,需要的开发者们随着小编来一起学习吧!
1.VueRouter安装与使用

2.参数传递
创建路由组件
在项目中定义Discover.vue、Friends.vue、My.vue三个组件,将来要使用vue-router来控制它们的展示与切换:
Discover.vue
<template><div><h1>发现音乐</h1></div>
</template>
Friends.vue
<template><div><h1>关注</h1></div>
</template>
My.vue
<template><div><h1>我的</h1></div>
</template>
声明路由链接和占位标签
可以使用<router-link> 标签来声明路由链接,并使用<router-view> 标签来声明路由占位符。
App.vue:
<template><div id="app"><!-- 声明路由链接 --><router-link to="/discover"> 发现音乐 </router-link><router-link to="/my"> 我的音乐 </router-link><router-link to="/friends"> 关注音乐 </router-link><!-- 声明路由展位标签 --><router-view></router-view></div>
</template><script>
export default {name: "App",components: {},
};
</script><style>
#app {font-family: Avenir, Helvetica, Arial, sans-serif;-webkit-font-smoothing: antialiased;-moz-osx-font-smoothing: grayscale;text-align: center;color: #2c3e50;margin-top: 60px;
}
</style>
Main.js:
import Vue from 'vue'
import App from './App.vue'
import router from './router'
Vue.config.productionTip = falsenew Vue({render: h => h(App),router: router
}).$mount('#app')
Index.js(在新建的src下面的router文件夹里)
import VueRouter from "vue-router";
import Vue from "vue";
import Discover from "../components/Discover.vue"
import Friends from "../components/Friends.vue"
import My from "../components/My.vue"Vue.use(VueRouter);const router = new VueRouter({// 指定hash属性与组件的对应关系routes: [{ path: "/discover", component: Discover },{ path: "/friends", component: Friends },{ path: "/my", component: My },],
})
export default router;
测试:


3.子路由
嵌套路由
Discover.vue
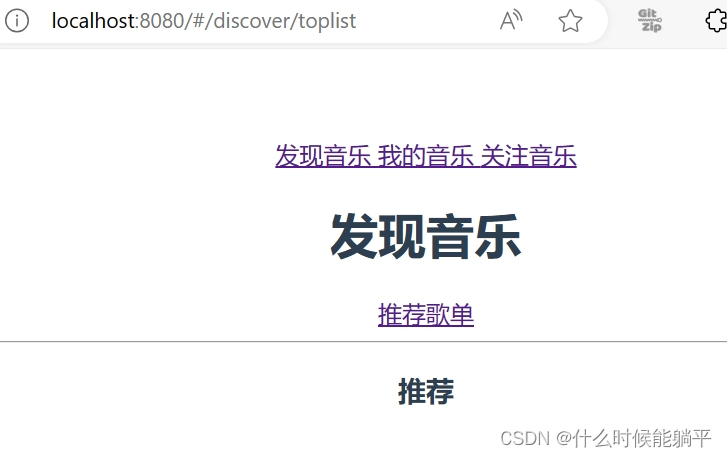
<template><div><h1>发现音乐</h1><!-- 子路由链接 --><router-link to="/discover/toplist">推荐</router-link><router-link to="/discover/playlist">歌单</router-link><hr><router-view></router-view></div>
</template>
TopList.vue
<template><h3>推荐</h3>
</template>
PlayList.vue
<template><h3>歌单</h3>
</template>
index.js:
import VueRouter from "vue-router";
import Vue from "vue";
import Discover from "../components/Discover.vue";
import Friends from "../components/Friends.vue";
import My from "../components/My.vue";
import TopList from "@/components/TopList.vue";
import PlayList from "@/components/PlayList.vue";Vue.use(VueRouter);const router = new VueRouter({// 指定hash属性与组件的对应关系routes: [{ path: "/", redirect: "/discover" },{path: "/discover",component: Discover,//通过children属性,嵌套声明子路由children: [{ path: "toplist", component: TopList },{ path: "playlist", component: PlayList },],},{ path: "/friends", component: Friends },{ path: "/my", component: My },],
});
export default router;
测试:
动态路由
动态路由指的是:把 Hash 地址中可变的部分定义为参数项,从而提高路由规则的复用性。在 vue-router 中使用英文的冒号(:)来定义路由的参数项:
{path:'/product/:id',component:Product}Product.vue:
<template><h3>商品</h3>
</template>
My.vue:
import VueRouter from 'vue-router';
<template><div><h1>我的</h1><router-link to="/my/1">商品1</router-link><router-link to="/my/2">商品2</router-link><router-link to="/my/3">商品3</router-link><VueRouter></VueRouter></div>
</template>
index.js:
{ path: "/my", component: My },改成
{path: "/my",component: My,children: [{ path: ":id", component: Product }],},或者将Producr.vue改成:
<template><div><h3>商品{{ $route.params.id }}</h3> </div>
</template><script>
export default {props: ["id"],
};
</script>
4.导航守卫
控制路由的访问权限
全局导航守卫会拦截每个路由规则,从而对每个路由进行访问权限的控制.
你可以使用 router.beforeEach 注册一个全局前置守卫
router.beforeEach((to, from, next) => {if (to.path==='/main'&&!isAuthenticated) {next('/login');} else {next();}
});
to:即将要进入的目标
from:当前导航正要离开的路由
在守卫方法中如果声明了 next 形参,则必须调用 next() 函数,否则不允许用户访问任何一个路
直接放行:next()
强制其停留在当前页面: next(false)
强制其跳转到登录页面: next('/login')
这篇关于1天搞定SpringBoot+Vue全栈开发 (8)前端路由VueRouter(进行组件切换)的文章就介绍到这儿,希望我们推荐的文章对编程师们有所帮助!


