本文主要是介绍Llama3-Tutorial之LMDeploy高效部署Llama3实践,希望对大家解决编程问题提供一定的参考价值,需要的开发者们随着小编来一起学习吧!
Llama3-Tutorial之LMDeploy高效部署Llama3实践
Llama 3 近期重磅发布,发布了 8B 和 70B 参数量的模型,lmdeploy团队对 Llama 3 部署进行了光速支持!!!
书生·浦语和机智流社区同学光速投稿了 LMDeploy 高效量化部署 Llama 3,欢迎 Star。
https://github.com/internLM/LMDeploy
参考: https://github.com/SmartFlowAI/Llama3-Tutorial
本文将分为以下几个部分来介绍,如何使用LMDeploy来部署Llama3
-
环境,模型准备 -
LMDeploy chat -
LMDeploy模型量化(lite) -
LMDeploy服务(serve) -
扩展部分
1. 环境和模型准备
1.1 环境配置
# 如果你是InternStudio 可以直接使用
# studio-conda -t lmdeploy -o pytorch-2.1.2
# 初始化环境
conda create -n lmdeploy python=3.10
conda activate lmdeploy
conda install pytorch==2.1.2 torchvision==0.16.2 torchaudio==2.1.2 pytorch-cuda=12.1 -c pytorch -c nvidia
安装lmdeploy最新版:
pip install -U lmdeploy[all]
1.2 llama3下载
# 创建文件夹
mkdir -p ~/model
cd ~/model

# 从OpenXLab中获取权重(开发机中不需要使用此步)
# 安装 git-lfs 依赖

# 如果下面命令报错则使用 apt install git git-lfs -y
conda install git-lfs
git-lfs install
#下载模型 (InternStudio 中不建议执行这一步)
git clone https://code.openxlab.org.cn/MrCat/Llama-3-8B-Instruct.git Meta-Llama-3-8B-Instruct


或者软链接 InternStudio 中的模型:
ln -s /root/share/new_models/meta-llama/Meta-Llama-3-8B-Instruct ~/model/Meta-Llama-3-8B-Instruct
2. LMDeploy Chat CLI 工具
conda activate lmdeploy
lmdeploy chat /root/model/Meta-Llama-3-8B-Instruct
3. LMDeploy模型量化(lite)
本部分内容主要介绍如何对模型进行量化。主要包括 KV8量化和W4A16量化。
3.1 设置最大KV Cache缓存大小
模型在运行时,占用的显存可大致分为三部分:模型参数本身占用的显存、KV Cache占用的显存,以及中间运算结果占用的显存。LMDeploy的KV Cache管理器可以通过设置--cache-max-entry-count参数,控制KV缓存占用剩余显存的最大比例。默认的比例为0.8。
下面通过几个例子,来看一下调整--cache-max-entry-count参数的效果。首先保持不加该参数(默认0.8),运行 Llama3-8b 模型。
lmdeploy chat /root/model/Meta-Llama-3-8B-Instruct/

(base) root@intern-studio-50014188:~# studio-smi
Running studio-smi by vgpu-smi
Mon May 06 09:58:19 2024
+------------------------------------------------------------------------------+
| VGPU-SMI 1.7.13       Driver Version: 535.54.03     CUDA Version: 12.2       |
+-------------------------------------------+----------------------------------+
| GPU  Name                Bus-Id           |        Memory-Usage     GPU-Util |
|===========================================+==================================|
|   0  NVIDIA A100-SXM...  00000000:13:00.0 | 23112MiB / 24566MiB    0% /  30% |
+-------------------------------------------+----------------------------------+

lmdeploy chat /root/model/Meta-Llama-3-8B-Instruct/ --cache-max-entry-count 0.5

(base) root@intern-studio-50014188:~# studio-smi
Running studio-smi by vgpu-smi
Mon May 06 09:59:20 2024
+------------------------------------------------------------------------------+
| VGPU-SMI 1.7.13       Driver Version: 535.54.03     CUDA Version: 12.2       |
+-------------------------------------------+----------------------------------+
| GPU  Name                Bus-Id           |        Memory-Usage     GPU-Util |
|===========================================+==================================|
|   0  NVIDIA A100-SXM...  00000000:13:00.0 | 20488MiB / 24566MiB    0% /  30% |
+-------------------------------------------+----------------------------------+

lmdeploy chat /root/model/Meta-Llama-3-8B-Instruct/ --cache-max-entry-count 0.01

(base) root@intern-studio-50014188:~# studio-smi
Running studio-smi by vgpu-smi
Mon May 06 09:57:27 2024
+------------------------------------------------------------------------------+
| VGPU-SMI 1.7.13       Driver Version: 535.54.03     CUDA Version: 12.2       |
+-------------------------------------------+----------------------------------+
| GPU  Name                Bus-Id           |        Memory-Usage     GPU-Util |
|===========================================+==================================|
|   0  NVIDIA A100-SXM...  00000000:13:00.0 | 16208MiB / 24566MiB    0% /  30% |
+-------------------------------------------+----------------------------------+
可以看出,降低KV Cache,可以降低显存资源的占用,代价是会降低模型推理速度。
3.2 使用W4A16量化
仅需执行一条命令,就可以完成模型量化工作。
lmdeploy lite auto_awq \
   /root/model/Meta-Llama-3-8B-Instruct \
  --calib-dataset 'ptb' \
  --calib-samples 128 \
  --calib-seqlen 1024 \
  --w-bits 4 \
  --w-group-size 128 \
  --work-dir /root/model/Meta-Llama-3-8B-Instruct_4bit
使用Chat功能运行W4A16量化后的模型:
lmdeploy chat /root/model/Meta-Llama-3-8B-Instruct_4bit --model-format awq
此时显存占用:
# studio-smi
Running studio-smi by vgpu-smi
Mon May 06 10:23:26 2024
+------------------------------------------------------------------------------+
| VGPU-SMI 1.7.13       Driver Version: 535.54.03     CUDA Version: 12.2       |
+-------------------------------------------+----------------------------------+
| GPU  Name                Bus-Id           |        Memory-Usage     GPU-Util |
|===========================================+==================================|
|   0  NVIDIA A100-SXM...  00000000:13:00.0 | 21174MiB / 24566MiB    0% /  30% |
+-------------------------------------------+----------------------------------+
将KV Cache比例再次调为0.01,查看显存占用情况:
lmdeploy chat /root/model/Meta-Llama-3-8B-Instruct_4bit --model-format awq --cache-max-entry-count 0.01
此时显存占用:
# studio-smi
Running studio-smi by vgpu-smi
Mon May 06 10:26:02 2024
+------------------------------------------------------------------------------+
| VGPU-SMI 1.7.13       Driver Version: 535.54.03     CUDA Version: 12.2       |
+-------------------------------------------+----------------------------------+
| GPU  Name                Bus-Id           |        Memory-Usage     GPU-Util |
|===========================================+==================================|
|   0  NVIDIA A100-SXM...  00000000:13:00.0 |  6582MiB / 24566MiB    0% /  30% |
+-------------------------------------------+----------------------------------+
显存占用变为6738MB,明显降低。
3.3 在线量化 KV
自 v0.4.0 起,LMDeploy KV 量化方式有原来的离线改为在线。并且,支持两种数值精度 int4、int8。量化方式为 per-head per-token 的非对称量化。它具备以下优势:
-
量化不需要校准数据集 -
kv int8 量化精度几乎无损,kv int4 量化精度在可接受范围之内 -
推理高效,在 llama2-7b 上加入 int8/int4 kv 量化,RPS 相较于 fp16 分别提升近 30% 和 40% -
支持 volta 架构(sm70)及以上的所有显卡型号:V100、20系列、T4、30系列、40系列、A10、A100 等等 通过 LMDeploy 应用 kv 量化非常简单,只需要设定 quant_policy 参数。LMDeploy 规定 qant_policy=4表示 kv int4 量化,quant_policy=8 表示 kv int8 量化。
4. LMDeploy服务(server)
在前面的章节,我们都是在本地直接推理大模型,这种方式成为本地部署。在生产环境下,我们有时会将大模型封装为 API 接口服务,供客户端访问。
4.1 启动API服务器
通过以下命令启动API服务器,推理Meta-Llama-3-8B-Instruct模型:
lmdeploy serve api_server \
    /root/model/Meta-Llama-3-8B-Instruct \
    --model-format hf \
    --quant-policy 0 \
    --server-name 0.0.0.0 \
    --server-port 23333 \
    --tp 1
其中,model-format、quant-policy这些参数是与第三章中量化推理模型一致的;server-name和server-port表示API服务器的服务IP与服务端口;tp参数表示并行数量(GPU数量)。 通过运行以上指令,我们成功启动了API服务器,请勿关闭该窗口,后面我们要新建客户端连接该服务。你也可以直接打开http://{host}:23333查看接口的具体使用说明。这一步由于Server在远程服务器上,需要配置ssh端口转发。
方法一:
vscode配置端口转发。

方法二:
在你本地打开一个cmd窗口,输入命令如下:
ssh -CNg -L 23333:127.0.0.1:23333 root@ssh.intern-ai.org.cn -p 你的ssh端口号
然后打开本地浏览器,访问http://127.0.0.1:23333

4.2 命令行客户端连接API服务器
上一节中在终端里新开了一个API服务器,要新建一个命令行客户端去连接API服务器。首先通过VS Code新建一个终端:
# 激活conda环境
(base) root@intern-studio-50014188:~# conda activate lmdeploy
# 启动api客户端连接API服务器
(lmdeploy) root@intern-studio-50014188:~# lmdeploy serve api_client http://localhost:23333
# chat测试
double enter to end input >>> Hello!  # 双击回车键发送

Hello there! It's nice to meet you! Is there something I can help you with, or would you like to chat for a bit? I'm here to listen and assist you with any questions or topics you'd like to discuss.
double enter to end input >>>
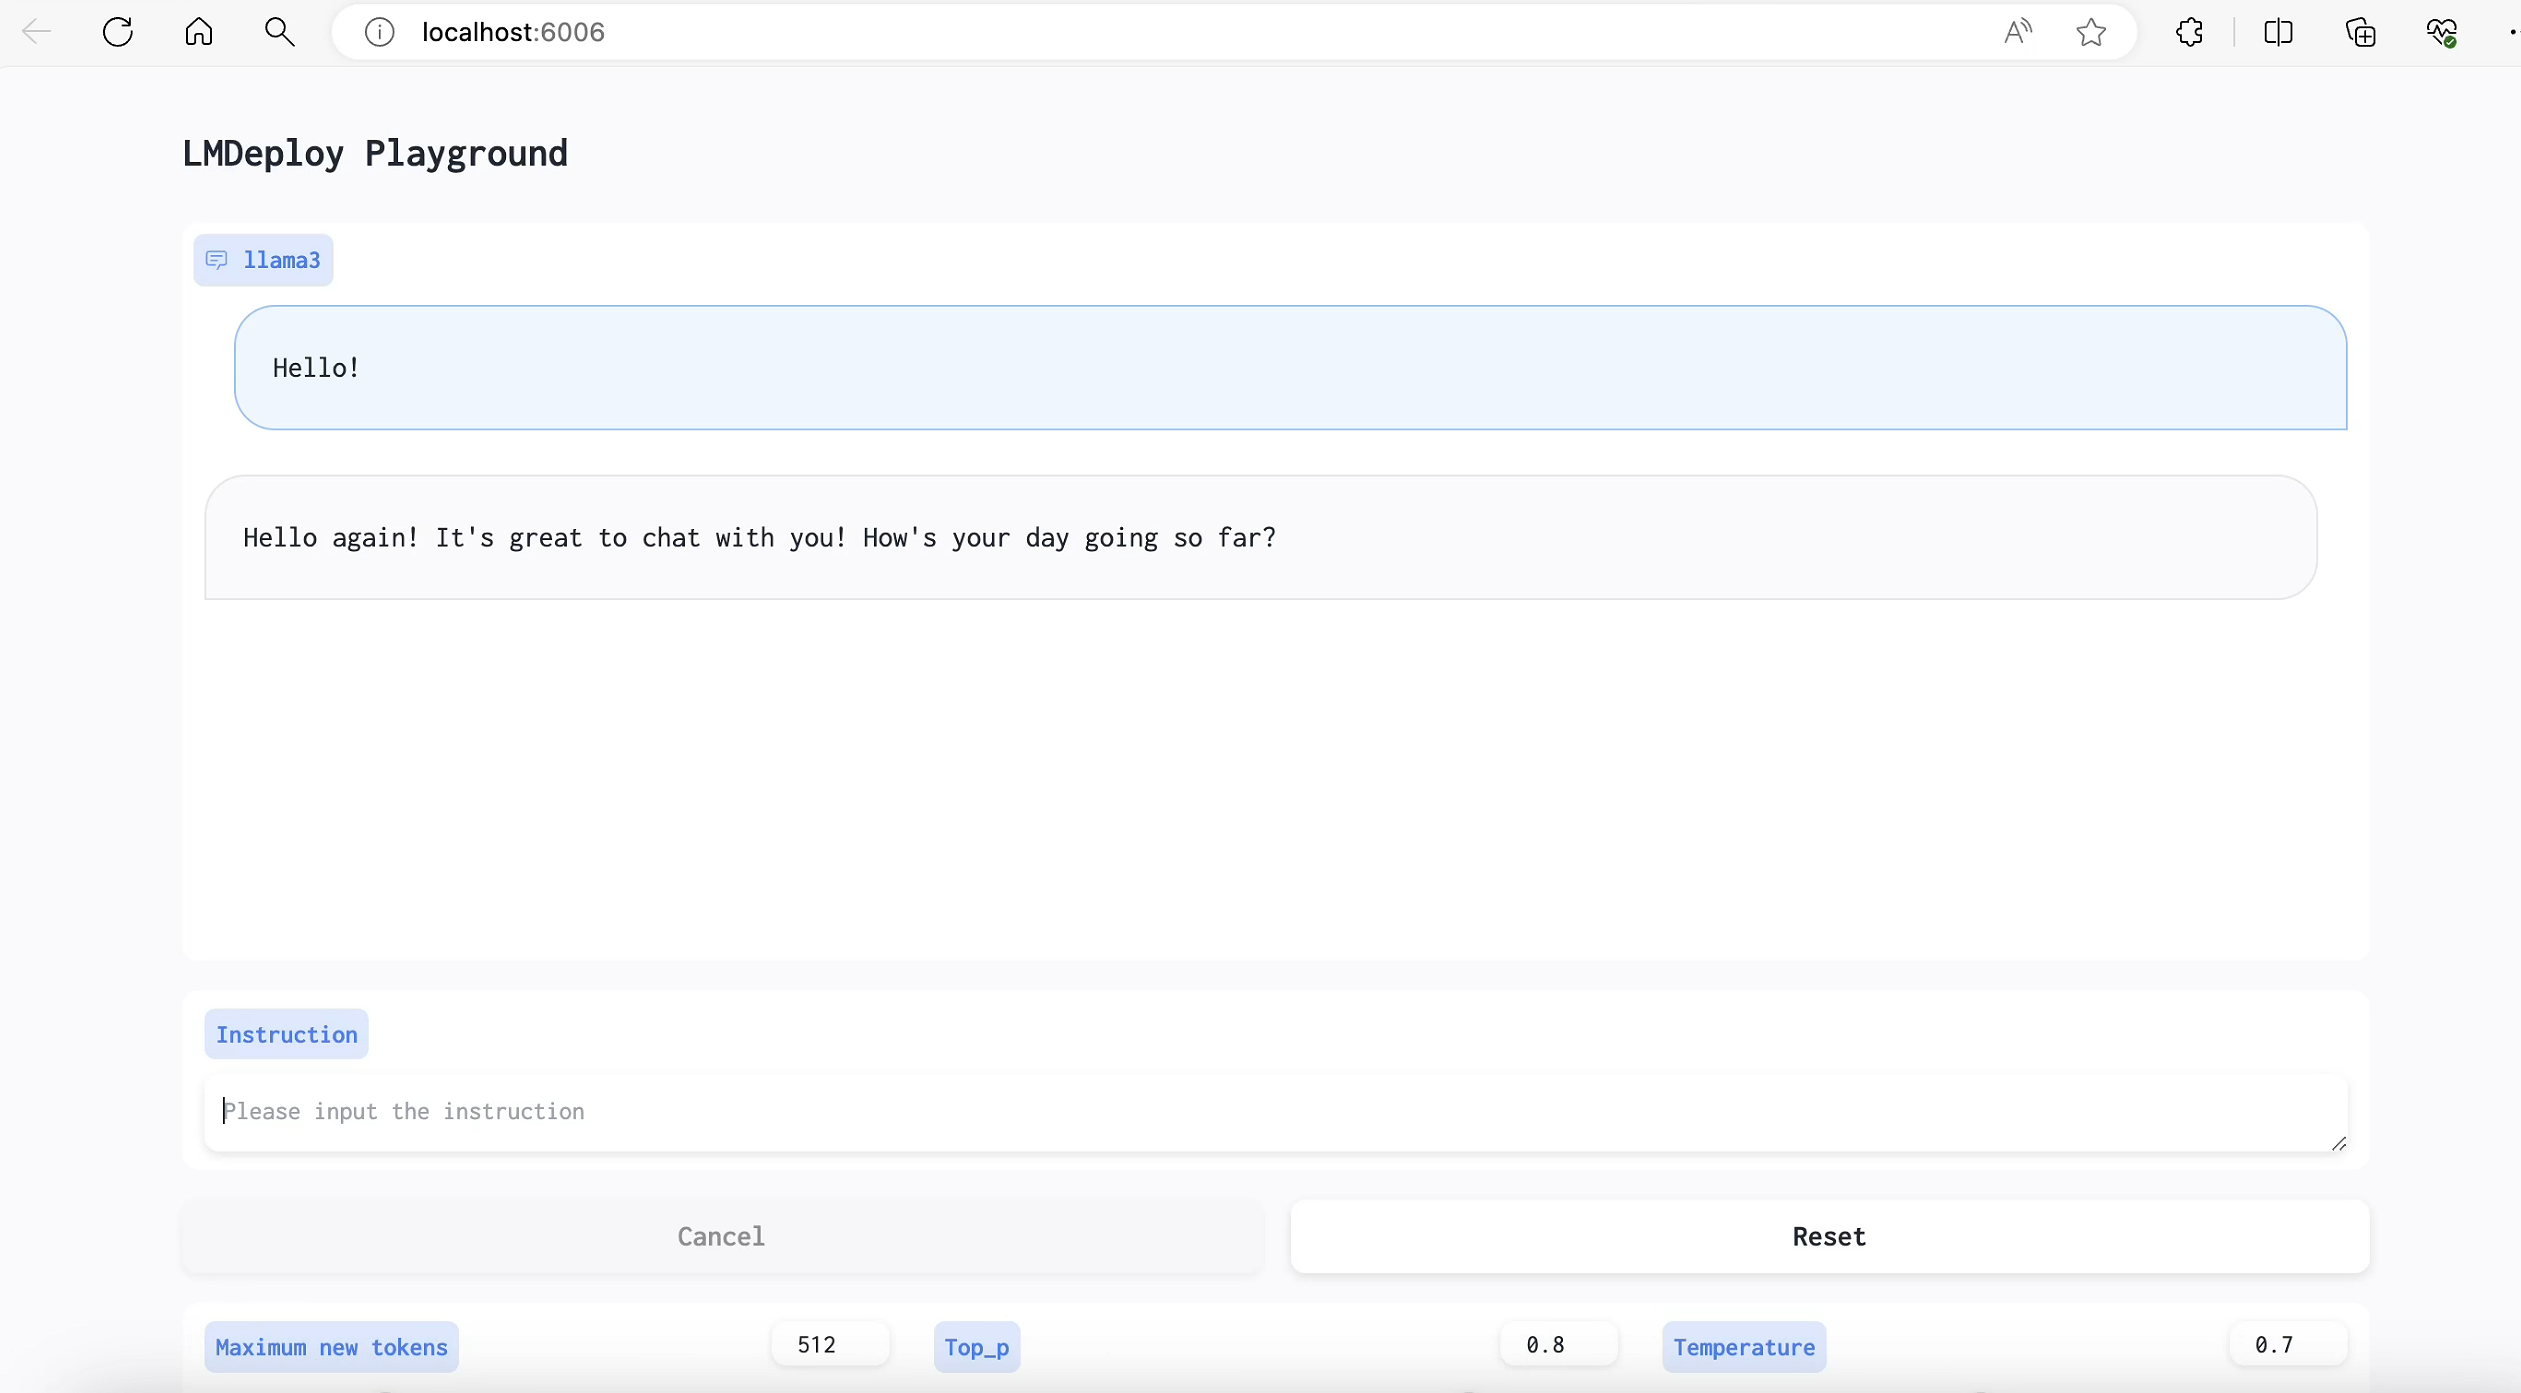
4.3 网页客户端连接API服务器
关闭刚刚的VSCode终端,但服务器端的终端不要关闭。 运行之前确保自己的gradio版本低于4.0.0。
pip install gradio==3.50.2
新建一个VSCode终端,激活conda环境。
conda activate lmdeploy
使用Gradio作为前端,启动网页客户端。
lmdeploy serve gradio http://localhost:23333 \
    --server-name 0.0.0.0 \
    --server-port 6006
同理配置端口转发:

打开浏览器,访问地址http://127.0.0.1:6006 然后就可以与模型进行对话了!
拓展部分
5. 推理速度
使用 LMDeploy 在 A100(80G)推理 Llama3,每秒请求处理数(RPS)高达 25,是 vLLM 推理效率的 1.8+ 倍。
-
克隆仓库
cd ~
git clone https://github.com/InternLM/lmdeploy.git
-
下载测试数据
cd /root/lmdeploy
wget https://hf-mirror.com/datasets/anon8231489123/ShareGPT_Vicuna_unfiltered/resolve/main/ShareGPT_V3_unfiltered_cleaned_split.json
-
执行 benchmark 命令(如果你的显存较小,可以调低 --cache-max-entry-count)
本文测试,使用30%的A100资源(24G显存),将cache-max-entry-count设置为0.2:
# 激活conda环境
conda activate lmdeploy
# 运行benchmark测试
python benchmark/profile_throughput.py \
    ShareGPT_V3_unfiltered_cleaned_split.json \
    /root/model/Meta-Llama-3-8B-Instruct \
    --cache-max-entry-count 0.2 \
    --concurrency 256 \
    --model-format hf \
    --quant-policy 0 \
    --num-prompts 10000

...

[llama]
model_name = llama3
tensor_para_size = 1
head_num = 32
kv_head_num = 8
vocab_size = 128256
num_layer = 32
inter_size = 14336
norm_eps = 1e-05
attn_bias = 0
start_id = 128000
end_id = 128001
session_len = 4096
weight_type = bf16
rotary_embedding = 128
rope_theta = 500000.0
size_per_head = 128
group_size = 0
max_batch_size = 256
max_context_token_num = 1
step_length = 1
cache_max_entry_count = 0.2
cache_block_seq_len = 64
cache_chunk_size = -1
num_tokens_per_iter = 8192
max_prefill_iters = 1
extra_tokens_per_iter = 0
use_context_fmha = 1
quant_policy = 0
max_position_embeddings = 8192
rope_scaling_factor = 0.0
use_dynamic_ntk = 0
use_logn_attn = 0
lora_policy =
lora_r = 0
lora_scale = 0.0
测试过程较长(2h以上),测试结果如下:
concurrency: 256
elapsed_time: 8759.642s

first token latency(s)(min, max, ave): 1.593, 298.350, 208.213
per-token latency(s) percentile(50, 75, 95, 99): [0.029, 0.033, 0.154, 0.694]

number of prompt tokens: 2238364
number of completion tokens: 2005448
token throughput (completion token): 228.942 token/s
token throughput (prompt + completion token): 484.473 token/s
RPS (request per second): 1.142 req/s
RPM (request per minute): 68.496 req/min
6. 使用LMDeploy运行视觉多模态大模型 Llava-Llama-3
6.1 安装依赖
(lmdeploy) root@intern-studio-50014188:~/lmdeploy# pip install git+https://github.com/haotian-liu/LLaVA.git
6.2 运行模型
运行vi /root/pipeline_llava.py,复制如下代码到文件中:
from lmdeploy import pipeline, ChatTemplateConfig
from lmdeploy.vl import load_image
pipe = pipeline('xtuner/llava-llama-3-8b-v1_1-hf',
                chat_template_config=ChatTemplateConfig(model_name='llama3'))

image = load_image('https://raw.githubusercontent.com/open-mmlab/mmdeploy/main/tests/data/tiger.jpeg')
response = pipe(('describe this image', image))
print(response.text)
上图中的图片如下:

运行上面的python文件,结果为:
(lmdeploy) root@intern-studio-50014188:~/lmdeploy# python ~/pipeline_llava.py
.gitattributes: 1.52kB [00:00, 9.95MB/s]
config.json: 1.01kB [00:00, 6.49MB/s]
README.md: 4.50kB [00:00, 27.3MB/s]
generation_config.json: 100%|████████████████████████████████████████████████████████████████████| 121/121 [00:00<00:00, 1.45MB/s]
model-00002-of-00009.safetensors: 100%|██████████████████████████████████████████████████████| 1.90G/1.90G [05:40<00:00, 5.57MB/s]
model-00006-of-00009.safetensors: 100%|██████████████████████████████████████████████████████| 1.95G/1.95G [05:53<00:00, 5.51MB/s]
model.safetensors.index.json: 73.2kB [00:00, 218MB/s]███████████████████████████████████████▌| 1.93G/1.95G [05:54<00:02, 5.78MB/s]
preprocessor_config.json: 780B [00:00, 5.84MB/s]
special_tokens_map.json: 100%|███████████████████████████████████████████████████████████████████| 301/301 [00:00<00:00, 2.75MB/s]
model-00004-of-00009.safetensors: 100%|██████████████████████████████████████████████████████| 1.95G/1.95G [05:57<00:00, 5.45MB/s]
tokenizer_config.json: 51.0kB [00:00, 201MB/s]███████████████████████████████████████████████| 1.95G/1.95G [05:57<00:00, 6.17MB/s]
tokenizer.json: 9.08MB [00:01, 6.44MB/s]██████████████████████████████████████████████████▏  | 1.88G/1.98G [05:56<00:15, 6.50MB/s]
model-00001-of-00009.safetensors: 100%|██████████████████████████████████████████████████████| 1.97G/1.97G [06:01<00:00, 5.46MB/s]
model-00008-of-00009.safetensors: 100%|██████████████████████████████████████████████████████| 2.00G/2.00G [06:02<00:00, 5.52MB/s]
model-00003-of-00009.safetensors: 100%|██████████████████████████████████████████████████████| 1.98G/1.98G [06:12<00:00, 5.31MB/s]
model-00005-of-00009.safetensors: 100%|██████████████████████████████████████████████████████| 1.98G/1.98G [06:14<00:00, 5.29MB/s]
model-00007-of-00009.safetensors: 100%|██████████████████████████████████████████████████████| 1.98G/1.98G [06:23<00:00, 5.16MB/s]
model-00009-of-00009.safetensors: 100%|██████████████████████████████████████████████████████| 1.05G/1.05G [02:58<00:00, 5.90MB/s]
Fetching 18 files: 100%|██████████████████████████████████████████████████████████████████████████| 18/18 [08:41<00:00, 28.99s/it]
preprocessor_config.json: 100%|██████████████████████████████████████████████████████████████████| 316/316 [00:00<00:00, 1.74MB/s]
config.json: 4.76kB [00:00, 30.7MB/s]
pytorch_model.bin: 100%|█████████████████████████████████████████████████████████████████████| 1.71G/1.71G [05:20<00:00, 5.34MB/s]
Loading checkpoint shards: 100%|████████████████████████████████████████████████████████████████████| 9/9 [00:06<00:00,  1.46it/s]
/root/.conda/envs/lmdeploy/lib/python3.10/site-packages/huggingface_hub/file_download.py:1132: FutureWarning: `resume_download` is deprecated and will be removed in version 1.0.0. Downloads always resume when possible. If you want to force a new download, use `force_download=True`.
  warnings.warn(
Special tokens have been added in the vocabulary, make sure the associated word embeddings are fine-tuned or trained.
Special tokens have been added in the vocabulary, make sure the associated word embeddings are fine-tuned or trained.
[WARNING] gemm_config.in is not found; using default GEMM algo
In the image, a majestic tiger is captured in a moment of tranquility. The tiger, with its distinctive orange and black stripes, is lying on its side on a lush, green grassy field. Its head is slightly tilted to the left, and it gazes directly into the camera, almost as if it's aware of its photograph being taken. The tiger's body is fully stretched out on the grass, and its front paws are slightly raised, perhaps in a relaxed manner. The background of the image is blurred, but it gives the impression of a forest or wooded area, providing a natural habitat for this magnificent creature. The image does not contain any text or other discernible objects. The tiger is the sole focus of this image, and its position and gaze give it a commanding presence. The colors, object types, and actions in this image have been described as accurately as possible based on the given image.
本文由 mdnice 多平台发布
这篇关于Llama3-Tutorial之LMDeploy高效部署Llama3实践的文章就介绍到这儿,希望我们推荐的文章对编程师们有所帮助!


