本文主要是介绍Threejs制作服务器机房冷却结构,希望对大家解决编程问题提供一定的参考价值,需要的开发者们随着小编来一起学习吧!
这节再绘制一个机房的结构,因为内容比较简单,就只使用一个章节来介绍,
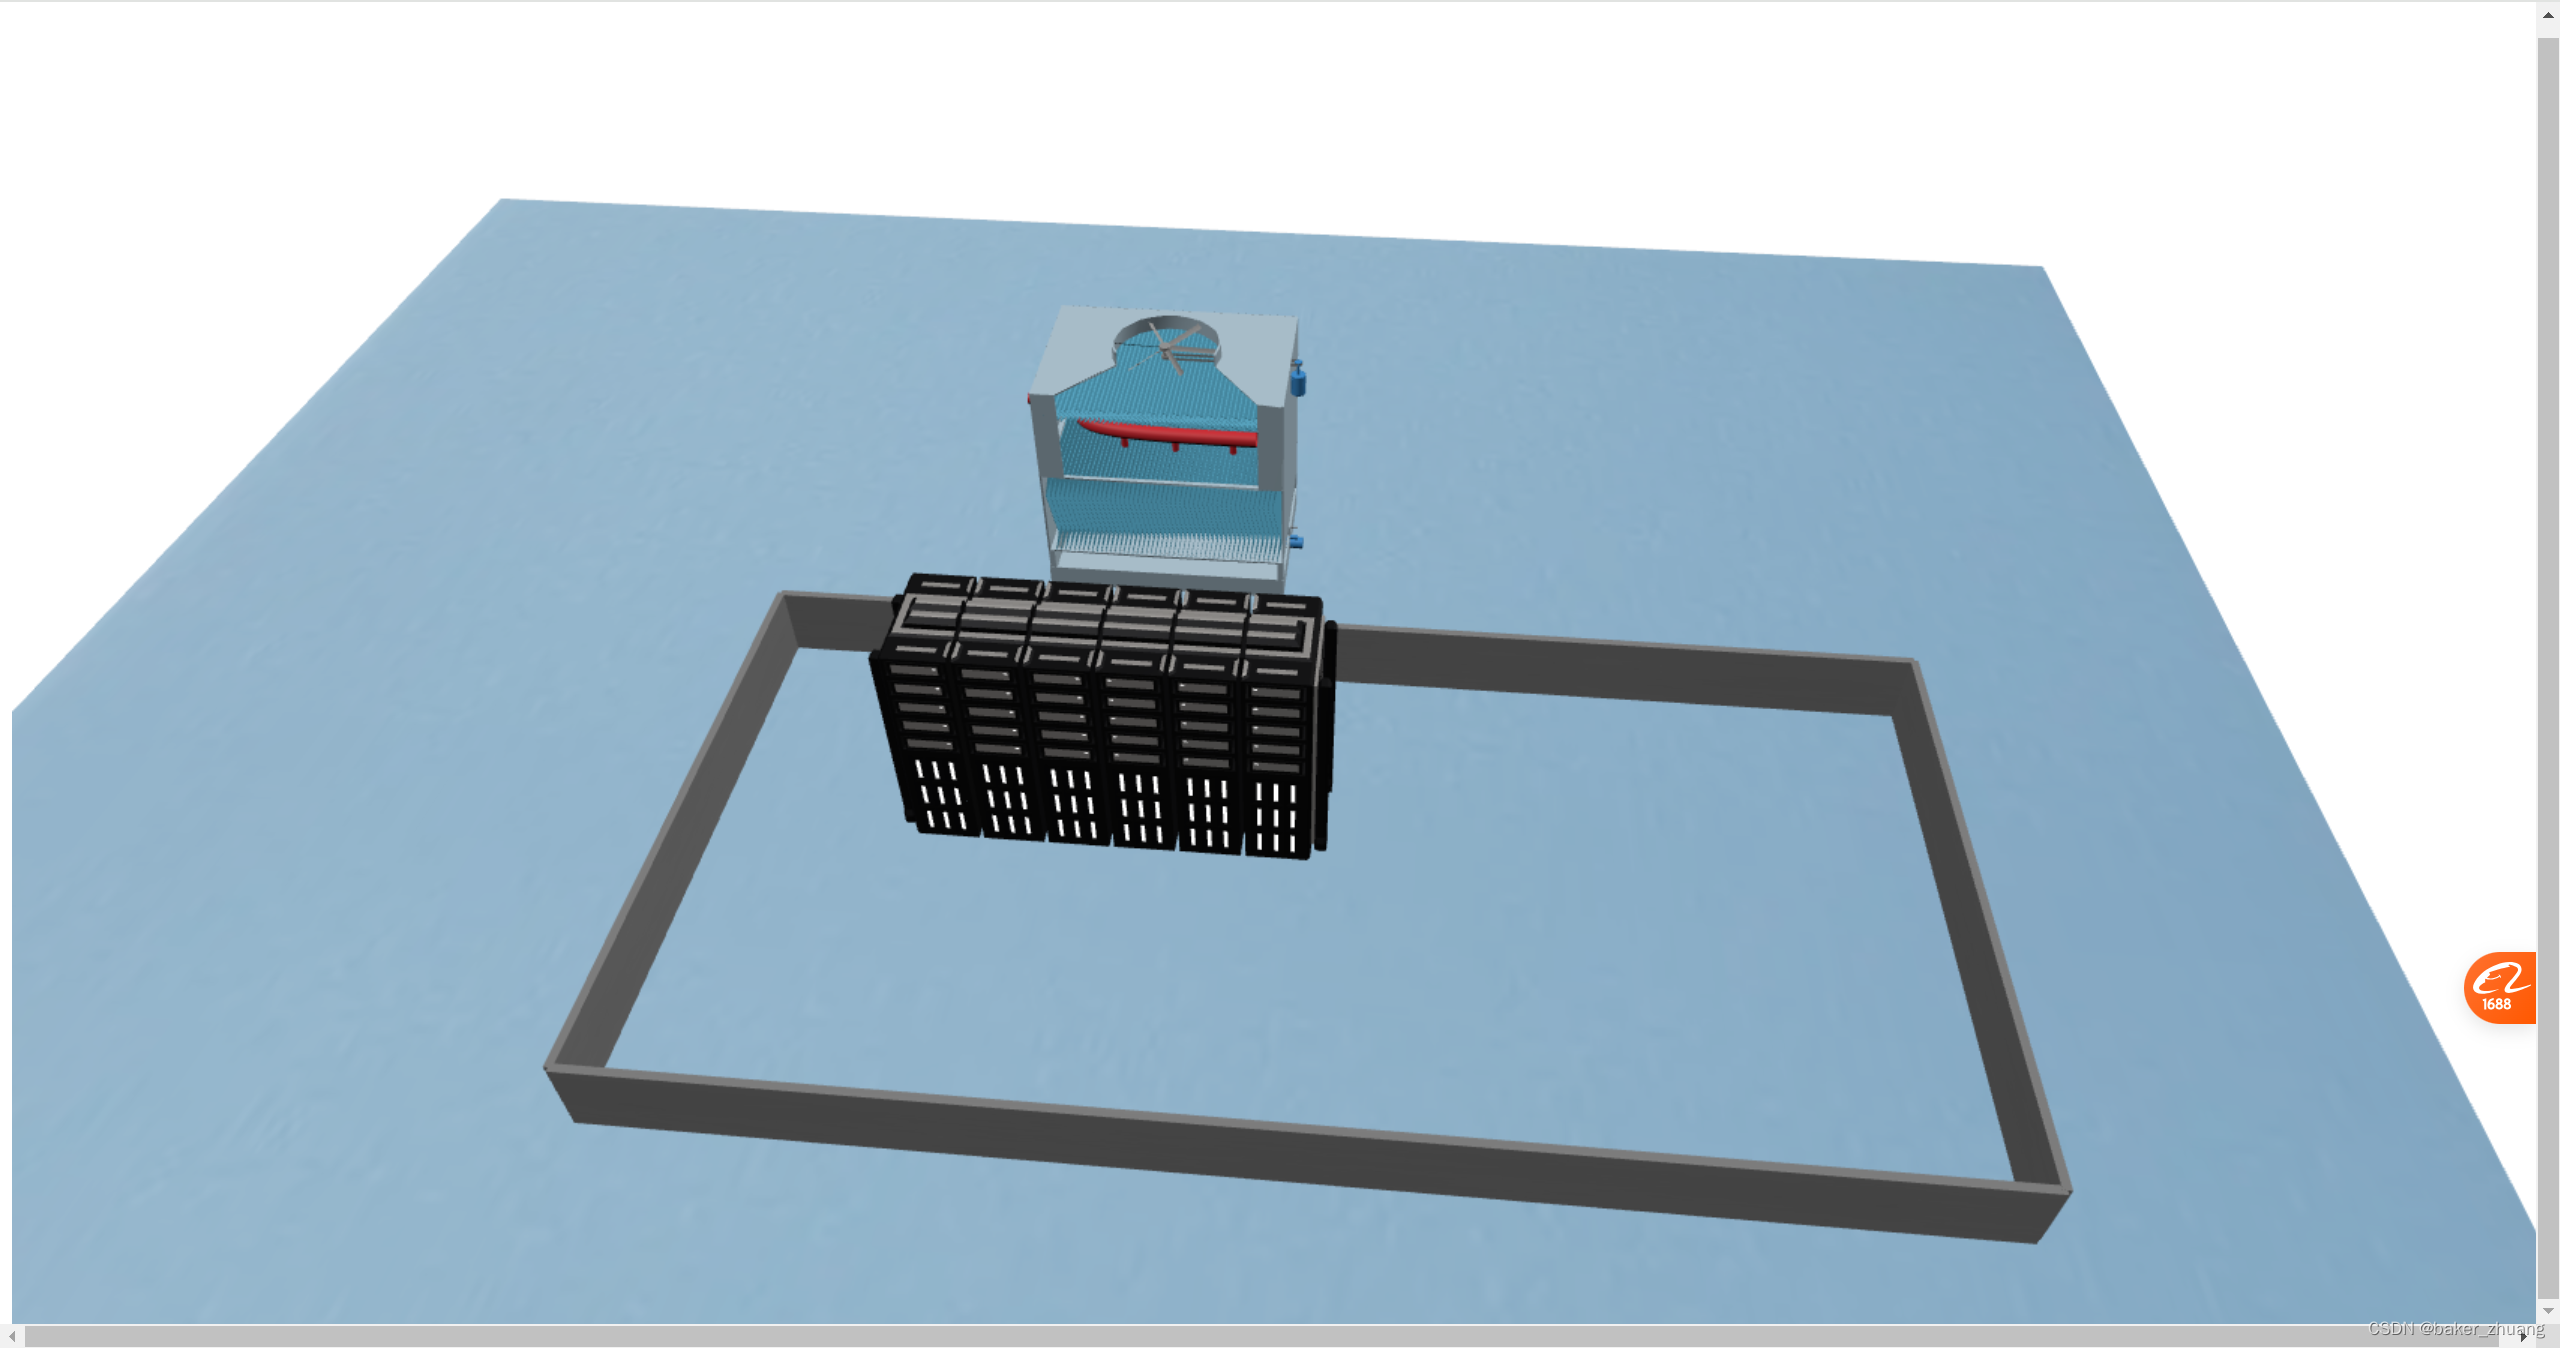
先来一张效果图,
 需要两个模型:一个冷却设备,一个服务器机箱,我这里是从网上找来的,首先我们搭建一个场景,
initScene(){this.scene = new THREE.Scene();},initCamera(){this.camera = new THREE.PerspectiveCamera(45, window.innerWidth / window.innerHeight, 0.1, 10000);this.camera.position.set(200,-100,200);this.camera.lookAt(200,200,0);this.camera.up.set(0, 0, 1); // <=== spin // around Z-axis},initLight(){//添加两个平行光const directionalLight1 = new THREE.DirectionalLight(0xffffff, 1.5);directionalLight1.position.set(-300,-300,600)this.scene.add(directionalLight1);const directionalLight2 = new THREE.DirectionalLight(0xffffff, 1.5);directionalLight2.position.set(600,200,600)this.scene.add(directionalLight2);},initRenderer(){this.renderer = new THREE.WebGLRenderer({ antialias: true });this.container = document.getElementById("container")this.renderer.setSize(this.container.clientWidth, this.container.clientHeight);this.renderer.setClearColor('#FFFFFF', 1.0);this.container.appendChild(this.renderer.domElement);},initControl(){this.controls = new OrbitControls(this.camera, this.renderer.domElement);this.controls.enableDamping = true;this.controls.maxPolarAngle = Math.PI / 2.2; // // 最大角度this.controls.target = new THREE.Vector3(200, 200, 0);this.camera.position.set(200, -100, 200);this.camera.lookAt(200, 200, 0);},initAnimate() {requestAnimationFrame(this.initAnimate);this.renderer.render(this.scene, this.camera);},然后添加房间,为了效果更真实,我们会创建一个房间,把服务器放在房间里,把冷却塔放在外面,创建方法和mes中的类似,只不过这个不用设计门了,可以直接搭建四堵墙和地板
floor:{floorWidth:600, floorLength:600,depth:1},wall:{wallWidth:150, wallLength:300,wallHeight:20},offsetValue:200,initFloor(){let floorGeometry = new THREE.BoxGeometry( this.floor.floorWidth,this.floor.floorLength,this.floor.depth);let floorMaterial = new THREE.MeshPhysicalMaterial({color:'#FFFFFF'});let textureFloor = new THREE.TextureLoader().load('/static/images/floor.jpg', function (texture) {texture.wrapS = texture.wrapT = THREE.RepeatWrapping;})floorMaterial.map = textureFloorlet floor = new THREE.Mesh( floorGeometry, floorMaterial );floor.name = '地板';floor.position.set(this.floor.floorWidth/2,this.floor.floorLength/2,0)this.scene.add(floor)},//初始化墙壁createCubeWall() {let materialTie = new THREE.MeshPhysicalMaterial({color: '#BBBBBB'}); //前 0xafc0ca :灰色let textureWall = new THREE.TextureLoader().load('/static/images/wall.jpg', function (texture) {texture.wrapS = texture.wrapT = THREE.RepeatWrapping;})materialTie.map = textureWalllet wallList = []let wall1 = {width:this.wall.wallLength, height:2, depth:this.wall.wallHeight, angle:0, matArrayB:materialTie, x:this.wall.wallLength/2+this.offsetValue, y:+this.offsetValue, z:this.wall.wallHeight/2, name:"墙面"};let wall2 = {width:this.wall.wallLength, height:2, depth:this.wall.wallHeight, angle:1, matArrayB:materialTie, x:this.wall.wallLength/2+200, y:this.wall.wallWidth+this.offsetValue, z:(this.wall.wallHeight/2), name:"墙面"};let wall3 = {width:this.wall.wallWidth, height:2, depth:this.wall.wallHeight, angle:1.5, matArrayB:materialTie, x:this.offsetValue, y:this.wall.wallWidth/2+this.offsetValue, z:(this.wall.wallHeight/2), name:"墙面"};let wall4 = {width:this.wall.wallWidth, height:2, depth:this.wall.wallHeight, angle:1.5, matArrayB:materialTie, x:this.wall.wallLength+this.offsetValue, y:(this.wall.wallWidth/2)+this.offsetValue, z:(this.wall.wallHeight/2), name:"墙面"};wallList.push(wall1);wallList.push(wall2);wallList.push(wall3);wallList.push(wall4);for(let i=0;i<wallList.length;i++){let cubeGeometry = new THREE.BoxGeometry(wallList[i].width, wallList[i].height, wallList[i].depth);let cube = new THREE.Mesh(cubeGeometry, wallList[i].matArrayB);cube.position.x = wallList[i].x;cube.position.y = wallList[i].y;cube.position.z = wallList[i].z;cube.rotation.z += wallList[i].angle * Math.PI; //-逆时针旋转,+顺时针cube.name = wallList[i].name;this.scene.add(cube);}},然后添加两个设备,一个冷却设备,一个服务器主机柜,要注意调整位置,保持一个在房间内一个在房间外,后续会通过冷凝管连接两个设备
initDevice(){const loader = new GLTFLoader()loader.load("/static/models/server.glb", (gltf) => {this.server = gltf.scene;this.server.scale.set(0.3,0.3,0.3);this.server.position.set(300,300,0);this.server.rotation.x = Math.PI/2this.server.rotation.y = Math.PI/2this.scene.add(this.server) // 加入场景})loader.load("/static/models/tower.glb", (gltf) => {this.tower = gltf.scene;this.tower.scale.set(20,20,20);this.tower.position.set(300,400,30);this.tower.rotation.x = Math.PI/2this.scene.add(this.tower) // 加入场景})},添加好设备后,我们就得到这样的场景,
然后需要添加管道给这两个设备连接起来,并且其中一个为蓝色一个为红色,之前有讲过Threejs绘制管道效果,可以就把那部分拿过来使用,配置好每个坐标点,这里用两个方法一个绘制冷水,一个绘制热水,并且让水流动起来,这部分开发可以参考之前的章节,不过要调整水管的接入点,如果想要直角管,可以在点数组中添加两个拐弯点的坐标,就可以避免后续的点的影响,以达到直角管道的效果。
代码如下:
initColdTube(){const path = new THREE.CatmullRomCurve3([new THREE.Vector3(350, 300, 10),new THREE.Vector3(380, 300, 10),new THREE.Vector3(380, 300, 10),new THREE.Vector3(380, 400, 10),new THREE.Vector3(380, 400, 10),new THREE.Vector3(320, 400, 7),]);let geometry1 = new THREE.TubeGeometry(path, 100, 1, 25, false);let textureLoader = new THREE.TextureLoader();let texture = textureLoader.load('/static/images/cold.png')texture.wrapS = texture.wrapT = THREE.RepeatWrapping;this.coldMaterial = new THREE.MeshBasicMaterial({map:texture,transparent: false,}); //材质对象Materiallet mesh1 = new THREE.Mesh(geometry1, this.coldMaterial); //网格模型对象Meshthis.scene.add(mesh1); //网格模型添加到场景let tubeGeometry2 = new THREE.TubeGeometry(path, 100, 2, 25, false);let tubeMaterial2 = new THREE.MeshPhongMaterial({color: 0xaaaaaa,transparent: true,opacity: 0.5,});let tube2 = new THREE.Mesh(tubeGeometry2, tubeMaterial2);this.scene.add(tube2);},initHotTube(){const path = new THREE.CatmullRomCurve3([new THREE.Vector3(300, 300, 10),new THREE.Vector3(230, 300, 10),new THREE.Vector3(230, 300, 10),new THREE.Vector3(230, 300, 53),new THREE.Vector3(230, 300, 53),new THREE.Vector3(230, 400, 53),new THREE.Vector3(230, 400, 53),new THREE.Vector3(270, 400, 53),]);let geometry1 = new THREE.TubeGeometry(path, 100, 1, 25, false);let textureLoader = new THREE.TextureLoader();let texture = textureLoader.load('/static/images/hot.png')texture.wrapS = texture.wrapT = THREE.RepeatWrapping;this.hotMaterial = new THREE.MeshBasicMaterial({map:texture,transparent: false,}); //材质对象Materiallet mesh1 = new THREE.Mesh(geometry1, this.hotMaterial); //网格模型对象Meshthis.scene.add(mesh1); //网格模型添加到场景let tubeGeometry2 = new THREE.TubeGeometry(path, 100, 2, 25, false);let tubeMaterial2 = new THREE.MeshPhongMaterial({color: 0xaaaaaa,transparent: true,opacity: 0.5,});let tube2 = new THREE.Mesh(tubeGeometry2, tubeMaterial2);this.scene.add(tube2);},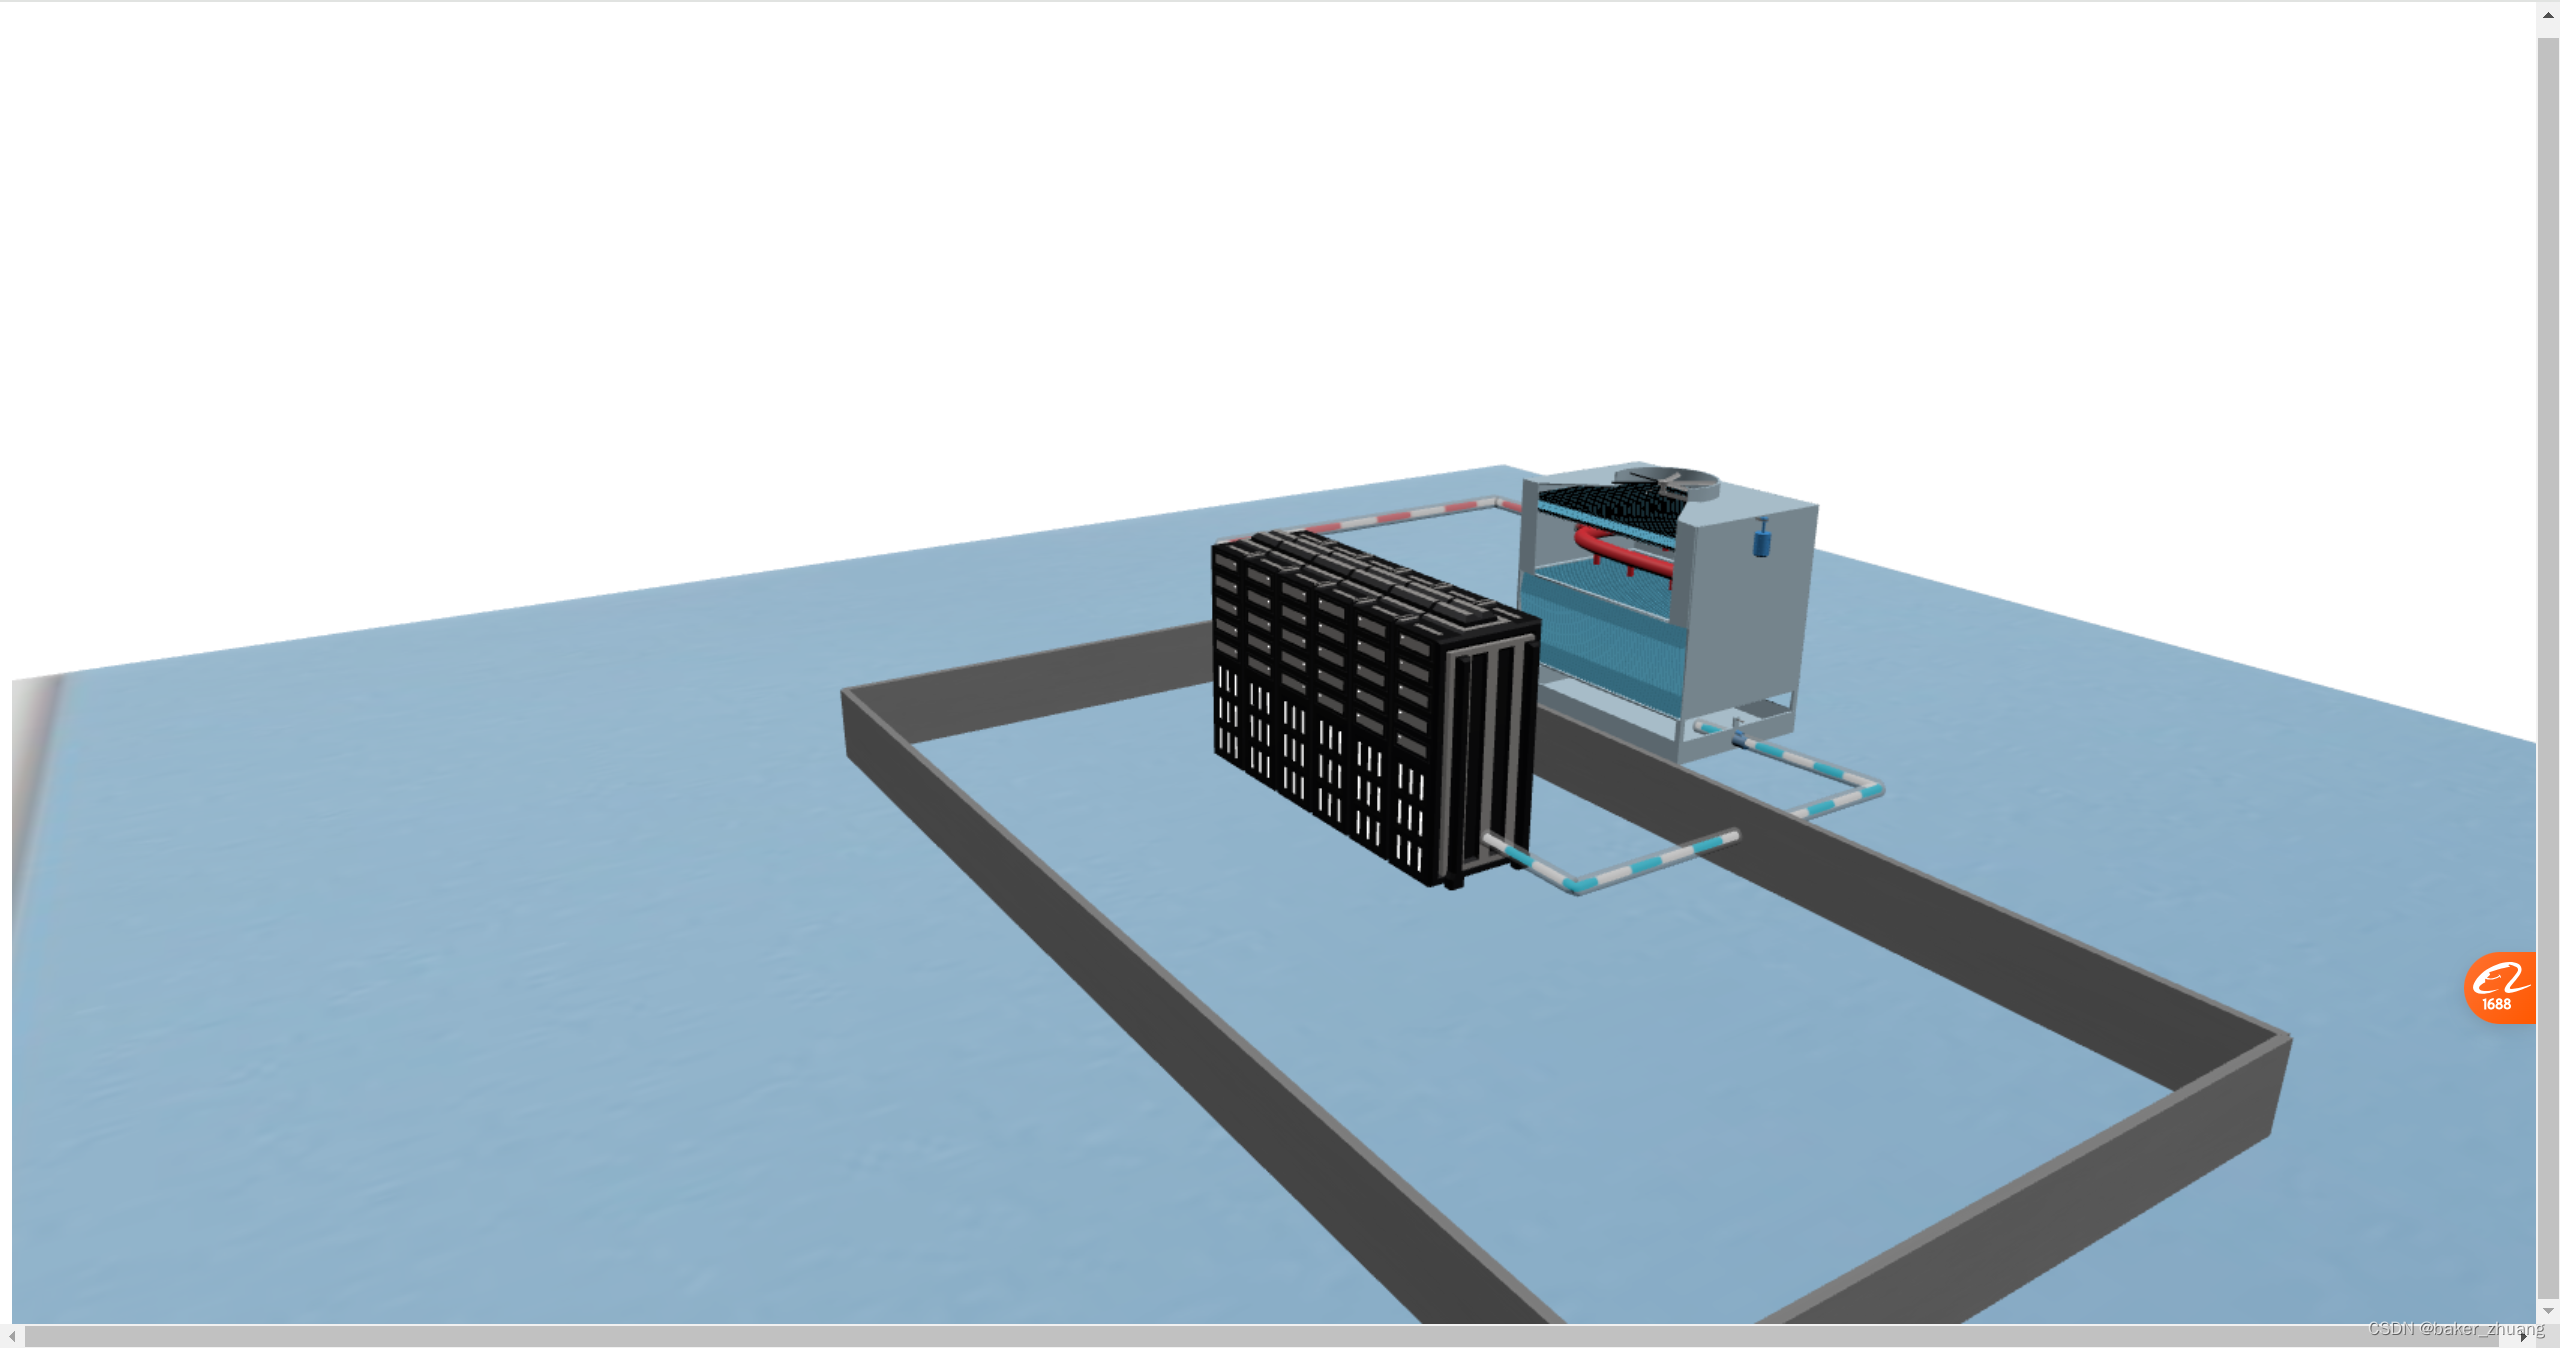
然后再给服务器和冷却设备添加状态和名字,用上个章节中给产线设备添加名字的方式:
initMachineName(x,y,z,name){//创建设备信息const earthDiv = document.createElement('div');earthDiv.className = "label";earthDiv.innerHTML = "<div style='border:1px #FFFFFF solid;border-radius: 5px;width:90px;padding-left:10px'>" +"<span style='font-size: 12px;color:#FFFFFF'>"+name+"</span><br/>" +"<span style='font-size: 12px;color:#FFFFFF'>运行正常</span><br/>" +"<span style='color:green;font-size: 12px;'>温度18℃</span>" +"</div>";const earthLabel = new CSS2DObject(earthDiv);earthLabel.position.set(x,y,z);//相对于父级元素的位置this.scene.add(earthLabel);this.labelRenderer = new CSS2DRenderer();this.labelRenderer.setSize(window.innerWidth, window.innerHeight);document.body.appendChild(this.labelRenderer.domElement)//设置样式this.labelRenderer.domElement.style.position = 'fixed';this.labelRenderer.domElement.style.top = '0px';this.labelRenderer.domElement.style.left = '0px';this.labelRenderer.domElement.style.zIndex = '10';//设置层级},最终效果如下:
机房冷却
这样一共不到250代码,一个简单的机房数字孪生场景就做好了,如果需要源码可以在评论区留下邮箱,也可以私信一起交流学习。
这篇关于Threejs制作服务器机房冷却结构的文章就介绍到这儿,希望我们推荐的文章对编程师们有所帮助!


