本文主要是介绍[ESP32]:TFLite Micro推理CIFAR10模型,希望对大家解决编程问题提供一定的参考价值,需要的开发者们随着小编来一起学习吧!
[ESP32]:TFLite Micro推理CIFAR10模型
模型训练
数据集处理
from keras.datasets import cifar10
from keras.preprocessing.image import ImageDataGenerator
from keras.models import Sequential, load_model, Model
from keras.layers import Input, Dense, Dropout, Activation, Flatten
from keras.layers import Convolution2D, MaxPooling2D, GlobalAveragePooling2D
import pandas as pd
import matplotlib.pyplot as plt
import time, pickle
from keras.utils import to_categorical
from keras import layers
import tensorflow as tf
from tensorflow.keras.callbacks import EarlyStopping(x_train, y_train), (x_test, y_test) = cifar10.load_data()y_train = y_train.reshape(y_train.shape[0])
y_test = y_test.reshape(y_test.shape[0])print('x_train shape:', x_train.shape)
print(x_train.shape[0], 'training samples')
print(x_test.shape[0], 'validation samples')x_train = x_train.astype('float32')
x_test = x_test.astype('float32')
x_train /= 255
x_test /= 255y_train = to_categorical(y_train, 10)
y_test = to_categorical(y_test, 10)
模型搭建
def build_model():model = tf.keras.Sequential()model.add(layers.Conv2D(32, kernel_size=(4,4), strides=1,activation='relu', input_shape=(32, 32, 3)))model.add(layers.MaxPooling2D((2, 2)))model.add(layers.Conv2D(32, kernel_size=(4,4), strides=1,activation='relu'))model.add(layers.MaxPooling2D((2, 2)))model.add(layers.Flatten())model.add(layers.Dense(256, activation='relu'))model.add(layers.Dense(10, activation='softmax'))print(model.summary())return modelmodel=build_model()
tflite模型转换
converter = tf.lite.TFLiteConverter.from_keras_model(model)
tflite_model = converter.convert()
open("cifar10.tflite", "wb").write(tflite_model)
ESP32推理
本文采用的是2DCNN,添加所需的op算子即可
static tflite::MicroMutableOpResolver<5> resolver;
// 这里需要添加我们模型使用的层
if (resolver.AddReshape() != kTfLiteOk)
{ESP_LOGI(TAG, "Add reshape failed");return;
}if (resolver.AddConv2D() != kTfLiteOk)
{ESP_LOGI(TAG, "Add reshape failed");return;
}if (resolver.AddMaxPool2D() != kTfLiteOk)
{ESP_LOGI(TAG, "Add reshape failed");return;
}if (resolver.AddFullyConnected() != kTfLiteOk)
{ESP_LOGI(TAG, "Add reshape failed");return;
}if (resolver.AddSoftmax() != kTfLiteOk)
{ESP_LOGI(TAG, "Add reshape failed");return;
}
推理方案1:PC端JPG图片转换为数组
每一个像素点都有RGB三个数值,依次排开即可,以下为python的一段实例
from PIL import Image
import numpy as npdef image_to_c_array(image_path):# 读取图片image = Image.open(image_path)print(image.size)# 转换为numpy数组image_array = np.array(image)# 归一化# normalized_image_array = image_array / 255.0print(image_array.size)x_array_flatten = image_array.flatten()print(len(x_array_flatten))c_array_string = "{" + ", ".join(str(pixel) for pixel in x_array_flatten) + "}"with open("image_array.h", "w") as f:f.write("#ifndef IMAGE_ARRAY_H\n")f.write("#define IMAGE_ARRAY_H\n\n")f.write("const float image_array[] = %s;\n" % c_array_string)f.write("#endif\n")# 调用函数生成.h文件
image_to_c_array("0042.jpg")

这样,我们可以直接将这个数组作为模型的输入去推理,记得归一化,除以255。
推理方案2:esp_jpeg解码jpg
size_t pic_buf_size = 32 * 32 * sizeof(uint32_t);uint8_t *pic_buf = (uint8_t *)heap_caps_malloc(pic_buf_size + 1, MALLOC_CAP_SPIRAM); // create out image bufferesp_jpeg_image_cfg_t jpeg_cfg = {.indata = (uint8_t *)file_buf,.indata_size = filesize,.outbuf = (uint8_t *)pic_buf,.outbuf_size = pic_buf_size,.out_format = JPEG_IMAGE_FORMAT_RGB888,.out_scale = JPEG_IMAGE_SCALE_0,};// // decode jpgesp_jpeg_image_output_t outimage;esp_jpeg_decode(&jpeg_cfg, &outimage);ESP_LOGI(TAG, "%s size: %d x %d", filename, outimage.width, outimage.height);
和上面python版本的一样,解码出来的pic_buf存放的也是每一个的像素,类似于这样
pic_buf[]= {像素0的R,像素0的G,像素0的B,像素1的R....}
所以在输入网络的时候,pic_buf的长度一定是图像宽图像高3,其中3为RGB,包括解码的时候选择RGB888
推理端的代码,记得归一化。
void cifar10_model_predict(const uint8_t *pic, int size)
{for (int i = 0; i < size; i++){input->data.f[i] = pic[i] / 255.0f;}TfLiteStatus invoke_status = interpreter->Invoke();if (invoke_status != kTfLiteOk){MicroPrintf("Invoke failed on");return;}for (int i = 0; i < 10; i++){printf("%.2f ", output->data.f[i]);}printf("\n");
}
LiteOk){MicroPrintf("Invoke failed on");return;}for (int i = 0; i < 10; i++){printf("%.2f ", output->data.f[i]);}printf("\n");
}
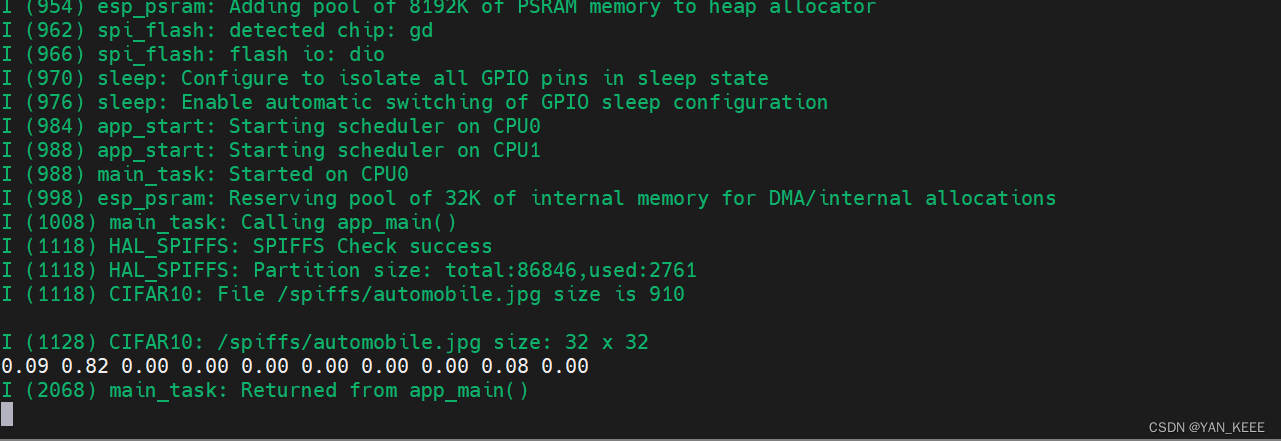
可以看到推理结果还是挺不错的。
这篇关于[ESP32]:TFLite Micro推理CIFAR10模型的文章就介绍到这儿,希望我们推荐的文章对编程师们有所帮助!


