本文主要是介绍OpenHarmony实战开发-如何实现自定义弹窗 (CustomDialog),希望对大家解决编程问题提供一定的参考价值,需要的开发者们随着小编来一起学习吧!
CustomDialog是自定义弹窗,可用于广告、中奖、警告、软件更新等与用户交互响应操作。开发者可以通过CustomDialogController类显示自定义弹窗。
创建自定义弹窗
- 使用@CustomDialog装饰器装饰自定义弹窗
- @CustomDialog装饰器用于装饰自定义弹框,此装饰器内进行自定义内容(也就是弹框内容)。
@CustomDialog
struct CustomDialogExample {controller: CustomDialogController = new CustomDialogController({builder: CustomDialogExample({}),})build() {Column() {Text('我是内容').fontSize(20).margin({ top: 10, bottom: 10 })}}
}
3.创建构造器,与装饰器呼应相连。
@Entry@Componentstruct CustomDialogUser {dialogController: CustomDialogController = new CustomDialogController({builder: CustomDialogExample(),})}
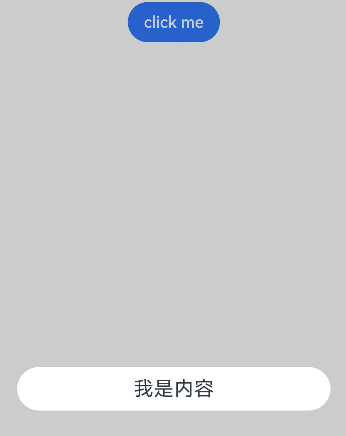
4.点击与onClick事件绑定的组件使弹窗弹出。
@Entry
@Component
struct CustomDialogUser {dialogController: CustomDialogController = new CustomDialogController({builder: CustomDialogExample(),})build() {Column() {Button('click me').onClick(() => {this.dialogController.open()})}.width('100%').margin({ top: 5 })}
}
弹窗的交互
弹窗可用于数据交互,完成用户一系列响应操作。
1.在@CustomDialog装饰器内添加按钮,同时添加数据函数。
@CustomDialog
struct CustomDialogExample {cancel?: () => voidconfirm?: () => voidcontroller: CustomDialogControllerbuild() {Column() {Text('我是内容').fontSize(20).margin({ top: 10, bottom: 10 })Flex({ justifyContent: FlexAlign.SpaceAround }) {Button('cancel').onClick(() => {this.controller.close()if (this.cancel) {this.cancel()}}).backgroundColor(0xffffff).fontColor(Color.Black)Button('confirm').onClick(() => {this.controller.close()if (this.confirm) {this.confirm()}}).backgroundColor(0xffffff).fontColor(Color.Red)}.margin({ bottom: 10 })}}
}
2.页面内需要在构造器内进行接收,同时创建相应的函数操作。
@Entry
@Component
struct CustomDialogUser {dialogController: CustomDialogController = new CustomDialogController({builder: CustomDialogExample({cancel: ()=> { this.onCancel() },confirm: ()=> { this.onAccept() },}),})onCancel() {console.info('Callback when the first button is clicked')}onAccept() {console.info('Callback when the second button is clicked')}build() {Column() {Button('click me').onClick(() => {this.dialogController.open()})}.width('100%').margin({ top: 5 })}
}

弹窗的动画
弹窗通过定义openAnimation控制弹窗出现动画的持续时间,速度等参数。
@CustomDialog
struct CustomDialogExample {controller?: CustomDialogControllerbuild() {Column() {Text('Whether to change a text?').fontSize(16).margin({ bottom: 10 })}}
}@Entry
@Component
struct CustomDialogUser {@State textValue: string = ''@State inputValue: string = 'click me'dialogController: CustomDialogController | null = new CustomDialogController({builder: CustomDialogExample(),openAnimation: {duration: 1200,curve: Curve.Friction,delay: 500,playMode: PlayMode.Alternate,onFinish: () => {console.info('play end')}},autoCancel: true,alignment: DialogAlignment.Bottom,offset: { dx: 0, dy: -20 },gridCount: 4,customStyle: false,backgroundColor: 0xd9ffffff,cornerRadius: 10,})// 在自定义组件即将析构销毁时将dialogControlle置空aboutToDisappear() {this.dialogController = null // 将dialogController置空}build() {Column() {Button(this.inputValue).onClick(() => {if (this.dialogController != null) {this.dialogController.open()}}).backgroundColor(0x317aff)}.width('100%').margin({ top: 5 })}
}

嵌套自定义弹窗
通过第一个弹窗打开第二个弹窗时,最好将第二个弹窗定义在第一个弹窗的父组件处,通过父组件传给第一个弹窗的回调来打开第二个弹窗。
@CustomDialog
struct CustomDialogExampleTwo {controllerTwo?: CustomDialogController@State message: string = "I'm the second dialog box."@State showIf: boolean = false;build() {Column() {if (this.showIf) {Text("Text").fontSize(30).height(100)}Text(this.message).fontSize(30).height(100)Button("Create Text").onClick(()=>{this.showIf = true;})Button ('Close Second Dialog Box').onClick(() => {if (this.controllerTwo != undefined) {this.controllerTwo.close()}}).margin(20)}}
}
@CustomDialog
struct CustomDialogExample {openSecondBox?: ()=>voidcontroller?: CustomDialogControllerbuild() {Column() {Button ('Open Second Dialog Box and close this box').onClick(() => {this.controller!.close();this.openSecondBox!();}).margin(20)}.borderRadius(10)}
}
@Entry
@Component
struct CustomDialogUser {@State inputValue: string = 'Click Me'dialogController: CustomDialogController | null = new CustomDialogController({builder: CustomDialogExample({openSecondBox: ()=>{if (this.dialogControllerTwo != null) {this.dialogControllerTwo.open()}}}),cancel: this.exitApp,autoCancel: true,alignment: DialogAlignment.Bottom,offset: { dx: 0, dy: -20 },gridCount: 4,customStyle: false})dialogControllerTwo: CustomDialogController | null = new CustomDialogController({builder: CustomDialogExampleTwo(),alignment: DialogAlignment.Bottom,offset: { dx: 0, dy: -25 } })aboutToDisappear() {this.dialogController = nullthis.dialogControllerTwo = null}onCancel() {console.info('Callback when the first button is clicked')}onAccept() {console.info('Callback when the second button is clicked')}exitApp() {console.info('Click the callback in the blank area')}build() {Column() {Button(this.inputValue).onClick(() => {if (this.dialogController != null) {this.dialogController.open()}}).backgroundColor(0x317aff)}.width('100%').margin({ top: 5 })}
}
@CustomDialog
struct CustomDialogExampleTwo {controllerTwo?: CustomDialogController@State message: string = "I'm the second dialog box."@State showIf: boolean = false;build() {Column() {if (this.showIf) {Text("Text").fontSize(30).height(100)}Text(this.message).fontSize(30).height(100)Button("Create Text").onClick(()=>{this.showIf = true;})Button ('Close Second Dialog Box').onClick(() => {if (this.controllerTwo != undefined) {this.controllerTwo.close()}}).margin(20)}}
}
由于自定义弹窗在状态管理侧有父子关系,如果将第二个弹窗定义在第一个弹窗内,那么当父组件(第一个弹窗)被销毁(关闭)时,子组件(第二个弹窗)内无法再继续创建新的组件。
完整示例
@CustomDialog
struct CustomDialogExample {cancel?: () => voidconfirm?: () => voidcontroller: CustomDialogControllerbuild() {Column() {Text('我是内容').fontSize(20).margin({ top: 10, bottom: 10 })Flex({ justifyContent: FlexAlign.SpaceAround }) {Button('cancel').onClick(() => {this.controller.close()if (this.cancel) {this.cancel()}}).backgroundColor(0xffffff).fontColor(Color.Black)Button('confirm').onClick(() => {this.controller.close()if (this.confirm) {this.confirm()}}).backgroundColor(0xffffff).fontColor(Color.Red)}.margin({ bottom: 10 })}}
}@Entry
@Component
struct CustomDialogUser {dialogController: CustomDialogController = new CustomDialogController({builder: CustomDialogExample({cancel: ()=> { this.onCancel() },confirm: ()=> { this.onAccept() },}),})onCancel() {console.info('Callback when the first button is clicked')}onAccept() {console.info('Callback when the second button is clicked')}build() {Column() {Button('click me').onClick(() => {this.dialogController.open()})}.width('100%').margin({ top: 5 })}
}
如果大家还没有掌握鸿蒙,现在想要在最短的时间里吃透它,我这边特意整理了《鸿蒙语法ArkTS、TypeScript、ArkUI等…视频教程》以及《鸿蒙开发学习手册》(共计890页),希望对大家有所帮助:https://docs.qq.com/doc/DZVVBYlhuRkZQZlB3
鸿蒙语法ArkTS、TypeScript、ArkUI等…视频教程:https://docs.qq.com/doc/DZVVBYlhuRkZQZlB3
OpenHarmony APP开发教程步骤:https://docs.qq.com/doc/DZVVBYlhuRkZQZlB3
《鸿蒙开发学习手册》:
如何快速入门:https://docs.qq.com/doc/DZVVBYlhuRkZQZlB3
1.基本概念
2.构建第一个ArkTS应用
3.……

开发基础知识:https://docs.qq.com/doc/DZVVBYlhuRkZQZlB3
1.应用基础知识
2.配置文件
3.应用数据管理
4.应用安全管理
5.应用隐私保护
6.三方应用调用管控机制
7.资源分类与访问
8.学习ArkTS语言
9.……

基于ArkTS 开发:https://docs.qq.com/doc/DZVVBYlhuRkZQZlB3
1.Ability开发
2.UI开发
3.公共事件与通知
4.窗口管理
5.媒体
6.安全
7.网络与链接
8.电话服务
9.数据管理
10.后台任务(Background Task)管理
11.设备管理
12.设备使用信息统计
13.DFX
14.国际化开发
15.折叠屏系列
16.……

鸿蒙生态应用开发白皮书V2.0PDF:https://docs.qq.com/doc/DZVVBYlhuRkZQZlB3

这篇关于OpenHarmony实战开发-如何实现自定义弹窗 (CustomDialog)的文章就介绍到这儿,希望我们推荐的文章对编程师们有所帮助!


