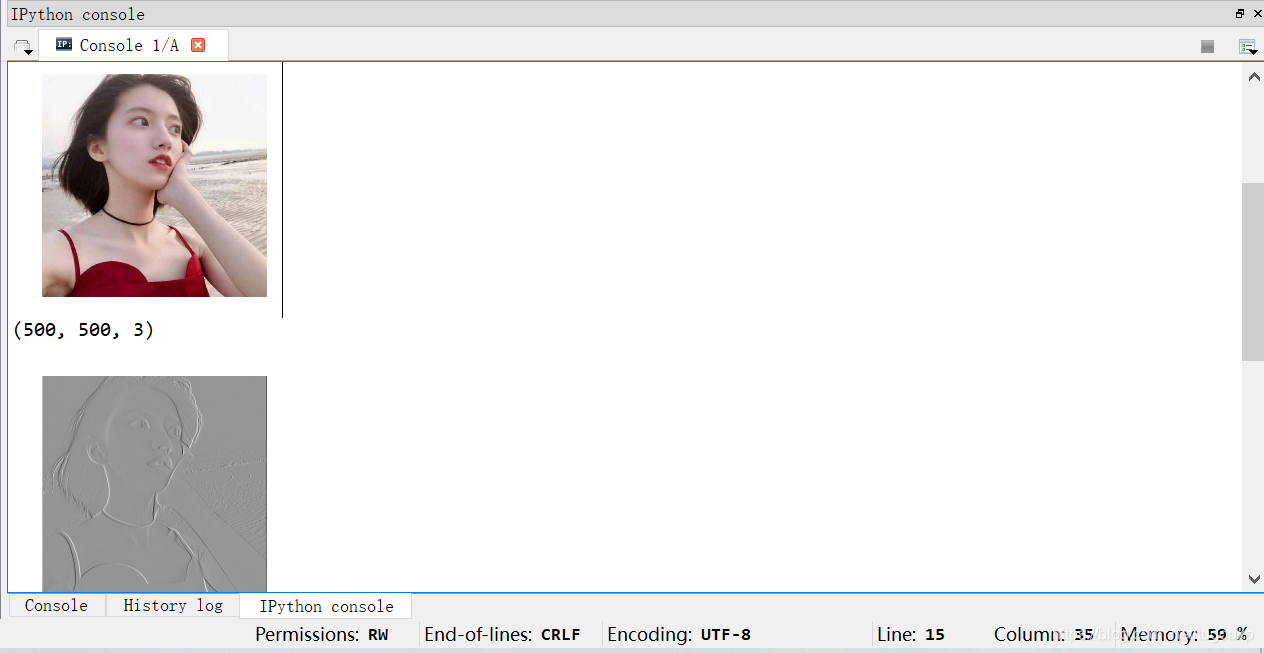
本文主要是介绍使用sobel算子提取图片轮廓,希望对大家解决编程问题提供一定的参考价值,需要的开发者们随着小编来一起学习吧!
代码:
import matplotlib.pyplot as plt # plt 用于显示图片
import matplotlib.image as mpimg # mpimg 用于读取图片
import numpy as np
import tensorflow as tf  myimg = mpimg.imread('img.jpg') # 读取和代码处于同一目录下的图片
plt.imshow(myimg) # 显示图片
plt.axis('off') # 不显示坐标轴
plt.show()
print(myimg.shape)full=np.reshape(myimg,[1,500,500,3])
inputfull = tf.Variable(tf.constant(1.0,shape = [1, 500, 500, 3]))filter =  tf.Variable(tf.constant([[-1.0,-1.0,-1.0],  [0,0,0],  [1.0,1.0,1.0],[-2.0,-2.0,-2.0], [0,0,0],  [2.0,2.0,2.0],[-1.0,-1.0,-1.0], [0,0,0],  [1.0,1.0,1.0]],shape = [3, 3, 3, 1]))                                    op = tf.nn.conv2d(inputfull, filter, strides=[1, 1, 1, 1], padding='SAME') #3个通道输入,生成1个feature ma
o=tf.cast(  ((op-tf.reduce_min(op))/(tf.reduce_max(op)-tf.reduce_min(op)) ) *255 ,tf.uint8)with tf.Session() as sess:  sess.run(tf.global_variables_initializer()  )  t,f=sess.run([o,filter],feed_dict={ inputfull:full})#print(f)t=np.reshape(t,[500,500]) plt.imshow(t,cmap='Greys_r') # 显示图片plt.axis('off') # 不显示坐标轴plt.show()
def conv2d(x, W):return tf.nn.conv2d(x, W, strides=[1, 1, 1, 1], padding='SAME')在学习tensorflow看到卷积这部分时,不明白这里的4个参数是什么意思,文档里面也没有具体说明。strides在官方定义中是一个一维具有四个元素的张量,其规定前后必须为1,所以我们可以改的是中间两个数,中间两个数分别代表了水平滑动和垂直滑动步长值。
在卷积核移动逐渐扫描整体图时候,因为步长的设置问题,可能导致剩下未扫描的空间不足以提供给卷积核的,大小扫描 比如有图大小为5*5,卷积核为2*2,步长为2,卷积核扫描了两次后,剩下一个元素,不够卷积核扫描了,这个时候就在后面补零,补完后满足卷积核的扫描,这种方式就是same。如果说把刚才不足以扫描的元素位置抛弃掉,就是valid方式。
效果:

使用拉普拉斯算子处理,效果不是很明显:
import matplotlib.pyplot as plt # plt 用于显示图片
import matplotlib.image as mpimg # mpimg 用于读取图片
import numpy as np
import tensorflow as tf  myimg = mpimg.imread('img.jpg') # 读取和代码处于同一目录下的图片
plt.imshow(myimg) # 显示图片
plt.axis('off') # 不显示坐标轴
plt.show()
print(myimg.shape)full=np.reshape(myimg,[1,500,500,3])
inputfull = tf.Variable(tf.constant(1.0,shape = [1, 500, 500, 3]))
#
#filter =  tf.Variable(tf.constant([[-1.0,-1.0,-1.0],  [0,0,0],  [1.0,1.0,1.0],
#                                    [-2.0,-2.0,-2.0], [0,0,0],  [2.0,2.0,2.0],
#                                    [-1.0,-1.0,-1.0], [0,0,0],  [1.0,1.0,1.0]],shape = [3, 3, 3, 1]))
filter =  tf.Variable(tf.constant([    [1.0,1.0,1.0],    [1.0,1.0,1.0],  [1.0,1.0,1.0],[1.0,1.0,1.0], [-8.0,-8.0,-8.0],[1.0,1.0,1.0],[1.0,1.0,1.0],    [1.0,1.0,1.0],  [1.0,1.0,1.0]],shape = [3, 3, 3, 1]))                                 op = tf.nn.conv2d(inputfull, filter, strides=[1, 1, 1, 1], padding='SAME') #3个通道输入,生成1个feature ma
o=tf.cast(  ((op-tf.reduce_min(op))/(tf.reduce_max(op)-tf.reduce_min(op)) ) *255 ,tf.uint8)with tf.Session() as sess:  sess.run(tf.global_variables_initializer()  )  t,f=sess.run([o,filter],feed_dict={ inputfull:full})#print(f)t=np.reshape(t,[500,500]) plt.imshow(t,cmap='Greys_r') # 显示图片plt.axis('off') # 不显示坐标轴plt.show()
结果:

sobel是一阶微分算子,而拉普拉斯是二阶微分算子,所以同一张图片经过处理后,输出结果不同。
可以将模型保存为ckpt格式
import matplotlib.pyplot as plt # plt 用于显示图片
import matplotlib.image as mpimg # mpimg 用于读取图片
import numpy as np
import tensorflow as tf  saver = tf.train.Saver()
myimg = mpimg.imread('img.jpg') # 读取和代码处于同一目录下的图片
plt.imshow(myimg) # 显示图片
plt.axis('off') # 不显示坐标轴
plt.show()
print(myimg.shape)full=np.reshape(myimg,[1,500,500,3])
inputfull = tf.Variable(tf.constant(1.0,shape = [1, 500, 500, 3]))
#
#filter =  tf.Variable(tf.constant([[-1.0,-1.0,-1.0],  [0,0,0],  [1.0,1.0,1.0],
#                                    [-2.0,-2.0,-2.0], [0,0,0],  [2.0,2.0,2.0],
#                                    [-1.0,-1.0,-1.0], [0,0,0],  [1.0,1.0,1.0]],shape = [3, 3, 3, 1]))
filter =  tf.Variable(tf.constant([    [1.0,1.0,1.0],    [1.0,1.0,1.0],  [1.0,1.0,1.0],[1.0,1.0,1.0], [-8.0,-8.0,-8.0],[1.0,1.0,1.0],[1.0,1.0,1.0],    [1.0,1.0,1.0],  [1.0,1.0,1.0]],shape = [3, 3, 3, 1]))                                 op = tf.nn.conv2d(inputfull, filter, strides=[1, 1, 1, 1], padding='SAME') #3个通道输入,生成1个feature ma
o=tf.cast(  ((op-tf.reduce_min(op))/(tf.reduce_max(op)-tf.reduce_min(op)) ) *255 ,tf.uint8)with tf.Session() as sess:sess.run(tf.global_variables_initializer()  )  t,f=sess.run([o,filter],feed_dict={ inputfull:full})#print(f)t=np.reshape(t,[500,500]) plt.imshow(t,cmap='Greys_r') # 显示图片plt.axis('off') # 不显示坐标轴plt.show()saver.save(sess, "model/linear")with tf.Session() as sess2:sess2.run(tf.global_variables_initializer())saver.restore(sess2, "model/linear")sess2.run([o,filter],feed_dict={ inputfull:full})
保存为CKPT格式的模型:
模型有很多种格式,其它的有比如ONNX,PB等等,日后慢慢总结。
结束!
这篇关于使用sobel算子提取图片轮廓的文章就介绍到这儿,希望我们推荐的文章对编程师们有所帮助!


