本文主要是介绍vue +antvX6 根据节点与线,动态设置节点坐标生成流程图,希望对大家解决编程问题提供一定的参考价值,需要的开发者们随着小编来一起学习吧!
需求
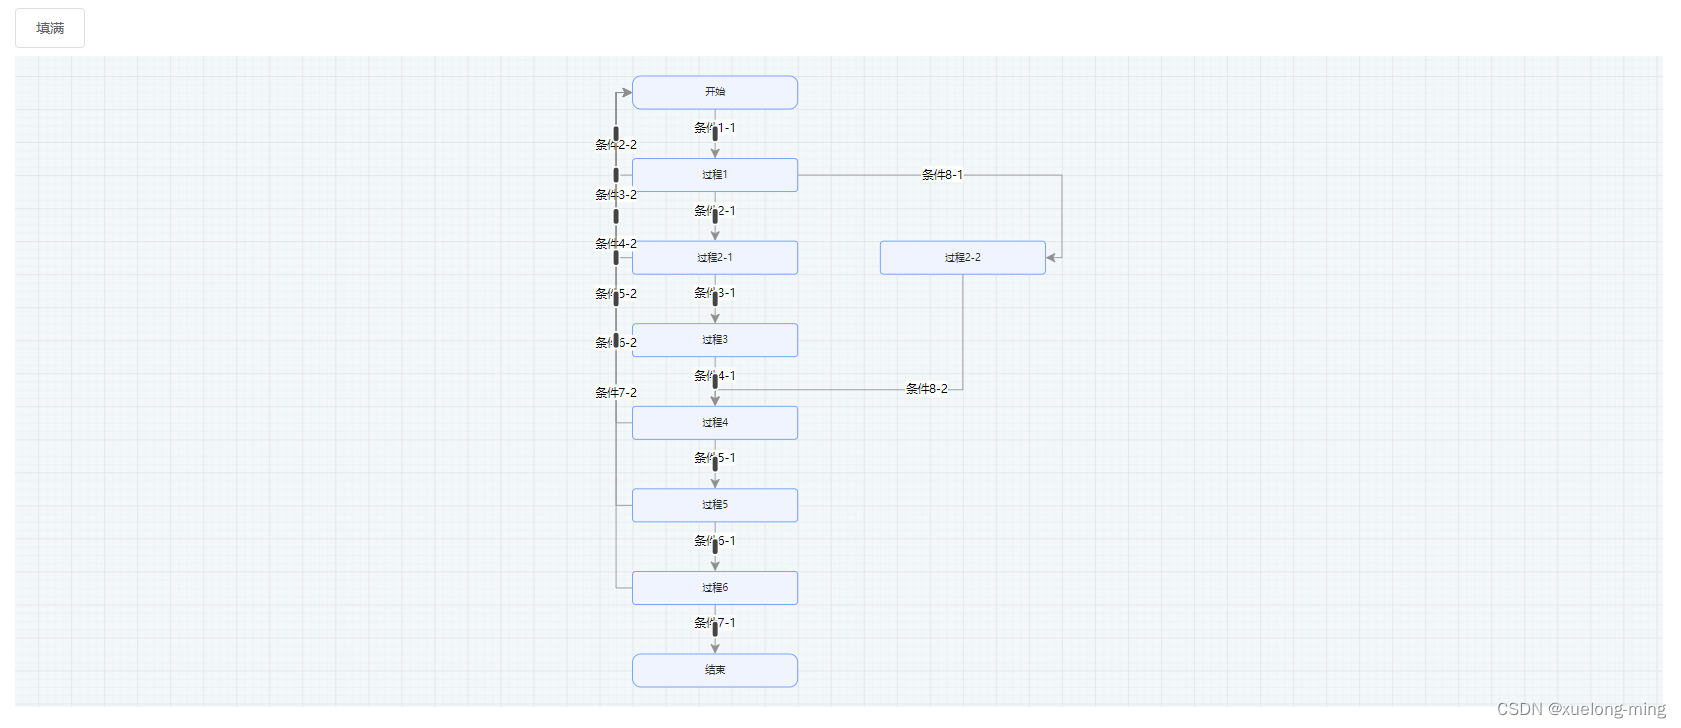
vue2 + antvX6完成流程图,但只有节点与线,没有节点的坐标,需要根据节点的顺序显示流程图。
需求:
1.根据数据动态生成对应的节点与线;
2.节点不能重叠;
3.节点与线可拖拽;
4.因为线存在重叠可能,所有鼠标移入时线必须高亮显示(红色),鼠标移出复原;
5.要求有对齐线;
6.线不能与节点重叠(先不能穿过节点)。
效果
图片
动图

参数
{"line_data": [ // 线数据{"name": "条件1-1", // 线名称"source_state_id": 6, // 源节点"destination_state_id": 5, // 目标节点"attribute_type_id": 1 // 成功或失败状态},{"name": "条件2-1","source_state_id": 9,"destination_state_id": 6,"attribute_type_id": 1},{"name": "条件2-2","source_state_id": 5,"destination_state_id": 6,"attribute_type_id": 2},{"name": "条件3-1","source_state_id": 10,"destination_state_id": 9,"attribute_type_id": 1},{"name": "条件3-2","source_state_id": 5,"destination_state_id": 9,"attribute_type_id": 2},{"name": "条件4-1","source_state_id": 11,"destination_state_id": 10,"attribute_type_id": 1},{"name": "条件4-2","source_state_id": 5,"destination_state_id": 10,"attribute_type_id": 2},{"name": "条件5-1","source_state_id": 12,"destination_state_id": 11,"attribute_type_id": 1},{"name": "条件5-2","source_state_id": 5,"destination_state_id": 11,"attribute_type_id": 2},{"name": "条件6-1","source_state_id": 13,"destination_state_id": 12,"attribute_type_id": 1},{"name": "条件6-2","source_state_id": 5,"destination_state_id": 12,"attribute_type_id": 2},{"name": "条件7-1","source_state_id": 18,"destination_state_id": 13,"attribute_type_id": 1},{"name": "条件7-2","source_state_id": 5,"destination_state_id": 13,"attribute_type_id": 2},{"name": "条件8-1","source_state_id": 19,"destination_state_id": 6,"attribute_type_id": 3},{"name": "条件8-2","source_state_id": 11,"destination_state_id": 19,"attribute_type_id": 1}],"node_data": [ // 节点数据{"id": 1, // 节点id"name": "开始", // 节点名称"type_id": 1, // 节点状态"order_id": 1 // 节点顺序},{"id": 2,"name": "过程1","type_id": 0,"order_id": 2},{"id": 3,"name": "过程2-1","type_id": 0,"order_id": 3},{"id": 4,"name": "过程2-2","type_id": 0,"order_id": 3},{"id": 5,"name": "过程3","type_id": 0,"order_id": 4},{"id": 6,"name": "过程4","type_id": 0,"order_id": 5},{"id": 7,"name": "过程5","type_id": 0,"order_id": 6},{"id": 8,"name": "过程6","type_id": 0,"order_id": 7},{"id": 9,"name": "结束","type_id": 2,"order_id": 8}]
}
代码
安装插件
1.antvX6
npm install @antv/x6 --save
2.对齐线
npm install @antv/x6-plugin-snapline --save
html代码
<template><div class="info-box"><div class="top-box"id="top-width"><el-button type=""@click="zoomToFit">填满</el-button></div><div class="content-box"><div class="container-box"><div id="container"></div></div></div></div>
</template>
js代码
<script>
import API from '../api' // 接口
import { Graph } from '@antv/x6' // 引入antvX6
import { Snapline } from '@antv/x6-plugin-snapline' // 引入对齐线
Graph.registerNode( // 设置节点基础样式'custom-rect',{inherit: 'rect',width: 200,height: 40,attrs: {body: {strokeWidth: 1,stroke: '#5F95FF',fill: '#EFF4FF'},text: {fontSize: 12,fill: '#262626'}},text: {fontSize: 12,fill: '#262626'}},true
)
export default {data() {return {loading: false,graph: null, // 画布实例对象data: {nodes: [],edges: []}}},mounted() {// 先初始化画布this.initGraph()},beforeDestroy() {// 画布的销毁以及回收this.graph.dispose()this.graph = null},methods: {// 初始化流程图画布initGraph() {const container = document.getElementById('container')this.graph = new Graph({container: container, // 画布容器width: container.offsetWidth, // 画布宽height: container.offsetHeight, // 画布高autoResize: true,background: { // 背景color: '#F2F7FA'},panning: {enabled: true // 支持滚动放大缩小},mousewheel: {enabled: true,modifiers: 'Ctrl', // 按住ctrl按键滚动鼠标滚轮缩放factor: 1.1,maxScale: 10, // 最大放大minScale: 0.05 // 最小缩小},grid: {visible: true, // 渲染网格背景type: 'doubleMesh',args: [{color: '#eee', // 主网格线颜色thickness: 1 // 主网格线宽度},{color: '#ddd', // 次网格线颜色thickness: 1, // 次网格线宽度factor: 4 // 主次网格线间隔}]}})this.graph.use( // 启用对齐线new Snapline({enabled: true}))// 鼠标移入线this.graph.on('edge:mouseenter', ({ e, edge, view }) => {edge.attr({line: {stroke: 'red',strokeWidth: 3}})})// 鼠标移出线this.graph.on('edge:mouseleave', ({ edge }) => {edge.attr({line: {stroke: '#8f8f8f',strokeWidth: 1}})})},// 获取数据init() {this.loading = trueAPI.getData().then(res => {if (res.code === 200) {this.setGraphData(res)} else {this.$message.error(res.msg)}}).finally(() => {this.loading = false})},// 设置画布数据setGraphData(data) {// const X = document.getElementById('top-width').offsetWidth / 2 - 100 // 居中const X = 200this.data = {nodes: [],edges: []}const obj = {}// 转为对象数组 节点有可能顺序相同,顺序相同的配列在同一行data.node_data.map(item => {if (obj[item.order_id]) {obj[item.order_id].push(item)} else {obj[item.order_id] = []obj[item.order_id].push(item)}})// 遍历对象数组  通过遍历数组,将节点数据转为流程图中需要的数据类型Object.keys(obj).forEach((key, objIndex) => {obj[key].map((item, index) => {const node = {id: item.id, // 节点idshape: 'custom-rect', // 这是上边定义的节点类型label: item.name, // 节点名称x: X + 300 * index, // 节点x轴坐标 因为存在顺序相同的节点,需要排在同一行,但是y不一样y: 40 + 100 * objIndex, // 节点y轴坐标 顺序不同的节点,y轴坐标不同attrs: {body: { // 这里是区分普通节点与开始结束节点的, 具体看效果图rx: item.type_id === 0 ? 4 : 10,ry: item.type_id === 0 ? 4 : 10}}}this.data.nodes.push(node)})})// 遍历线的数据 通过遍历数组,将线数据转为流程图中需要的数据类型data.line_data.map((item, index) => {const obj = {id: item.id, // 线idshape: 'edge', // 类型为线source: item.destination_state_id, // 源节点target: item.source_state_id, // 目标节点labels: [ // 线名称样式{attrs: {label: {text: item.name // 线名称}},position: 0.4 // 名称在线的相对位置(0-1)一般为0.5}],router: { // 线的路由name: 'manhattan', // 智能路由 移动节点时,线自动避免与节点接触args: { // 这里根据线的状态来判断线是从源节点的哪里开始,到目标节点的哪里结束// 值为1 线从源节点下方开始,到目标节点上方结束 // 值为2 线从源节点左方开始,到目标节点左方结束 // 值其他 线从源节点右方开始,到目标节点右方结束startDirections: item.attribute_type_id === 1 ? ['bottom'] : item.attribute_type_id === 2 ? ['left'] : ['right'],endDirections: item.attribute_type_id === 1 ? ['top'] : item.attribute_type_id === 2 ? ['left'] : ['right']}},tools: [{name: 'segments',args: {snapRadius: 20,attrs: {fill: '#444'}}}],attrs: { // 线样式line: {stroke: '#8f8f8f',strokeWidth: 1}}}this.data.edges.push(obj)})this.graph.fromJSON(this.data) // 渲染数据 将添加的节点与线画出来},zoomToFit() {this.graph.zoomToFit({padding: 20,preserveAspectRatio: true,maxScale: 1})}}
}
</script>
css代码
<style lang="scss" scoped>
.info-box {position: relative;width: 100%;height: 100%;padding: 1rem;box-sizing: border-box;.top-box {width: 100%;height: 3rem;}.content-box {width: 100%;height: calc(100% - 3rem);.container-box {width: 100%;height: 100%;}}
}
</style>
这篇关于vue +antvX6 根据节点与线,动态设置节点坐标生成流程图的文章就介绍到这儿,希望我们推荐的文章对编程师们有所帮助!


