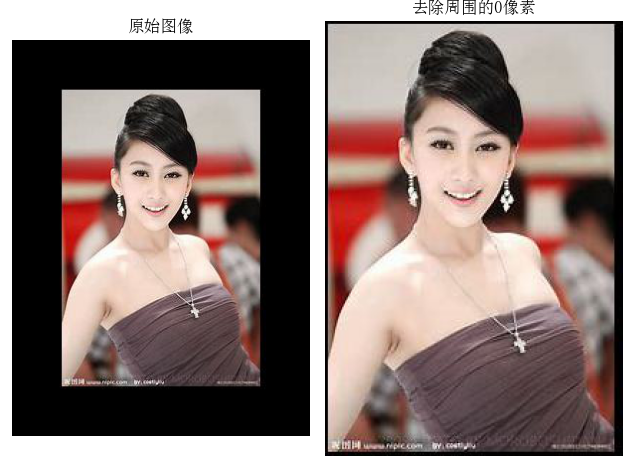
本文主要是介绍去除图像周围的0像素,调整大小,希望对大家解决编程问题提供一定的参考价值,需要的开发者们随着小编来一起学习吧!
在做分割任务时,经常需要处理图像,如果图像周围有一圈0像素,需要去除掉,重新调整大小
数组的处理
如果图像的最外一圈为0,我们将图像最外圈的图像0去除掉。
import numpy as npdef remove_outer_zeros(arr):# 获取数组的行数和列数rows, cols = arr.shape# 检查最外层是否存在0top_row_zero = np.all(arr[0, :] == 0)bottom_row_zero = np.all(arr[-1, :] == 0)left_col_zero = np.all(arr[:, 0] == 0)right_col_zero = np.all(arr[:, -1] == 0)# 如果最外层有0,将其去除if top_row_zero:arr = arr[1:, :]if bottom_row_zero:arr = arr[:-1, :]if left_col_zero:arr = arr[:, 1:]if right_col_zero:arr = arr[:, :-1]return arr# 测试
a = np.array([[0,0,0,0,0,0],[0,1,2,0,3,0],[0,2,0,3,6,0],[0,0,5,6,13,0],[0,5,8,0,0,0],[0,0,0,0,0,0]])
new_arr = remove_outer_zeros(a)
print(a)
print(new_arr)
[[ 0 0 0 0 0 0]
[ 0 1 2 0 3 0]
[ 0 2 0 3 6 0]
[ 0 0 5 6 13 0]
[ 0 5 8 0 0 0]
[ 0 0 0 0 0 0]]
[[ 1 2 0 3]
[ 2 0 3 6]
[ 0 5 6 13]
[ 5 8 0 0]]
灰度图像的处理
如果我们处理的图像为灰度图像
import numpy as np
from PIL import Image
from matplotlib import pyplot as pltdef remove_outer_zeros(image_path):# 打开图像img = Image.open(image_path)pixels = img.load()# 获取图像的尺寸width, height = img.size# 寻找最外层全为0的行和列top, bottom, left, right = 0, height, 0, widthfor i in range(height):if all(pixels[x, i] == 0 for x in range(width)):top = i + 1else:breakfor i in range(height - 1, -1, -1):if all(pixels[x, i] == 0 for x in range(width)):bottom = ielse:breakfor i in range(width):if all(pixels[i, y] == 0 for y in range(height)):left = i + 1else:breakfor i in range(width - 1, -1, -1):if all(pixels[i, y] == 0 for y in range(height)):right = ielse:break# 剪裁图像cropped_img = img.crop((left, top, right, bottom))cropped_img = np.array(cropped_img)return cropped_img# 调用函数
image_path = r"D:\BaiduNetdiskDownload\DRIVE\DRIVE\training\mask\21_training_mask.gif"img = np.array(Image.open(image_path))
cropped_img = remove_outer_zeros(image_path)print(img.shape)
print(cropped_img.size )# 设置中文字体
plt.rcParams['font.sans-serif'] = ['SimSun']# 创建一个包含四个子图的画布
# 创建一个包含四个子图的画布
fig, axes = plt.subplots(1, 2)# 第一张子图:原始图像
axes[0].imshow(img)
axes[0].set_title('原始图像')
axes[0].axis('off')# 第二张子图:插值后的图像
axes[1].imshow(cropped_img)
axes[1].set_title('裁剪后图像')
axes[1].axis('off')
# 调整布局,防止标题重叠
plt.tight_layout()# 展示图像
plt.show()# # 保存新的图像
# new_image.save("new_image.gif")
彩色图像的处理
这是我们的原始图像 大小为(299,200,3)

我们将原始图像扩充50个0像素后的图像
from PIL import Image, ImageOps
import numpy as npdef expand_image(image_path, padding):# 打开图像image = Image.open(image_path)# 获取图像原始尺寸width, height = image.size# 创建一个新的图像,包含原图像和指定大小的填充new_width = width + 2 * paddingnew_height = height + 2 * paddingexpanded_image = Image.new("RGB", (new_width, new_height), color=(0, 0, 0))# 将原图像粘贴到新图像的中间expanded_image.paste(image, (padding, padding))return expanded_image# 图像路径
image_path = r"D:\My Data\Figure\下载.jpg"
# 填充大小
padding = 50# 扩充图像
expanded_image = expand_image(image_path, padding)# 保存扩充后的图像
output_path = r"D:\My Data\Figure\扩充.jpg"
expanded_image.save(output_path)# 提示保存成功
print("扩充后的图像已保存到:", output_path)
扩充后的图像,大小为(399, 300, 3)
,
然后我们处理扩充后的图像,去掉周围的0像素。
import numpy as np
from PIL import Image
from matplotlib import pyplot as pltdef trim_image(image_path):# 打开图像image = Image.open(image_path)# 转换为numpy数组image_array = np.array(image)# 找到非零像素的边界non_zero_indices = np.nonzero(image_array)min_row = np.min(non_zero_indices[0])max_row = np.max(non_zero_indices[0])min_col = np.min(non_zero_indices[1])max_col = np.max(non_zero_indices[1])# 裁剪图像cropped_image_array = image_array[min_row:max_row + 1, min_col:max_col + 1]# 将裁剪后的数组转换为图像#cropped_image = Image.fromarray(cropped_image_array)cropped_image = np.array(cropped_image_array)return cropped_image# 图像路径
image_path = r"D:\My Data\Figure\扩充.jpg"image = np.array(Image.open(image_path))
# 调用函数裁剪图像
cropped_image = trim_image(image_path)print(image.shape)
print(cropped_image.shape)# 显示裁剪后的图像和原图像
# 设置中文字体
plt.rcParams['font.sans-serif'] = ['SimSun']# 创建一个包含四个子图的画布
# 创建一个包含四个子图的画布
fig, axes = plt.subplots(1, 2)# 第一张子图:原始图像
axes[0].imshow(image)
axes[0].set_title('原始图像')
axes[0].axis('off')# 第二张子图:插值后的图像
axes[1].imshow(cropped_image)
axes[1].set_title('去除周围的0像素')
axes[1].axis('off')# 调整布局,防止标题重叠
plt.tight_layout()# 展示图像
plt.show()
去除后的图像大小为(304, 208, 3), 可见我们确实将周围的0像素去除掉了,但是周围还是有黑边,说明去掉的还是不够好。
这篇关于去除图像周围的0像素,调整大小的文章就介绍到这儿,希望我们推荐的文章对编程师们有所帮助!


