本文主要是介绍【mall-learning】01-mall整合SpringBoot+MyBatis搭建基本骨架,希望对大家解决编程问题提供一定的参考价值,需要的开发者们随着小编来一起学习吧!
本文主要讲解mall整合SpringBoot+MyBatis搭建基本骨架,以商品品牌为例实现基本的CRUD操作及通过PageHelper实现分页查询。
mysql数据库环境搭建
- 下载并安装mysql5.7版本,下载地址:https://dev.mysql.com/downloads/installer/
- 设置数据库帐号密码:root root
- 下载并安装客户端连接工具Navicat,下载地址:https://www.formysql.com/xiazai.html
- 创建数据库mall
- 导入mall的数据库脚本
项目使用框架介绍
SpringBoot
SpringBoot可以让你快速构建基于Spring的Web应用程序,内置多种Web容器(如Tomcat),通过启动入口程序的main函数即可运行。
PagerHelper
MyBatis分页插件,简单的几行代码就能实现分页,在与SpringBoot整合时,只要整合了PagerHelper就自动整合了MyBatis。
PageHelper.startPage(pageNum, pageSize);
//之后进行查询操作将自动进行分页
List<PmsBrand> brandList = brandMapper.selectByExample(new PmsBrandExample());
//通过构造PageInfo对象获取分页信息,如当前页码,总页数,总条数
PageInfo<PmsBrand> pageInfo = new PageInfo<PmsBrand>(list);
Druid
alibaba开源的数据库连接池,号称Java语言中最好的数据库连接池。
Mybatis generator
MyBatis的代码生成器,可以根据数据库生成model、mapper.xml、mapper接口和Example,通常情况下的单表查询不用再手写mapper。
项目搭建
使用IDEA初始化一个SpringBoot项目

添加项目依赖
在pom.xml中添加相关依赖。
<parent><groupId>org.springframework.boot</groupId><artifactId>spring-boot-starter-parent</artifactId><version>2.1.3.RELEASE</version><relativePath/> <!-- lookup parent from repository --></parent><dependencies><!--SpringBoot通用依赖模块--><dependency><groupId>org.springframework.boot</groupId><artifactId>spring-boot-starter-web</artifactId></dependency><dependency><groupId>org.springframework.boot</groupId><artifactId>spring-boot-starter-actuator</artifactId></dependency><dependency><groupId>org.springframework.boot</groupId><artifactId>spring-boot-starter-aop</artifactId></dependency><dependency><groupId>org.springframework.boot</groupId><artifactId>spring-boot-starter-test</artifactId><scope>test</scope></dependency><!--MyBatis分页插件--><dependency><groupId>com.github.pagehelper</groupId><artifactId>pagehelper-spring-boot-starter</artifactId><version>1.2.10</version></dependency><!--集成druid连接池--><dependency><groupId>com.alibaba</groupId><artifactId>druid-spring-boot-starter</artifactId><version>1.1.10</version></dependency><!-- MyBatis 生成器 --><dependency><groupId>org.mybatis.generator</groupId><artifactId>mybatis-generator-core</artifactId><version>1.3.3</version></dependency><!--Mysql数据库驱动--><dependency><groupId>mysql</groupId><artifactId>mysql-connector-java</artifactId><version>8.0.15</version></dependency></dependencies>
修改SpringBoot配置文件
在application.yml中添加数据源配置和MyBatis的mapper.xml的路径配置。
server:port: 8080spring:datasource:url: jdbc:mysql://localhost:3306/mall?useUnicode=true&characterEncoding=utf-8&serverTimezone=Asia/Shanghaiusername: rootpassword: rootmybatis:mapper-locations:- classpath:mapper/*.xml- classpath*:com/**/mapper/*.xml
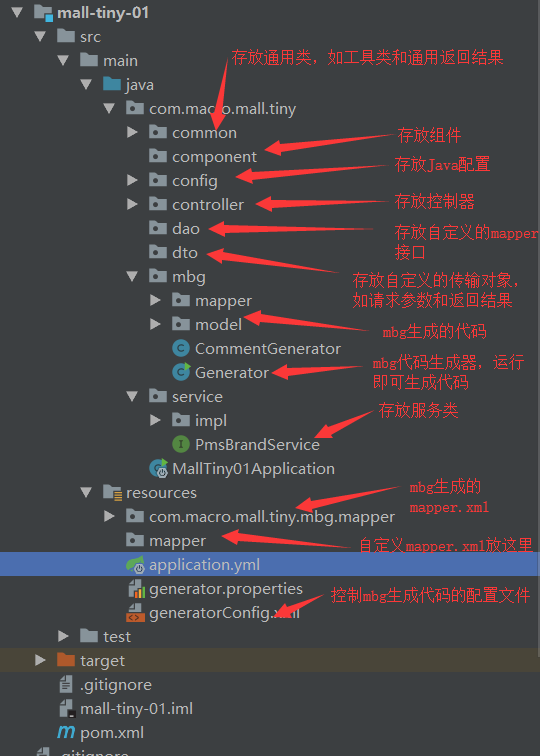
项目结构说明
Mybatis generator 配置文件
配置数据库连接,Mybatis generator生成model、mapper接口及mapper.xml的路径。
<?xml version="1.0" encoding="UTF-8"?>
<!DOCTYPE generatorConfigurationPUBLIC "-//mybatis.org//DTD MyBatis Generator Configuration 1.0//EN""http://mybatis.org/dtd/mybatis-generator-config_1_0.dtd"><generatorConfiguration><properties resource="generator.properties"/><context id="MySqlContext" targetRuntime="MyBatis3" defaultModelType="flat"><property name="beginningDelimiter" value="`"/><property name="endingDelimiter" value="`"/><property name="javaFileEncoding" value="UTF-8"/><!-- 为模型生成序列化方法--><plugin type="org.mybatis.generator.plugins.SerializablePlugin"/><!-- 为生成的Java模型创建一个toString方法 --><plugin type="org.mybatis.generator.plugins.ToStringPlugin"/><!--可以自定义生成model的代码注释--><commentGenerator type="com.macro.mall.tiny.mbg.CommentGenerator"><!-- 是否去除自动生成的注释 true:是 : false:否 --><property name="suppressAllComments" value="true"/><property name="suppressDate" value="true"/><property name="addRemarkComments" value="true"/></commentGenerator><!--配置数据库连接--><jdbcConnection driverClass="${jdbc.driverClass}"connectionURL="${jdbc.connectionURL}"userId="${jdbc.userId}"password="${jdbc.password}"><!--解决mysql驱动升级到8.0后不生成指定数据库代码的问题--><property name="nullCatalogMeansCurrent" value="true" /></jdbcConnection><!--指定生成model的路径--><javaModelGenerator targetPackage="com.macro.mall.tiny.mbg.model" targetProject="mall-tiny-01\src\main\java"/><!--指定生成mapper.xml的路径--><sqlMapGenerator targetPackage="com.macro.mall.tiny.mbg.mapper" targetProject="mall-tiny-01\src\main\resources"/><!--指定生成mapper接口的的路径--><javaClientGenerator type="XMLMAPPER" targetPackage="com.macro.mall.tiny.mbg.mapper"targetProject="mall-tiny-01\src\main\java"/><!--生成全部表tableName设为%--><table tableName="pms_brand"><generatedKey column="id" sqlStatement="MySql" identity="true"/></table></context>
</generatorConfiguration>
运行Generator的main函数生成代码
package com.macro.mall.tiny.mbg;import org.mybatis.generator.api.MyBatisGenerator;
import org.mybatis.generator.config.Configuration;
import org.mybatis.generator.config.xml.ConfigurationParser;
import org.mybatis.generator.internal.DefaultShellCallback;import java.io.InputStream;
import java.util.ArrayList;
import java.util.List;/*** 用于生产MBG的代码* Created by macro on 2018/4/26.*/
public class Generator {public static void main(String[] args) throws Exception {//MBG 执行过程中的警告信息List<String> warnings = new ArrayList<String>();//当生成的代码重复时,覆盖原代码boolean overwrite = true;//读取我们的 MBG 配置文件InputStream is = Generator.class.getResourceAsStream("/generatorConfig.xml");ConfigurationParser cp = new ConfigurationParser(warnings);Configuration config = cp.parseConfiguration(is);is.close();DefaultShellCallback callback = new DefaultShellCallback(overwrite);//创建 MBGMyBatisGenerator myBatisGenerator = new MyBatisGenerator(config, callback, warnings);//执行生成代码myBatisGenerator.generate(null);//输出警告信息for (String warning : warnings) {System.out.println(warning);}}
}
添加MyBatis的Java配置
用于配置需要动态生成的mapper接口的路径
package com.macro.mall.tiny.config;import org.mybatis.spring.annotation.MapperScan;
import org.springframework.context.annotation.Configuration;/*** MyBatis配置类* Created by macro on 2019/4/8.*/
@Configuration
@MapperScan("com.macro.mall.tiny.mbg.mapper")
public class MyBatisConfig {
}
package com.macro.mall.tiny.controller;import com.macro.mall.tiny.common.api.CommonPage;
import com.macro.mall.tiny.common.api.CommonResult;
import com.macro.mall.tiny.mbg.model.PmsBrand;
import com.macro.mall.tiny.service.PmsBrandService;
import org.slf4j.Logger;
import org.slf4j.LoggerFactory;
import org.springframework.beans.factory.annotation.Autowired;
import org.springframework.stereotype.Controller;
import org.springframework.validation.BindingResult;
import org.springframework.web.bind.annotation.*;import java.util.List;/*** 品牌管理Controller* Created by macro on 2019/4/19.*/
@Controller
@RequestMapping("/brand")
public class PmsBrandController {@Autowiredprivate PmsBrandService demoService;private static final Logger LOGGER = LoggerFactory.getLogger(PmsBrandController.class);@RequestMapping(value = "listAll", method = RequestMethod.GET)@ResponseBodypublic CommonResult<List<PmsBrand>> getBrandList() {return CommonResult.success(demoService.listAllBrand());}@RequestMapping(value = "/create", method = RequestMethod.POST)@ResponseBodypublic CommonResult createBrand(@RequestBody PmsBrand pmsBrand) {CommonResult commonResult;int count = demoService.createBrand(pmsBrand);if (count == 1) {commonResult = CommonResult.success(pmsBrand);LOGGER.debug("createBrand success:{}", pmsBrand);} else {commonResult = CommonResult.failed("操作失败");LOGGER.debug("createBrand failed:{}", pmsBrand);}return commonResult;}@RequestMapping(value = "/update/{id}", method = RequestMethod.POST)@ResponseBodypublic CommonResult updateBrand(@PathVariable("id") Long id, @RequestBody PmsBrand pmsBrandDto, BindingResult result) {CommonResult commonResult;int count = demoService.updateBrand(id, pmsBrandDto);if (count == 1) {commonResult = CommonResult.success(pmsBrandDto);LOGGER.debug("updateBrand success:{}", pmsBrandDto);} else {commonResult = CommonResult.failed("操作失败");LOGGER.debug("updateBrand failed:{}", pmsBrandDto);}return commonResult;}@RequestMapping(value = "/delete/{id}", method = RequestMethod.GET)@ResponseBodypublic CommonResult deleteBrand(@PathVariable("id") Long id) {int count = demoService.deleteBrand(id);if (count == 1) {LOGGER.debug("deleteBrand success :id={}", id);return CommonResult.success(null);} else {LOGGER.debug("deleteBrand failed :id={}", id);return CommonResult.failed("操作失败");}}@RequestMapping(value = "/list", method = RequestMethod.GET)@ResponseBodypublic CommonResult<CommonPage<PmsBrand>> listBrand(@RequestParam(value = "pageNum", defaultValue = "1") Integer pageNum,@RequestParam(value = "pageSize", defaultValue = "3") Integer pageSize) {List<PmsBrand> brandList = demoService.listBrand(pageNum, pageSize);return CommonResult.success(CommonPage.restPage(brandList));}@RequestMapping(value = "/{id}", method = RequestMethod.GET)@ResponseBodypublic CommonResult<PmsBrand> brand(@PathVariable("id") Long id) {return CommonResult.success(demoService.getBrand(id));}
}
添加Service接口
package com.macro.mall.tiny.service;import com.macro.mall.tiny.mbg.model.PmsBrand;import java.util.List;/*** PmsBrandService* Created by macro on 2019/4/19.*/
public interface PmsBrandService {List<PmsBrand> listAllBrand();int createBrand(PmsBrand brand);int updateBrand(Long id, PmsBrand brand);int deleteBrand(Long id);List<PmsBrand> listBrand(int pageNum, int pageSize);PmsBrand getBrand(Long id);
}
这篇关于【mall-learning】01-mall整合SpringBoot+MyBatis搭建基本骨架的文章就介绍到这儿,希望我们推荐的文章对编程师们有所帮助!


