本文主要是介绍PaddleDetection算法分析(3),希望对大家解决编程问题提供一定的参考价值,需要的开发者们随着小编来一起学习吧!
2021SC@SDUSC
YOLOv3的目标检测源代码,核心的函数包括:
detect_image()
generate()
yolo_eval()
yolo_model()
yolo_boxes_and_scores()
yolo_head()
yolo_correct_boxes()
等
1.算法代码
yolo.py
class YOLO(object):_defaults = {"model_path": 'model_data/yolo.h5', #已经训练好的模型"anchors_path": 'model_data/yolo_anchors.txt', #通过聚类算法得到的3组9个anchor box,分别用于13x13、26x26、52x52的feature map"classes_path": 'model_data/coco_classes.txt', #可识别的COCO类别列表,一共80个"score" : 0.3, #框置信度阈值阈值,小于阈值则目标框被抛弃"iou" : 0.45, #IOU(Intersection over Union)阈值,大于阈值的重叠框被删除"model_image_size" : (416, 416), #输入图片的“标准尺寸”,不同于这个尺寸的输入会首先调整到标准大小"gpu_num" : 1, #GPU数量,通常是指Nvidia的GPU}def __init__(self, **kwargs):self.__dict__.update(self._defaults) # set up default valuesself.__dict__.update(kwargs) # and update with user overridesself.class_names = self._get_class()self.anchors = self._get_anchors()self.sess = K.get_session()self.boxes, self.scores, self.classes = self.generate() #由generate()函数完成目标检测def generate(self):#读取:model路径、anchor box、coco类别,加载模型yolo.h5model_path = os.path.expanduser(self.model_path)assert model_path.endswith('.h5'), 'Keras model or weights must be a .h5 file.'# Load model, or construct model and load weights.num_anchors = len(self.anchors)num_classes = len(self.class_names)is_tiny_version = num_anchors==6 # default settingtry:self.yolo_model = load_model(model_path, compile=False)except:self.yolo_model = tiny_yolo_body(Input(shape=(None,None,3)), num_anchors//2, num_classes) \if is_tiny_version else yolo_body(Input(shape=(None,None,3)), num_anchors//3, num_classes)self.yolo_model.load_weights(self.model_path) # make sure model, anchors and classes matchelse:assert self.yolo_model.layers[-1].output_shape[-1] == \num_anchors/len(self.yolo_model.output) * (num_classes + 5), \'Mismatch between model and given anchor and class sizes'print('{} model, anchors, and classes loaded.'.format(model_path))# Generate colors for drawing bounding boxes.#对于80种coco目标,确定每一种目标框的绘制颜色,即:将(x/80, 1.0, 1.0)的颜色转换为RGB格式,并随机调整颜色以便于肉眼识别,其中:一个1.0表示饱和度,一个1.0表示亮度hsv_tuples = [(x / len(self.class_names), 1., 1.)for x in range(len(self.class_names))]self.colors = list(map(lambda x: colorsys.hsv_to_rgb(*x), hsv_tuples))self.colors = list(map(lambda x: (int(x[0] * 255), int(x[1] * 255), int(x[2] * 255)),self.colors))np.random.seed(10101) # Fixed seed for consistent colors across runs.np.random.shuffle(self.colors) # Shuffle colors to decorrelate adjacent classes.np.random.seed(None) # Reset seed to default.# Generate output tensor targets for filtered bounding boxes.self.input_image_shape = K.placeholder(shape=(2, ))#若GPU个数大于等于2,调用multi_gpu_model()if self.gpu_num>=2:self.yolo_model = multi_gpu_model(self.yolo_model, gpus=self.gpu_num)boxes, scores, classes = yolo_eval(self.yolo_model.output, self.anchors,len(self.class_names), self.input_image_shape,score_threshold=self.score, iou_threshold=self.iou)return boxes, scores, classesdef detect_image(self, image):#开始计时start = timer()#调用letterbox_image()函数,即:先生成一个用“绝对灰”R128-G128-B128“填充的416x416新图片,然后用按比例缩放(采样方法:BICUBIC)后的输入图片粘贴,粘贴不到的部分保留为灰色if self.model_image_size != (None, None):assert self.model_image_size[0]%32 == 0, 'Multiples of 32 required'assert self.model_image_size[1]%32 == 0, 'Multiples of 32 required'boxed_image = letterbox_image(image, tuple(reversed(self.model_image_size)))else:#model_image_size定义的宽和高必须是32的整倍数;若没有定义model_image_size,将输入图片的尺寸调整到32的整倍数,并调用letterbox_image()函数进行缩放new_image_size = (image.width - (image.width % 32),image.height - (image.height % 32))boxed_image = letterbox_image(image, new_image_size)image_data = np.array(boxed_image, dtype='float32')print(image_data.shape)image_data /= 255. #将缩放后图片的数值除以255,做归一化#将(416,416,3)数组调整为(1,416,416,3)元组,满足YOLOv3输入的张量格式image_data = np.expand_dims(image_data, 0) # Add batch dimension.out_boxes, out_scores, out_classes = self.sess.run([self.boxes, self.scores, self.classes],feed_dict={ #输入参数self.yolo_model.input: image_data, #输入图片self.input_image_shape: [image.size[1], image.size[0]], #图片尺寸416x416K.learning_phase(): 0 #学习模式:0测试/1训练})print('Found {} boxes for {}'.format(len(out_boxes), 'img'))#设置字体font = ImageFont.truetype(font='font/FiraMono-Medium.otf',size=np.floor(3e-2 * image.size[1] + 0.5).astype('int32'))#设置目标框线条的宽度thickness = (image.size[0] + image.size[1]) // 300#对于c个目标类别中的每个目标框i,调用Pillow画图for i, c in reversed(list(enumerate(out_classes))):predicted_class = self.class_names[c] #目标类别的名字box = out_boxes[i] #目标框score = out_scores[i] #目标框的置信度评分label = '{} {:.2f}'.format(predicted_class, score)draw = ImageDraw.Draw(image) #输出:绘制输入的原始图片label_size = draw.textsize(label, font) #返回label的宽和高(多少个pixels).top, left, bottom, right = box#目标框的上、左两个坐标小数点后一位四舍五入top = max(0, np.floor(top + 0.5).astype('int32'))left = max(0, np.floor(left + 0.5).astype('int32'))#目标框的下、右两个坐标小数点后一位四舍五入,与图片的尺寸相比,取最小值bottom = min(image.size[1], np.floor(bottom + 0.5).astype('int32'))right = min(image.size[0], np.floor(right + 0.5).astype('int32'))print(label, (left, top), (right, bottom))#确定标签(label)起始点位置:左、下if top - label_size[1] >= 0:text_origin = np.array([left, top - label_size[1]])else:text_origin = np.array([left, top + 1])# My kingdom for a good redistributable image drawing library.#画目标框,线条宽度为thicknessfor i in range(thickness):draw.rectangle([left + i, top + i, right - i, bottom - i],outline=self.colors[c])#画标签框draw.rectangle([tuple(text_origin), tuple(text_origin + label_size)],fill=self.colors[c])#填写标签内容draw.text(text_origin, label, fill=(0, 0, 0), font=font)del draw#结束计时end = timer()print(end - start)return image
yolo3\model.py
def yolo_head(feats, anchors, num_classes, input_shape, calc_loss=False):#feats,即:feature maps"""Convert final layer features to bounding box parameters."""num_anchors = len(anchors) #num_anchors = 3# Reshape to batch, height, width, num_anchors, box_params.anchors_tensor = K.reshape(K.constant(anchors), [1, 1, 1, num_anchors, 2])grid_shape = K.shape(feats)[1:3] # height, width #13x13或26x26或52x52#通过arange、reshape、tile的组合,根据grid_shape(13x13、26x26或52x52)创建y轴的0~N-1的组合grid_y,再创建x轴的0~N-1的组合grid_x,将两者拼接concatenate,形成NxN的grid(13x13、26x26或52x52)grid_y = K.tile(K.reshape(K.arange(0, stop=grid_shape[0]), [-1, 1, 1, 1]),[1, grid_shape[1], 1, 1])grid_x = K.tile(K.reshape(K.arange(0, stop=grid_shape[1]), [1, -1, 1, 1]),[grid_shape[0], 1, 1, 1])grid = K.concatenate([grid_x, grid_y])grid = K.cast(grid, K.dtype(feats))#从待处理的feature map的最后一维数据中,先将num_anchors这个维度与num_classes+5这个维度的数据分离,再取出4个框值tx、ty(最后一维数据的0:1)、tw和th(最后一维数据的2:3)feats = K.reshape(feats, [-1, grid_shape[0], grid_shape[1], num_anchors, num_classes + 5])# Adjust preditions to each spatial grid point and anchor size.#用sigmoid()函数计算目标框的中心点box_xy,用exp()函数计算目标框的宽和高box_wh#使用特征图尺寸(如:13x13、26x26或52x52)在水平x、垂直y两个维度对box_xy进行归一化,确定目标框的中心点的相对位置#使用标准图片尺寸(416x416)在宽和高两个维度对box_wh(因为,3组9个anchor box是基于416x416尺寸定义的)进行归一化,确定目标框的高和宽的相对位置box_xy = (K.sigmoid(feats[..., :2]) + grid) / K.cast(grid_shape[::-1], K.dtype(feats))box_wh = K.exp(feats[..., 2:4]) * anchors_tensor / K.cast(input_shape[::-1], K.dtype(feats))#用sigmoid()函数计算目标框的置信度box_confidencebox_confidence = K.sigmoid(feats[..., 4:5])#用sigmoid()函数计算目标框的类别置信度box_class_probsbox_class_probs = K.sigmoid(feats[..., 5:])if calc_loss == True:return grid, feats, box_xy, box_whreturn box_xy, box_wh, box_confidence, box_class_probsdef yolo_correct_boxes(box_xy, box_wh, input_shape, image_shape):'''Get corrected boxes'''#将box_xy, box_wh转换为输入图片上的真实坐标,输出boxes是框的左下、右上两个坐标(y_min, x_min, y_max, x_max)#np.array[i:j:s],当s<0时,i缺省时,默认为-1;j缺省时,默认为-len(a)-1;所以array[::-1]相当于array[-1:-len(a)-1:-1],也就是从最后一个元素到第一个元素复制一遍,即倒序box_yx = box_xy[..., ::-1]box_hw = box_wh[..., ::-1]input_shape = K.cast(input_shape, K.dtype(box_yx))image_shape = K.cast(image_shape, K.dtype(box_yx))new_shape = K.round(image_shape * K.min(input_shape/image_shape))offset = (input_shape-new_shape)/2./input_shapescale = input_shape/new_shapebox_yx = (box_yx - offset) * scalebox_hw *= scalebox_mins = box_yx - (box_hw / 2.)box_maxes = box_yx + (box_hw / 2.)boxes = K.concatenate([yolo3\utils.py
def letterbox_image(image, size):'''resize image with unchanged aspect ratio using padding'''#先生成一个用“绝对灰”R128-G128-B128“填充的416x416新图片,然后用按比例缩放(采样方法:BICUBIC)后的输入图片粘贴,粘贴不到的部分保留为灰色iw, ih = image.sizew, h = sizescale = min(w/iw, h/ih)nw = int(iw*scale)nh = int(ih*scale)image = image.resize((nw,nh), Image.BICUBIC)new_image = Image.new('RGB', size, (128,128,128))new_image.paste(image, ((w-nw)//2, (h-nh)//2))return new_image
(二)代码分析
YOLOv3的目标识别的源代码流程大致如下:
(1)设置缺省值并初始化:

(2)detect_image()将图片缩放成416x416大小,调用yolo_model(),生成13x13、26x26与52x52等3个feature map的输出,对这3个feature map进行预测,调用yolo_eval()函数得到目标框、目标框得分和类别,然后使用Pillow对发现的每一类对象的每一个目标框,绘制标签、框和文字: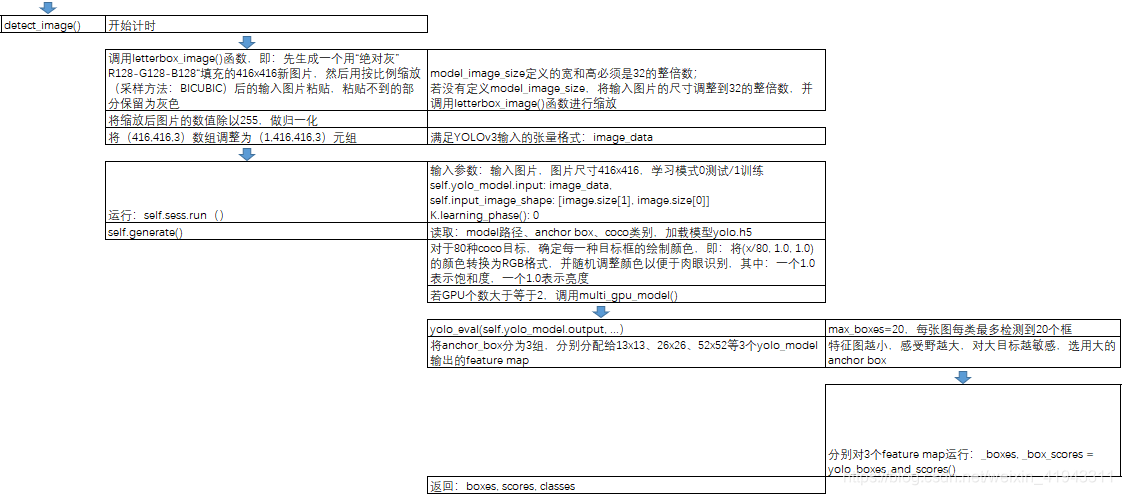
剩余部分下周讲解
这篇关于PaddleDetection算法分析(3)的文章就介绍到这儿,希望我们推荐的文章对编程师们有所帮助!


