本文主要是介绍用Sprintboot(java程序)访问Salesforce RestAPI,希望对大家解决编程问题提供一定的参考价值,需要的开发者们随着小编来一起学习吧!
本文讲一下,如何从0构建一个Springboot的应用程序,并且和Salesforce系统集成,取得Salesforce里面的数据。
一、先在Salesforce上构建一个ConnectApp。
有了这个,SF才允许你和它集成。手顺如下:

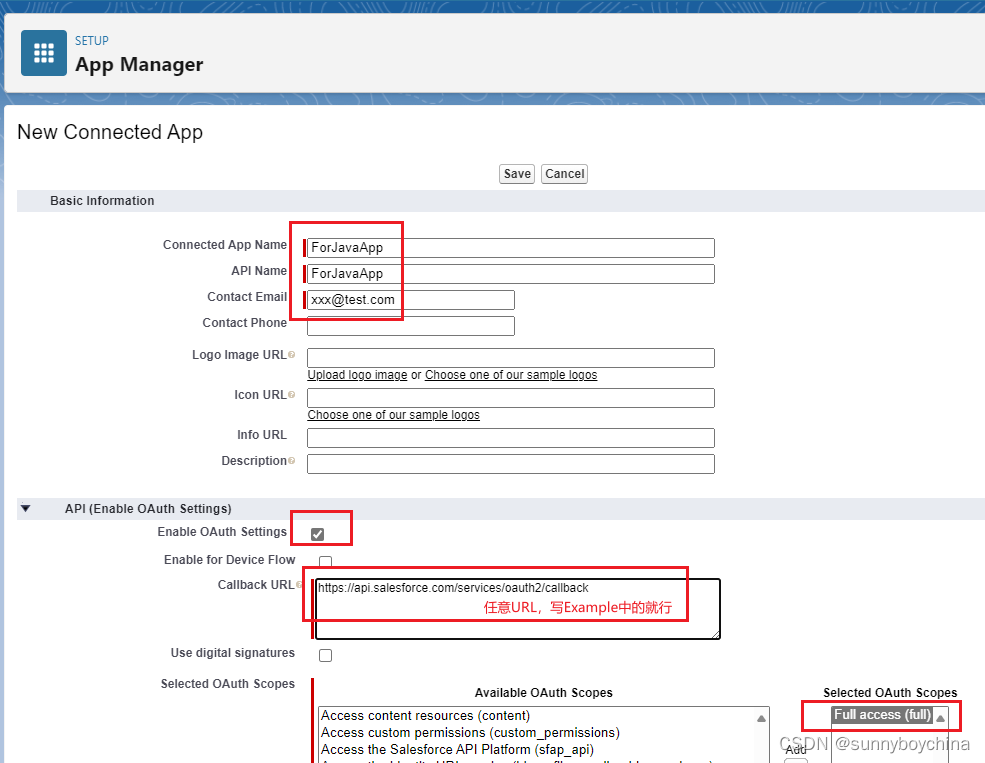
保存后,会提示你10分钟后才能生效,先不用管它。


点击上面的“Manage Consumer Details”按钮,会生成你自己的Consumer Key和Secret,这个拷贝出来,之后Java代码里要用到。

二、构建Springboot工程
关于Java,Eclipse,Maven等的环境构建,就省略了。
先Download一个Springboot的工程:https://start.spring.io/
注意右边的Dependencies,一定要ADD上Spring Web。
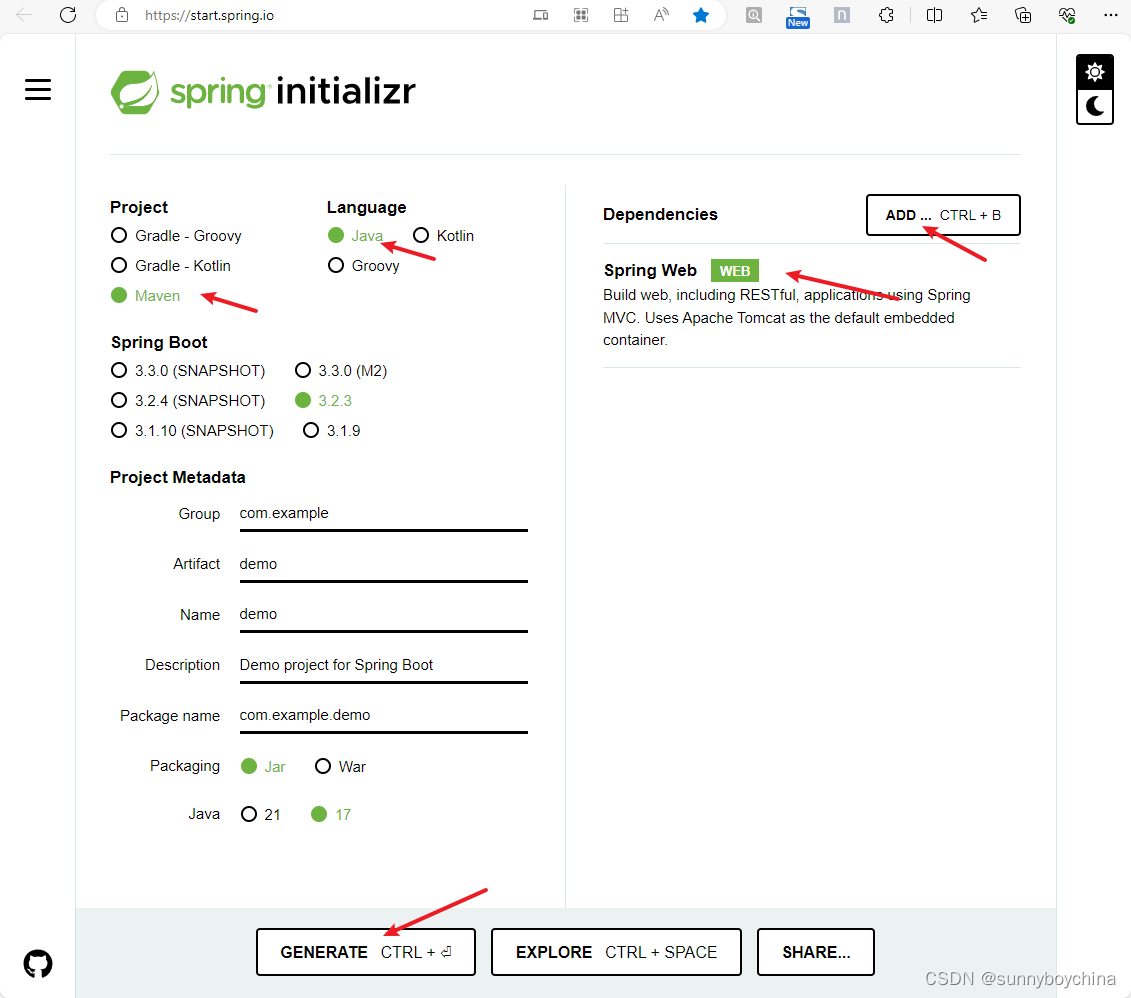
你会得到“Demo.zip”的工程,把它导入到Eclipse里面。
然后根据下面的引导:
https://spring.io/quickstart
确保你的Springboot工程可以正常运行。
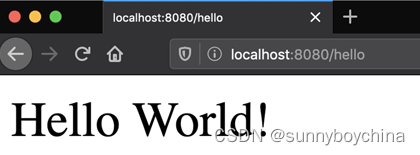
下面直接上代码:
我在com.example.demo目录下,建立了如下的代码文件:
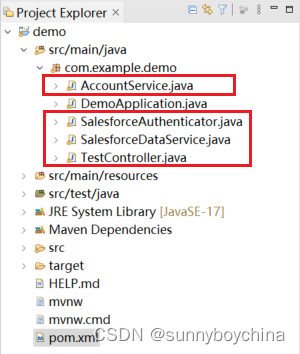
package com.example.demo;import java.util.HashMap;
import java.util.Map;import org.springframework.beans.factory.annotation.Autowired;
import org.springframework.web.bind.annotation.GetMapping;
import org.springframework.web.bind.annotation.RequestParam;
import org.springframework.web.bind.annotation.RestController;@RestController
public class TestController {@Autowiredprivate AccountService accountService;@GetMapping(value = "/accounts")public Map getAccounts() {try {return accountService.getAccountList();} catch (Exception e) {System.out.println(e.getMessage());}return new HashMap<String, String>();}
}
package com.example.demo;import java.util.Map;import org.springframework.beans.factory.annotation.Autowired;
import org.springframework.web.bind.annotation.RestController;@RestController
public class AccountService {@Autowiredprivate SalesforceDataService salesforceDataService;public Map getAccountList() {String query = "SELECT Id, Name FROM Account";return salesforceDataService.getSalesforceData(query);}
}SalesforceDataService这个类你可以理解为Dao,就是去SF里面取数据。
这里面的instanceUrl和accessToken是最下面的类(SalesforceAuthenticator)取得的。
有了这2个,才能去有权访问你的SF系统。
取数据的过程,是利用了SF的标准RESTAPI接口,instanceUrl + "/services/data/v52.0/query/?q=SELECT Id, Name FROM Account"
这里就不详细讲SF的接口内容了。
package com.example.demo;
import java.net.URI;
import java.net.URISyntaxException;
import java.net.URLEncoder;
import java.nio.charset.StandardCharsets;
import java.util.Collections;
import java.util.HashMap;
import java.util.Map;import org.springframework.http.HttpEntity;
import org.springframework.http.HttpHeaders;
import org.springframework.http.HttpMethod;
import org.springframework.http.MediaType;
import org.springframework.http.ResponseEntity;
import org.springframework.stereotype.Service;
import org.springframework.web.client.HttpClientErrorException;
import org.springframework.web.client.RestTemplate;@Service
public class SalesforceDataService {public Map getSalesforceData(String query) {SalesforceAuthenticator salesforceAuthenticator = SalesforceAuthenticator.getSalesforceToken();try {RestTemplate restTemplate = new RestTemplate();String encodedQuery = URLEncoder.encode(query, StandardCharsets.UTF_8.toString());final String baseUrl = salesforceAuthenticator.instanceUrl + "/services/data/v52.0/query/?q="+ encodedQuery;URI uri = new URI(baseUrl);HttpHeaders headers = new HttpHeaders();headers.setContentType(MediaType.APPLICATION_FORM_URLENCODED);headers.add(HttpHeaders.AUTHORIZATION, String.format("Bearer %s", salesforceAuthenticator.accessToken));HttpEntity<?> request = new HttpEntity<Object>(headers);ResponseEntity<Map> response = null;try {response = restTemplate.exchange(uri, HttpMethod.GET, request, Map.class);} catch (HttpClientErrorException e) {System.out.println(e.getMessage());}return response.getBody();} catch (Exception e) {System.out.println(e.getMessage());}return Collections.emptyMap();}
}
SalesforceAuthenticator这个类是为了取得:
- accessToken:访问令牌(即认证的通行证)
- instanceUrl:你真实的SF系统的URL
上面两个是如何取得的,稍微解释一下:
通过向SF发送HttpRequest(POST),
请求的目标URL为:https://login.salesforce.com/services/oauth2/token
通过用户名密码的方式进行,这里要注意的是Password要加上你的Security Token
client_id和client_secret设定为在SF里面取得的那两个很长的字符串。
package com.example.demo;import java.net.URI;
import java.net.URISyntaxException;
import java.util.Map;import org.springframework.http.HttpEntity;
import org.springframework.http.HttpHeaders;
import org.springframework.http.HttpMethod;
import org.springframework.http.MediaType;
import org.springframework.http.ResponseEntity;
import org.springframework.util.LinkedMultiValueMap;
import org.springframework.util.MultiValueMap;
import org.springframework.web.client.HttpClientErrorException;
import org.springframework.web.client.RestTemplate;public class SalesforceAuthenticator {private static SalesforceAuthenticator salesforceAuthenticator = null; public static String accessToken;public static String instanceUrl;// you can replace "https://login.salesforce.com" with your own URLprivate static final String LOGINURL = "https://login.salesforce.com/services/oauth2/token";// Consumer Keyprivate static final String CLIENTID = "<Your-consumer-id>";// Consumer Secretprivate static final String CLIENTSECRET = "<Your-consumer-secret>";// Salesforce Login Usernameprivate static final String USERNAME = "<Your-username>";// Salesforce Login password+Security Tokenprivate static final String PASSWORD = "<Your-password+Security Token>";private SalesforceAuthenticator() {try {final String baseUrl = LOGINURL;URI uri = new URI(baseUrl);HttpHeaders headers = new HttpHeaders();headers.setContentType(MediaType.APPLICATION_FORM_URLENCODED);MultiValueMap<String, String> params= new LinkedMultiValueMap<String, String>();params.add("username", USERNAME);params.add("password", PASSWORD);params.add("client_secret", CLIENTSECRET);params.add("client_id", CLIENTID);params.add("grant_type","password");HttpEntity<MultiValueMap<String, String>> request = new HttpEntity<MultiValueMap<String, String>>(params, headers);RestTemplate restTemplate = new RestTemplate();ResponseEntity<Map> response = restTemplate.postForEntity(uri, request, Map.class);System.out.println("StatusCode = " + response.getStatusCode()); Map<String, String> responseBody = response.getBody();accessToken = responseBody.get("access_token");instanceUrl = responseBody.get("instance_url");System.out.println("accessToken = " + accessToken); System.out.println("instanceUrl = " + instanceUrl); }catch(Exception e) {System.out.println(e.getMessage()); 		}}public static SalesforceAuthenticator getSalesforceToken() { try {if (salesforceAuthenticator == null) { salesforceAuthenticator = new SalesforceAuthenticator();return salesforceAuthenticator;}else {return salesforceAuthenticator;}}catch(Exception e) {e.printStackTrace();System.out.println(e.getMessage());}return null;}
}
其他的文件都不用改什么。
然后启动,

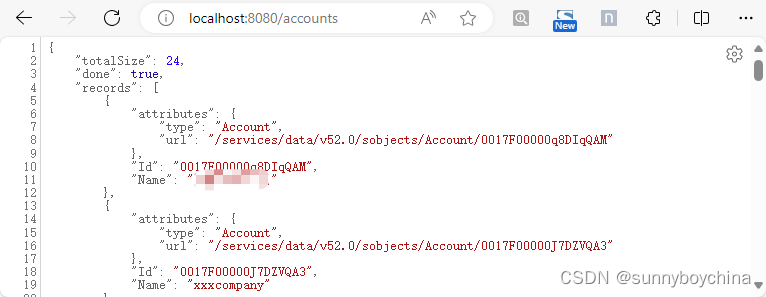
然后浏览器输入:http://localhost:8080/accounts,你的SF中Account一览就出来了。
参考文章:
https://www.coditation.com/blog/salesforce-integration-with-spring-boot-application
https://dzone.com/articles/leveraging-salesforce-without-using-salesforce
Gitlab salesforce-integration-service
这篇关于用Sprintboot(java程序)访问Salesforce RestAPI的文章就介绍到这儿,希望我们推荐的文章对编程师们有所帮助!


