本文主要是介绍06-vuePC端项目(子传父$emit与父传子props,兄弟传值用bus,新增用户小问题解决,修改用户,深浅拷贝,企业列表完成),希望对大家解决编程问题提供一定的参考价值,需要的开发者们随着小编来一起学习吧!
01-父子组件交互:
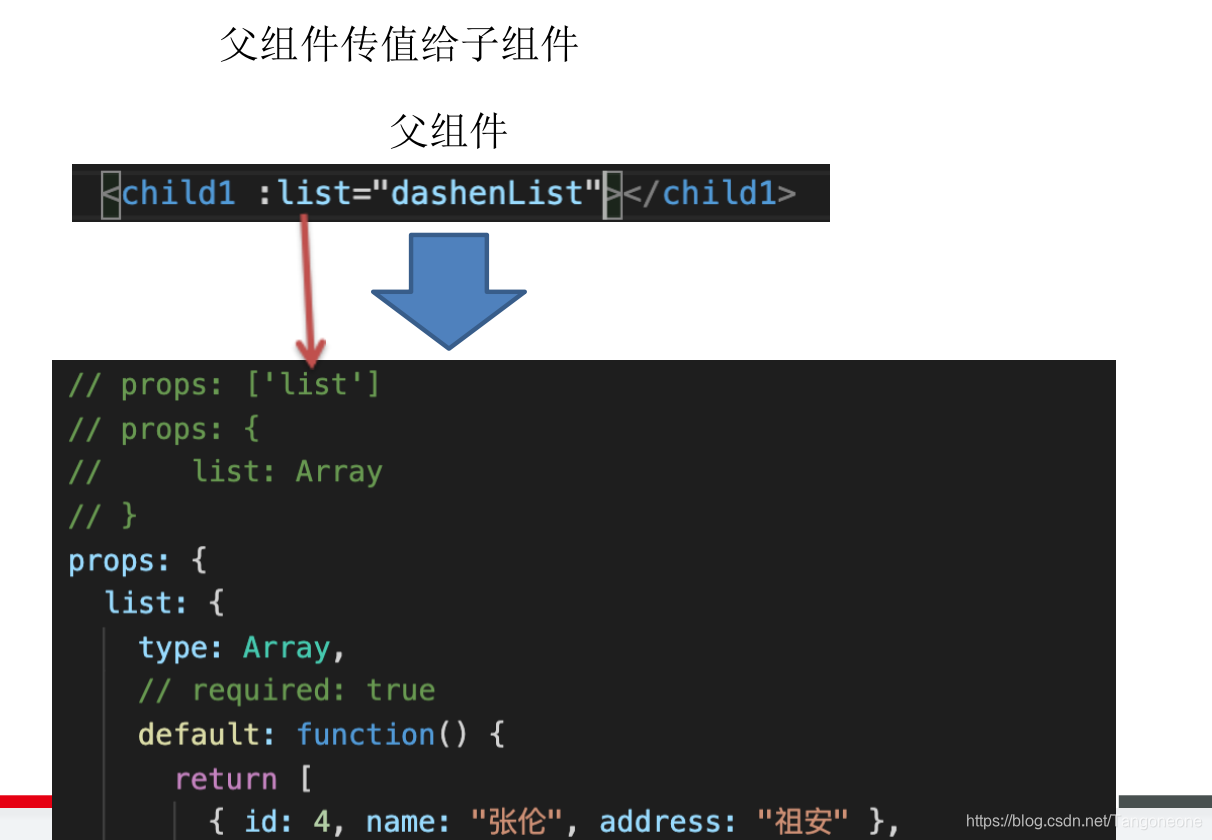
父子组件传值父传子props1、在子组件中,通过 props 来定义接收时候的名字 props: ['list']2、我们在父组件中传递值的时候,要在使用子组件的时候,通过 属性名 = 值 的方式来传递,其中 属性名必须是在子组件中 props 定义好的,值也要注意,如果值是来源于模型中话,必须进行绑定子传父$emit1、在子组件中,通过触发自定义事件 this.$emit('自定义事件名称',值),进行传值,第一个参数必须写,第二个参数是可选的2、父组件中只需要监听我们触发的自定义事件,并且写好处理函数即可
父子组件各自操作对方的属性或是方法$ref父组件中,给子组件设置一个ref属性,这样的话,我们就可以拿到子组件的实例,那我们就可以更改子组件中的值$parent子组件中,要想拿到父组件里面的某个方法或者data里面的数据,可以直接this.$parent.属性或方法
实例代码:
这里就只说一下props与$emit
父传子用props方法:

子传父用 $emit方法:(在子组件弄了一个按钮@click=“sendValueToParent”,就会执行这个sendValueToParent方法,然后传递一个自定义事件过去给父组件,那么父组件就要监听这个事件触发这个事件执行getFoodValue的方法,这个方法里面的obj就是传递过来的数据)
第二个参数也可以不写

02-兄弟组件传值:
1、整一个公共的Vue实例,取名叫 bus
2、传值的那一方导入公共的bus【公共的bus】,使用公共的vue实例bus,触发自定义事件bus.$emit('自定义事件',参数),
3、接收值的那一方,需要使用公共的bus,监听自定义事件,并且写好处理函数,获取导致bus.$on('自定义事件',处理函数)注意哦!vue中处理函数式箭头函数,因为里面可能需要使用this
实例代码:
两个兄弟组件是没有练习的,整个bus让他们有联系后面用也是bus.$emit 跟 bus. $on
03- 新增用户小问题解决
小问题不好的用户体验,关闭之后,重新打开,之前的值还在,并且之前的错误校验也放在这里1、在每次新增打开之前 ,拿到子组件的实例,然后把userForm中的所有模型值,设置为空串2、验证也要设置为没有
nextTick当我们需要等到某个dom节点渲染完毕之后,拿到它,或者做什么事情,那么我们就是用nextTicker作用保证dom节点,渲染完毕之后,再执行回调
实例代码:
user文件夹下的index.vue组件中
add() {// 点击新增的时候子组件user-add-or-update.vue组件展示this.$refs.userEditRef.dialogVisible = true;// 并且修改他的子组件的modal值为add,表示是新增点的不是编辑点的//法1.用refs方法传值子组件this.$refs.userEditRef.modal='add'//法2:用props的方法传值子组件// this.modal = "add";// 解决点击新增时在表单上输入一些内容按x或者取消后,再点击新增时,form表单内容还存在上一次输入的内容//方法1:点击新增之前先把这个form内容全部清空this.$refs.userEditRef.addForm = {username: "", // 用户名email: "", // 邮箱phone: "", // 手机号role_id: "", // 角色 1:超级管理员 2:管理员 3:老师 4:学生status: "", // 状态 1:启用 0:禁用remark: "" // 备注};// 方法1:再把校验清空,跟上面是一起的this.$nextTick(()=>{this.$refs.userEditRef.$refs.addFormRef.clearValidate()})//方法2:调用form表单的resetFields()方法不管内容还是校验全部清空// 这个方法不是很好用还是有bug,当第一次点击编辑叉掉再点击新增时还是有内容,所以不用这个啦!// this.$nextTick(() => {// this.$refs.userEditRef.$refs.addFormRef.resetFields();// });},// 方法3:// 把这里的方法1中的this.$nextTick与修改用户的this.$nextTick里的这两段代码写在user-add-or-update组件中去// 写在watch里面,监听dialogVisible的变化user文件夹下的user-add-or-update.vue组件中(与上面的方法3呼应)
watch: {dialogVisible(newValue){if (newValue) {this.$nextTick(()=>{this.$refs.addFormRef.clearValidate(); //清空校验})}}// 用这种有一点点bug,当下拉框选择一个的时候再×掉再点开,校验就有了,因为值改变了// dialogVisible(newValue){// if (!newValue) {// //当dialog对话框不可见的时候把校验都清空,此时dom都已经渲染过了不需要用$nextTick// this.$refs.addFormRef.clearValidate()// }// }},
04-修改用户:
先展示要修改的数据
再进行修改
// 修改用户editUser(row) {this.modal = "edit";//console.log(row);//这里的row就是点击编辑的那行的数据(是个对象)this.$refs.userEditRef.dialogVisible = true;//this.$refs.userEditRef.addForm = row 这种是浅拷贝,一改就把那行本来的数据也改了,所以不行//this.$refs.userEditRef.addForm = {...row }//深拷贝第一种,但是这种只能拷贝一层this.$refs.userEditRef.addForm = JSON.parse(JSON.stringify(row)); //深拷贝第二种,无论对象的层次有多深都能进行拷贝this.$nextTick(() => {//要想使用 clearValidate 和 resetFields 需要给el-form-item 设置propthis.$refs.userEditRef.$refs.addFormRef.clearValidate()});}
再发送请求修改就行啦
下面是在user-add-or-update.vue组件里面的,就是那个不管点新增还是编辑弹出的那个框就是这个组件展示的页面

05-深浅拷贝:
浅拷贝直接把对象赋值给另外一个对象,他们的引用还是指向同一块内存空间
深拷贝把copy的对象拷贝过来之后,再单独开辟一块内容空间,拷贝形成之后的对象,跟之前的对象不指向同一块内存空间JSON.parse(JSON.stringify(被拷贝的对象))无论对象的层次有多深都能进行拷贝... 只能拷贝一层
为了解决图中这个问题就涉及到了深浅拷贝的问题,所以参考04-修改用户里面的实例代码,就写了有两种办法:
this.$refs.userEditRef.addForm = row //这种是浅拷贝,一改就把那行本来的数据也改了,所以不行
this.$refs.userEditRef.addForm = {...row }//深拷贝第一种,但是这种只能拷贝一层
this.$refs.userEditRef.addForm = JSON.parse(JSON.stringify(row)); //深拷贝第二种,无论对象的层次有多深都能进行拷贝

06-企业列表:
更用户列表一样没啥好说的看代码就完事了
enterprise文件夹下的index.vue组件:
<template><div><el-card><!-- 搜索部分 --><el-form inline :model="searchForm" ref="searchFormRef" label-width="80px"><el-form-item label="企业编号" prop="eid"><el-input v-model="searchForm.eid"></el-input></el-form-item><el-form-item label="企业名称" prop="name"><el-input v-model="searchForm.name"></el-input></el-form-item><el-form-item label="创建者" prop="username"><el-input v-model="searchForm.username"></el-input></el-form-item><el-form-item label="状态" prop="status"><el-select v-model="searchForm.status" placeholder="请选择状态"><el-option label="启用" :value="1"></el-option><el-option label="禁用" :value="0"></el-option></el-select></el-form-item><el-form-item><el-button type="primary" @click="search">搜索</el-button><el-button @click="clear">清除</el-button><el-button type="primary" @click="add">+新增企业</el-button></el-form-item></el-form></el-card><el-card style="margin-top:15px;"><!-- 表格部分 --><el-table :data="enterpriseList" style="width: 100%" border stripe><el-table-column type="index" label="序号"></el-table-column><el-table-column prop="eid" label="企业编号"></el-table-column><el-table-column prop="name" label="企业名称"></el-table-column><el-table-column prop="username" label="创建者"></el-table-column><el-table-column prop="create_time" label="创建日期"></el-table-column><el-table-column label="状态"><template slot-scope="scope"><span:style="{color: scope.row.status===1?'#85ce61':'red'}">{{scope.row.status===1?'启用':'禁用'}}</span></template></el-table-column><el-table-column label="操作" width="280"><template slot-scope="scope"><el-button type="primary" @click="editEnterprise(scope.row)">编辑</el-button><el-button@click="changeStatus(scope.row.id)":type="scope.row.status===1?'info':'success'">{{scope.row.status===1?"禁用":"启用"}}</el-button><el-button @click="deleteEnterprise(scope.row.name,scope.row.id)">删除</el-button></template></el-table-column></el-table><!-- 分页 --><div style="margin-top:15px;text-align:center"><el-pagination@size-change="handleSizeChange"@current-change="handleCurrentChange":current-page="page":page-sizes="[2, 4, 6, 8]":page-size="limit"layout="total, sizes, prev, pager, next, jumper":total="total"></el-pagination></div></el-card><enterprise-edit ref="enterpriseEditRef"></enterprise-edit></div>
</template><script>
// 导入子组件
import EnterpriseEdit from "./enterprise=add=or-update";
export default {name: "EnterPrise",//局部注册components: {EnterpriseEdit},data() {return {//模型searchForm: {eid: "", //企业idname: "", //企业名称username: "", //用户名status: "" //状态},page: 1, // 页码limit: 2, // 页容量enterpriseList: [], // table展示所需要的数据total: 0 // 总条数};},methods: {async getEnterPriseData() {const res = await this.$axios.get("/enterprise/list", {params: {...this.searchForm,page: this.page,limit: this.limit}});//console.log(res);if (res.data.code == 200) {this.enterpriseList = res.data.data.items;this.total = res.data.data.pagination.total;}},// 点击搜索按鈕search() {this.page = 1;this.getEnterPriseData();},//清除clear() {this.$refs.searchFormRef.resetFields();this.search();},// 页容量改变handleSizeChange(val) {this.limit = val;this.search();},// 当前页变化handleCurrentChange(val) {this.page = val;this.getEnterPriseData();},//改变状态async changeStatus(id) {const res = await this.$axios.post("/enterprise/status", { id });if (res.data.code == 200) {//提示this.$message({message: "更改成功",type: "success"});//刷新this.getEnterPriseData();}},//删除deleteEnterprise(eid, id) {this.$confirm(`确定删除${name}这个企业吗`, "提示", {confirmButtonText: "确定",cancelButtonText: "取消",type: "warning"}).then(async () => {const res = await this.$axios.post("/enterprise/remove", { id });if (res.data.code == 200) {this.$message({type: "success",message: "删除成功!"});}// 重新搜索this.search();}).catch(() => {});},// 点击新增企业按钮add() {this.$refs.enterpriseEditRef.modal = "add"; //告诉子组件是新增点过来的不是编辑this.$refs.enterpriseEditRef.dialogVisible = true; //子组件可见//清空内容this.$refs.enterpriseEditRef.addForm = {eid: "", //企业编号name: "", //企业名称short_name: "", //简称intro: "", //企业简介remark: "" //备注};// this.$nextTick(() => {//   this.$refs.enterpriseEditRef.$refs.addFormRef.clearValidate(); //清空校验// });},// 点击编辑企业按钮editEnterprise(row) {//console.log(row);this.$refs.enterpriseEditRef.modal = "edit";this.$refs.enterpriseEditRef.dialogVisible = true;const { id, eid, name, short_name, intro, remark } = row; //把row里面的部分属性的值赋值给左边那些属性this.$refs.enterpriseEditRef.addForm = {id,eid,name,short_name,intro,remark};// this.$nextTick(() => {//  this.$refs.enterpriseEditRef.$refs.addFormRef.clearValidate(); //清空校验// });}},created() {this.getEnterPriseData();}
};
</script><style>
</style>
enterprise文件夹下的enterprise-add-or-update.vue组件(展示新增跟编辑企业的组件):
<template><div class="enterprise"><el-dialog center :visible.sync="dialogVisible" width="600px"><div class="title" slot="title">{{modal==='add'?'新增企业':'编辑企业'}}</div><el-form :model="addForm" :rules="rules" ref="addFormRef" label-width="80px"><el-form-item label="企业编号" prop="eid"><el-input v-model="addForm.eid"></el-input></el-form-item><el-form-item label="企业名称" prop="name"><el-input v-model="addForm.name"></el-input></el-form-item><el-form-item label="企业简称" prop="short_name"><el-input v-model="addForm.short_name"></el-input></el-form-item><el-form-item label="企业简介" prop="intro"><el-input v-model="addForm.intro"></el-input></el-form-item><el-form-item label="企业备注" prop="remark"><el-input v-model="addForm.remark"></el-input></el-form-item></el-form><span slot="footer"><el-button @click="dialogVisible = false">取 消</el-button><el-button type="primary" @click="submit">确 定</el-button></span></el-dialog></div>
</template><script>
export default {name: "EnterpriseEdit",data() {return {dialogVisible: false,modal: "", // 新增(add) & 修改(edit)//提交给后台的数据addForm: {eid: "", //企业编号name: "", //企业名称short_name: "", //简称intro: "", //企业简介remark: "" //备注},rules: {eid: [{ required: true, message: "请输入企业编号", trigger: "blur" }],name: [{ required: true, message: "请输入企业名称", trigger: "blur" }],short_name: [{ required: true, message: "请输入企业简称", trigger: "blur" }],intro: [{ required: true, message: "请输入企业简介", trigger: "blur" }],remark: [{ required: true, message: "请输入备注", trigger: "blur" }]}};},methods: {//   点击确定按钮submit() {//做最后一次校验this.$refs.addFormRef.validate(async valid => {if (!valid) return; //校验不成功// 校验成功发送请求let res = "";if (this.modal == "add") {res = await this.$axios.post("/enterprise/add", this.addForm);} else {res = await this.$axios.post("/enterprise/edit", this.addForm);}if (res.data.code == 200) {//提示this.$message({type: "success",message: this.modal === "add" ? "新增成功" : "编辑成功"});// 关掉当前对话框this.dialogVisible = false;//刷新列表// 方式1,通过 $emit// this.$emit('search')// 方式2,通过 $parentthis.$parent.search();} else {this.$message.error(res.data.message);}});}},// 监听器们watch: {//当dialogVisible为true出现的时候清空校验// dialogVisible(newValue){//   if (newValue) {//     this.$nextTick(()=>{//        this.$refs.addFormRef.clearValidate(); //清空校验//     })//   }// }//当dialogVisible为false出现的时候清空校验// 这里不用写$nextTick因为这个时候dom已经渲染出来了dialogVisible(newValue) {if (!newValue) {this.$refs.addFormRef.clearValidate(); //清空校验}}}
};
</script>
效果演示:


企业列表代码说明:
更改状态 & 删除
- 获取到那一行的值: 通过作用域插槽获取
- 做删除的时候,别忘记弹出一个确认框,可以让用户选择
- 调用相应的接口,更改状态, 删除
- 操作完成之后,给用户一个提示和重新加载第一页
新增企业
- 正确的弹出会话框
1、创建一个子组件,里面写好 el-dialog
2、让新增&修改组件和列表组件形成父子关系
components:局部注册
3、点击列表组件中的新增,拿到子组件的实例,然后通过控制子组件的dialogVisible来控制子组件中弹框的显示和隐藏 - 完善新增&修改对话框中的内容
- 获取用户输入的值 :model v-model
- 验证规则 :rules prop
修改企业
- 展示你要修改的数据
- 完成修改操作
新增 & 修改的小bug修复(与用户列表一样的)
- 新增关闭之后,之前的值还存在
- 验证规则没有清空
- 点击新增按钮时的部分代码,这里的this.$ nextTick与修改用户的this.$nextTick里的这两段代码写在user-add-or-update组件中去可以写在watch里面,监听dialogVisible的变化
this.$refs.enterpriseEditRef.addForm = {eid: "", // 企业编号name: "", // 企业名称short_name: "", // 简称intro: "", // 企业简介remark: "", // 备注}this.$nextTick(() => {// this.$refs.enterpriseEditRef.$refs.enterpriseFormRef.resetFields();//这个方法不太好使用this.$refs.enterpriseEditRef.$refs.enterpriseFormRef.clearValidate()})
这篇关于06-vuePC端项目(子传父$emit与父传子props,兄弟传值用bus,新增用户小问题解决,修改用户,深浅拷贝,企业列表完成)的文章就介绍到这儿,希望我们推荐的文章对编程师们有所帮助!


