本文主要是介绍OpenGL-贴纸方案,希望对大家解决编程问题提供一定的参考价值,需要的开发者们随着小编来一起学习吧!
OpenGL-贴纸方案
普通贴纸(缩放、Z轴旋转、平移)
OpenGL环境说明
OpenGL渲染区域使用正交投影换算,正常OpenGL坐标是vertexData,这样的 Matrix.orthoM
进行换算
    //顶点坐标(原点为显示区域中心店)private final float[] vertexData  = {-1.0f, -1.0f,  //左下角1.0f, -1.0f,   //右下角-1.0f,  1.0f,  //左上角1.0f,  1.0f,   //右上角};
m_width=720;
m_height=1280Matrix.orthoM(matrix, 0, 0, m_width, m_height,0 , -1, 1);//坐标原点对应屏幕左上角private final float[] m_position = {0f, 0f,//左上角坐标720f,0f,///右上角坐标0f, 1280f, //左下角坐标720f, 1280f,//右下角坐标};
以上面的基础的渲染区域设置FBO的绘制区,进行贴纸绘制,对应的缩放、旋转、平移时候对矩阵的处理和顶点点位处理的方法说明m_position对应的是贴纸的坐标,m_materialRect对应的xy轴的坐标和宽高。
float[] m_materialRect={0f,0f,500f,500f};//x,y,w,h//坐标原点对应屏幕左上角private final float[] m_position = {0f, 0f,//左上角坐标500f, 0f,//右上角坐标0f, 500f, //左下角坐标500f, 500f,//右下角坐标};void processCommonRect() {if (m_locateType == Locate_Common_Rect && m_position) {float x = m_materialRect.origin.x * m_width;float y = m_materialRect.origin.y * m_height;Rect rect(x, y, m_materialRect.size.width, m_materialRect.size.height);m_matrix->identity();if (m_scale != 1.0f || (m_angle != 0.f && m_angle != 360.f)) {m_matrix->scale(m_scale);m_matrix->rotateZ(m_angle);// 纹理在屏幕上旋转,x 和 y 需要计算屏幕的比例,防止拉伸float screenRadio = m_height / m_width;float screenRadioFlip = 1.0f / screenRadio;float *m = (float *)m_matrix->get();m[0] *= screenRadio;m[4] *= screenRadio;m_matrix->scale(screenRadioFlip, 1, 1);if (m_offsetRect.size.width > 0 && m_offsetRect.size.height > 0) {float offsetX = m_offsetRect.origin.x - (0.5f - m_offsetRect.size.width / m_width * 0.5f);float offsetY = m_offsetRect.origin.y - (0.5f - m_offsetRect.size.height / m_height * 0.5f);rect.origin.x -= offsetX * m_width;rect.origin.y -= offsetY * m_height;m[12] = offsetX * 2.0f;m[13] = offsetY * 2.0f;} else {float centerX = (m_width - rect.size.width) * 0.5f;float centerY = (m_height - rect.size.height) * 0.5f;m[12] = (rect.origin.x - centerX) / m_width * 2.0f;m[13] = (rect.origin.y - centerY) / m_height * 2.0f;rect.origin.x = centerX;rect.origin.y = centerY;}}if(m_isCut){if(m_originalRect.size.width != 0 && m_originalRect.size.height != 0){m_texcoord[0].set(0, 0);if(1.0f*m_materialRect.size.width/m_originalRect.size.width < 1.0){m_texcoord[1].set(1.0f*m_materialRect.size.width/m_originalRect.size.width, 0);}else{m_texcoord[1].set(1.0,0);}m_texcoord[2].set(0, 1);if(1.0f*m_materialRect.size.width/m_originalRect.size.width < 1.0){m_texcoord[3].set(1.0f*m_materialRect.size.width/m_originalRect.size.width, 1);}else{m_texcoord[3].set(1.0, 1);}}else{m_texcoord[0].set(0, 0);m_texcoord[1].set(1, 0);m_texcoord[2].set(0, 1);m_texcoord[3].set(1, 1);}}m_position[0].set(rect.origin.x, rect.origin.y);m_position[1].set(rect.right(), rect.origin.y);m_position[2].set(rect.origin.x, rect.bottom());m_position[3].set(rect.right(), rect.bottom());}
}
代码解说:
float x = m_materialRect.origin.x * m_width;float y = m_materialRect.origin.y * m_height;Rect rect(x, y, m_materialRect.size.width, m_materialRect.size.height);
m_materialRect.origin.x和m_materialRect.origin.y分别是占m_width和m_height的比例,相乘就获取真实的x,y坐标值,然后保存到Rect。
m_matrix->identity();是矩阵的初始化, m_matrix->scale(m_scale);进行缩放, m_matrix->rotateZ(m_angle); 进行旋转.
// 纹理在屏幕上旋转,x 和 y 需要计算屏幕的比例,防止拉伸float screenRadio = m_height / m_width;float screenRadioFlip = 1.0f / screenRadio;float *m = (float *)m_matrix->get();m[0] *= screenRadio;m[4] *= screenRadio;m_matrix->scale(screenRadioFlip, 1, 1);
上面的代码是对进行缩放后的再按屏幕(720,1280)比例进行再次矫正,防止拉伸,实际上的操作 m[0] *= screenRadio*screenRadioFlip; m[4] *= screenRadio*screenRadioFlip; 如果不理解可以查看缩放矩阵和Z轴旋转矩阵相乘
float centerX = (m_width - rect.size.width) * 0.5f;float centerY = (m_height - rect.size.height) * 0.5f;m[12] = (rect.origin.x - centerX) / m_width * 2.0f;m[13] = (rect.origin.y - centerY) / m_height * 2.0f;rect.origin.x = centerX;rect.origin.y = centerY;
-
float centerX = (m_width - rect.size.width) * 0.5f;:计算屏幕宽度减去矩形宽度后的一半,以此确定矩形在 x 轴上居中的位置。 -
float centerY = (m_height - rect.size.height) * 0.5f;:计算屏幕高度减去矩形高度后的一半,以此确定矩形在 y 轴上居中的位置。 -
m[12] = (rect.origin.x - centerX) / m_width * 2.0f;:这行代码的目的是根据矩形左上角的 x 坐标相对于屏幕中心点的偏移量来计算 x 轴的位移量。以下是具体步骤:(rect.origin.x - centerX):计算矩形左上角 x 坐标和屏幕中心 x 坐标之间的偏移量。/ m_width:将得到的偏移量除以屏幕宽度,将其转换为比例,结果范围在 [-0.5, 0.5] 之间。* 2.0f:最后乘以 2.0,将比例倍增,确保偏移量适合矩阵的变换范围。而归一化后的[-0.5, 0.5]范围不太适合用于这些变换。通过乘以2,可以使得矩阵的位移调整更加明显和精确[-0.1, 0.1]
-
这样计算出的结果将会被存储在矩阵
m_matrix的第 12 个元素中,通常表示 x 轴的位移信息。
总的来说,这段代码用于根据矩形左上角与屏幕中心的偏移量,计算并设置矩阵的 x 方向位移,以便将矩形移动到屏幕的中心位置,从而实现在屏幕中心进行正确显示和定位。
Matrix4说明:
Matrix4& Matrix4::identity()
{m[0] = m[5] = m[10] = m[15] = 1.0f;m[1] = m[2] = m[3] = m[4] = m[6] = m[7] = m[8] = m[9] = m[11] = m[12] = m[13] = m[14] = 0.0f;return *this;
}Matrix4& Matrix4::rotateZ(float angle)
{angle *= DEG2RAD;float c = cosf(angle);float s = sinf(angle);float m0 = m[0], m1 = m[1], m2 = m[2],  m3 = m[3],m4 = m[4], m5 = m[5], m6 = m[6],  m7 = m[7];m[0] = m0 * c + m4 *-s;m[1] = m1 * c + m5 *-s;m[2] = m2 * c + m6 *-s;m[3] = m3 * c + m7 *-s;m[4] = m0 * s + m4 * c;m[5] = m1 * s + m5 * c;m[6] = m2 * s + m6 * c;m[7] = m3 * s + m7 * c;return *this;
}Matrix4& Matrix4::scale(float s)
{return scale(s, s, s);
}Matrix4& Matrix4::scale(float x, float y, float z)
{m[0] = m[0]*x;   m[1] = m[1]*x;   m[2] = m[2]*x;   m[3] = m[3]*x;m[4] = m[4]*y;   m[5] = m[5]*y;   m[6] = m[6]*y;   m[7] = m[7]*y;m[8] = m[8]*z;   m[9] = m[9]*z;   m[10]= m[10]*z;  m[11]= m[11]*z;return *this;
}
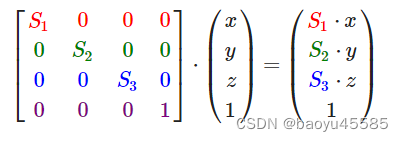
缩放转的矩阵等于:

沿Z轴旋转的矩阵等于:

计算重心坐标原理
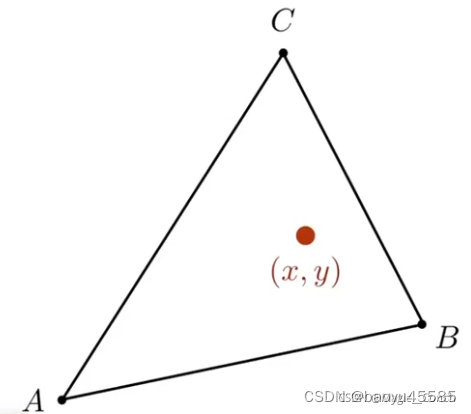
已知三角形3顶点坐标A(x1,y1),B(x2,y2),C(x3,y3),求三角形ABC的面积的公式
写成一般形式如下:
设A(x1,y1),B(x2,y2),C(x3,y3)在坐标系中中顺序为三点按逆时针排列,对应的权重 ( weight1, weight2, weight3 )
weight1 + weight2 + weight3 = 1S=1/2[(x1y2-x2y1)+(x2y3-x3y2)+(x3y1-x1y3)]//分别计算三个点对总面积的贡献 这一步表示每个点在总面积中所占的比例。
S1 = S * weight1;
S2 = S * weight2;
S3 = S * weight3;
//计算加权平均的重心坐标 (xw, yw)xw = (S1 * x1 + S2 * x2 + S3 * x3) / S;yw = (S1 * y1 + S2 * y2 + S3 * y3) / S;

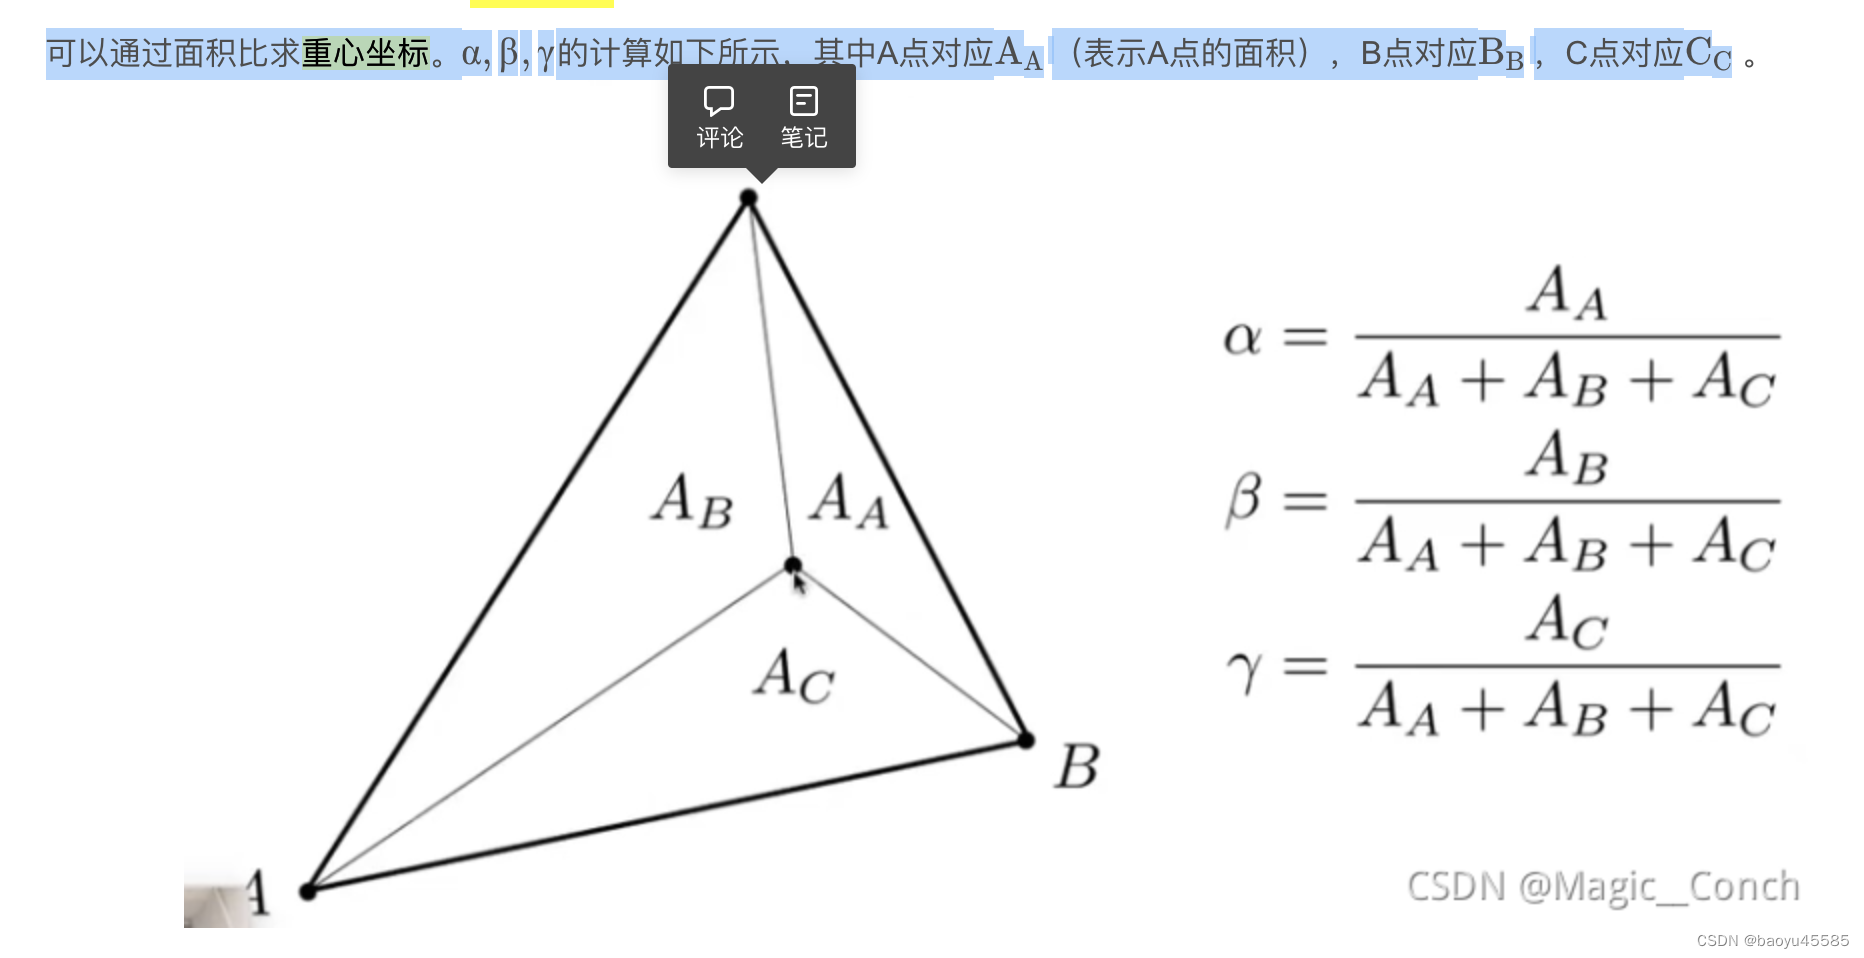
在重心坐标系中,三角形平面的任何一个点(x,y)都可以表示成三角形三个顶点的线性组合(系数分别是α β γ \alpha \beta \gammaαβγ,且满足这三个系数相加和为1)

获得三角形任意一点的重心坐标

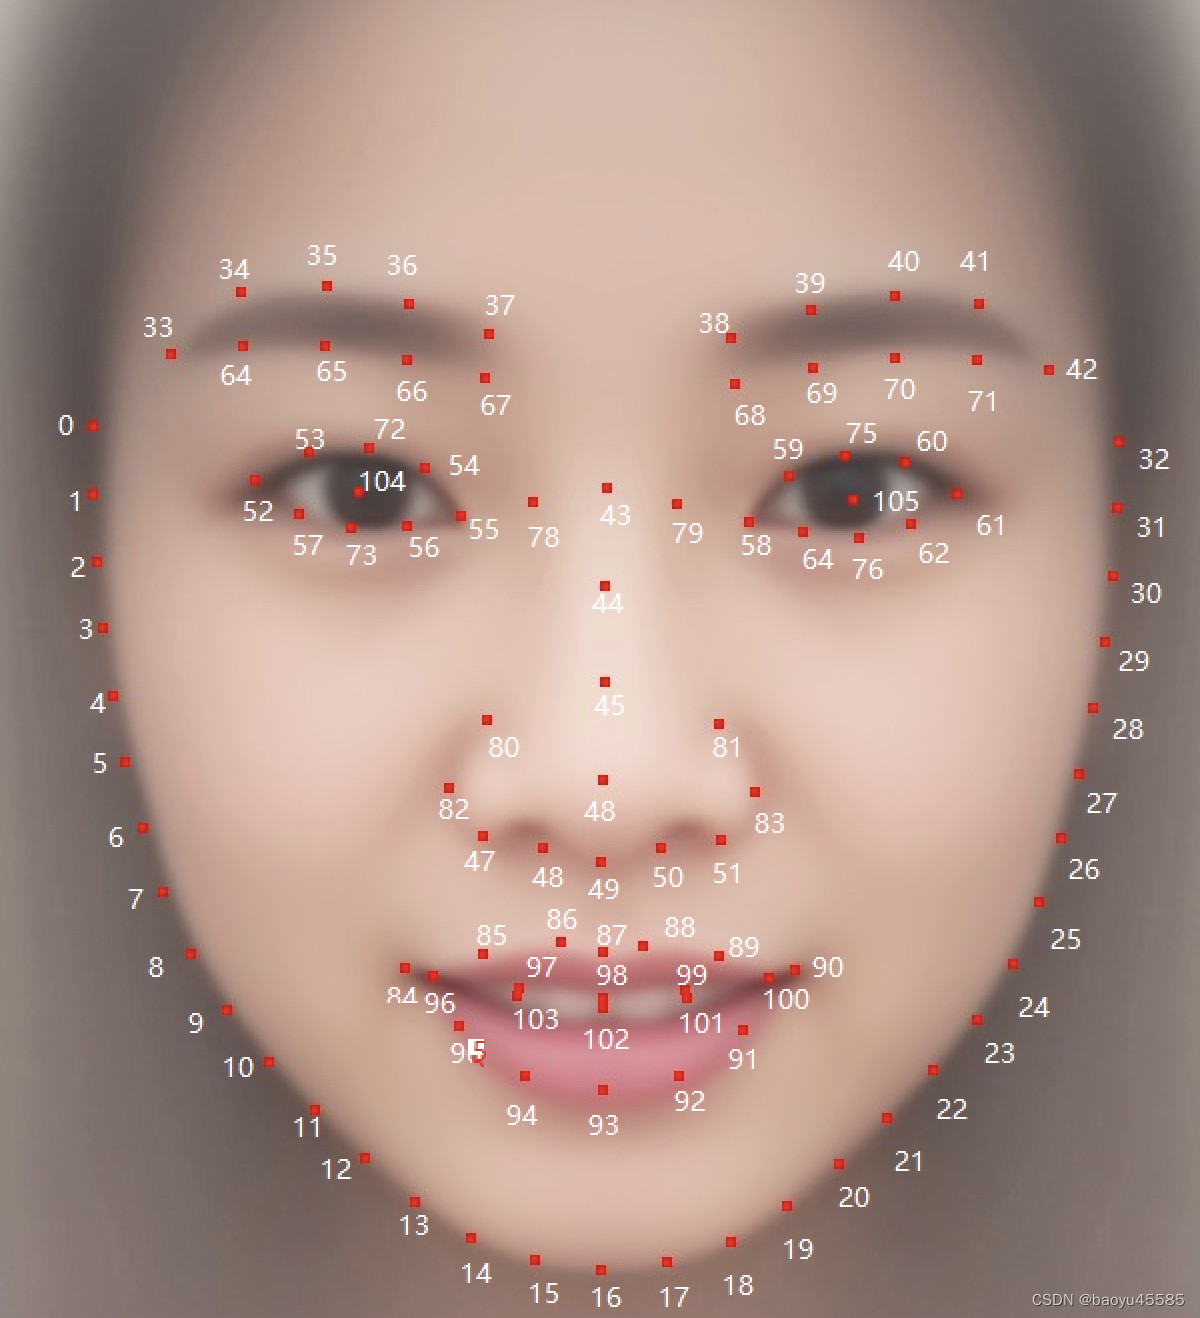
人脸贴纸说明
1=weight1+weight2+weight3
p_index_1=44
weight1=-2.2564
p_index_2=38
weight2=1.6250
p_index_3=37
weight3=1.6314void processFace2DLocate()
{if (m_position == nullptr) {Rect rect = m_materialRect;rect.origin.x = (m_width - rect.size.width) * 0.5f;rect.origin.y = (m_height - rect.size.height) * 0.5f;// 更新数据int count = 4;m_position = new Vector2[count];m_position[0].set(rect.origin.x, rect.origin.y);m_position[1].set(rect.right(), rect.origin.y);m_position[2].set(rect.origin.x, rect.bottom());m_position[3].set(rect.right(), rect.bottom());m_texcoord = new Vector2[count];m_texcoord[0].set(0, 0);m_texcoord[1].set(1, 0);m_texcoord[2].set(0, 1);m_texcoord[3].set(1, 1);m_indexCount = 6;m_pointIndex = new unsigned short[m_indexCount]{0, 1, 2, 2, 1, 3};m_matrix = new Matrix4;}m_matrix->identity();Vector2* point106 = m_face->getPoint106();float screenRadio = m_height / m_width;float screenRadioFlip = 1.0f / screenRadio;float x_dis = std::fabs(point106[32].x - point106[0].x) * screenRadioFlip;float y_dis = std::fabs(point106[32].y - point106[0].y);// 标准人脸0\32之间的距离float standard_face_x = 475.0f / m_width;float standard_face_y = 0.0f;float scale = std::sqrt(x_dis * x_dis + y_dis * y_dis) / std::sqrt(standard_face_x * standard_face_x + standard_face_y * standard_face_y) * screenRadio;int index1 = m_2DLocateParam.p_index_1;float weight1 = m_2DLocateParam.p_weight_1;int index2 = m_2DLocateParam.p_index_2;float weight2 = m_2DLocateParam.p_weight_2;int index3 = m_2DLocateParam.p_index_3;float weight3 = m_2DLocateParam.p_weight_3;float _x1 = point106[index1].x;float _y1 = point106[index1].y;float _x2 = point106[index2].x;float _y2 = point106[index2].y;float _x3 = point106[index3].x;float _y3 = point106[index3].y;// 总面积float S = 0.5 * fabs((_x1 * _y2 - _x2 * _y1) + (_x2 * _y3 - _x3 * _y2) + (_x3 * _y1 - _x1 * _y3));// s_index1float S1 = S * weight1;// s_index2float S2 = S * weight2;// s_index3float S3 = S * weight3;float xw = (S1 * _x1 + S2 * _x2 + S3 * _x3) / S;float yw = (S1 * _y1 + S2 * _y2 + S3 * _y3) / S;m_matrix->scale(scale);m_matrix->rotate(m_face->getYaw() * 1.2, 0.0, 1.0, 0.0);m_matrix->rotate(m_face->getPitch() * 1.2, 1.0, 0.0, 0.0);m_matrix->rotate(m_face->getRoll(), 0.0, 0.0, 1.0);
//    printf("m_face->getRoll() = %f, %f, %f\n", 360 + m_face->getRoll(), m_face->getPitch(), m_face->getYaw());// 纹理在屏幕上旋转,x 和 y 需要计算屏幕的比例,防止拉伸float *m = (float *)m_matrix->get();m[0] *= screenRadio;m[4] *= screenRadio;m_matrix->scale(screenRadioFlip, 1, 1);m[12] = xw * 2.f - 1.f;m[13] = yw * 2.f - 1.f;
}
m_matrix 进行旋转变换,根据人脸的偏航角(yaw)、俯仰角(pitch)和横摆角(roll)来调整姿态。让我给您解释一下:
-
m_matrix->rotate(m_face->getYaw() * 1.2, 0.0, 1.0, 0.0);- 这行代码根据人脸的偏航角(yaw)来进行绕 Y 轴旋转。
m_face->getYaw()是获取人脸的偏航角度,乘以1.2用于增加旋转幅度。- 参数
(0.0, 1.0, 0.0)表示围绕 Y 轴旋转。
-
m_matrix->rotate(m_face->getPitch() * 1.2, 1.0, 0.0, 0.0);- 这行代码根据人脸的俯仰角(pitch)来进行绕 X 轴旋转。
m_face->getPitch()是获取人脸的俯仰角度,乘以1.2用于增加旋转幅度。- 参数
(1.0, 0.0, 0.0)表示围绕 X 轴旋转。
-
m_matrix->rotate(m_face->getRoll(), 0.0, 0.0, 1.0);- 这行代码根据人脸的横摆角(roll)来进行绕 Z 轴旋转。
m_face->getRoll()是获取人脸的横摆角度。- 参数
(0.0, 0.0, 1.0)表示围绕 Z 轴旋转。

point106[32]和point106[0]分别是左右两边脸部两个点,下面代码为了计算脸部对屏幕上的缩放比例,std::sqrt(x_dis * x_dis + y_dis * y_dis) 计算了特征点索引为 0 和 32 之间的欧几里德距离。同时,std::sqrt(standard_face_x * standard_face_x + standard_face_y * standard_face_y) 则计算了标准人脸上 x 和 y 方向的长度与屏幕尺寸的比例之间的欧几里德距离。
float x_dis = std::fabs(point106[32].x - point106[0].x) * screenRadioFlip;float y_dis = std::fabs(point106[32].y - point106[0].y);// 标准人脸0\32之间的距离float standard_face_x = 475.0f / m_width;float standard_face_y = 0.0f;float scale = std::sqrt(x_dis * x_dis + y_dis * y_dis) / std::sqrt(standard_face_x * standard_face_x + standard_face_y * standard_face_y) * screenRadio;
重心坐标值(xw,yw)在[0, 1]范围转化为[-1, 1] 范围,这个顶点坐标标准
m[12] = xw * 2.f - 1.f;m[13] = yw * 2.f - 1.f;
这篇关于OpenGL-贴纸方案的文章就介绍到这儿,希望我们推荐的文章对编程师们有所帮助!


