本文主要是介绍2_springboot_shiro_jwt_多端认证鉴权_Realm与匹配器,希望对大家解决编程问题提供一定的参考价值,需要的开发者们随着小编来一起学习吧!
1. 拦截器流程梳理
这里梳理的工作流程是以开发者的角度来梳理其执行流程,不会过多涉及到Shiro的内部执行流程。通过上一章节对FormAuthenticationFilter 的改造,知道了一个大概。下面会对它做详细分析。
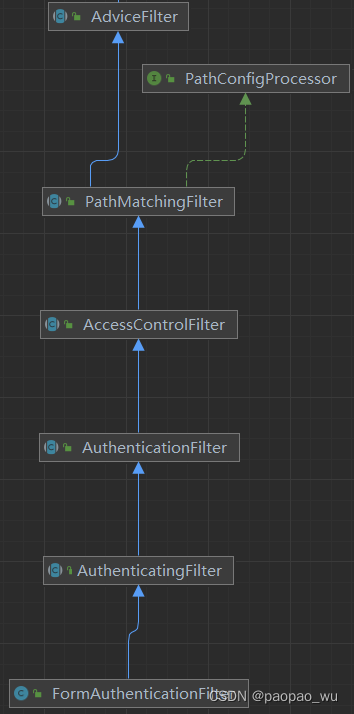
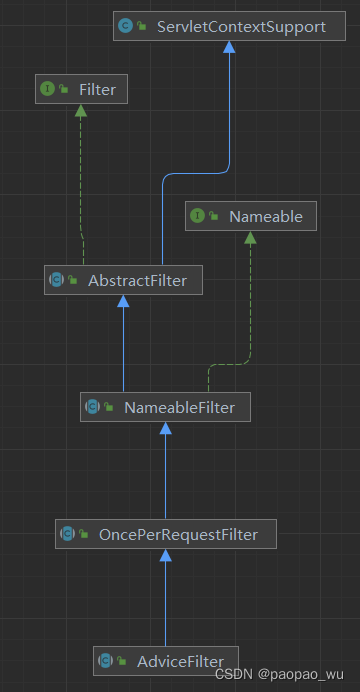
继承关系比较长,这里拆分成两张图
-
AbstractFilter :它实现了
javax.servlet.Filter接口,也就是JavaEE Servlet 规范中的Filter,并进行了初始化。所以Shiro web中提供的Filter ,实际上就是一个 Servlet Filter。在传统web项目中,Servlet Filter是配置在web.xml中的,那么在SpringBoot中,这些Filter会被Spring 容器接管,改如何配置呢?实际上上一个章节已经配置过了,模板代码:
@Beanpublic FilterRegistrationBean<AuthenticationFilter> customShiroFilterRegistration(ShiroFilterFactoryBean shiroFilterFactoryBean) {...}给Sprinig容器中扔一个
FilterRegistrationBean即可,它是一个泛型类, T 就是要注册的Filterpublic class FilterRegistrationBean<T extends Filter> extends AbstractFilterRegistrationBean<T> -
NameableFilter:提供了name属性表示Filter的名称如“anon,auth,logout”等,在spring应用中,这些Filter将会被注册到SpringShiroFilterFactoryBean上,注册完毕之后,框架会遍历那些注册的Filter,调用setName来将name保存到filter对象中
-
OncePerRequestFilter: 首先看这个Filter是否已经执行过了,如果已经执行过了,则放行,交给下一个过滤器。如果没有执行,则执行doFilterInternal 这个抽象方法,这个抽象方法由子类来实现。它的主要功能是保证这个filter在一次请求中只能执行一次
-
AdviceFilter:对拦截器做的工作进行了前置和后置处理,实现了 doFilterInternal 方法,这个方法中做了一系列的流程判断:
-
调用preHandle方法来判断流程是否还要继续,如果需要继续,则将请求交给后续的过滤器链
-
后续的过滤器链执行。调用的是executeChain方法,这个方法仅仅简单的执行了 chain.doFilter(request, response); 在后面的大量子类中对它都做了重写
-
调用postHandle 来继续做一些后置 处理
-
-
PathMatchingFilter: 定义了一个PatternMatcher,默认使用了是AntPathMatcher匹配器,还定义了一个appliedPaths ,是一个ant格式的路径匹配器,预先定义一些路径,如果当前请求的url与设定的路径匹配上了,则处理,否则不进行处理
-
AccessControlFilter抽象类: 定义了 loginUrl 属性表示登录地址,默认为/login.jsp. 重写了父类的
preHandler方法, 在这个方法中会调用的抽象方法,这些抽象方法需要后面的子类来实现- isAccessAllowed抽象方法
- onAccessDenied抽象方法
-
AuthenticationFilter 抽象类:它重写了 isAccessAllowed() 方法,获取Shiro 的 Subject 对象后判断是否已经认证过了
protected boolean isAccessAllowed(ServletRequest request, ServletResponse response, Object mappedValue) {Subject subject = getSubject(request, response);return subject.isAuthenticated() && subject.getPrincipal() != null;} -
AuthenticatingFilter 抽象类:这个类中有几个重点要关注的方法:
-
createToken 抽象方法,用于创建 Shiro中的 AuthenticationToken .
AuthenticationToken 是一个核心接口,它定义了身份验证过程中客户端提交的用于证明用户身份和权限的数据结构. 它包含两个方法:
Object getPrincipal(): 这个方法返回主体(Principals),通常代表的是用户的标识信息,如用户名、用户ID或者更复杂的用户实体对象。主体是认证过程中用来唯一识别用户的身份元素Object getCredentials(): 这个方法返回凭证(Credentials),通常对应于用户的密码、密钥或者其他形式的秘密或证据,用以验证主体的真实性。凭证是敏感信息,通常会进行加密处理。
-
executeLogin 方法: 这个方法中首先创建了
AuthenticationToken, 然后获取了Subject对象,然后调用了subject.login(token)方法。它实际完成的工作就是将 token交给Shiro框架来完成登录的工作。这个login 方法就进入到了Shiro的内部工作流程中了。这个内部工作流程简单来讲就是会调用
Realm来获取用户正确的身份信息,然后再使用匹配器来比较正确身份信息和 客户端提交的token信息 -
onLoginSuccess() 方法: 登录成功后的方法,在这个类中,返回了
true, 这样请求就会到达Spring的Controller中。 -
onLoginFailure()方法: 登录失败后的方法,在这个类中,返回了
false,此时请求调用不会继续向前。
-
-
FormAuthenticationFilter:
-
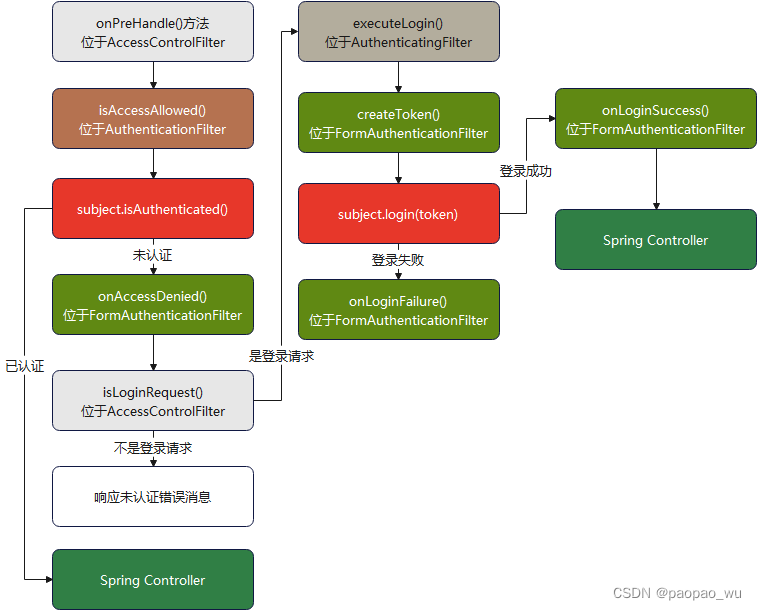
onAccessDenied: 判断是不是登录请求,如果不是登录请求则跳转到登录页面。上一章节我们对它进行了重写,不会跳转到登录页面,而是返回JSON格式的数据
如果是登录请求,再判断是不是登录提交,如果不是则直接返回true,执行executeLogin方法,完成登录
-
覆盖onLoginSuccess ,跳转登录成功页,上一章节我们对她进行了改造,返回JSON格式数据
-
覆盖 onLoginFailure, 登录失败后,返回了true,表示它可以继续进入Spring Controller,此时可以在Controller中获取登录失败的原因
整个Filter的工作流程如下:
-
以上只是Shiro Web 中的过滤器的工作流程,整个流程中,红色部分的 subject.isAuthenticated() 和 subject.login(token) 才是Shiro的核心功能部分。下面从 改造Shiro的 Realm开始,逐步了解Shiro的核心框架流程。
2. Shiro核心概念
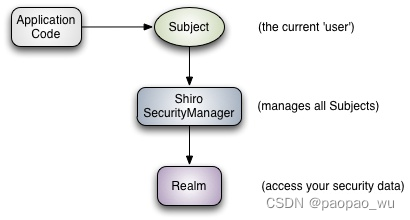
上一章节提到了核心概念,但是没有详细分析。Shiro 架构包含三个主要的理念:Subject,SecurityManager和 Realm
-
Subject:主体,当前参与应用安全部分的主体。一般指用户,可以是第三方服务,比如我们向第三方开放一些接口供第三方介入。主要指一个正在与当前系统交互的东西,而这个东西就叫Subject. 所以Shiro中的Subject不仅仅指的是用户。
所有Subject都需要SecurityManager,进行管理。 当系统与Subject进行交互,这些交互行最终会委托给SecurityManager。
也就是说前面 红色框内的
subject.isAuthenticated()和subject.login(token)方法的调用,最终都会由 SecurityManager来执行,它才是真正干活的 -
SecurityManager:安全管理员,Shiro架构的核心,真正调度和干活的就是它。当系统与Subject进行交互的时候,实际上是委托给 SecurityManager在背后执行操作。
实际开发中,SecurityManager一旦配置好,开发者就很少去关注它了。
-
Realms:Realms作为Shiro和应用的连接桥,因为Shiro是不知道系统里有谁,能干什么,即需要认证和鉴权的数据。所以当需要与安全数据交互的时候,像用户账户,或者访问控制,Shiro就从一个或多个Realms中查找。Realm就像是一个安全数据的数据源提供给Shiro框架。Shiro自身提供了一些可以直接使用的Realms,如果默认的Realms不能满足你的需求,我们也可以定制自己的Realms。
3. TextConfigurationRealm
org.apache.shiro.realm.text.TextConfigurationRealm 是Shiro内置的一个Realm。它允许开发人员通过文本配置文件(例如 properties 文件或 ini 文件)来管理应用程序的安全数据,如用户、角色和权限。
比如:下面是 shiro.ini , 即把数据信息放入到一个叫做 shiro.ini 的文件中
[users]
root = secret, admin[roles]
admin = *[permissions]
* = *
在这个例子中,用户 “root” 的密码是 “secret”,并且他属于角色 “admin”;角色 “admin” 拥有所有的权限(“*” 表示所有)。这种配置使得具有 “admin” 角色的用户能够访问系统中的所有资源。
前面章节中我们是写死在代码里面的。
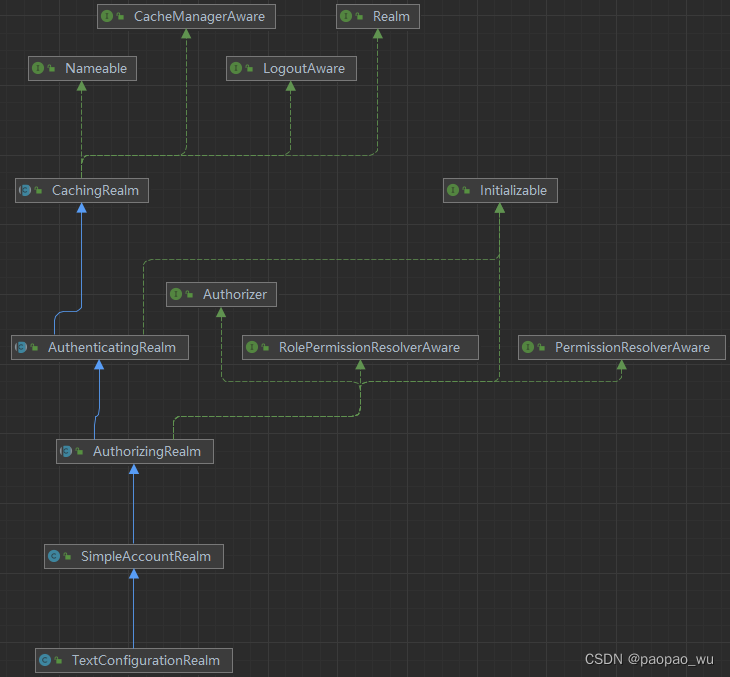
通过TextConfigurationRealm 类继承机构图,来详细了解 Realm。重点要关注的就是最顶层的接口 org.apache.shiro.realm.Realm
3.1 Realm接口
public interface Realm {String getName();boolean supports(AuthenticationToken token);AuthenticationInfo getAuthenticationInfo(AuthenticationToken token) throws AuthenticationException;
}
所有的Realm都必须实现这个接口
String getName(): Shiro框架核心(SecurityManager)拿到realm对象后通过它可以知道这个 realm 的名称boolean supports(AuthenticationToken token): 通过前面Filter的分析,客户端会传入一个AuthenticationToken,其中包含了客户端提交的身份和凭证信息(简单理解成用户名密码), 那么SecurityManager在通过realm获取用户真实身份信息的时候,就需要调用这个方法来判断传入的AuthenticationToken是不是与当前的这个Realm适配。
比如有这样的一个场景:我们开发了一个开放平台,为第三方提供API服务,第三方入驻我方后,我方会为第三方分配AppID(应用ID),SecurityKey(秘钥)等信息。当第三方调用我们API接口的时候,我们就需要对这个调用进行认证,此时就需要写一个Realm 来提供第三方用户的真实身份信息,同时也需要自定义个AuthenticationToken ,即实现 AuthenticationToken 接口的一个类来与Realm相匹配。
AuthenticationInfo getAuthenticationInfo(AuthenticationToken token):根据客户端提交的token获取用户的真实身份信息, 真实身份信息被封装到了AuthenticationInfo中,它翻译为认证信息,实际上它也是一个接口,包含身份和凭证信息。
仔细看
AuthenticationToken和AuthenticationInfo的定义:public interface AuthenticationToken extends Serializable {Object getPrincipal();Object getCredentials(); } public interface AuthenticationInfo extends Serializable {PrincipalCollection getPrincipals();Object getCredentials(); }会发现两个很相似,都包含了Principal,翻译为主体身份, Credential翻译为凭证。即都包含了主体身份和凭证两部分信息。
区别是:AuthenticationToken是客户端请求携带过来的信息,它是不可信任的
AuthenticationInfo 是系统中完全可信的,真实的信息
通过Realm接口可以看到,Realm最重要的作用就是:
SecurityManager拿客户端提交的AuthenticationToken来换取 完全可信的AuthenticationInfo, 然后使用匹配器来验证是否匹配
3.2 CachingRealm 抽象类
因为系统在运行的时候经常需要获取AuthenticationInfo 来进行认证,为了提高性能,加入了缓存。至于存放到哪个缓存上,此时可以为 Realm 配置一个 CacheManager ,通过它来管理缓存
3.3 AuthenticatingRealm 抽象类
它是一个抽象类,提供了对用户凭据(如用户名/密码)进行身份验证的基本框架。任何需要处理登录验证的 Realm 都应该扩展这个类。
3.3.1 两个重要的属性:
-
CacheManager即缓存管理器 -
CredentialsMatcher前面多次提到了凭证匹配器。默认使用的是SimpleCredentialsMatcherpublic interface CredentialsMatcher {boolean doCredentialsMatch(AuthenticationToken token, AuthenticationInfo info); }它就只提供了一个方法,用来判定 客户端提交的
AuthenticationToken和可信任的AuthenticationInfo是否匹配
这两个属性可以通过set方法传入,也可以通过构造方法传入
3.3.2 几个重要的方法
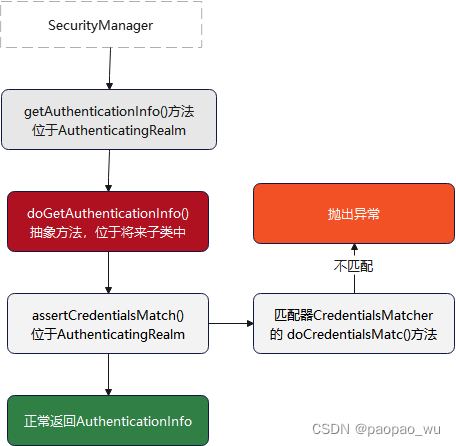
AuthenticationInfo getAuthenticationInfo(AuthenticationToken token)它是 Realm接口中规定的方法实现之所以重要,是因为它规范了认证的主框架流程
public final AuthenticationInfo getAuthenticationInfo(AuthenticationToken token) throws AuthenticationException {// 从缓存中获取AuthenticationInfoAuthenticationInfo info = getCachedAuthenticationInfo(token);if (info == null) {//重要!!!! 缓存中没有,则调用 doGetAuthenticationInfo,它是一个抽象方法,由子类实现info = doGetAuthenticationInfo(token);LOGGER.debug("Looked up AuthenticationInfo [{}] from doGetAuthenticationInfo", info);if (token != null && info != null) {cacheAuthenticationInfoIfPossible(token, info);}} else {LOGGER.debug("Using cached authentication info [{}] to perform credentials matching.", info);}// 重要!!!! 如果 凭证不为空,则开始匹配 AuthenticationToken与 AuthenticationInfoif (info != null) {assertCredentialsMatch(token, info);} else {LOGGER.debug("No AuthenticationInfo found for submitted AuthenticationToken [{}].  Returning null.", token);}return info;
}
-
doGetAuthenticationInfo()抽象方法,子类要实现的,由子类来提供AuthenticationInfo -
assertCredentialsMatch()调用匹配器来验证 AuthenticationToken 与 AuthenticationInfo 是否匹配这个方法是 protected 的方法,比对凭证也可以在子类中完成,也可以提供了一个匹配器来完成对比
3.4 AuthorizingRealm 抽象类
它实例化的时候,同样可以传入 CacheManager 和 CredentialsMatcher
同时,它也实现了 org.apache.shiro.authz.Authorizer 接口,它是个鉴权 接口, 即鉴定是否拥有某个角色,是否具备某种权限等。这个接口中定义了isPermitted,checkPermission,hasRole 等与鉴权功能相关的接口。这些接口方法同样会被 SecurityManager 来调用。所以AuthorizingRealm 就需要实现与鉴权 相关的接口。
跟踪源码我们发现,实现的这些与鉴权 相关的方法都会调用 AuthorizationInfo getAuthorizationInfo(PrincipalCollection principals) 这个方法来获取授权信息。而这个方法又会调用protected abstract AuthorizationInfo doGetAuthorizationInfo(PrincipalCollection principals) 这个抽象方法,也就是说 用户的授权信息实际上是由它子类 来提供的。
所以子类要实现 doGetAuthorizationInfo 方法来提供用户真实的授权信息。 因为 SecurityManager 在调用鉴权方法(
org.apache.shiro.authz.Authorizer接口提供)的时候,都会调用doGetAuthorizationInfo来获取用户授权信息,然后对比看是否具备授权
分析到这里后,现在得到了如下启事: 自定义的Realm 如果继承
AuthorizingRealm抽象类, 至少要实现两个抽象方法:
- doGetAuthenticationInfo() 提供主体身份信息
- doGetAuthorizationInfo() 提供主体授权信息
3.5 SimpleAccountRealm 类
这个类不是抽象类,通过名字可以看出它提供的主体身份和授权信息是比较简单的用户名密码和一些简单角色,它实现了上面的两个方法:
protected AuthenticationInfo doGetAuthenticationInfo(AuthenticationToken token)protected AuthorizationInfo doGetAuthorizationInfo(PrincipalCollection principals)
对实现有兴趣可以去看它们的源码
3.6 TextConfigurationRealm
它通过重写 onInit() 方法,将文本配置的 主体身份信息和角色权限信息初始化到了Realm 中,为 SecurityManager 在认证和鉴权的时候有可以对比的数据。
4. 小结
通过前面对TextConfigurationRealm 的分析,我们明白了 SecurityManager 主要是
- 依靠
org.apache.shiro.realm.Realm这个接口的实现类来提供 主体认证身份信息 - 依靠
org.apache.shiro.authz.Authorizer接口的实现类来提供 主体的角色权限信息 - 而AuthorizingRealm 抽象类实现了这两个接口中所有的方法,但还是留了两个抽象方法
doGetAuthenticationInfo和doGetAuthorizationInfo让子类去实现 - 所以要自定义Realm我们就只需要继承 AuthorizingRealm 即可,并实现那两个抽象方法。
5. 自定义Realm
这个自定义的Realm模拟数据库中用户名,密码认证。所不同的是数据库中往往不会保存用户密码的明文,保存的往往都是加密过的数据。Shiro 也提供了一些加密解密,散列算法。在这个例子中正好都用进去。
这个例子中为了相对简单,我不会连接数据库,只在内存中模拟数据库中的数据。
5.1 用户
这里定义一个用户类,来封装用户的一些信息
package com.qinyeit.shirojwt.demos.shiro.entity
...
@Data
@ToString
@Builder
public class SystemAccount implements Serializable {private String account;//账号private String pwdEncrypt;//密码密文private String salt;// 对密码加密的时候使用的salt值
}
5.2 创建两个用户
因为要给用户明文加密,而且两个用户的盐值为随机数,所以写个测试用例先运行出来用户数据:
@Test
public void createSystemAccount() {// 创建两个系统账号,调用Shiro提供的散列算法计算出加密密码String account = "administrator";String pwd     = "admin";// 明文密码// 使用Shiro 提供的随机数生成器生成盐值,默认生成16字节,128位RandomNumberGenerator saltGenerator = new SecureRandomNumberGenerator();// 使用16进制字符串表示String salt = saltGenerator.nextBytes().toHex();// 使用 SHA-256 散列算法, 对 密码明文加密,加盐 salt,迭代次数为 2 次SimpleHash shiroHash = new SimpleHash("SHA-256", pwd, salt, 2);// 加密后的密码, 也可以通过 new Sha256Hash(pwd, salt, 2) 来实现String pwdEncrypt = shiroHash.toHex();SystemAccount admin = SystemAccount.builder().account(account).pwdEncrypt(pwdEncrypt).salt(salt).build();// SystemAccount(// account=administrator,// pwdEncrypt=0b188436fd5c434e3b8ed05cfe7c107250c1ff0ac034fad089db0f017ac3cacb,// salt=55ae2b2c63ddd6d4763e0c57bda9078e// )log.info("admin:{}", admin.toString());///account = "zhangsan";pwd = "123456";// 明文密码// 使用16进制字符串表示salt = saltGenerator.nextBytes().toHex();// 使用 SHA-256 散列算法, 对 密码明文加密,加盐 salt,迭代次数为 2 次pwdEncrypt = new Sha256Hash(pwd, salt, 2).toHex();SystemAccount zhangsan = SystemAccount.builder().account(account).pwdEncrypt(pwdEncrypt).salt(salt).build();//zhangsan:SystemAccount(// account=zhangsan,// pwdEncrypt=3bff14c4279f01892165b96afed9b40ec7f14a9de55d9564c088bad3e04d6411,// salt=cbce2d1aad0867f8317e7ebeb3427999// )log.info("zhangsan:{}", zhangsan.toString());}
5.4 定义匹配器
自定义的Realm,如果不指定匹配器,那么使用的就是 SimpleCredentialsMatcher :
SimpleCredentialsMatcher.java
public class SimpleCredentialsMatcher extends CodecSupport implements CredentialsMatcher {...// 仅仅只是简单比较了凭证是否相等。这里的凭证就是密码public boolean doCredentialsMatch(AuthenticationToken token, AuthenticationInfo info) {Object tokenCredentials = getCredentials(token);Object accountCredentials = getCredentials(info);return equals(tokenCredentials, accountCredentials);}
}
这个匹配器显然是不适用的。因为客户端提交过来的是 用户名和密码明文,所以 AuthenticationToken 中存放的明文密码和 AuthenticationInfo 中存放的密文密码是没法直接比较的,需要将 AuthenticationToken 中的明文密码和AuthenticationInfo 中存放的salt 进行两个散列得到的加密数据再与AuthenticationInfo 中存放的 pwdEncrypt 进行对比才行。
所以要自定义一个匹配器,在这个匹配器:
- 从
AuthenticationInfo中取出SystemAccount信息 - 取出
SystemAccount中的 salt - 从
AuthenticationToken中取出凭证,即密码 - 用 Sha256算法,对从token中取出的密码加盐值进行2次散列。因为保存
SystemAccount的pwdEncrypt 值的时候,采用的也是这个算法,它们要保持一致 - 将散列结果与
SystemAccount中保存的pwdEncrypt 进行对比
package com.qinyeit.shirojwt.demos.shiro.matcher;
...
public class Sha256HashCredentialsMatcher extends CodecSupport implements CredentialsMatcher {@Overridepublic boolean doCredentialsMatch(AuthenticationToken token, AuthenticationInfo info) {//1. 取出真实身份信息Object primaryPrincipal = info.getPrincipals().getPrimaryPrincipal();// 如果身份信息是 SystemAccount 对象// 此时要注意,Realm 中要将 SystemAccount 对象放入到 AuthenticationInfo 中if (primaryPrincipal instanceof SystemAccount account) {String accountPwd = account.getPwdEncrypt();//2. 获取盐值String accountSalt = account.getSalt();//3. token中取出凭证. 这里可以强转成UsernamePasswordTokenString tokenPwd = new String(((UsernamePasswordToken) token).getPassword());//4. 进行2次散列String tokenPwdSha = new Sha256Hash(tokenPwd, accountSalt, 2).toHex();//5. 与account 中的 pwdEncrypt进行对比return accountPwd.equals(tokenPwdSha);}return false;}
}
5.5 定义 Realm
自定义的Realm 只需要继承 AuthorizingRealm 即可。为了演示方便,在构造函数中初始化了两个账号,并指定了上面定义的匹配器。
这个Realm支持的AuthenticationToken 是什么类型的?通过查看源码,发现 是 UsernamePasswordToken .
我们自己定义了一个 com.qinyeit.shirojwt.demos.shiro.filter.AuthenticationFilter , 在这个 Filter中默认创建的Token也是 UsernamePasswordToken:
package org.apache.shiro.web.filter.authc;
...
public abstract class AuthenticatingFilter extends AuthenticationFilter {...protected AuthenticationToken createToken(String username, String password,boolean rememberMe, String host) {// 返回的是 UsernamePasswordTokenreturn new UsernamePasswordToken(username, password, rememberMe, host);} ...
}
因为后续我们会创建多个不同的Realm 来处理多端的认证鉴权,也会自己扩展一些 AuthenticationToken , 所以在自定义的Reaml中虽然可以使用父类的 supports 方法来判断当前的Realm是否支持所使用的Token类型,还是写明白比较好一些。下面是自定义的 SystemAccountRealm:
public class SystemAccountRealm extends AuthorizingRealm {// 模拟数据库中的账号信息 key为账号private Map<String, SystemAccount> systemAccountMap = new HashedMap();// 一个账号可以拥有多种角色private Map<String, Set<String>>   roles            = Map.of("administrator", Set.of("admin"),//管理员"zhangsan", Set.of("normal") // 普通用户);// 角色权限private Map<String, Set<String>>   permissions      = Map.of("admin", Set.of("*", "*:*"), //所有权限"normal", Set.of("employee:write", "employee:read") //normal角色对员工只有写和读的权限,不能做其它操作);public SystemAccountRealm() {// 指定密码匹配器. 也可以在配置 Realm的时候指定,因为在父类中提供了匹配器的set方法super(new Sha256HashCredentialsMatcher());// 构造方法中构建出账号信息systemAccountMap.put("administrator", SystemAccount.builder().account("administrator")// 明文为 admin.pwdEncrypt("0b188436fd5c434e3b8ed05cfe7c107250c1ff0ac034fad089db0f017ac3cacb").salt("55ae2b2c63ddd6d4763e0c57bda9078e").build());systemAccountMap.put("zhangsan", SystemAccount.builder().account("zhangsan")// 明文为 123456.pwdEncrypt("3bff14c4279f01892165b96afed9b40ec7f14a9de55d9564c088bad3e04d6411").salt("cbce2d1aad0867f8317e7ebeb3427999").build());}// 当前Realm 只支持 UsernamePasswordToken类型的Tokenpublic boolean supports(AuthenticationToken token) {return token != null && UsernamePasswordToken.class.isAssignableFrom(token.getClass());}@Overrideprotected AuthenticationInfo doGetAuthenticationInfo(AuthenticationToken token) throws AuthenticationException {// 1. 获取用户信息SystemAccount account = (SystemAccount) principals.getPrimaryPrincipal();// 2. 获取用户角色Set<String> accountRoles = roles.get(account.getAccount());if (systemAccount == null) {throw new AuthenticationException("账号不存在");}// 3. 创建认证信息,即正确的用户名和密码。// 三个参数,第一个参数为主体,第二个参数为凭证,第三个参数为Realm的名称// 因为上面将凭证信息和主体身份信息都保存在 SystemAccount中了,所以这里直接将 SystemAccount对象作为主体信息即可// 第二个参数表示凭证,匹配器中会从 SystemAccount中获取凭证信息,所以这里直接传null。// 第三个参数表示 Realm的名称SimpleAuthenticationInfo authenticationInfo = new SimpleAuthenticationInfo(systemAccount, null, getName());return authenticationInfo;}@Overrideprotected AuthorizationInfo doGetAuthorizationInfo(PrincipalCollection principals) {// 1. 获取用户信息String account = (String) principals.getPrimaryPrincipal();// 2. 获取用户角色Set<String> accountRoles = roles.get(account);// 3. 获取角色拥有的权限Set<String> accountPermissions = new HashSet<>();accountRoles.forEach(role -> {accountPermissions.addAll(permissions.get(role));});// 4. 授权信息SimpleAuthorizationInfo authorizationInfo = new SimpleAuthorizationInfo();//指定角色authorizationInfo.setRoles(accountRoles);// 权限字符串authorizationInfo.setStringPermissions(accountPermissions);return authorizationInfo;}
}
5.6 将Realm注册为Spring Bean
现在只需要将原先在 ShiroConfiguration中的 TextConfigurationRealm 替换为自定义的 Realm
package com.qinyeit.shirojwt.demos.configuration;
...
@Configuration
public class ShiroConfiguration {@Beanpublic Realm realm() {return new SystemAccountRealm();}
...
}
现在思考一个问题:Realm是要被 SecurityManager 管理的,所以系统需要将SecurityManager 实例创建出来。但是我们发现 SecurityManager 是一个接口。这个接口的实现是哪个具体的类?它是如何被创建的?只需要将自定义的realm 注册为spring bean,它就能被 SecurityManager 管理了吗?
5.6.1 SecurityManager的创建
因为这里使用的是 shiro-spring-boot-web-starter,我们知道SpringBoot 有自动配置的功能。所以找到 shiro-spring-boot-starter-2.0.0.jar 这个文件,看看里面是不是有自动配置为我们创建了 SecurityManager
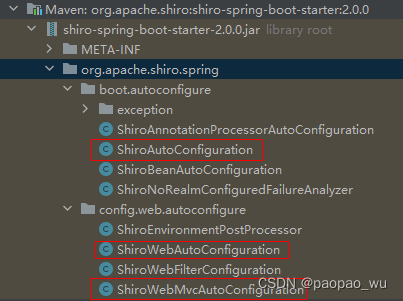
发现有三个自动配置,那么它们之间的先后顺序是什么?因为是在web环境中,所以打开 ShiroWebAutoConfiguration 看看源码:
package org.apache.shiro.spring.config.web.autoconfigure;
...
@Configuration
@AutoConfigureBefore(ShiroAutoConfiguration.class)
@AutoConfigureAfter(ShiroWebMvcAutoConfiguration.class)
@ConditionalOnWebApplication(type = ConditionalOnWebApplication.Type.SERVLET)
@ConditionalOnProperty(name = "shiro.web.enabled", matchIfMissing = true)
public class ShiroWebAutoConfiguration extends AbstractShiroWebConfiguration {...// 配置 securityManager@Bean@ConditionalOnMissingBean@Overrideprotected SessionsSecurityManager securityManager(List<Realm> realms) {return super.securityManager(realms);}...
}
发现这个配置是在ShiroAutoConfiguration 之前 ShiroWebMvcAutoConfiguration 之后。
在这个类中找到了securityManager(List<Realm> realms) 方法。可以看到配置这个Bean的时候,会将系统中所有的Realm 收集到后,交给父类中的securityManager方法,继续跟踪这个方法,最终发现调用的是这个方法:
package org.apache.shiro.spring.config;
public class AbstractShiroConfiguration {...protected SessionsSecurityManager securityManager(List<Realm> realms) {SessionsSecurityManager securityManager = createSecurityManager();...// 将realms配置到SecurityManager中securityManager.setRealms(realms);...return securityManager;}     ...
}
package org.apache.shiro.spring.web.config;
public class AbstractShiroWebConfiguration extends AbstractShiroConfiguration {...@Overrideprotected SessionsSecurityManager createSecurityManager() {DefaultWebSecurityManager securityManager = new DefaultWebSecurityManager();securityManager.setSubjectDAO(subjectDAO());securityManager.setSubjectFactory(subjectFactory());securityManager.setRememberMeManager(rememberMeManager());return securityManager;}    ...
}
默认情况下使用的是 DefaultWebSecurityManager
5.6.2 还有哪些Realm?
在 ShiroAutoConfiguration中发现了如下代码:
...@Bean@ConditionalOnResource(resources = "classpath:shiro.ini")protected Realm iniClasspathRealm() {return iniRealmFromLocation("classpath:shiro.ini");}@Bean@ConditionalOnResource(resources = "classpath:META-INF/shiro.ini")protected Realm iniMetaInfClasspathRealm() {return iniRealmFromLocation("classpath:META-INF/shiro.ini");}@Bean@ConditionalOnMissingBean(Realm.class)protected Realm missingRealm() {throw new NoRealmBeanConfiguredException();}
...
如果存在 classpath:shiro.ini 或者 classpath:META-INF/shiro.ini 这两个文件,会实例化IniRealm, 如果没有任何Realm,就会抛出异常。 项目中,很少有将配置放入到 shiro.ini 文件中的。
6. 测试
6.1 登录测试
POST请求报文:
POST /login HTTP/1.1
Host: 127.0.0.1:8080
User-Agent: Apifox/1.0.0 (https://apifox.com)
Accept: */*
Host: 127.0.0.1:8080
Connection: keep-alive
Content-Type: application/x-www-form-urlencoded
Cookie: JSESSIONID=2C08D12CE02F0F5C53796EF312E1EF6Cusername=administrator&password=admin
响应报文:
{"name": "SystemAccount(account=administrator, pwdEncrypt=0b188436fd5c434e3b8ed05cfe7c107250c1ff0ac034fad089db0f017ac3cacb, salt=55ae2b2c63ddd6d4763e0c57bda9078e)","message": "登录成功"
}
6.2 退出登录后访问home
退出登录后访问home页面, 是无法访问的,GET 请求报文:
GET / HTTP/1.1
Host: 127.0.0.1:8080
User-Agent: Apifox/1.0.0 (https://apifox.com)
Accept: */*
Host: 127.0.0.1:8080
Connection: keep-alive
响应报文:
{"msg": "未登录或登录已过期","code": 401
}
6.3 权限测试
Realm中定义了两个角色:admin和 normal, admin具备所有权限, 而 normal角色只有"employee:read", “employee:show” 这两个权限, administrator 属于 admin角色, zhangsan 属于 normal角色。
下面编写一个 EmployeeController.java:
package com.qinyeit.shirojwt.demos.controller;
...
@RestController
@Slf4j
public class EmployeeController {@PostMapping("/employees")// 需要employee:write 权限@RequiresPermissions("employee:write")public void addEmployee() {log.info("添加员工....");}// 需要employee:read 权限@GetMapping("/employees")@RequiresPermissions("employee:read")public void index() {log.info("员工管理....");}// 需要employee:delete 权限@DeleteMapping("/employees")@RequiresPermissions("employee:delete")public void destroy() {log.info("销毁....");}
}
而 home页面要求 admin 角色才能访问:
package com.qinyeit.shirojwt.demos.controller;
...
@RestController
@Slf4j
public class HomeController {// 需要管理员角色才能访问@RequiresRoles("admin")@GetMapping("/")public Map<String, String> home() {...}
}
现在使用 zhagnsan登录,登录后访问:
请求:
GET / HTTP/1.1
Host: 127.0.0.1:8080
User-Agent: Apifox/1.0.0 (https://apifox.com)
Accept: */*
Host: 127.0.0.1:8080
Connection: keep-alive
Cookie: JSESSIONID=61353D5B8D205B5E84B5E9A2E75E7897
响应:
{"timestamp": "2024-03-12T06:49:35.206+00:00","status": 500,"error": "Internal Server Error","trace": "org.apache.shiro.authz.UnauthorizedException: Subject does not have role [admin] ....","message": "Subject does not have role [admin]","path": "/"
}
这说明当访问资源时,Shiro框架会进行认证,认证通过后还要检查是否具备资源的访问权限。
org.apache.shiro.authz.Authorizer中定义了 boolean isXxxx() 和 void checkPermission() throws AuthorizationException ,以及boolean hasXxxx 鉴权的时候,如果失败,就会抛出异常.
在代码中需要鉴权可以调用:
Subject subject = SecurityUtils.getSubject();
subject.checkPermission("employee:delete");
实际上,这个调用会委托给 SecurityManager,由它来执行。通过前面的分析, SecurityManager 具体的实现类是 DefaultWebSecurityManager, 跟踪方法,发现调用最终会到 Realm 中的doGetAuthorizationInfo() 方法来获取用户的所有授权信息,然后比较 :访问资源需要的权限字符串或者角色 与 用户拥有的角色或权限字符串,如果不一致,则会抛出异常
7. 鉴权异常处理
前面在Controller方法上,使用了 @RequiresPermissions("employee:write") 或者 @RequiresRoles("admin") 这样的 annotation, Shiro 框架会用 AOP方式对这些方法进行拦截,获取这些 annotation, 然后进行解析。
然而在解析过程中,由于鉴权没有通过而抛出异常,这个异常会被SpringBoot的Error控制器处理。
在 Spring Boot 默认的 Error 控制器(BasicErrorController)处理错误时,会调用 DefaultErrorAttributes 的 getErrorAttributes() 方法获取错误或异常信息,并封装成 model 数据(Map 对象),返回到页面或 JSON 数据中。该 model 数据主要包含以下属性:
{timestamp:时间戳;status:错误状态码error:错误的提示exception:导致请求处理失败的异常对象message:错误/异常消息trace: 错误/异常栈信息path:错误/异常抛出时所请求的URL路径
}
这些信息不太友好,我们可以自定义一个全局异常处理:
package com.qinyeit.shirojwt.demos.advice;
...
@RestControllerAdvice
public class GlobalExceptionHandler {@ExceptionHandler(UnauthorizedException.class)public Map<String, Object> handleAccessDeniedException(UnauthorizedException e, HttpServletRequest request) {String requestUri = request.getRequestURI();return Map.of("requestPath", requestUri,"message", "没有权限访问该资源,请联系管理员授权");}
}
使用zhangsan 登录后,再次访问 home页面,现在响应回来的数据:
{"message": "没有权限访问该资源,请联系管理员授权","requestPath": "/"
}
8. 本章小结
本章详细分析了拦截器的执行流程,知道了拦截器的目的就是对客户端进行认证,在拦截器中调用 subject.isAuthenticated() 进行认证判断 和 subject.login(token) 进行登录。 知道了拦截器如何运作,后期再扩展特殊功能的拦截器就更灵活了
subject.isAuthenticated()和 subject.login(token) 的调用实际上会转交给 Shiro的核心组件 SecurityManager , 它会接管所有的认证和鉴权。 Shiro 抽象了两个接口:
org.apache.shiro.realm.Realm认证时获取主体的认证信息org.apache.shiro.authz.Authorizer鉴权时获取主体的权限角色信息
org.apache.shiro.realm.AuthorizingRealm 抽象类实现了这两个接口。如果我们需要自定义 Realm,就需要继承AuthorizingRealm 类,并实现它的抽象方法即可。
Realm 中要重点搞清楚几个概念:
- Principal 主体身份,比如用户名,手机号,email
- Credential 凭证,比如密码,accessToken 等
自定义的Realm要关注所支持的AuthenticationToken, 在过滤器中如果对 AuthenticationToken进行了扩展,那么它会传递到所对应的 Realm 中。
自定义的Realm需要指定一个凭证匹配器,凭证匹配器需要实现 CredentialsMatcher 接口
自定义Realm需要配置成 SpringBean, 自动配置会收集所有的 Realm 然后交给创建出来的 SecurityManager ,默认使用的是 DefaultWebSecurityManager 这个类
代码仓库 https://github.com/kaiwill/shiro-jwt , 本节代码在 2_springboot_shiro_jwt_多端认证鉴权_Realm与匹配器 分支上.
这篇关于2_springboot_shiro_jwt_多端认证鉴权_Realm与匹配器的文章就介绍到这儿,希望我们推荐的文章对编程师们有所帮助!


