本文主要是介绍深度学习:基于yolov8口罩识别,希望对大家解决编程问题提供一定的参考价值,需要的开发者们随着小编来一起学习吧!
目录
一、项目背景:
二、项目配置:
数据集:
数据集格式:图片格式png,大小853张
三、模型训练:
1.数据集预处理:
2.划分数据集:
3.配置yolov8训练的yaml:
4.训练参数设置:
四、分析模型:
1.F1 Curve图:
2.results图:
一、第二次的模型参数效果
五、模型测试:
六、结语:
一、项目背景:
在医疗和食品行业,口罩佩戴是维护卫生规范的重要要求。口罩佩戴目标检测系统系统可以用于确保员工和工作人员在工作时正确佩戴口罩,减少交叉污染的风险。
2019新型冠状病毒(2019-nCoV)突袭中国武汉,感染人数感染危害之震惊全球!在党和国家的强有力和正确的领导下,全国人民众志成城,团结一致战胜疫情狙击战。平台上线了口罩识别检测系统,实现实时检测未佩戴口人员并及时预警, 为构建人们安全架起一道安全防线网。
二、项目配置:
数据集:
- 数据集来源:Face Mask Detection (kaggle.com)
Masks play a crucial role in protecting the health of individuals against respiratory diseases, as is one of the few precautions available for COVID-19 in the absence of immunization. With this dataset, it is possible to create a model to detect people wearing masks, not wearing them, or wearing masks improperly.
This dataset contains 853 images belonging to the 3 classes, as well as their bounding boxes in the PASCAL VOC format.
The classes are:
- With mask;
- Without mask;
- Mask worn incorrectly.
数据集格式:图片格式png,大小853张
先去自己的anaconda的安装的envs(虚拟环境),在导航栏输入cmd,进入命令窗口,确保3.11>=python>=3.8(YOLOv8要求)
创建一个虚拟环境
conda create -n torch1.12.1 python=3.11.1到官方网站下载YOLOv8模型 ,下载好后解压,里面有个文件requirements.txt https://github.com/ultralytics/ultralytics
安装一个整体包:(路径要按自己的文件路径改,不然会报错:pip install -r 自己的文件路径\requirements.txt )
pip install -r .\requirements.txt 然后安装ultralytics
pip install ultralytics YOLOv8本身的模型权重并没有识别口罩,所以需要自己训练模型权重,并完成口罩的识别。
三、模型训练:
1.数据集预处理:
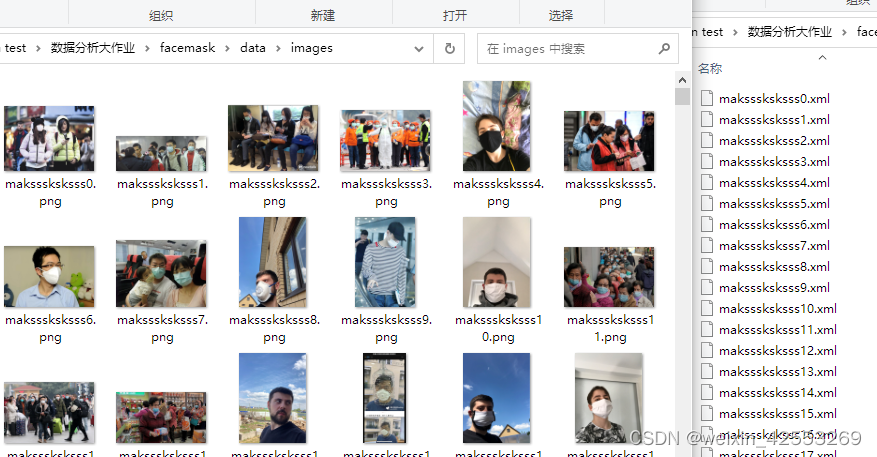
数据集解压得到两个文件夹,分别存储着图片与标注信息,格式为(png)和(xml)
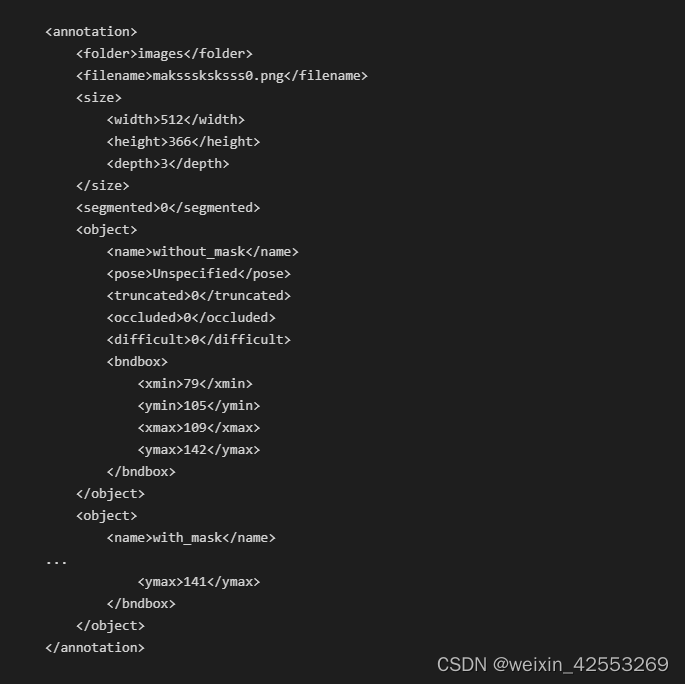
打开其中一个xml文件
with open('../data/annotations/maksssksksss0.xml') as f:contents = f.read()print(contents)得到标注信息
学习YOLOv8的模型训练,使用的是txt标注信息,所以需要对原xml标注信息进行转换,将xml标注信息转成YOLOv8模型训练样式,仅保留YOLOv8模型训练所需的类别和标记信息。剔除后得到包含类别的标记信息的文件。
此数据集只需要三个类别,写在classes.txt,类别包括(["without_mask", "with_mask", "mask_weared_incorrect"])。
xml的标记信息是像素值标注,YOLOv8中的txt是比例标注,所以进行一个转换,获取文件id,输出成txt文件保存。
def xml_to_yolo_bbox(bbox, w, h):# xmin, ymin, xmax, ymaxx_center = ((bbox[2] + bbox[0]) / 2) / wy_center = ((bbox[3] + bbox[1]) / 2) / hwidth = (bbox[2] - bbox[0]) / wheight = (bbox[3] - bbox[1]) / hreturn [x_center, y_center, width, height]def yolo_to_xml_bbox(bbox, w, h):# x_center, y_center, width, heightw_half_len = (bbox[2] * w) / 2h_half_len = (bbox[3] * h) / 2xmin = int((bbox[0] * w) - w_half_len)ymin = int((bbox[1] * h) - h_half_len)xmax = int((bbox[0] * w) + w_half_len)ymax = int((bbox[1] * h) + h_half_len)return [xmin, ymin, xmax, ymax]classes = ["without_mask", "with_mask", "mask_weared_incorrect"]
input_dir = "../data/annotations"
output_dir = "../data/labels"
image_dir = "../data/images"if not os.path.isdir(output_dir):os.mkdir(output_dir)import globfiles = glob.glob(os.path.join(input_dir, "*.xml"))
for fil in files:basename = os.path.basename(fil)filename = os.path.splitext(basename)[0]if not os.path.exists(os.path.join(image_dir, f"{filename}.png")):print(f"{filename} image does not exist!")continueresult = []# 解析 xml 文件的内容tree = ET.parse(fil)root = tree.getroot()width = int(root.find("size").find("width").text)height = int(root.find("size").find("height").text)for obj in root.findall("object"):label = obj.find("name").text# 检查新类并追加到列表if label not in classes:classes.append(label)index = classes.index(label)pil_bbox = [int(x.text) for x in obj.find("bndbox")]yolo_bbox = xml_to_yolo_bbox(pil_bbox, width, height)# 将数据转换为字符串bbox_string = " ".join([str(x) for x in yolo_bbox])result.append(f"{index} {bbox_string}")if result:# 为每个 XML 文件生成一个 YOLO 格式的文本文件with open(os.path.join(output_dir, f"{filename}.txt"), "w", encoding = "utf-8") as f:f.write("\n".join(result))
# generate the classes file as reference()
with open("../data/classes.txt", "w", encoding = "utf-8") as f:f.write(json.dumps(classes))
新建一个列表,获取的图片去掉后四位(.png),得到图片的id
metarial = []for i in os.listdir("../data/images"):srt = i[:-4]metarial.append(srt)查看是否成功获取文件的id
metarial[0:10]2.划分数据集:
学习YOLOv8的模型训练 ,按照YOLOv8的训练模型的要求,将数据集划分为test,train,val(每个文件夹包括images和labels)

使用代码将数据集分类到(train,test,val)
def preparinbdata(main_txt_file, main_img_file, train_size, test_size, val_size):for i in range(0,train_size):source_txt = main_txt_file + "/" + metarial[i] + ".txt"source_img = main_img_file + "/" + metarial[i] + ".png"mstring = metarial[i]train_destination_txt = "../dataset/train/labels/" + "/" + metarial[i] + ".txt"train_destination_png = "../dataset/train/images" + "/" + metarial[i] + ".png"shutil.copy(source_txt, train_destination_txt)shutil.copy(source_img, train_destination_png)for l in range(train_size , train_size + test_size):source_txt = main_txt_file + "/" + metarial[l] + ".txt"source_img = main_img_file + "/" + metarial[l] + ".png"mstring = metarial[l]test_destination_txt = "../dataset/test/labels" + "/" + metarial[l] + ".txt"test_destination_png = "../dataset/test/images" + "/" + metarial[l] + ".png"shutil.copy(source_txt, test_destination_txt)shutil.copy(source_img, test_destination_png)for n in range(train_size + test_size , train_size + test_size + val_size):source_txt = main_txt_file + "/" + metarial[n] + ".txt"source_img = main_img_file + "/" + metarial[n] + ".png"mstring = metarial[n]val_destination_txt = "../dataset/val/labels" + "/" + metarial[n] + ".txt"val_destination_png = "../dataset/val/images" + "/" + metarial[n] + ".png"shutil.copy(source_txt, val_destination_txt)shutil.copy(source_img, val_destination_png)运行这串将数据集简单分类(通常训练7测试2验证1)
preparinbdata("../data/labels", "../data/images", 603, 150, 100)3.配置yolov8训练的yaml:
配置和管理YOLOv8模型训练过程中所需的数据集信息,创建一个dataset.yaml文件。这个文件包含了数据集的路径和类别信息
train: ../dataset/train/images
test: ../datasset/tset.images
val: ../dataset/val/imagesnc: 3
names: ["without_mask", "with_mask", "mask_weared_incorrect"]
4.训练参数设置:
启用YOLOv8,训练模型(根据自己情况调整——参数链接 Ultralytics YOLOv8 Docs)
不使用官方的预训练模型对数据进行模型训练,进行模型训练(后续效果由此次模型得出)
import ultralytics import YOLO
YOLO.checks()
# 直接使用配置好的yaml文件训练模型,训练参数适当调整
model = YOLO('../../yolov8n.pt')
model.train(data="../dataset/dataset.yaml",epochs=50, imgsz=640
)
使用官方的预训练模型对数据进行模型训练(推荐)
# Load a model
model = YOLO('../../yolov8n.pt') # load an official model
model.train(**{'cfg': 'ultralytics/cfg/default.yaml',data="../../dataset/dataset.yaml"
})
对于自己训练的数据集,通常使用预训练的权重文件来初始化模型。这些预训练的权重文件通常是在大规模图像数据上训练得到的,可以帮助模型更快地收敛和学习特征。因此从ultralytics公司的github官网下载了YOLOv8n.pt文件作为预训练模型。学习率默认设置为0.01,优化器使用SGD,设置最大迭代次数epoch为200,批处理大小batch size设置为默认16
model:  # (str, optional) path to model file, i.e. yolov8n.pt, yolov8n.yaml
data:  # (str, optional) path to data file, i.e. coco128.yaml
epochs: 200  # (int) number of epochs to train for
patience: 50  # (int) epochs to wait for no observable improvement for early stopping of training
batch: 16  # (int) number of images per batch (-1 for AutoBatch)
imgsz: 640  # (int | list) input images size as int for train and val modes, or list[w,h] for predict and export modes
save: True  # (bool) save train checkpoints and predict results
save_period: -1 # (int) Save checkpoint every x epochs (disabled if < 1)
cache: False  # (bool) True/ram, disk or False. Use cache for data loading
device:  # (int | str | list, optional) device to run on, i.e. cuda device=0 or device=0,1,2,3 or device=cpu
workers: 8  # (int) number of worker threads for data loading (per RANK if DDP)
project:  # (str, optional) project name
name:  # (str, optional) experiment name, results saved to 'project/name' directory
exist_ok: False  # (bool) whether to overwrite existing experiment
pretrained: True  # (bool | str) whether to use a pretrained model (bool) or a model to load weights from (str)
optimizer: auto  # (str) optimizer to use, choices=[SGD, Adam, Adamax, AdamW, NAdam, RAdam, RMSProp, auto]
verbose: True  # (bool) whether to print verbose output
seed: 0  # (int) random seed for reproducibility
deterministic: True  # (bool) whether to enable deterministic mode
single_cls: False  # (bool) train multi-class data as single-class
rect: False  # (bool) rectangular training if mode='train' or rectangular validation if mode='val'
cos_lr: False  # (bool) use cosine learning rate scheduler
close_mosaic: 10  # (int) disable mosaic augmentation for final epochs (0 to disable)
resume: False  # (bool) resume training from last checkpoint
amp: True  # (bool) Automatic Mixed Precision (AMP) training, choices=[True, False], True runs AMP check
fraction: 1.0  # (float) dataset fraction to train on (default is 1.0, all images in train set)
profile: False  # (bool) profile ONNX and TensorRT speeds during training for loggers
freeze: None  # (int | list, optional) freeze first n layers, or freeze list of layer indices during training
四、分析模型:
YOLOv8完成模型训练后会输出各种参数图
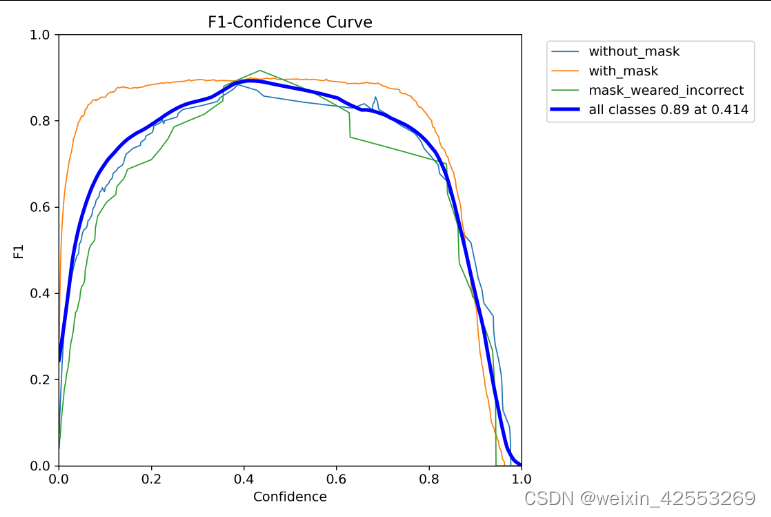
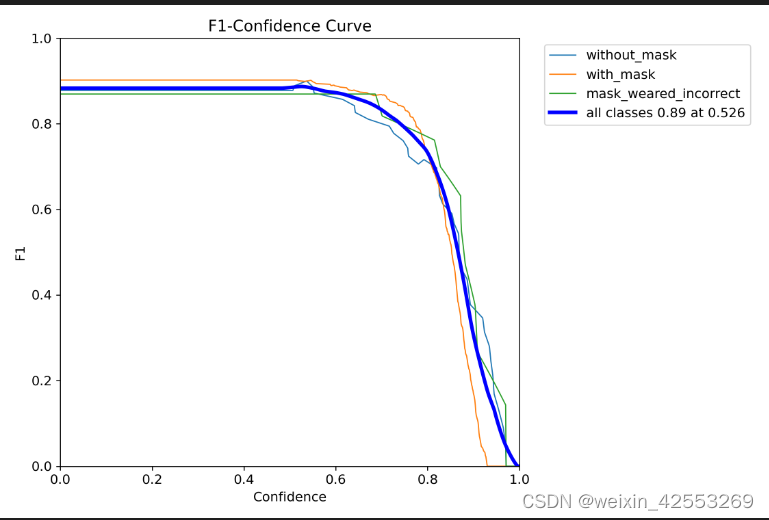
1.F1 Curve图:
未使用官方的预处理模型的F1图。F1分数与置信度(x轴)之间的关系。F1分数是分类的一个衡量标准,是精确率和召回率的调和平均函数,介于0,1之间。越大越好,看出来该模型效果一般
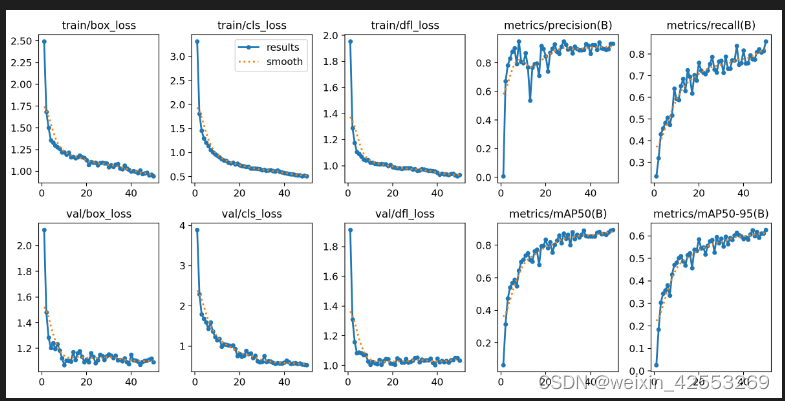
2.results图:
在训练过程中,我们使用深度学习(tensorboard)记录了模型在训练集和验证集上的损失曲线,比较训练集的损失和验证集的损失曲线,发现训练集的损失曲线一直下降,而验证集的损失曲线后面呈上升状态,说明模型训练过程中发生了过拟合。
可以考虑使用以下方法缓解或者解决过拟合:增加数据量:过拟合可能是由于数据量不足导致的,因此可以增加训练数据量,以减少过拟合的风险。
一、第二次的模型参数效果
第二次运行的F1和results(刚开始参数调过大,效果也一般)

五、模型测试:
完成后从restult找到第一次训练模型权重(best.pt),使用该模型权重,使用该模型运行test集,保存
model = YOLO('../Result/runs/detect/train/weights/best.pt')
model.predict(source='../test/images', **{'save': True})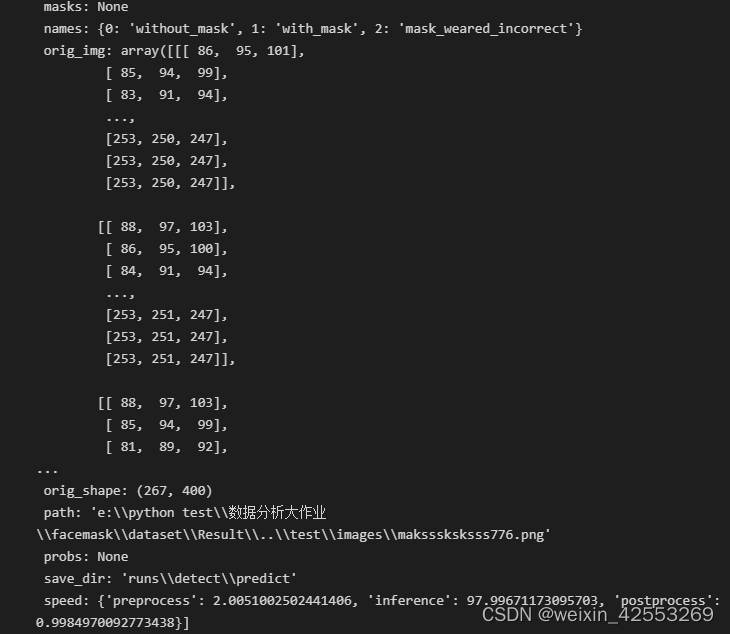
打开一张test集图片看看识别效果
from PIL import Image
Image.open('../dataset/Result/runs/detect/predict/maksssksksss641.png')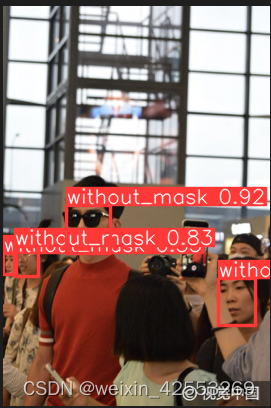 效果还行,可以继续优化,有更高精度需求可以继续训练模型。
六、结语:
在此项目中,我学到了许多有关目标检测和深度学习的重要知识和经验。通过这次项目,我了解了目标检测领域的主要算法,特别是YOLOv8。学习了如何使用现代深度学习技术来构建高性能的目标检测系统:了解了模型训练的基本原理,包括损失函数、优化器和迭代过程;学会了如何选择和调整超参数以优化模型性能;此外,学习了如何使用不同的性能指标(如Precision、Recall、mAP等)来评估模型的性能。
这篇关于深度学习:基于yolov8口罩识别的文章就介绍到这儿,希望我们推荐的文章对编程师们有所帮助!


