本文主要是介绍Halcon测量专栏-圆弧测量,希望对大家解决编程问题提供一定的参考价值,需要的开发者们随着小编来一起学习吧!
1.前言
1.1什么是圆弧
圆上任意两点间的部分叫做圆弧。由于圆弧有正反的特性,即为有顺时针方向和逆时针方向,在确定圆弧时,也需要确定圆弧的方向。
1.2halcon实现方式
针对圆弧的问题。1:它与圆是相似的,都具备中心坐标和半径,还有起始和终点角度;2:定义一个圆弧方向,以顺时针为测量方向。
2.halcon程序
2.1halcon程序
read_image (Image, 'D:/1NewWork/work/2.26/圆.png')get_image_size (Image, Width, Height)
*获得圆上初始采样点
row:=[296,949,2046]
column:=[2555,3063,1192]
********************************拟合弧形采样ROI*****************
gen_contour_polygon_xld (Contour, row, column)
fit_circle_contour_xld (Contour, 'algebraic', -1, 0, 0, 3, 2, Row, Column, Radius, StartPhi, EndPhi, PointOrder)
gen_circle_contour_xld (ContCircle, Row, Column, Radius, EndPhi,StartPhi,  'positive', 1)
*gen_circle_contour_xld (ContCircle, Row, Column, Radius, 1,EndPhi,  'positive', 1)
dev_display (Image)
dev_display (ContCircle)
row1:=[]
column1:=[]
gen_empty_obj (EmptyObject)
gen_empty_obj (EmptyObject2)phi:=3.14*2-StartPhituple_abs (StartPhi-EndPhi+3.14*2, Abs)
tuple_ceil (Abs/3.1415926*90, Ceil)
**********************************弧形采样*********************
for Index := 0to Ceil-1 by 1tuple_sin(phi+rad(Index*2),Sin)tuple_cos(phi+rad(Index*2),Cos)*创建测量矩形gen_measure_rectangle2 (Row+Radius*Sin, Column+Radius*Cos, -Index*3.1415926/180*2-phi, 50, 5, Width, Height, 'nearest_neighbor', MeasureHandle)*绘制测量矩形轮廓用于显示gen_rectangle2_contour_xld (Rectangle,Row+Radius*Sin, Column+Radius*Cos, -Index*3.1415926/180*2-phi, 50, 5)*开启测量measure_pos (Image, MeasureHandle, 2, 20, 'all', 'last', RowEdge, ColumnEdge, Amplitude, Distance)*绘制测量结果gen_cross_contour_xld (Cross, RowEdge, ColumnEdge, 20, 1)concat_obj (Cross, EmptyObject, EmptyObject)concat_obj (EmptyObject2, Rectangle, EmptyObject2)row1:=[row1,RowEdge]column1:=[column1,ColumnEdge]
endforgen_contour_polygon_xld (Contour1, row1, column1)
*********************输出结果横纵坐标与半径,起始与结束的角度*****************
fit_circle_contour_xld (Contour1, 'algebraic', -1, 0, 0, 3, 2, Row2, Column2, Radius2, StartPhi2, EndPhi2, PointOrder2)
gen_circle_contour_xld (ContCircle2, Row2, Column2, Radius2,EndPhi2, StartPhi2,  'positive', 1)
dev_display (Image)
dev_display (ContCircle)
dev_display (EmptyObject2)
dev_display (EmptyObject)
dev_display (ContCircle2)
2.2halcon程序讲解
2.2.1读取图像和绘制ROI
read_image (Image, 'D:/1NewWork/work/2.26/圆.png')
get_image_size (Image, Width, Height)
*获得圆上初始采样点
row:=[296,949,2046]
column:=[2555,3063,1192]
********************************拟合弧形采样ROI*****************
gen_contour_polygon_xld (Contour, row, column)
fit_circle_contour_xld (Contour, 'algebraic', -1, 0, 0, 3, 2, Row, Column, Radius, StartPhi, EndPhi, PointOrder)
找圆弧与找圆是类似的,都需要一个基准的ROI区域,但是圆弧在于,它需要起始点和终点,中间点为圆心位置。根据3点绘制圆的方式,所以ROI选取,3个采样点即可
2.2.2拟合采样点,并绘制弧线ROI
gen_contour_polygon_xld (Contour, row, column)
fit_circle_contour_xld (Contour, 'algebraic', -1, 0, 0, 3, 2, Row, Column, Radius, StartPhi, EndPhi, PointOrder)
gen_circle_contour_xld (ContCircle, Row, Column, Radius, EndPhi,StartPhi,  'positive', 1)
*gen_circle_contour_xld (ContCircle, Row, Column, Radius, 1,EndPhi,  'positive', 1)
dev_display (Image)
dev_display (ContCircle)
通过选取的3点ROI拟合一个圆,获取到圆心坐标,半径,圆弧的起始和终点
2.2.3圆弧检测
row1:=[]
column1:=[]
gen_empty_obj (EmptyObject)
gen_empty_obj (EmptyObject2)phi:=3.14*2-StartPhituple_abs (StartPhi-EndPhi+3.14*2, Abs)
tuple_ceil (Abs/3.1415926*90, Ceil)
**********************************弧形采样*********************
for Index := 0to Ceil-1 by 1tuple_sin(phi+rad(Index*2),Sin)tuple_cos(phi+rad(Index*2),Cos)*创建测量矩形gen_measure_rectangle2 (Row+Radius*Sin, Column+Radius*Cos, -Index*3.1415926/180*2-phi, 50, 5, Width, Height, 'nearest_neighbor', MeasureHandle)*绘制测量矩形轮廓用于显示gen_rectangle2_contour_xld (Rectangle,Row+Radius*Sin, Column+Radius*Cos, -Index*3.1415926/180*2-phi, 50, 5)*开启测量measure_pos (Image, MeasureHandle, 2, 20, 'all', 'last', RowEdge, ColumnEdge, Amplitude, Distance)*绘制测量结果gen_cross_contour_xld (Cross, RowEdge, ColumnEdge, 20, 1)concat_obj (Cross, EmptyObject, EmptyObject)concat_obj (EmptyObject2, Rectangle, EmptyObject2)row1:=[row1,RowEdge]column1:=[column1,ColumnEdge]
endforgen_contour_polygon_xld (Contour1, row1, column1)
*********************输出结果横纵坐标与半径,起始与结束的角度*****************
fit_circle_contour_xld (Contour1, 'algebraic', -1, 0, 0, 3, 2, Row2, Column2, Radius2, StartPhi2, EndPhi2, PointOrder2)
gen_circle_contour_xld (ContCircle2, Row2, Column2, Radius2,EndPhi2, StartPhi2,  'positive', 1)
dev_display (Image)
dev_display (ContCircle)
dev_display (EmptyObject2)
dev_display (EmptyObject)
dev_display (ContCircle2)
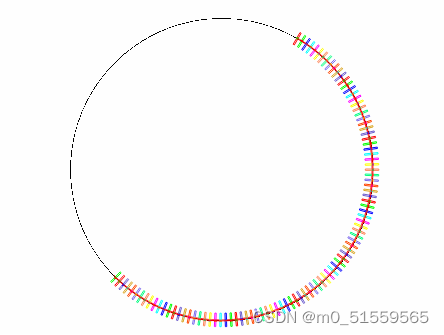
根据定义的圆弧,以初始点为起始点,顺时针旋转,旋转指定角度,并使用测量矩形对每个采样区域进行采样,将所有采样点重新拟合为圆即可得到最终结果

2.2.4注意事项
尤为要注意圆弧是有方向的,文中预先定义圆弧方向为顺时针方向
3.C#程序工具实现
#region // 圆弧测量
public static bool ArcMeasure(HObject image,HTuple Row1,HTuple Column1,HTuple Row2,HTuple Column2,HTuple Row3,HTuple Column3, HTuple Sigma, HTuple Threshold,out HObject ConCircle,out HTuple CenterRow,out HTuple CenterColumn,out HTuple ResultR,out HTuple StartPhi,out HTuple EndPhi)
{HOperatorSet.GenEmptyObj(out ConCircle);CenterRow = -1;CenterColumn = -1;ResultR = -1;StartPhi = -1;EndPhi = -1;try{HOperatorSet.GetImageSize(image, out HTuple width, out HTuple height);HTuple Row = new HTuple(),Column=new HTuple();Row[0] = Row1; Row[1] = Row2; Row[2] = Row3;Column[0]= Column1; Column[1]= Column2; Column[2] = Column3;HOperatorSet.GenContourPolygonXld(out HObject  Contour, Row, Column);HOperatorSet.FitCircleContourXld(Contour, "algebraic", -1, 0, 0, 3, 2, out HTuple row,out HTuple column, out HTuple radius, out HTuple startPhi, out HTuple endPhi, out HTuple pointOrder);HTuple row1=new HTuple(),column1=new HTuple(),phi=0;HOperatorSet.GenEmptyObj(out HObject emptyObject);HOperatorSet.GenEmptyObj(out HObject emptyObject2);phi = Math.PI*2 - startPhi;HOperatorSet.TupleAbs(startPhi - endPhi+Math.PI*2, out HTuple abs);HOperatorSet.TupleCeil(abs / Math.PI * 90, out HTuple ceil);for (int i = 0; i < ceil-1; i++){HOperatorSet.TupleSin(phi + i * 2 * Math.PI / 180 , out HTuple sin);HOperatorSet.TupleCos(phi + i * 2 * Math.PI / 180 , out HTuple cos);HOperatorSet.GenMeasureRectangle2(row + radius * sin, column + radius * cos, ((((-i) * 3.1415926) / 180) * 2) - phi ,50, 5, width, height, new HTuple("nearest_neighbor"), out HTuple measureHandle);HOperatorSet.MeasurePos(image, measureHandle, 2, 20, new HTuple("all"), new HTuple("last"), out HTuple rowEdge,out HTuple columnEdge, out HTuple amplitude, out HTuple distance);row1 = row1.TupleConcat(rowEdge);column1 = column1.TupleConcat(columnEdge);}HOperatorSet.GenContourPolygonXld(out HObject contour, row1, column1);HOperatorSet.FitCircleContourXld(contour, new HTuple("algebraic"), -1, 0, 0, 3, 2, out CenterRow, out CenterColumn,out ResultR, out StartPhi, out EndPhi , out HTuple pointOrder2);HOperatorSet.TupleLength(CenterRow, out HTuple length);if (length == 0){return false;}HOperatorSet.GenCircleContourXld(out ConCircle, CenterRow, CenterColumn, ResultR, EndPhi, StartPhi, new HTuple("positive"), 1);return true;}catch (Exception){return false;}
}
#endregion
#region // 单点查找
/// <summary>
/// 单个点查找
/// </summary>
/// <param name="Image">输入图像</param>
/// <param name="Row1">输入直线起始横坐标</param>
/// <param name="Column1">输入直线起始列坐标</param>
/// <param name="Row2">输入直线终点横坐标</param>
/// <param name="Column2">输入直线终点列坐标</param>
/// <param name="MeasureWide">输入测量矩形宽度</param>
/// <param name="Sigma">输入测量矩形的高斯滤波值</param>
/// <param name="Thrashold">输入最小边缘对比度</param>
/// <param name="ResultRow">输出结果横坐标</param>
/// <param name="ResultColumn">输出结果列坐标</param>
/// <returns>拟合成功返回true,拟合失败返回false</returns>
static public bool PointMeasure_(HObject Image, HTuple Row1, HTuple Column1,HTuple Row2,HTuple Column2,HTuple MeasureWide, HTuple Sigma, HTuple Thrashold, out HTuple ResultRow, out HTuple ResultColumn)
{ResultRow = -1; ResultColumn = -1;try{HTuple hv_TmpCtrl_Row, hv_TmpCtrl_Column, hv_TmpCtrl_Dr, hv_TmpCtrl_Dc, hv_TmpCtrl_Phi,hv_TmpCtrl_Len1;HOperatorSet.GetImageSize(Image, out HTuple width, out HTuple height);hv_TmpCtrl_Row = 0.5 * (Row1 + Row2);hv_TmpCtrl_Column = 0.5 * (Column1 + Column2);hv_TmpCtrl_Dr = Row1 - Row2;hv_TmpCtrl_Dc = Column2 - Column1;hv_TmpCtrl_Phi = hv_TmpCtrl_Dr.TupleAtan2( hv_TmpCtrl_Dc);hv_TmpCtrl_Len1 = 0.5 * ((((hv_TmpCtrl_Dr * hv_TmpCtrl_Dr) + (hv_TmpCtrl_Dc * hv_TmpCtrl_Dc))).TupleSqrt());HOperatorSet.GenMeasureRectangle2(hv_TmpCtrl_Row, hv_TmpCtrl_Column, hv_TmpCtrl_Phi,hv_TmpCtrl_Len1, MeasureWide, width, height, "nearest_neighbor", out HTuple measureHandle);HOperatorSet.MeasurePos(Image, measureHandle, Sigma, Thrashold, new HTuple("all"), new HTuple("first"), out ResultRow,out ResultColumn, out HTuple amplitude, out HTuple distance);HOperatorSet.TupleLength(ResultRow, out HTuple length);if (length==0){return false;}return true;}catch (Exception){return false;}
}
#endregion
总结
弧形检测,与圆检测依旧类型,都是通过一定量的采样点去拟合出几何图形。
这篇关于Halcon测量专栏-圆弧测量的文章就介绍到这儿,希望我们推荐的文章对编程师们有所帮助!


