本文主要是介绍挑战杯 基于深度学习的人脸表情识别,希望对大家解决编程问题提供一定的参考价值,需要的开发者们随着小编来一起学习吧!
文章目录
- 0 前言
- 1 技术介绍
- 1.1 技术概括
- 1.2 目前表情识别实现技术
- 2 实现效果
- 3 深度学习表情识别实现过程
- 3.1 网络架构
- 3.2 数据
- 3.3 实现流程
- 3.4 部分实现代码
- 4 最后
0 前言
🔥 优质竞赛项目系列,今天要分享的是
基于深度学习的人脸表情识别
该项目较为新颖,适合作为竞赛课题方向,学长非常推荐!
🧿 更多资料, 项目分享:
https://gitee.com/dancheng-senior/postgraduate
1 技术介绍
1.1 技术概括
面部表情识别技术源于1971年心理学家Ekman和Friesen的一项研究,他们提出人类主要有六种基本情感,每种情感以唯一的表情来反映当时的心理活动,这六种情感分别是愤怒(anger)、高兴(happiness)、悲伤
(sadness)、惊讶(surprise)、厌恶(disgust)和恐惧(fear)。
尽管人类的情感维度和表情复杂度远不是数字6可以量化的,但总体而言,这6种也差不多够描述了。

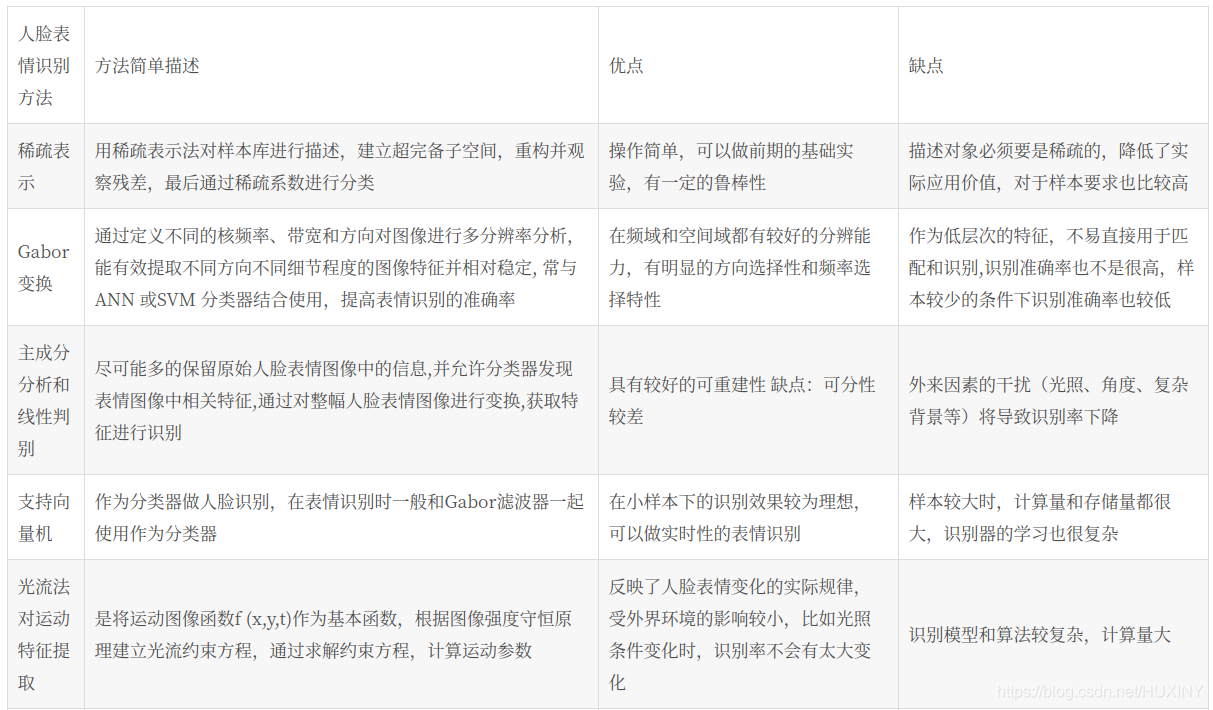
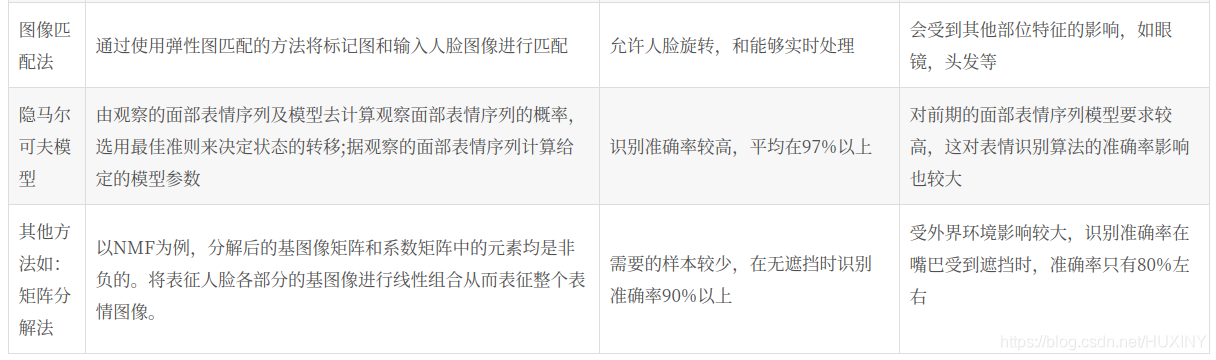
1.2 目前表情识别实现技术
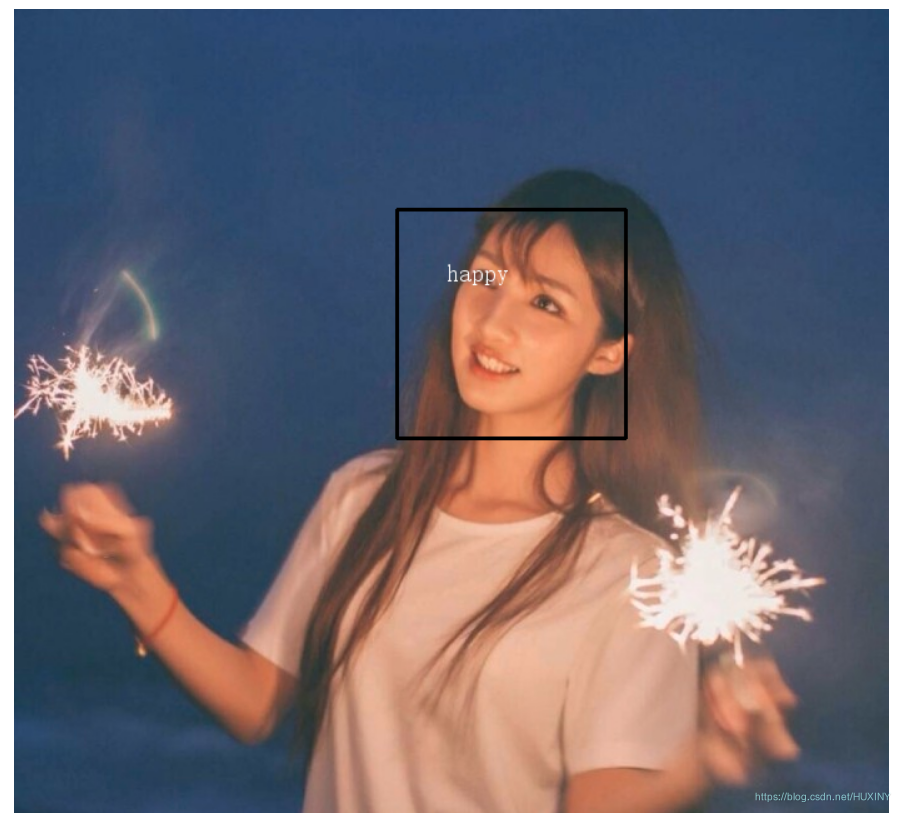
2 实现效果
废话不多说,先上实现效果


3 深度学习表情识别实现过程
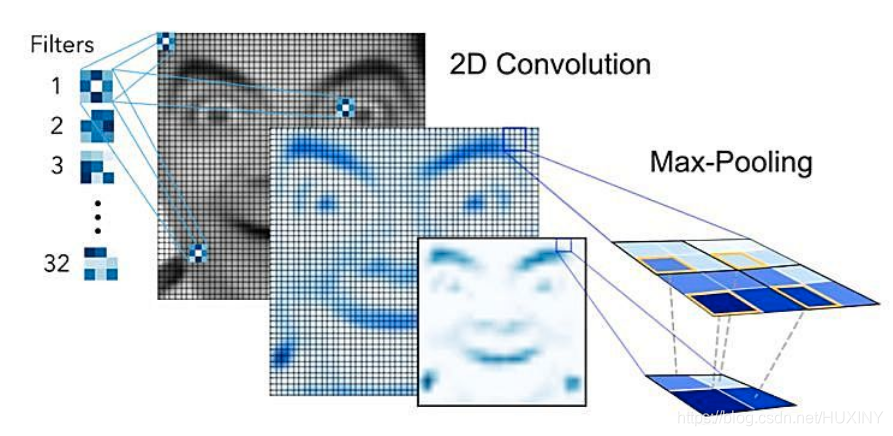
3.1 网络架构
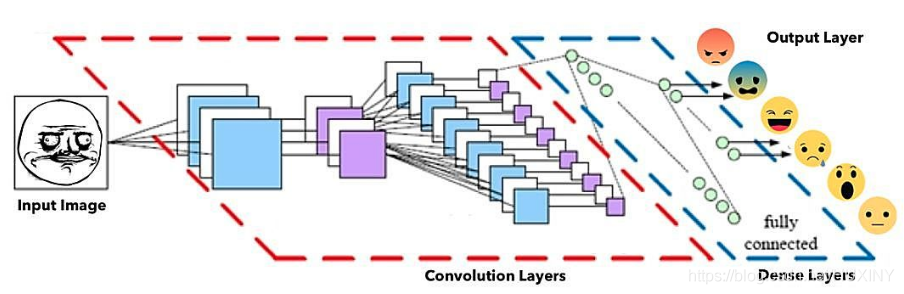
面部表情识别CNN架构(改编自 埃因霍芬理工大学PARsE结构图)
其中,通过卷积操作来创建特征映射,将卷积核挨个与图像进行卷积,从而创建一组要素图,并在其后通过池化(pooling)操作来降维。
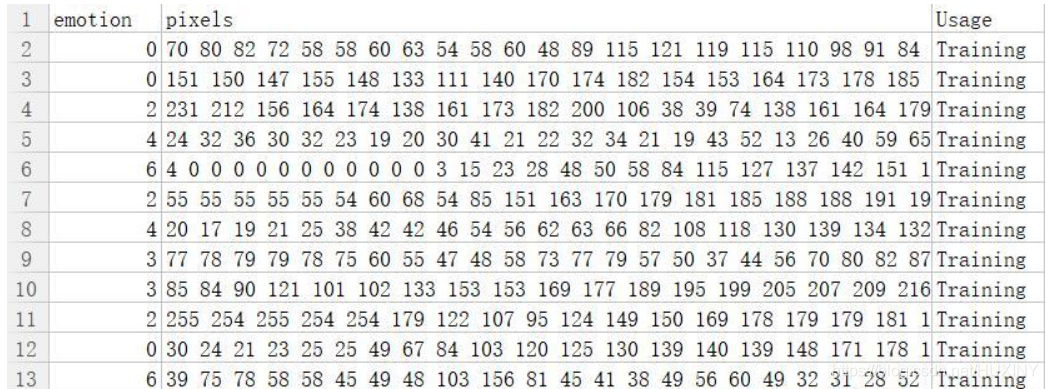
3.2 数据
主要来源于kaggle比赛,下载地址。
有七种表情类别: (0=Angry, 1=Disgust, 2=Fear, 3=Happy, 4=Sad, 5=Surprise, 6=Neutral).
数据是48x48 灰度图,格式比较奇葩。
第一列是情绪分类,第二列是图像的numpy,第三列是train or test。
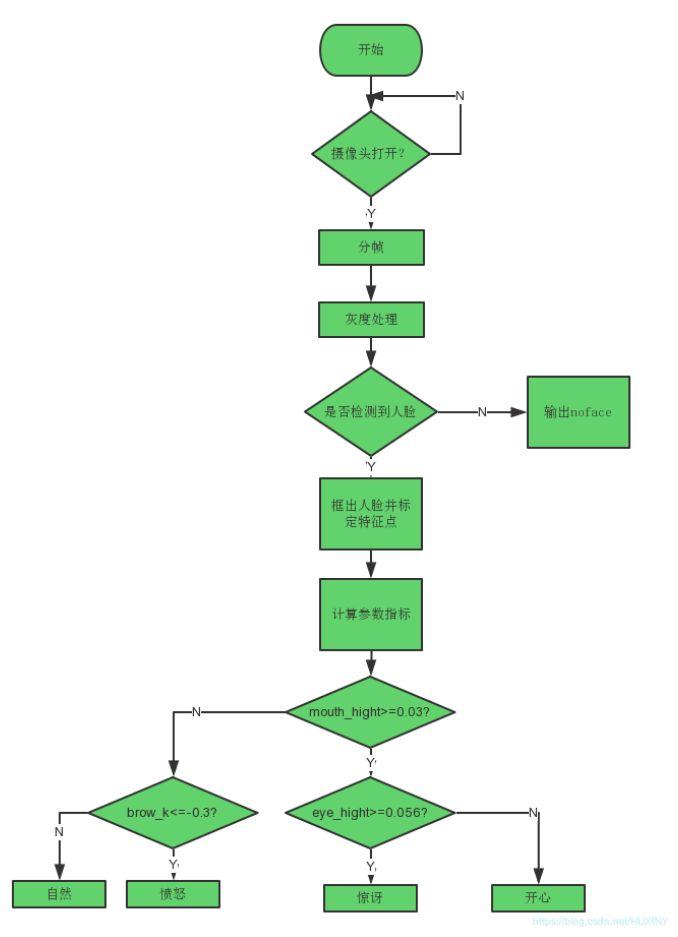
3.3 实现流程
3.4 部分实现代码
import cv2import sysimport jsonimport numpy as npfrom keras.models import model_from_jsonemotions = ['angry', 'fear', 'happy', 'sad', 'surprise', 'neutral']cascPath = sys.argv[1]faceCascade = cv2.CascadeClassifier(cascPath)noseCascade = cv2.CascadeClassifier(cascPath)# load json and create model archjson_file = open('model.json','r')loaded_model_json = json_file.read()json_file.close()model = model_from_json(loaded_model_json)# load weights into new modelmodel.load_weights('model.h5')# overlay meme facedef overlay_memeface(probs):if max(probs) > 0.8:emotion = emotions[np.argmax(probs)]return 'meme_faces/{}-{}.png'.format(emotion, emotion)else:index1, index2 = np.argsort(probs)[::-1][:2]emotion1 = emotions[index1]emotion2 = emotions[index2]return 'meme_faces/{}-{}.png'.format(emotion1, emotion2)def predict_emotion(face_image_gray): # a single cropped faceresized_img = cv2.resize(face_image_gray, (48,48), interpolation = cv2.INTER_AREA)# cv2.imwrite(str(index)+'.png', resized_img)image = resized_img.reshape(1, 1, 48, 48)list_of_list = model.predict(image, batch_size=1, verbose=1)angry, fear, happy, sad, surprise, neutral = [prob for lst in list_of_list for prob in lst]return [angry, fear, happy, sad, surprise, neutral]video_capture = cv2.VideoCapture(0)while True:# Capture frame-by-frameret, frame = video_capture.read()img_gray = cv2.cvtColor(frame, cv2.COLOR_BGR2GRAY,1)faces = faceCascade.detectMultiScale(img_gray,scaleFactor=1.1,minNeighbors=5,minSize=(30, 30),flags=cv2.cv.CV_HAAR_SCALE_IMAGE)# Draw a rectangle around the facesfor (x, y, w, h) in faces:face_image_gray = img_gray[y:y+h, x:x+w]filename = overlay_memeface(predict_emotion(face_image_gray))print filenamememe = cv2.imread(filename,-1)# meme = (meme/256).astype('uint8')try:meme.shape[2]except:meme = meme.reshape(meme.shape[0], meme.shape[1], 1)# print meme.dtype# print meme.shapeorig_mask = meme[:,:,3]# print orig_mask.shape# memegray = cv2.cvtColor(orig_mask, cv2.COLOR_BGR2GRAY)ret1, orig_mask = cv2.threshold(orig_mask, 10, 255, cv2.THRESH_BINARY)orig_mask_inv = cv2.bitwise_not(orig_mask)meme = meme[:,:,0:3]origMustacheHeight, origMustacheWidth = meme.shape[:2]roi_gray = img_gray[y:y+h, x:x+w]roi_color = frame[y:y+h, x:x+w]# Detect a nose within the region bounded by each face (the ROI)nose = noseCascade.detectMultiScale(roi_gray)for (nx,ny,nw,nh) in nose:# Un-comment the next line for debug (draw box around the nose)#cv2.rectangle(roi_color,(nx,ny),(nx+nw,ny+nh),(255,0,0),2)# The mustache should be three times the width of the nosemustacheWidth = 20 * nwmustacheHeight = mustacheWidth * origMustacheHeight / origMustacheWidth# Center the mustache on the bottom of the nosex1 = nx - (mustacheWidth/4)x2 = nx + nw + (mustacheWidth/4)y1 = ny + nh - (mustacheHeight/2)y2 = ny + nh + (mustacheHeight/2)# Check for clippingif x1 < 0:x1 = 0if y1 < 0:y1 = 0if x2 > w:x2 = wif y2 > h:y2 = h# Re-calculate the width and height of the mustache imagemustacheWidth = (x2 - x1)mustacheHeight = (y2 - y1)# Re-size the original image and the masks to the mustache sizes# calcualted abovemustache = cv2.resize(meme, (mustacheWidth,mustacheHeight), interpolation = cv2.INTER_AREA)mask = cv2.resize(orig_mask, (mustacheWidth,mustacheHeight), interpolation = cv2.INTER_AREA)mask_inv = cv2.resize(orig_mask_inv, (mustacheWidth,mustacheHeight), interpolation = cv2.INTER_AREA)# take ROI for mustache from background equal to size of mustache imageroi = roi_color[y1:y2, x1:x2]# roi_bg contains the original image only where the mustache is not# in the region that is the size of the mustache.roi_bg = cv2.bitwise_and(roi,roi,mask = mask_inv)# roi_fg contains the image of the mustache only where the mustache isroi_fg = cv2.bitwise_and(mustache,mustache,mask = mask)# join the roi_bg and roi_fgdst = cv2.add(roi_bg,roi_fg)# place the joined image, saved to dst back over the original imageroi_color[y1:y2, x1:x2] = dstbreak# cv2.rectangle(frame, (x, y), (x+w, y+h), (0, 255, 0), 2)# angry, fear, happy, sad, surprise, neutral = predict_emotion(face_image_gray)# text1 = 'Angry: {} Fear: {} Happy: {}'.format(angry, fear, happy)# text2 = ' Sad: {} Surprise: {} Neutral: {}'.format(sad, surprise, neutral)## cv2.putText(frame, text1, (50, 50), cv2.FONT_HERSHEY_SIMPLEX, 2, (255, 0, 0), 3)# cv2.putText(frame, text2, (50, 150), cv2.FONT_HERSHEY_SIMPLEX, 2, (255, 0, 0), 3)# Display the resulting framecv2.imshow('Video', frame)if cv2.waitKey(1) & 0xFF == ord('q'):break# When everything is done, release the capturevideo_capture.release()cv2.destroyAllWindows()4 最后
🧿 更多资料, 项目分享:
https://gitee.com/dancheng-senior/postgraduate
这篇关于挑战杯 基于深度学习的人脸表情识别的文章就介绍到这儿,希望我们推荐的文章对编程师们有所帮助!


