本文主要是介绍bun build,希望对大家解决编程问题提供一定的参考价值,需要的开发者们随着小编来一起学习吧!
Bun 的快速原生打包器现已进入测试版阶段。可通过 bun build CLI 命令或 Bun.build() JavaScript API 使用。
bun build ./index.tsx --outdir ./buildawait Bun.build({entrypoints: ['./index.tsx'],outdir: './build',
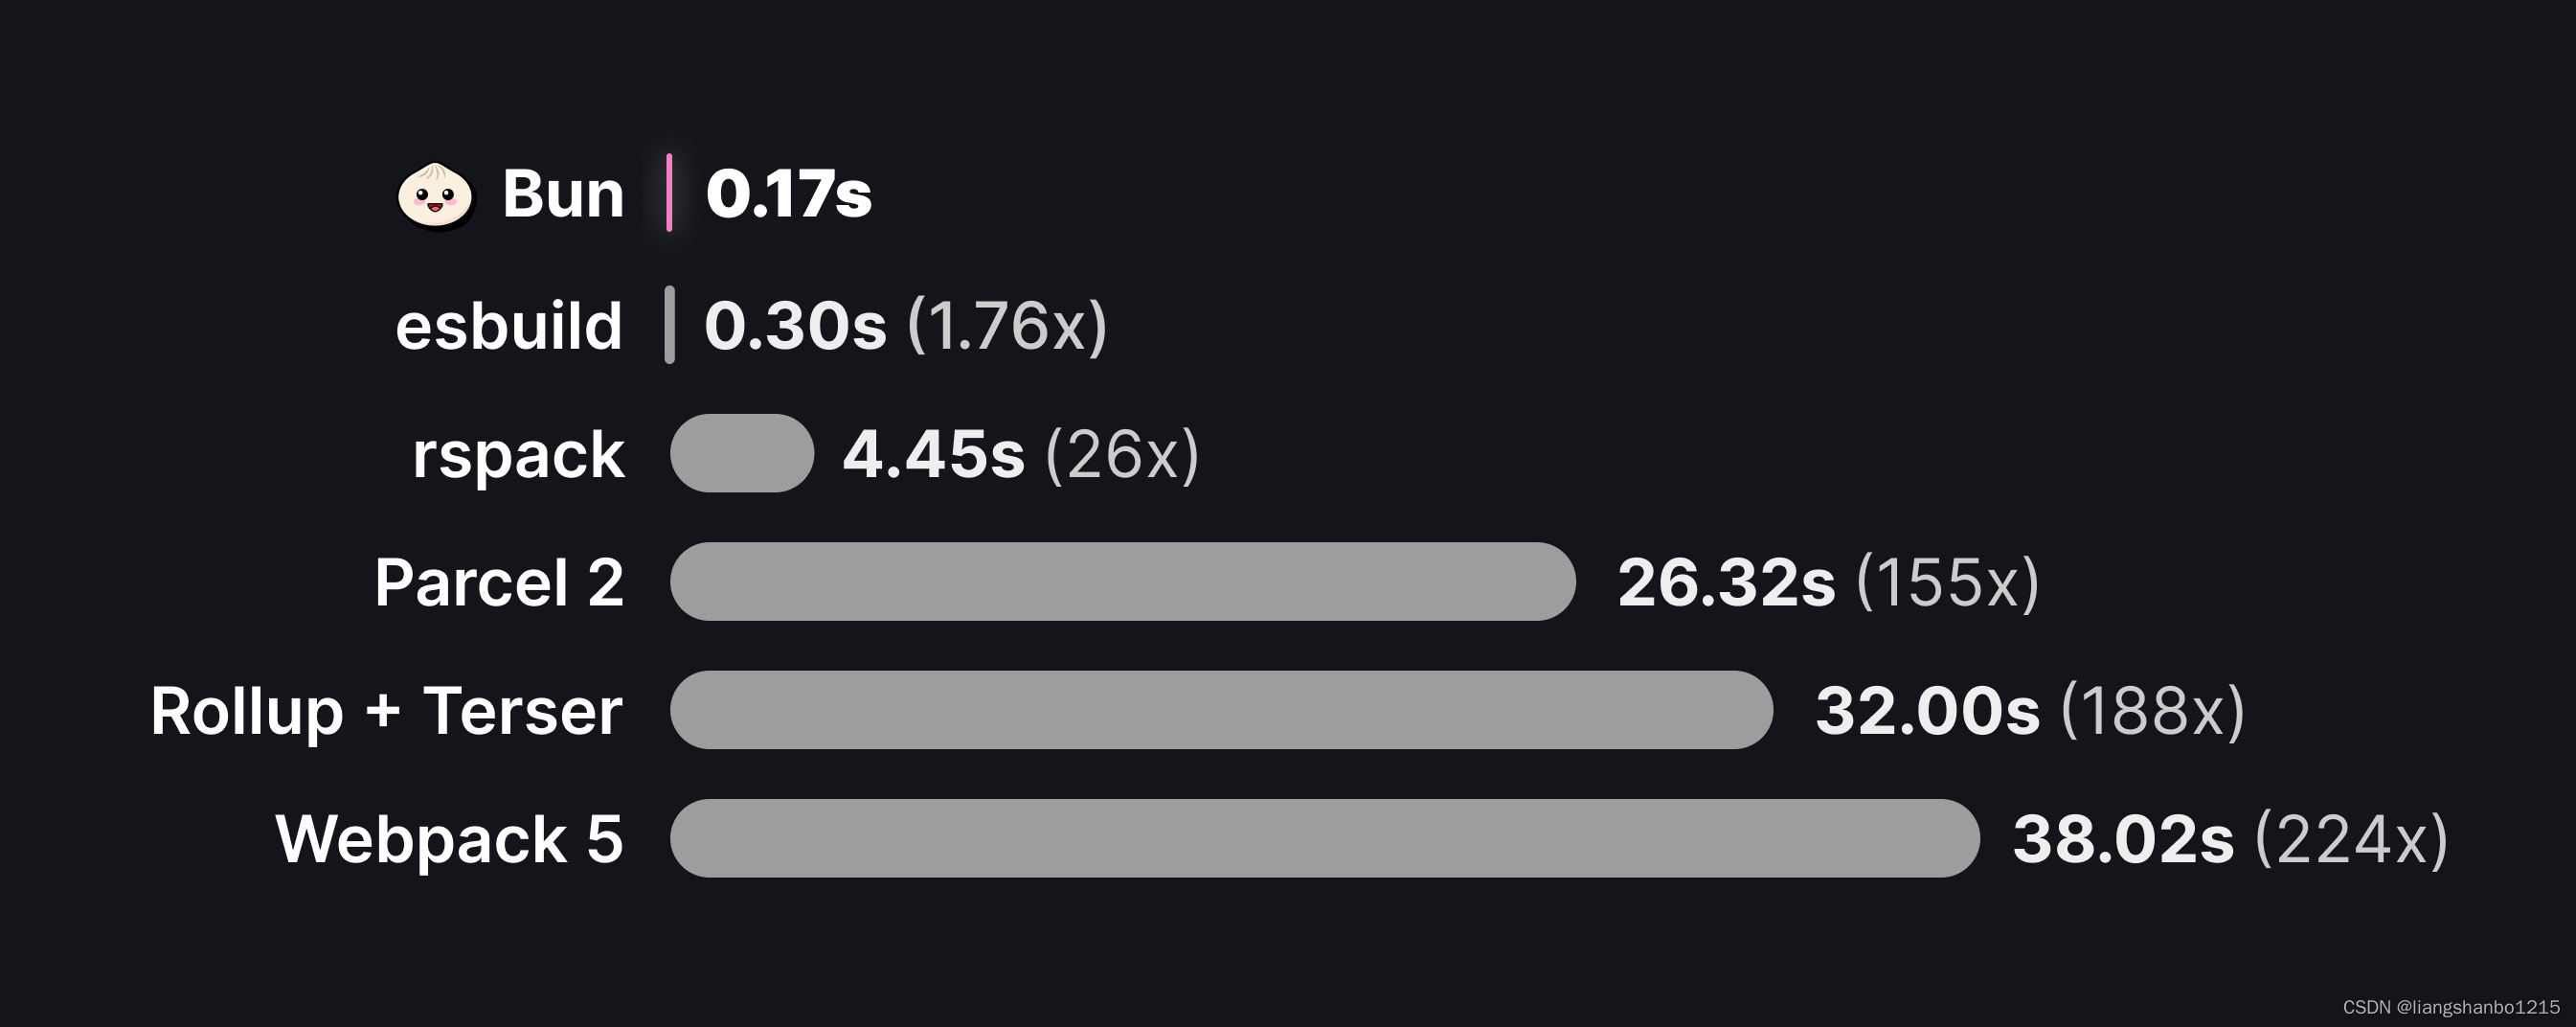
});速度很快。下面的数字代表 esbuild 在 three.js 基准测试中的性能。

为什么使用 Bun 作为打包器?
- 减少HTTP请求。node_modules 中的一个包可能包含数百个文件,而大型应用程序可能具有数十个这样的依赖项。使用单独的HTTP请求加载这些文件很快就会变得不可行,因此打包器被用于将我们的应用程序源代码转换为数量较少、可以单独加载的“捆绑包”。
- 代码转换。现代应用程序通常使用TypeScript、JSX和CSS模块等语言或工具构建,所有这些在浏览器使用之前都必须转换为普通的JavaScript和CSS。打包器是配置这些转换的自然位置。
- 框架功能。框架依赖于打包器插件和代码转换来实现常见的模式,如文件系统路由、客户端-服务器代码共存(例如getServerSideProps或Remix加载器)和服务器组件。
现在,让我们深入了解打包器API。
注意,Bun打包器不是为了替换tsc进行类型检查或生成类型声明。
基本示例
让我们构建第一个 bundle 包。您有以下两个文件,它们实现了客户端渲染的简单的 React 应用程序。
// ./index.tsx
import * as ReactDOM from 'react-dom/client';
import {Component} from "./Component"const root = ReactDOM.createRoot(document.getElementById('root')!);
root.render(<Component message="Sup!" />)// ./Component.tsx
export function Component(props: {message: string}) {return <p>{props.message}</p>
}
在这里,index.tsx 是我们应用程序的“入口点”。通常,这将是一个执行一些副作用的脚本,比如启动服务器或初始化一个 React 根结点。因为我们正在使用 TypeScript 和 JSX,所以我们需要将我们的代码打包后才能发送到浏览器。
创建我们的打包文件:
使用命令行:
bun build ./index.tsx --outdir ./out使用 Javascript:
await Bun.build({entrypoints: ['./index.tsx'],outdir: './out',
})
对于 entrypoints 中指定的每个文件,Bun 将生成一个新的 bundle。这个 bundle 将被写入到当前工作目录(current working directory)下的 ./out 目录中。构建运行后,文件系统看起来像这样:
.
├── index.tsx
├── Component.tsx
└── out└── index.js
out/index.js 的内容看起来像这样:
// ...
// ~20k lines of code
// including the contents of `react-dom/client` and all its dependencies
// this is where the $jsxDEV and $createRoot functions are defined// Component.tsx
function Component(props) {return $jsxDEV("p", {children: props.message}, undefined, false, undefined, this);
}// index.tsx
var rootNode = document.getElementById("root");
var root = $createRoot(rootNode);
root.render($jsxDEV(Component, {message: "Sup!"
}, undefined, false, undefined, this));
教程:在浏览器中运行此文件
我们可以在浏览器中加载此文件来查看我们的应用程序的实际操作。在 out 目录中创建一个 index.html 文件:
touch out/index.html然后将以下内容粘贴到其中:
<html><body><div id="root"></div><script type="module" src="/index.js"></script></body>
</html>
然后,启动一个静态文件服务器,为 out 目录提供服务:
bunx serve out访问 http://localhost:5000 以查看打包后的应用程序的运行情况。
watch 模式
像运行时和测试运行器一样,打包器也原生支持监视模式。
bun build ./index.tsx --outdir ./out --watch内容类型
像Bun运行时一样,打包器开箱即用支持多种文件类型。下面的表格分解了打包器的标准“加载器”集合。如需完整文档,请参阅《打包器>文件类型》。
| 扩展后缀 | 详情 |
|
| 使用 Bun 的内置转译器解析文件,并将 TypeScript/JSX 语法转译为纯 JavaScript。打包器执行一组默认转换,包括无效代码消除、摇树优化和环境变量内联。目前,Bun 不尝试降级语法;如果你使用最新的 ECMAScript 语法,那将反映在打包后的代码中。 |
| .json | JSON 文件将被解析并以内联的方式以 JavaScript 对象的形式包含在打包文件中。 |
| .toml | TOML文件被解析并内联到捆绑包中作为一个JavaScript对象。 |
| .txt | 文本文件的内容被读取并以字符串的形式内联到捆绑包中。 |
|
| 这些文件由Bun运行时支持,但在打包过程中,它们被视为资源。 |
Assets
如果打包器遇到具有无法识别的扩展名的导入,则将其视为外部文件。 将引用的文件原样复制到输出目录(outdir),并将导入解析为到该文件的路径。
// 输入 bundle entrypoint
import logo from "./logo.svg";
console.log(logo);// 输出 bundled output
var logo = "./logo-ab237dfe.svg";
console.log(logo);
文件加载器的确切行为也受到命名和 publicPath 的影响。请参阅 Bundler > Loaders 页面,获取关于文件加载器的更完整文档。
Plugins
此表中描述的行为可以通过插件进行重写或扩展。请参考 Bundler > Loaders 页面以获取完整文档。
API
entrypoints(必须)
一个与我们的应用程序的入口点相对应的路径数组。每个入口点将生成一个捆绑包。
bun build --entrypoints ./index.ts
# the bundle will be printed to stdout
# <bundled code>ORconst result = await Bun.build({entrypoints: ["./index.ts"],
});
// => { success: boolean, outputs: BuildArtifact[], logs: BuildMessage[] }
outdir
输出文件将被写入的目录。
bun build --entrypoints ./index.ts --outdir ./out
# a summary of bundled files will be printed to stdoutORconst result = await Bun.build({entrypoints: ['./index.ts'],outdir: './out'
});
// => { success: boolean, outputs: BuildArtifact[], logs: BuildMessage[] }
如果未将 outdir 传递给JavaScript API,被打包代码将不会写入磁盘。被打包的文件将作为BuildArtifact 对象数组返回。这些对象是具有额外属性的Blob;请参阅 “outputs” 以获取完整的文档。
const result = await Bun.build({entrypoints: ["./index.ts"],
});for (const res of result.outputs) {// Can be consumed as blobsawait res.text();// Bun will set Content-Type and Etag headersnew Response(res);// Can be written manually, but you should use `outdir` in this case.Bun.write(path.join("out", res.path), res);
}
当 outdir 被设置时,BuildArtifact上 的 path 属性将是被写入位置的绝对路径。
target
打包的预期执行环境。
bun build --entrypoints ./index.ts --outdir ./out --target browser// ORawait Bun.build({entrypoints: ['./index.ts'],outdir: './out',target: 'browser', // default
})
根据 target,Bun 将应用不同的模块解析规则和优化。
| browser | 默认值。用于生成供浏览器执行的 bundle 包。在解析导入时优先考虑 “browser” 导出条件。导入任何内置模块,如node:events 或 node:path 都可以运行,但调用某些函数,如fs.readFile 则无法运行。 |
| bun | 用于生成由Bun运行时执行的 bundle 包。在许多情况下,没有必要打包服务器端代码;你可以直接执行源代码而无需修改。然而,打包服务器代码可以减少启动时间并提高运行性能。 所有使用 target:“bun” 生成的bundle 包都用一个特殊的 // @bun pragma 标记,它告诉Bun运行时在执行之前无需重新编译该文件。 如果入口点包含 Bun shebang(#!/usr/bin/env bun),打包器将默认目标为 "bun" 而不是 "browser"。 |
| node | 用于生成由 Node.js 运行的 bundle 包。在解析导入时优先考虑“node” 导出条件,并输出 .mjs。未来,这将自动为 Bun 全局和其他内置 bun:* 模块填充 polyfill,尽管这尚未实现。 |
format
指定在生成的 bundle 包中要使用的模块格式。目前,打包器仅支持一种模块格式:“esm”。“cjs” 和 “iife” 的支持正在计划中。
bun build ./index.tsx --outdir ./out --format esm// ORawait Bun.build({entrypoints: ['./index.tsx'],outdir: './out',format: "esm",
})
Splitting
是否启用代码拆包。
bun build ./index.tsx --outdir ./out --splitting// ORawait Bun.build({entrypoints: ['./index.tsx'],outdir: './out',splitting: false, // default
})
当为 true 时,打包器将启用代码拆分。当多个入口点都导入同一个文件、模块或文件/模块集时,通常将共享代码拆分为单独的捆绑包是有用的。这个共享捆绑包被称为块。考虑以下文件:
// entry-a.ts
import { shared } from './shared.ts';// entry-b.ts
import { shared } from './shared.ts';// shared.ts
export const shared = 'shared';
启用代码分割,将 entry-a.ts 和 entry-b.ts 打包:
bun build ./entry-a.ts ./entry-b.ts --outdir ./out --splitting// ORawait Bun.build({entrypoints: ['./entry-a.ts', './entry-b.ts'],outdir: './out',splitting: true,
})
运行这个构建将产生以下文件:
.
├── entry-a.tsx
├── entry-b.tsx
├── shared.tsx
└── out├── entry-a.js├── entry-b.js└── chunk-2fce6291bf86559d.js
生成的 chunk-2fce6291bf86559d.js 文件包含共享代码。为了避免冲突,文件名默认会自动包含内容哈希。这可以通过命名进行自定义。
plugins
打包过程中要使用的插件列表。
await Bun.build({entrypoints: ['./index.tsx'],outdir: './out',plugins: [/* ... */],
})
Bun 为 Bun 的运行时和打包器实现了一个通用的插件系统。请参考插件文档以获取完整的文档。
sourcemap
指定要生成的源映射的类型。
bun build ./index.tsx --outdir ./out --sourcemap=external// ORawait Bun.build({entrypoints: ['./index.tsx'],outdir: './out',sourcemap: "external", // default "none"
})| "none" | 默认。不生成 sourcemap。 |
| "inline" | 将 sourcemap 生成为 base64 的有效数据,并将其附加到生成的 bundle 包的末尾。 |
| "external" | 每个 *.js bundle 包旁边都会创建一个单独的 *.js.map 文件。
|
minify
是否启用压缩。默认为 false。当 target 为 bun 时,将默认开启压缩。
启用所有压缩选项:
bun build ./index.tsx --outdir ./out --minify// ORawait Bun.build({entrypoints: ['./index.tsx'],outdir: './out',minify: true, // default false
})
为了对特定最小化进行粒度化启用:
bun build ./index.tsx --outdir ./out --minify-whitespace --minify-identifiers --minify-syntax// ORawait Bun.build({entrypoints: ['./index.tsx'],outdir: './out',minify: {whitespace: true,identifiers: true,syntax: true,},
})
external
要导入外部模块的路径列表。默认为 []。
bun build ./index.tsx --outdir ./out --external lodash --external react// ORawait Bun.build({entrypoints: ['./index.tsx'],outdir: './out',external: ["lodash", "react"], // default: []
})
外部导入是指在最终打包时不会被包含的导入。相反,导入语句将保持不变,将在运行时进行解析。例如,考虑以下入口文件:
import _ from "lodash";
import {z} from "zod";const value = z.string().parse("Hello world!")
console.log(_.upperCase(value));
通常情况下,打包中的 index.tsx 会生成一个包含 “zod” 包全部源代码的bundle包。相反,如果我们想保持 import 语句不变,我们可以将其标记为外部:
bun build ./index.tsx --outdir ./out --external zod// ORawait Bun.build({entrypoints: ['./index.tsx'],outdir: './out',external: ['zod'],
})
生成的捆绑包将类似于以下内容:
import {z} from "zod";// ...
// the contents of the "lodash" package
// including the `_.upperCase` functionvar value = z.string().parse("Hello world!")
console.log(_.upperCase(value));
要将所有导入项都标记为外部,请使用通配符 *:
await Bun.build({entrypoints: ['./index.tsx'],outdir: './out',external: ['*'],
})
naming
自定义生成的文件名。默认值为 ./[dir]/[name].[ext]。
await Bun.build({entrypoints: ['./index.tsx'],outdir: './out',naming: "[dir]/[name].[ext]", // default
})
默认情况下,生成的包的名称是基于关联的入口名称。
.
├── index.tsx
└── out└── index.js
使用多个入口点时,生成的文件层次结构将反映入口点的目录结构。
.
├── index.tsx
└── nested└── index.tsx
└── out├── index.js└── nested└── index.js
生成的文件的名称和位置可以通过命名字段进行自定义。该字段接受一个模板字符串,用于为与入口点相对应的所有 bundle 包生成文件名。其中,以下 tokens 将替换为其相应的值:
- [name] - 入口点文件的名称,不包括扩展名。
- [ext] - 生成的 bundle 包的扩展。
- [hash] - bundle 包内容的哈希值。
- [dir] - 从构建根目录到文件父目录的相对路径。
举个栗子:
| Token | [name] | [ext] | [hash] | [dir] |
|---|---|---|---|---|
./index.tsx | index | js | a1b2c3d4 | "" (empty string) |
./nested/entry.ts | entry | js | c3d4e5f6 | "nested" |
我们可以将这些令牌组合起来创建一个模板字符串。例如,为了在生成的包名称中包含哈希值:
await Bun.build({entrypoints: ['./index.tsx'],outdir: './out',naming: 'files/[dir]/[name]-[hash].[ext]',
})
这种构建将产生以下文件结构:
.
├── index.tsx
└── out└── files└── index-a1b2c3d4.js
当为命名字段提供字符串时,它仅用于与入口点相对应的 bundle 包。块和复制资源的名称不受影响。使用 JavaScript API,可以为每种类型的生成文件指定单独的模板字符串。
await Bun.build({entrypoints: ['./index.tsx'],outdir: './out',naming: {// default valuesentry: '[dir]/[name].[ext]',chunk: '[name]-[hash].[ext]',asset: '[name]-[hash].[ext]',},
})
root
项目的根目录。
await Bun.build({entrypoints: ['./pages/a.tsx', './pages/b.tsx'],outdir: './out',root: '.',
})
如果未指定,则将其计算为所有入口点文件的第一个公共父目录。考虑以下文件结构:
.
└── pages└── index.tsx└── settings.tsx
我们可以在页面目录中构建两个入口点:
await Bun.build({entrypoints: ['./pages/index.tsx', './pages/settings.tsx'],outdir: './out',
})
这将导致文件结构如下所示:
.
└── pages└── index.tsx└── settings.tsx
└── out└── index.js└── settings.js
由于 pages 目录是入口文件的第一个公共父目录,因此它被视为项目根目录。 这意味着生成的捆绑包位于 out 目录的顶层;没有 out/pages 目录。
可以通过指定 root 选项来覆盖此行为:
await Bun.build({entrypoints: ['./pages/index.tsx', './pages/settings.tsx'],outdir: './out',root: '.',
})
通过指定.作为根目录,生成的文件结构将如下所示:
.
└── pages└── index.tsx└── settings.tsx
└── out└── pages└── index.js└── settings.js
publicPath
打包后的代码中任何导入路径前都要添加的前缀。
在很多情况下,生成的 bundle 不包含导入语句。毕竟,打包的目的就是将所有的代码合并成一个文件。然而,也有许多生成的 bundle 会包含导入语句。
Asset imports — 在导入如 *.svg 等不被识别的文件类型时,打包器会依赖文件加载器,该加载器会将文件原样复制到输出目录(outdir)。导入将被转换为变量。
External modules — 文件和模块可以被标记为外部,在这种情况下,它们将不会被包含在 bundle 包中。相反,import 语句将保留在最终的 bundle 包中。
Chunking — 当启用拆分时,打包器可能会生成代表多个入口点之间共享代码的单独“块”文件。
在这些情况下,最终的 bundle 包可能包含指向其他文件的路径。默认情况下,这些导入是相对的。下面是一个简单的资源导入示例:
// 输入
import logo from './logo.svg';
console.log(logo);// 输出
// logo.svg is copied into <outdir>
// and hash is added to the filename to prevent collisions
var logo = './logo-a7305bdef.svg';
console.log(logo);
设置 publicPath 会在所有文件路径前添加指定的值。
bun build ./index.tsx --outdir ./out --public-path https://cdn.example.com/// ORawait Bun.build({entrypoints: ['./index.tsx'],outdir: './out',publicPath: 'https://cdn.example.com/', // default is undefined
})
现在,输出文件将类似于以下内容。
- var logo = './logo-a7305bdef.svg';
+ var logo = 'https://cdn.example.com/logo-a7305bdef.svg';
define
一张在构建时替换的全局标识符地图。该对象的键是标识符名称,值是内联的 JSON 字符串。
await Bun.build({entrypoints: ['./index.tsx'],outdir: './out',define: {STRING: JSON.stringify("value"),"nested.boolean": "true",},
})
loader
一个文件扩展名到内置加载器名称的映射。这可以用于快速定制如何加载某些文件。
await Bun.build({entrypoints: ['./index.tsx'],outdir: './out',loader: {".png": "dataurl",".txt": "file",},
})
Outputs
Bun.build 函数返回一个 Promise<BuildOutput>,其定义为:
interface BuildOutput {outputs: BuildArtifact[];success: boolean;logs: Array<object>; // see docs for details
}interface BuildArtifact extends Blob {kind: "entry-point" | "chunk" | "asset" | "sourcemap";path: string;loader: Loader;hash: string | null;sourcemap: BuildArtifact | null;
}
outputs 数组包含由构建生成的所有文件。每个产物都实现了 Blob 接口。
const build = await Bun.build({/* */
});for (const output of build.outputs) {await output.arrayBuffer(); // => ArrayBufferawait output.text(); // string
}
每个产物还包含以下属性:
| kind | 这个文件是哪种构建输出。构建会生成 bundled 的入口点、代码分割的 “chunks”、sourcemaps 和复制的资源(如图像)。 |
| path | 磁盘上文件的绝对路径。 |
| loader | 加载器用于解释文件。查看 Bundler > Loaders 可了解 Bun 是如何将文件扩展名映射到相应内置加载器的。 |
| hash | 文件内容的哈希值。 |
| sourcemap | 如果生成了与这个文件相对应的 sourcemap 文件。只适用于入口和块。 |
类似于BunFile,可以直接将 BuildArtifact 对象传递给新的 Response()。
const build = await Bun.build({/* */
});const artifact = build.outputs[0];// Content-Type header is automatically set
return new Response(artifact);
Bun 运行时实现了 BuildArtifact 对象的特殊美化打印,以便更容易地进行调试。
// Build script
// build.ts
const build = await Bun.build({/* */});const artifact = build.outputs[0];
console.log(artifact);// Shell output
bun run build.ts
BuildArtifact (entry-point) {path: "./index.js",loader: "tsx",kind: "entry-point",hash: "824a039620219640",Blob (114 bytes) {type: "text/javascript;charset=utf-8"},sourcemap: null
}
可执行文件
Bun 支持将 JavaScript/TypeScript 的入口点“编译”成独立的可执行文件。这个可执行文件包含 Bun 二进制文件的副本。
bun build ./cli.tsx --outfile mycli --compile
./mycli
请参阅 Bundler > Executables 以获取完整的文档。
日志和错误
如果提供了无效选项,Bun.build 只会抛出异常。请读取 success 属性以确定构建是否成功;logs 属性将包含更多详细信息。
const result = await Bun.build({entrypoints: ["./index.tsx"],outdir: "./out",
});if (!result.success) {console.error("Build failed");for (const message of result.logs) {// Bun will pretty print the message objectconsole.error(message);}
}
每个消息要么是 BuildMessage 对象,要么是 ResolveMessage 对象,可以用于追踪构建过程中出现的问题。
class BuildMessage {name: string;position?: Position;message: string;level: "error" | "warning" | "info" | "debug" | "verbose";
}class ResolveMessage extends BuildMessage {code: string;referrer: string;specifier: string;importKind: ImportKind;
}
如果你想从失败的构建中抛出一个错误,可以考虑将日志传递给 AggregateError。如果未捕获,Bun 将很好地打印出包含的消息。
if (!result.success) {throw new AggregateError(result.logs, "Build failed");
}
参考代码
interface Bun {build(options: BuildOptions): Promise<BuildOutput>;
}interface BuildOptions {entrypoints: string[]; // requiredoutdir?: string; // default: no write (in-memory only)format?: "esm"; // later: "cjs" | "iife"target?: "browser" | "bun" | "node"; // "browser"splitting?: boolean; // trueplugins?: BunPlugin[]; // [] // See https://bun.sh/docs/bundler/pluginsloader?: { [k in string]: Loader }; // See https://bun.sh/docs/bundler/loadersmanifest?: boolean; // falseexternal?: string[]; // []sourcemap?: "none" | "inline" | "external"; // "none"root?: string; // computed from entrypointsnaming?:| string| {entry?: string; // '[dir]/[name].[ext]'chunk?: string; // '[name]-[hash].[ext]'asset?: string; // '[name]-[hash].[ext]'};publicPath?: string; // e.g. http://mydomain.com/minify?:| boolean // false| {identifiers?: boolean;whitespace?: boolean;syntax?: boolean;};
}interface BuildOutput {outputs: BuildArtifact[];success: boolean;logs: Array<BuildMessage | ResolveMessage>;
}interface BuildArtifact extends Blob {path: string;loader: Loader;hash?: string;kind: "entry-point" | "chunk" | "asset" | "sourcemap";sourcemap?: BuildArtifact;
}type Loader =| "js"| "jsx"| "ts"| "tsx"| "json"| "toml"| "file"| "napi"| "wasm"| "text";interface BuildOutput {outputs: BuildArtifact[];success: boolean;logs: Array<BuildMessage | ResolveMessage>;
}declare class ResolveMessage {readonly name: "ResolveMessage";readonly position: Position | null;readonly code: string;readonly message: string;readonly referrer: string;readonly specifier: string;readonly importKind:| "entry_point"| "stmt"| "require"| "import"| "dynamic"| "require_resolve"| "at"| "at_conditional"| "url"| "internal";readonly level: "error" | "warning" | "info" | "debug" | "verbose";toString(): string;
}
这篇关于bun build的文章就介绍到这儿,希望我们推荐的文章对编程师们有所帮助!


![The `XXXUITests [Debug]` target overrides the `ALWAYS_EMBED_SWIFT_STANDARD_LIBRARIES` build......](https://i-blog.csdnimg.cn/blog_migrate/7e43f76c8b7367452a401d20f5dce54e.png)


