本文主要是介绍使用 React 和 MUI 创建多选 Checkbox 树组件,希望对大家解决编程问题提供一定的参考价值,需要的开发者们随着小编来一起学习吧!
在本篇博客中,我们将使用 React 和 MUI(Material-UI)库来创建一个多选 Checkbox 树组件。该组件可以用于展示树形结构的数据,并允许用户选择多个节点。
前提
在开始之前,确保你已经安装了以下依赖:
- React
- MUI(Material-UI)
最终样式
非全选状态
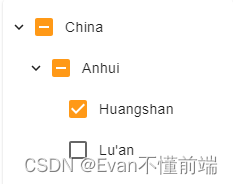
全选状态

思路
我们的目标是创建一个多选 Checkbox 树组件,它可以接收树节点数据,并根据用户的选择返回选中的节点数据。为了实现这个目标,我们将按照以下步骤进行:
- 创建一个 React 函数组件
CheckBoxTree,它接收一个data属性作为树节点数据,并可选地接收一个handleCheckData属性作为回调函数,用于传递选中的节点数据。 - 在组件的状态中,创建一个
selected数组,用于存储选中的节点的 id。 - 实现一个
onCheck函数,用于处理节点 Checkbox 的点击事件。在该函数中,我们将根据用户的选择更新selected数组,并递归处理子节点的选中状态。 - 实现一个
renderTree函数,用于递归渲染树节点。在该函数中,我们将根据节点的选中状态和子节点的数量来渲染 Checkbox 和节点名称。 - 使用
TreeView和TreeItem组件来展示树形结构,并将树节点数据传递给renderTree函数进行渲染。
步骤
下面是实现多选 Checkbox 树组件的详细步骤:
1. 创建 React 函数组件
首先,我们需要创建一个 React 函数组件 CheckBoxTree,并定义它的属性和状态。代码如下:
import React from 'react';interface CheckboxTreeState {selected: string[];
}interface CheckBoxTreeProps {data: RegionType[]; //起码要包含childre,name和parentId,handleCheckData?: (data: string[]) => void;
}export default function CheckBoxTree(props: CheckBoxTreeProps) {const { data, handleCheckData } = props;const [state, setState] = React.useState<CheckboxTreeState>({selected: []});// ...
}
2. 分割父节点
接下来,我们定义了splitNodeId函数,用于将节点id拆分为所有父节点id。它接受一个节点id字符串,格式为'1_2_3',并返回一个父节点id数组,例如['1_2', '1']。3表示的是当前节点。
/*** 拆分节点id为所有父节点id* @param id 节点id,格式为'1_2_3'* @returns 父节点id数组,如['1_2', '1']*/
function splitNodeId(id: string) {// 按'_'分割节点idconst path = id.split('_');// 累加生成父节点idreturn path.reduce((result: string[], current) => {// 拼接'_'和当前节点result.push(`${result.at(-1) ? result.at(-1) + '_' : ''}${current}`);return result;}, []);
}
3. 实现节点 Checkbox 的点击事件处理函数
接下来,我们需要实现一个 onCheck 函数,用于处理节点 Checkbox 的点击事件。在该函数中,我们将根据用户的选择更新 selected 数组,并递归处理子节点的选中状态。代码如下:
const onCheck = (event: React.ChangeEvent<HTMLInputElement>,node: RegionType,parentNodeName?: string
) => {const { checked } = event.target;const currentId = parentNodeName ?`${parentNodeName}_${node.id.id}` :node.id.id;const parentAreaName = splitNodeId(currentId);if (checked) {setState((prevState) => ({...prevState,selected: Array.from(new Set([...prevState.selected, ...parentAreaName]))}));if (node.children && node.children.length > 0) {node.children.forEach((item) => {onCheck(event, item, currentId);});}} else if (!checked) {let tempState = { ...state };for (let index = parentAreaName.length - 1; index >= 0; index--) {const element = parentAreaName[index];if (tempState.selected.filter((id) => id.startsWith(`${element}_`)).length === 0) {tempState = {...tempState,selected: tempState.selected.filter((id) => id !== element)};}if (tempState.selected.filter((id) => id.startsWith(`${currentId}_`)).length !== 0) {tempState = {...tempState,selected: tempState.selected.filter((id) =>!id.startsWith(`${currentId}_`) &&!id.startsWith(`${currentId}`))};}}setState(tempState);}
};
4. 实现递归渲染树节点的函数
然后,我们需要实现一个 renderTree 函数,用于递归渲染树节点。在该函数中,我们将根据节点的选中状态和子节点的数量来渲染 Checkbox 和节点名称。代码如下:
const renderTree = (nodes: RegionType, parentNodeName?: string) => {let currentLength = 0;function getNodeLength(currentNodes: RegionType) {currentNodes.children?.forEach((node) => {currentLength++;if (node.children) {getNodeLength(node);}});}const currentId = parentNodeName ?`${parentNodeName}_${nodes.id.id}` :nodes.id.id;getNodeLength(nodes);return (<TreeItemkey={nodes.id.id}nodeId={nodes.id.id}label={<FormControlLabelonClick={(e) => e.stopPropagation()}control={<Checkboxname={nodes.name}checked={nodes.children &&nodes.children.length &&state.selected.filter((id) =>id.startsWith(`${currentId}_`)).length === currentLength ||state.selected.some((id) => id === currentId)}indeterminate={nodes.children &&nodes.children.length > 0 &&state.selected.some((id) => id.startsWith(`${currentId}_`)) &&state.selected.filter((id) => id.startsWith(`${currentId}_`)).length < currentLength}onChange={(e) => {e.stopPropagation();onCheck(e, nodes, parentNodeName);}}onClick={(e) => e.stopPropagation()}/>}label={nodes.name}/>}>{Array.isArray(nodes.children) ?nodes.children.map((node) => renderTree(node, currentId)) :null}</TreeItem>);
};
5. 渲染树形结构
最后,我们使用 TreeView 和 TreeItem 组件来展示树形结构,并将树节点数据传递给 renderTree 函数进行渲染。代码如下:
return (<TreeViewaria-label="checkbox tree"defaultCollapseIcon={<ExpandMore />}defaultExpandIcon={<ChevronRight />}disableSelection={true}>{data.map((item) => {return renderTree(item);})}</TreeView>
);
6. 完整代码
import { ChevronRight, ExpandMore } from '@mui/icons-material';
import { TreeItem, TreeView } from '@mui/lab';
import { Checkbox, FormControlLabel } from '@mui/material';
import React from 'react';export interface RegionType {abbreviation: string;children?: RegionType[];createdTime: number;id: EntityData;level: number;name: string;nameCn: string;parentId: string;sort: number;status: boolean;
}// 组件状态
int
erface CheckboxTreeState {// 选中节点id数组selected: string[];
}// 组件属性
interface CheckBoxTreeProps {// 树节点数据data: RegionType[];// 向外传递选择框数据,handleCheckData?: (data: string[]) => void;
}/*** 拆分节点id为所有父节点id* @param id 节点id,格式为'1_2_3'* @returns 父节点id数组,如['1_2', '1']*/
function splitNodeId(id: string) {// 按'_'分割节点idconst path = id.split('_');// 累加生成父节点idreturn path.reduce((result: string[], current) => {// 拼接'_'和当前节点result.push(`${result.at(-1) ? result.at(-1) + '_' : ''}${current}`);return result;}, []);
}/*** 多选Checkbox树组件* @param props 组件属性* @returns JSX组件*/
export default function CheckBoxTree(props: CheckBoxTreeProps) {// 获取树节点数据const { data, handleCheckData } = props;// 组件状态:选中节点id数组const [state, setState] = React.useState<CheckboxTreeState>({selected: []});/*** 点击节点Checkbox触发* @param event 事件对象* @param node 节点对象* @param parentNodeName 父节点名称*/const onCheck = (event: React.ChangeEvent<HTMLInputElement>,node: RegionType,parentNodeName?: string) => {// 获取Checkbox选中状态const { checked } = event.target;// 当前节点idconst currentId = parentNodeName ?`${parentNodeName}_${node.id.id}` :node.id.id;// 父节点id数组const parentAreaName = splitNodeId(currentId);// 选中状态:选中当前节点和父节点if (checked) {setState((prevState) => ({...prevState,//使用Set对selected数组去重selected: Array.from(new Set([...prevState.selected, ...parentAreaName]))}));// 若有子节点,递归选中if (node.children && node.children.length > 0) {node.children.forEach((item) => {onCheck(event, item, currentId);});}} else if (!checked) {// 临时statelet tempState = { ...state };// 逆序遍历,进行选中状态更新for (let index = parentAreaName.length - 1; index >= 0; index--) {const element = parentAreaName[index];// 若父区域已无选中节点,取消选中父区域if (tempState.selected.filter((id) => id.startsWith(`${element}_`)).length === 0) {tempState = {...tempState,selected: tempState.selected.filter((id) => id !== element)};}// 取消选中当前区域if (tempState.selected.filter((id) => id.startsWith(`${currentId}_`)).length !== 0) {tempState = {...tempState,selected: tempState.selected.filter((id) =>!id.startsWith(`${currentId}_`) &&!id.startsWith(`${currentId}`))};}}// 更新statesetState(tempState);}};/*** 递归渲染树节点* @param nodes 树节点数组* @param parentNodeName 父节点名称* @returns JSX组件*/const renderTree = (nodes: RegionType, parentNodeName?: string) => {// 子节点总数let currentLength = 0;/*** 获取子节点总数* @param currentNodes 当前节点*/function getNodeLength(currentNodes: RegionType) {currentNodes.children?.forEach((node) => {currentLength++;if (node.children) {getNodeLength(node);}});}// 当前节点idconst currentId = parentNodeName ?`${parentNodeName}_${nodes.id.id}` :nodes.id.id;// 获取当前节点子节点总数getNodeLength(nodes);return (<TreeItemkey={nodes.id.id}nodeId={nodes.id.id}sx={{'.MuiTreeItem-label': {'maxWidth': '100%','overflow': 'hidden','wordBreak': 'break-all','.MuiFormControlLabel-label': {pt: '2px'}}}}label={<FormControlLabelonClick={(e) => e.stopPropagation()}sx={{ alignItems: 'flex-start', mt: 1 }}control={<Checkboxname={nodes.name}sx={{ pt: 0 }}checked={// 若有子节点,判断子节点是否全部选中// 或节点自身是否选中nodes.children &&nodes.children.length &&state.selected.filter((id) =>id.startsWith(`${currentId}_`)).length === currentLength ||state.selected.some((id) => id === currentId)}indeterminate={// 子节点存在选中与非选中状态nodes.children &&nodes.children.length > 0 &&state.selected.some((id) => id.startsWith(`${currentId}_`)) &&state.selected.filter((id) => id.startsWith(`${currentId}_`)).length < currentLength}onChange={(e) => {e.stopPropagation();onCheck(e, nodes, parentNodeName);}}onClick={(e) => e.stopPropagation()}/>}label={nodes.name}/>}>{Array.isArray(nodes.children) ?nodes.children.map((node) => renderTree(node, currentId)) :null}</TreeItem>);};/*** 组件加载时触发,获取去重后的多选框id列表*/React.useEffect(() => {// state.selected拆分数组并合并,返回成一个数组,如果需要去重后的值,可以使用Array.from(new set)const checkBoxList = state.selected.flatMap((item) => item.split('_'));// 因为是通过parent id来绑定子元素,所以下面的元素是只返回最后的子元素const checkTransferList = checkBoxList.filter((value) => checkBoxList.indexOf(value) === checkBoxList.lastIndexOf(value));// 从多选值数组中生成集合Set,再使用Array.from转换为数组if (handleCheckData) {handleCheckData(checkTransferList);}}, [state]);React.useEffect(() => {if (data.length) {setState({ selected: [] });}}, [data]);return (<TreeViewaria-label="checkbox tree"defaultCollapseIcon={<ExpandMore />}defaultExpandIcon={<ChevronRight />}disableSelection={true}>{data.map((item) => {return renderTree(item);})}</TreeView>);
}
总结
通过以上步骤,我们成功地创建了一个多选 Checkbox 树组件。该组件可以接收树节点数据,并根据用户的选择返回选中的节点数据。我们使用了 React 和 MUI(Material-UI)库来实现这个功能,并按照前提、思路和步骤的顺序进行了解析和实现。
希望本篇博客对你理解如何使用 React 和 MUI 创建多选 Checkbox 树组件有所帮助!如果你有任何问题或建议,请随时留言。谢谢阅读!
这篇关于使用 React 和 MUI 创建多选 Checkbox 树组件的文章就介绍到这儿,希望我们推荐的文章对编程师们有所帮助!


