本文主要是介绍yolov8添加注意力机制模块-ShuffleAttention,希望对大家解决编程问题提供一定的参考价值,需要的开发者们随着小编来一起学习吧!
修改
原本打算把ShuffleAttention模块先写进conv.py文件中,然后在引入tasks.py文件中。但是不知道咋回事,在tasks.py文件中引入报红。所以干脆直接把ShuffleAttention模块写进了tasks.py文件中。
from torch.nn import init
from torch.nn.parameter import Parameterclass ShuffleAttention(nn.Module):def __init__(self, channel=512, reduction=16, G=8):super().__init__()self.G = Gself.channel = channelself.avg_pool = nn.AdaptiveAvgPool2d(1)self.gn = nn.GroupNorm(channel // (2 * G), channel // (2 * G))self.cweight = Parameter(torch.zeros(1, channel // (2 * G), 1, 1))self.cbias = Parameter(torch.ones(1, channel // (2 * G), 1, 1))self.sweight = Parameter(torch.zeros(1, channel // (2 * G), 1, 1))self.sbias = Parameter(torch.ones(1, channel // (2 * G), 1, 1))self.sigmoid = nn.Sigmoid()def init_weights(self):for m in self.modules():if isinstance(m, nn.Conv2d):init.kaiming_normal_(m.weight, mode='fan_out')if m.bias is not None:init.constant_(m.bias, 0)elif isinstance(m, nn.BatchNorm2d):init.constant_(m.weight, 1)init.constant_(m.bias, 0)elif isinstance(m, nn.Linear):init.normal_(m.weight, std=0.001)if m.bias is not None:init.constant_(m.bias, 0)@staticmethoddef channel_shuffle(x, groups):b, c, h, w = x.shapex = x.reshape(b, groups, -1, h, w)x = x.permute(0, 2, 1, 3, 4)# flattenx = x.reshape(b, -1, h, w)return xdef forward(self, x):b, c, h, w = x.size()# group into subfeaturesx = x.view(b * self.G, -1, h, w)  # bs*G,c//G,h,w# channel_splitx_0, x_1 = x.chunk(2, dim=1)  # bs*G,c//(2*G),h,w# channel attentionx_channel = self.avg_pool(x_0)  # bs*G,c//(2*G),1,1x_channel = self.cweight * x_channel + self.cbias  # bs*G,c//(2*G),1,1x_channel = x_0 * self.sigmoid(x_channel)# spatial attentionx_spatial = self.gn(x_1)  # bs*G,c//(2*G),h,wx_spatial = self.sweight * x_spatial + self.sbias  # bs*G,c//(2*G),h,wx_spatial = x_1 * self.sigmoid(x_spatial)  # bs*G,c//(2*G),h,w# concatenate along channel axisout = torch.cat([x_channel, x_spatial], dim=1)  # bs*G,c//G,h,wout = out.contiguous().view(b, -1, h, w)# channel shuffleout = self.channel_shuffle(out, 2)return out
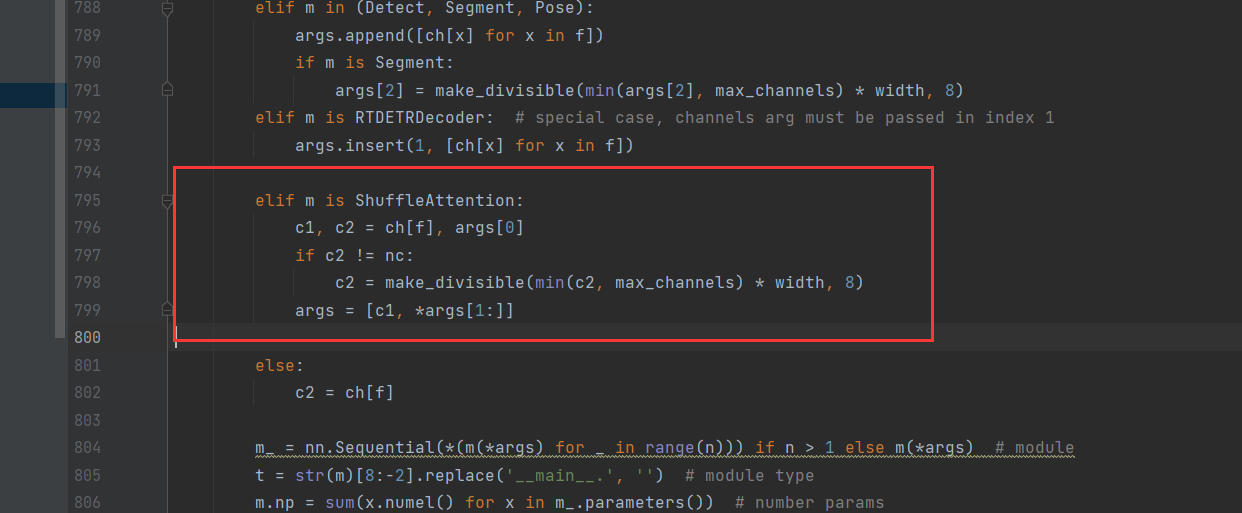
tasks.py文件中,在指定位置添加如下代码。在函数parse_model处。
elif m is ShuffleAttention:c1, c2 = ch[f], args[0]if c2 != nc:c2 = make_divisible(min(c2, max_channels) * width, 8)args = [c1, *args[1:]]
修改yolov8.yaml文件。改动的地方为标红的地方。

# Ultralytics YOLO  , GPL-3.0 license
# YOLOv8 object detection model with P3-P5 outputs. For Usage examples see https://docs.ultralytics.com/tasks/detect# Parameters
nc: 2  # number of classes
scales: # model compound scaling constants, i.e. 'model=yolov8n.yaml' will call yolov8.yaml with scale 'n'# [depth, width, max_channels]n: [ 0.33, 0.25, 1024 ]  # YOLOv8n summary: 225 layers,  3157200 parameters,  3157184 gradients,   8.9 GFLOPss: [ 0.33, 0.50, 1024 ]  # YOLOv8s summary: 225 layers, 11166560 parameters, 11166544 gradients,  28.8 GFLOPsm: [ 0.67, 0.75, 768 ]   # YOLOv8m summary: 295 layers, 25902640 parameters, 25902624 gradients,  79.3 GFLOPsl: [ 1.00, 1.00, 512 ]   # YOLOv8l summary: 365 layers, 43691520 parameters, 43691504 gradients, 165.7 GFLOPsx: [ 1.00, 1.25, 512 ]   # YOLOv8x summary: 365 layers, 68229648 parameters, 68229632 gradients, 258.5 GFLOPs# YOLOv8.0n backbone
backbone:# [from, repeats, module, args]- [ -1, 1, Conv, [ 64, 3, 2 ] ]  # 0-P1/2- [ -1, 1, Conv, [ 128, 3, 2 ] ]  # 1-P2/4- [ -1, 3, C2f, [ 128, True ] ]- [ -1, 1, Conv, [ 256, 3, 2 ] ]  # 3-P3/8- [ -1, 6, C2f, [ 256, True ] ]- [ -1, 1, Conv, [ 512, 3, 2 ] ]  # 5-P4/16- [ -1, 6, C2f, [ 512, True ] ]- [ -1, 1, Conv, [ 1024, 3, 2 ] ]  # 7-P5/32- [ -1, 3, C2f, [ 1024, True ] ]- [ -1, 1, SPPF, [ 1024, 5 ] ]  # 9# YOLOv8.0n head
head:- [ -1, 1, nn.Upsample, [ None, 2, 'nearest' ] ]- [ [ -1, 6 ], 1, Concat, [ 1 ] ]  # cat backbone P4- [ -1, 3, C2f, [ 512 ] ]  # 12- [ -1, 1, nn.Upsample, [ None, 2, 'nearest' ] ]- [ [ -1, 4 ], 1, Concat, [ 1 ] ]  # cat backbone P3- [ -1, 3, C2f, [ 256 ] ]  # 15 (P3/8-small)- [ -1, 1, Conv, [ 256, 3, 2 ] ]- [ [ -1, 12 ], 1, Concat, [ 1 ] ]  # cat head P4- [ -1, 3, C2f, [ 512 ] ]  # 18 (P4/16-medium)- [ -1, 1, Conv, [ 512, 3, 2 ] ]- [ [ -1, 9 ], 1, Concat, [ 1 ] ]  # cat head P5- [ -1, 3, C2f, [ 1024 ] ]  # 21 (P5/32-large)- [ -1, 3, ShuffleAttention, [ 1024 ] ]- [ [ 15, 18, 22 ], 1, Detect, [ nc ] ]  # Detect(P3, P4, P5)
测试打印网络。


分析
下面对ShuffleAttention模块一部分一部分进行解读。
def __init__(self, channel=512, reduction=16, G=8):super().__init__()self.G = Gself.channel = channelself.avg_pool = nn.AdaptiveAvgPool2d(1)self.gn = nn.GroupNorm(channel // (2 * G), channel // (2 * G))self.cweight = Parameter(torch.zeros(1, channel // (2 * G), 1, 1))self.cbias = Parameter(torch.ones(1, channel // (2 * G), 1, 1))self.sweight = Parameter(torch.zeros(1, channel // (2 * G), 1, 1))self.sbias = Parameter(torch.ones(1, channel // (2 * G), 1, 1))self.sigmoid = nn.Sigmoid()self.G:存储组的数量。self.channel:存储输入特征的通道数。self.avg_pool:自适应平均池化层,输出大小为1x1,用于全局池化操作。self.gn:分组归一化层。self.cweight和self.cbias:通道注意力的可学习权重和偏置。self.sweight和self.sbias:空间注意力的可学习权重和偏置。self.sigmoid:Sigmoid激活函数。
注:分组归一化层self.gn,是对输入的x,按照通道分成几组,然后在每组里在分别进行归一化。经过这一层,会改变其中的值,但不改变形状。Parameter()方法,使用Parameter包装一个张量表示这个张量是模型中的一个参数,它会在模型的训练过程中被优化器更新。
def init_weights(self):for m in self.modules():if isinstance(m, nn.Conv2d):init.kaiming_normal_(m.weight, mode='fan_out')if m.bias is not None:init.constant_(m.bias, 0)elif isinstance(m, nn.BatchNorm2d):init.constant_(m.weight, 1)init.constant_(m.bias, 0)elif isinstance(m, nn.Linear):init.normal_(m.weight, std=0.001)if m.bias is not None:init.constant_(m.bias, 0)init_weights 方法是用于初始化神经网络模型中不同类型层的权重和偏置参数的函数。遍历模型中的所有模块,对于nn.Conv2d,nn.BatchNorm2d,nn.Linear分别进行不同的初始化操作。
def channel_shuffle(x, groups):b, c, h, w = x.shapex = x.reshape(b, groups, -1, h, w)x = x.permute(0, 2, 1, 3, 4)# flattenx = x.reshape(b, -1, h, w)return x在一个卷积神经网络中对输入的4维张量(通常代表图像批次)的通道进行混洗。这种操作通常用于那些使用分组卷积的网络架构(例如ShuffleNet)中来提升模型性能,它通过在通道间进行信息的交换来增强特征的表达能力。
逐行进行解释:
-
b, c, h, w = x.shape:这行代码获取输入张量x的形状,其中b是批次大小,c是通道数,h是特征图的高度,w是特征图的宽度。 -
x = x.reshape(b, groups, -1, h, w):这里,张量x被重新塑形(reshape)为一个新的形状。它首先按照批次大小b,然后是分组数groups进行分割。-1表示自动计算该维度的大小,具体来说,这里的-1表示每个分组的通道数(即c // groups)。最后两维h和w保持不变。这一步准备将通道分为groups组,每组具有相等数量的通道。 -
x = x.permute(0, 2, 1, 3, 4):permute函数用于对张量的维度进行重新排列。这里,它将分组的维度(索引为1的维度)和通道的维度(索引为2的维度)调换位置。经过这一步操作后,张量的形状将变为(b, -1, groups, h, w)。 -
x = x.reshape(b, -1, h, w):在上一步维度调换之后,此行代码再次将张量x进行重新塑形,使其变回原始的4维形状(b, c, h, w),其中分组内的通道现在已经被混洗。由于维度调换的操作,原先属于同一组的通道现在分散到了不同的位置,从而完成了通道混洗的过程。 -
return x:最后,返回了经过通道混洗后的张量x。
下面对forward中部分代码进行解析
x = x.view(b * self.G, -1, h, w)这里将输入x的形状重构,将批次内的图像分成G组,每组的通道数变为原通道数除以G。
x_0, x_1 = x.chunk(2, dim=1) # 将输入x沿着通道维度分成两块这里使用chunk函数沿着通道维度将输入x分成两部分,x_0和x_1。每部分包含原本通道数的一半。
# channel attentionx_channel = self.avg_pool(x_0) # 对x_0进行全局平均池化,输出维度变为(batch_size * G, new_channels, 1, 1)x_channel = self.cweight * x_channel + self.cbias # 应用学习到的权重和偏置x_channel = x_0 * self.sigmoid(x_channel) # 通过Sigmoid函数后与x_0相乘实现通道注意力这是通道注意力机制的实现。首先,对x_0应用全局平均池化(avg_pool)来得到每个通道的全局特征,然后通过一个权重cweight和偏置cbias进行线性变换(这些可能是在类的初始化中定义的参数)。接着,通过Sigmoid函数激活这个通道特征图(x_channel),并将它与原始的x_0相乘,实现对不同通道的不同权重分配,即通道注意力。
# spatial attentionx_spatial = self.gn(x_1) # 对x_1进行分组归一化x_spatial = self.sweight * x_spatial + self.sbias # 应用学习到的权重和偏置x_spatial = x_1 * self.sigmoid(x_spatial) # 通过Sigmoid函数后与x_1相乘实现空间注意力这是空间注意力机制的实现。首先,对x_1应用分组归一化(gn),然后通过一个权重sweight和偏置sbias进行线性变换。最后,相同地,通过Sigmoid函数激活并与x_1相乘,实现对空间位置不同重要性的加权,即空间注意力。
# concatenate along channel axisout = torch.cat([x_channel, x_spatial], dim=1) # 将通道和空间注意力的结果在通道维度上拼接out = out.contiguous().view(b, -1, h, w) # 重构形状为(batch_size, channels, height, width)这里将通道注意力和空间注意力处理后的两部分沿通道维度拼接回一个完整的张量。然后改变其形状,以确保它与原始输入的批次大小、高度、宽度一致。
# channel shuffleout = self.channel_shuffle(out, 2)return out最后,进行通道混洗操作,改善跨通道的信息流通。
这篇关于yolov8添加注意力机制模块-ShuffleAttention的文章就介绍到这儿,希望我们推荐的文章对编程师们有所帮助!


