本文主要是介绍鸿蒙自定义DrawerLayout侧滑菜单实现原理,希望对大家解决编程问题提供一定的参考价值,需要的开发者们随着小编来一起学习吧!
前言
DevEcoStudio版本:
DrawerLayout如何使用:鸿蒙自定义侧滑菜单布局(DrawerLayout)-CSDN博客
实现原理
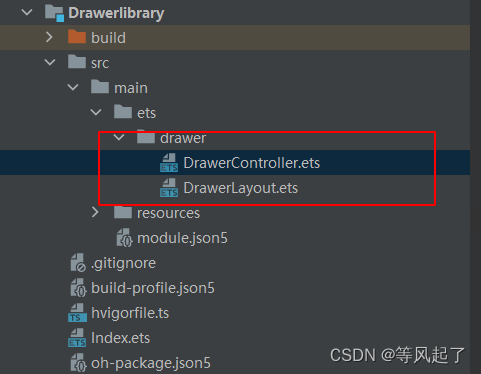
1、Library创建
新建module选择static library,命名为DrawerLibrary
2、DrawerLayout原理分析
import { DrawerController } from './DrawerController'/*** 自定义抽屉布局*/
@Component
export struct DrawerLayout {@State offsetX: number = 0//缩放比例@State scaleX: number = 1//是否显示侧边栏@Link isShowSideBar: boolean//侧边栏的宽度private sideBarWidth: number = 300// 按下的x坐标private downX = 0@BuilderParamleftView: () => void@BuilderParamrightView: () => void//控制器@Link controller: DrawerController;aboutToAppear() {if (this.isShowSideBar) {this.offsetX = this.sideBarWidththis.scaleX = 0.8} else {this.offsetX = 0this.scaleX = 1}this.controller.showSideBar = () => {this.showSideBar();};this.controller.hideSideBar = () => {this.hideSideBar();};}build() {Row() {Stack() {this.leftView()}.backgroundColor(Color.White).width(this.sideBarWidth).height('100%').offset({ x: this.offsetX - this.sideBarWidth, y: 0 })Stack() {this.rightView()}.backgroundColor(Color.White).width(`${this.scaleX * 100}%`).height(`${this.scaleX * 100}%`).margin({ left: (1 - this.scaleX) * 180 }).offset({ x: this.offsetX - this.sideBarWidth, y: 0 }).onClick(() => {this.controller.hideSideBar()})}// .onTouch((event) => this.touchEvent(event)) //留的手指滑动的口子,大家根据下面原理自己实现.backgroundColor('#CCCCCCCC').width('100%').height('100%')}/*** 显示侧边栏*/private showSideBar() {animateTo({ duration: 300 }, () => {this.offsetX = this.sideBarWidththis.scaleX = 0.8this.isShowSideBar = true})}/*** 隐藏侧边栏*/private hideSideBar() {animateTo({ duration: 300 }, () => {this.offsetX = 0this.scaleX = 1this.isShowSideBar = false})}
}
DrawerController类:
/*** 抽屉布局控制器*/
export class DrawerController {showSideBar: () => void;hideSideBar: () => void;
}
a:偏移量
通过offset({ x: this.offsetX - this.sideBarWidth, y: 0 })动态调整左右视图在x轴方向的偏移量,有两种状态:显示和隐藏侧边栏,在显示状态下通过animateTo动画将offsetX=0在300ms内改变成offsetX = sideBarWidth(侧边栏宽度),同理在隐藏状态下通过animateTo动画将offsetX = sideBarWidth(侧边栏宽度)在300ms内改变成 offsetX = 0。
b:右侧内容缩放
通过动态调整右侧内容的width和height值来实现缩放效果。在显示状态下通过animateTo动画将scaleX = 1在300ms内改变成scaleX = 0.8,同理在隐藏状态下通过animateTo动画将scaleX = 0.8在300ms内改变成 scaleX = 1。
.width(`${this.scaleX * 100}%`)
.height(`${this.scaleX * 100}%`)
c:右侧内容距离左侧侧边栏的距离
通过动态调整右侧内容的的外边距左侧距离margin({ left: (1 - this.scaleX) * 180 })
通过以上的原理就能实现侧边栏效果了。
思考:
上面的实现原理没有实现通过手指滑动来控制侧边栏的隐藏和显示,通过下图的示意图分析下了手指滑动的原理,这里给大家留一个自己动手的机会,自己实现下如何通过手指控制侧边栏的显示和隐藏。
提示下:通过给最外层Row()设置触摸监听
Row(){}.onTouch((event) => this.touchEvent(event))

这篇关于鸿蒙自定义DrawerLayout侧滑菜单实现原理的文章就介绍到这儿,希望我们推荐的文章对编程师们有所帮助!


