本文主要是介绍matplotlib图例使用案例1.1:在不同行或列的图例上添加title,希望对大家解决编程问题提供一定的参考价值,需要的开发者们随着小编来一起学习吧!
我们将图例进行行显示或者列显示后,只能想继续赋予不同行或者列不同的title来进行分类。比较简单的方式,就是通过ax.annotate方法添加标签,这样方法复用率比较低,每次使用都要微调ax.annotate的显示位置。比较方便的方法是在案例1实现的基础上,添加title显示的功能。
motplotlib图例案例1:通过多个legend完全控制图例显示顺序(指定按行排序 or 按列排序)
添加title显示功能后的代码:
import matplotlib.pyplot as plt
import matplotlib.axes
from typing import List, Tuple, Any
#这个函数可以获得axis对象的已经绘制的artist中的所有的hander和labels,这个可以只给它一个axis参数。注意这个参数需要是列表类的。
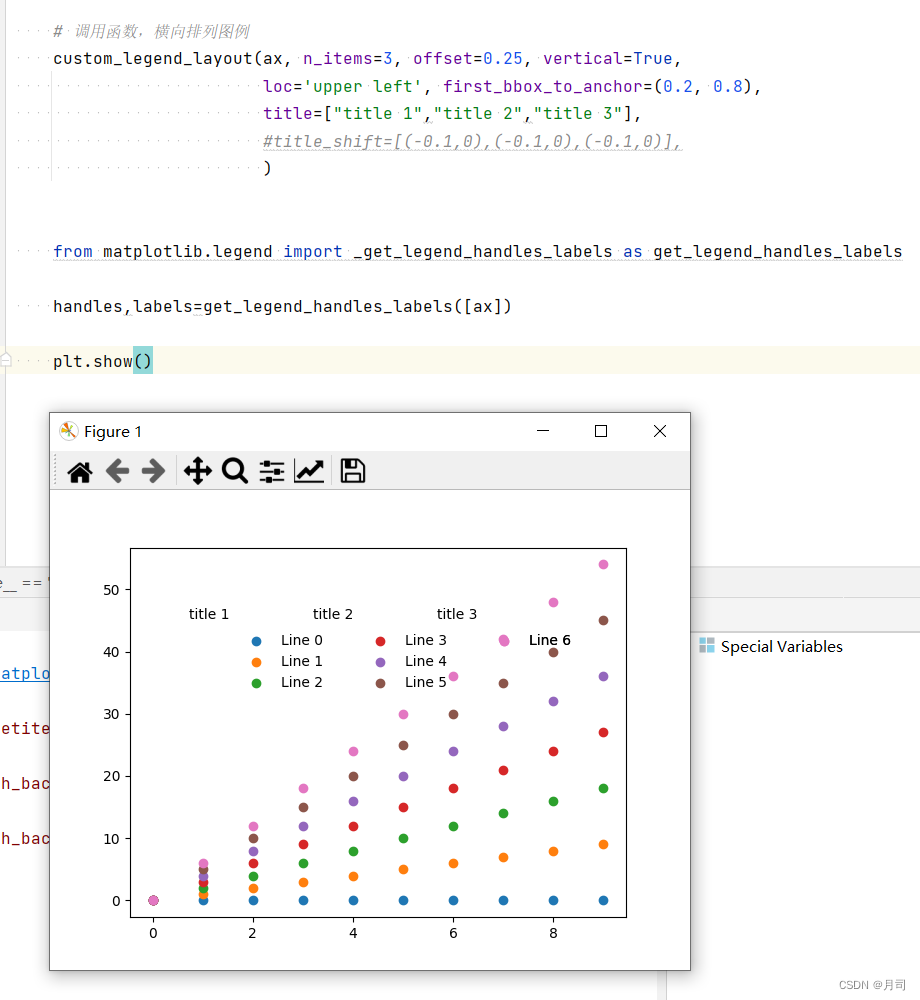
from matplotlib.legend import _get_legend_handles_labels as get_legend_handles_labelsdef custom_legend_layout(axis: matplotlib.axes.Axes,handlers: List[Any]=None,labels: List[str]=None,n_items: int = 3,offset: float = 0.05,vertical: bool = False,loc: str = 'upper right',first_bbox_to_anchor: Tuple[float, float] = (1, 1),title:List[str]=None,title_shift:List[Tuple[float,float]]=None,**kwargs) -> None:"""A function to arrange legend items in a custom layout.:param axis: Axis object on which to place the legends.:param lines: List of line objects to include in the legends.:param labels: List of labels corresponding to the line objects.:param n_items: Number of items per row (if vertical=False) or column (if vertical=True).:param offset: Vertical offset between rows (or horizontal offset between columns if vertical=True).:param vertical: If True, legends are arranged vertically, otherwise horizontally.:param loc: Location anchor for all legends.:param first_bbox_to_anchor: `~matplotlib.transforms.BboxBase` instance,Bbox anchor of the first legend.:param kwargs: Additional keyword arguments to pass to the legend function."""va_dict={"center":'center',"lower":'top',"upper":'bottom'}ha_dict={"center": 'center',"right":"left","left":"right",}if (handlers is None) != (labels is None): # Check if only one of handlers or labels is providedraise ValueError("Both 'handlers' and 'labels' must be specified if one is provided.")if (handlers is None) and (labels is None): # get default handlers and labels from axhandlers,labels=get_legend_handles_labels(axs=[axis]) # note: the param axs is list object# 确保n_items不为0,避免除以0的错误n_items = max(1, n_items)# 计算需要多少个图例n_legends = len(handlers) // n_items + (1 if len(handlers) % n_items else 0)# 计算每个图例的bbox_to_anchorfor i in range(n_legends):start_idx = i * n_itemsend_idx = min(start_idx + n_items, len(handlers))legend_lines = handlers[start_idx:end_idx]legend_labels = labels[start_idx:end_idx]if vertical:# 对于垂直布局ncol = 1if i == 0:bbox_anchor = first_bbox_to_anchorelse:# 计算后续图例的bbox_to_anchorbbox_anchor = (first_bbox_to_anchor[0] + i * offset, first_bbox_to_anchor[1])else:# 对于水平布局ncol = len(legend_lines)if i == 0:bbox_anchor = first_bbox_to_anchorelse:# 计算后续图例的bbox_to_anchorbbox_anchor = (first_bbox_to_anchor[0], first_bbox_to_anchor[1] - i * offset)legend = axis.legend(legend_lines, legend_labels, loc=loc, bbox_to_anchor=bbox_anchor, ncol=ncol, frameon=False, **kwargs)axis.add_artist(legend)# 计算每个title的位置va_key,ha_key=loc.split(" ")if title and len(title)==n_legends:w_shift= title_shift[i][0] if title_shift else 0h_shift=title_shift[i][1] if title_shift else 0axis.annotate(text=title[i],xy=(bbox_anchor[0]+w_shift, bbox_anchor[1]+h_shift),xycoords='axes fraction',va=va_dict[va_key],ha=ha_dict[ha_key])if __name__ == '__main__':# 示例使用这个函数fig, ax = plt.subplots()handlers = [ax.scatter(range(10), [i * x for x in range(10)], label=f'Line {i}') for i in range(7)]# 调用函数,横向排列图例custom_legend_layout(ax, n_items=3, offset=0.25, vertical=True,loc='upper left', first_bbox_to_anchor=(0.2, 0.8),title=["title 1","title 2","title 3"],#title_shift=[(-0.1,0),(-0.1,0),(-0.1,0)],)from matplotlib.legend import _get_legend_handles_labels as get_legend_handles_labelshandles,labels=get_legend_handles_labels([ax])plt.show()
运行后:
这篇关于matplotlib图例使用案例1.1:在不同行或列的图例上添加title的文章就介绍到这儿,希望我们推荐的文章对编程师们有所帮助!


