本文主要是介绍ubuntu22.04@laptop OpenCV Get Started: 013_contour_detection,希望对大家解决编程问题提供一定的参考价值,需要的开发者们随着小编来一起学习吧!
ubuntu22.04@laptop OpenCV Get Started: 013_contour_detection
- 1. 源由
- 2. 应用Demo
- 2.1 C++应用Demo
- 2.2 Python应用Demo
- 3. contour_approx应用
- 3.1 读取图像并将其转换为灰度格式
- 3.2 应用二进制阈值过滤算法
- 3.3 查找对象轮廓
- 3.4 绘制对象轮廓
- 3.5 效果
- 3.6 `CHAIN_APPROX_SIMPLE` v.s.`CHAIN_APPROX_NONE`
- 4. channel_experiments应用
- 4.1 读取图像并将其转换为单通道
- 4.2 查找对象轮廓
- 4.3 绘制对象轮廓
- 4.4 效果
- 5. contour_extraction应用
- 5.1 RETR_LIST
- 5.2 RETR_EXTERNAL
- 5.3 RETR_CCOMP
- 5.4 RETR_TREE
- 5.5 运行时间比较
- 6. 总结
- 7. 参考资料
- 8. 补充
1. 源由
使用轮廓检测检测物体的边界,通常是许多有趣应用的第一步,如图像前景提取、简单的图像分割、检测和识别。
罗列一些使用轮廓进行运动检测或分割应用:
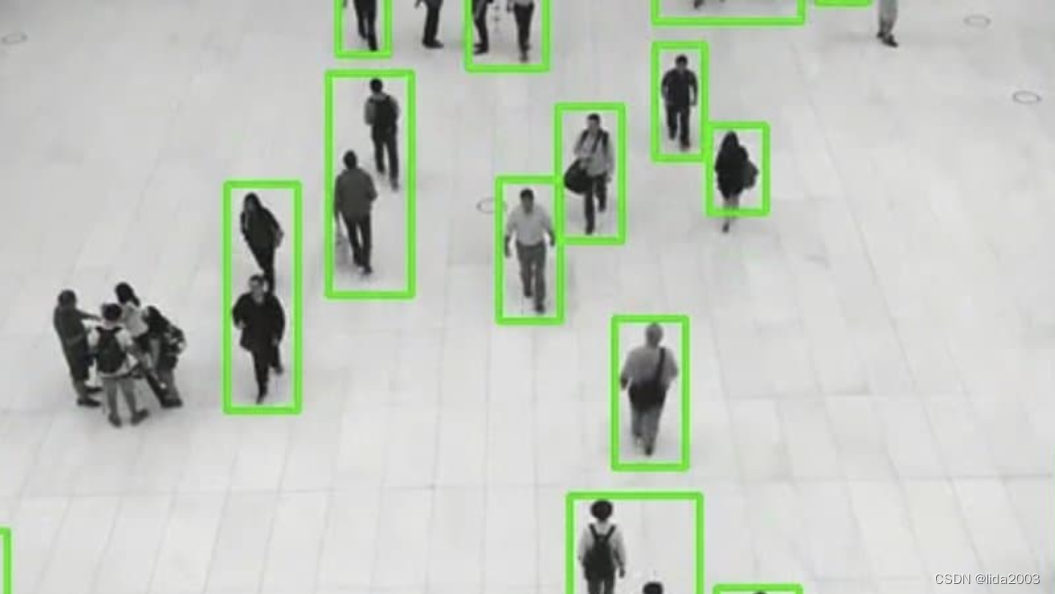
- 运动检测:在监控视频中,运动检测技术有许多应用,包括室内和室外安全环境、交通控制、体育活动中的行为检测、无人看管物体的检测,甚至视频压缩。在下图中,可以看到检测视频流中的人员移动在监控应用程序中是如何有用的。请注意,未检测到静止在图像左侧的那组人。只有运动中的人才会被捕捉到。请参考《Moving Object Detection and Segmentation using Frame differencing and Summing Technique》详细研究这种方法。
- 无人值守物体检测:公共场所的无人值守物体通常被视为可疑物体。一个有效且安全的解决方案详见:《Unattended Object Detection through Contour Formation using Background Subtraction》。

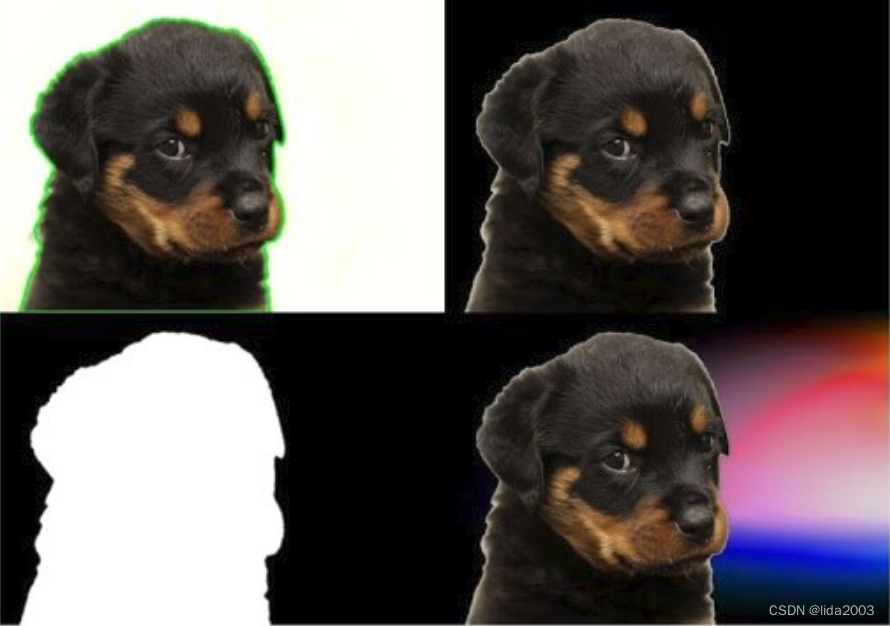
- 背景/前景分割:要用另一个图像替换图像的背景,需要执行图像前景提取(类似于图像分割)。使用轮廓是可以用于执行分割的一种方法。有关更多详细信息,请参阅《Background Removal with Python Using OpenCV to Detect the Foreground》。
2. 应用Demo
013_contour_detection是OpenCV通过鼠标指针和轨迹条与用户交互的示例。
2.1 C++应用Demo
C++应用Demo工程结构:
013_contour_detection/CPP$ tree .                                              .
├── channel_experiments
│   ├── channel_experiments.cpp
│   └── CMakeLists.txt
├── contour_approximations
│   ├── CMakeLists.txt
│   └── contour_approx.cpp
└── contour_extraction├── CMakeLists.txt└── contour_extraction.cpp3 directories, 6 files
确认OpenCV安装路径:
$ find /home/daniel/ -name "OpenCVConfig.cmake"
/home/daniel/OpenCV/installation/opencv-4.9.0/lib/cmake/opencv4/
/home/daniel/OpenCV/opencv/build/OpenCVConfig.cmake
/home/daniel/OpenCV/opencv/build/unix-install/OpenCVConfig.cmake$ export OpenCV_DIR=/home/daniel/OpenCV/installation/opencv-4.9.0/lib/cmake/opencv4/
C++应用Demo工程编译执行:
$ mkdir build
$ cd build
$ cmake ..
$ cmake --build . --config Release
$ cd ..
$ ./build/channel_experiments
$ mkdir build
$ cd build
$ cmake ..
$ cmake --build . --config Release
$ cd ..
$ ./build/contour_approximations
$ mkdir build
$ cd build
$ cmake ..
$ cmake --build . --config Release
$ cd ..
$ ./build/contour_extraction
2.2 Python应用Demo
Python应用Demo工程结构:
013_contour_detection/Python$ tree .
.
├── channel_experiments
│   └── channel_experiments.py
├── contour_approximations
│   └── contour_approx.py
├── contour_extraction
│   └── contour_extraction.py
└── requirements.txt3 directories, 4 files
Python应用Demo工程执行:
$ workoncv-4.9.0
$ python channel_experiments.py
$ python contour_approx.py
$ python contour_extraction.py
3. contour_approx应用
在OpenCV中检测和绘制轮廓的步骤如下所示:
- 读取图像并将其转换为灰度格式
- 应用二进制阈值过滤算法
- 查找对象轮廓
- 绘制对象轮廓
查找轮廓可以采用两种方式:
- CHAIN_APPROX_SIMPLE
- CHAIN_APPROX_NONE
3.1 读取图像并将其转换为灰度格式
读取图像并将图像转换为灰度格式。将图像转换为灰度非常重要,因为它为下一步的图像做准备。
将图像转换为单通道灰度图像对于阈值处理很重要,这反过来又是轮廓检测算法正常工作所必需的。
C++:
// read the imageMat image = imread("../../input/image_1.jpg");// convert the image to grayscale formatMat img_gray;cvtColor(image, img_gray, COLOR_BGR2GRAY);
Python:
# read the image
image = cv2.imread('../../input/image_1.jpg')
# convert the image to grayscale format
img_gray = cv2.cvtColor(image, cv2.COLOR_BGR2GRAY)
3.2 应用二进制阈值过滤算法
在寻找轮廓时,首先总是对灰度图像应用二进制阈值或Canny边缘检测。在这里,我们将应用二进制阈值。
这将图像转换为黑白图像,突出显示感兴趣的对象,从而简化轮廓检测算法。阈值化使图像中对象的边界完全变白,所有像素都具有相同的强度。该算法现在可以从这些白色像素中检测物体的边界。
C++:
// apply binary thresholdingMat thresh;threshold(img_gray, thresh, 150, 255, THRESH_BINARY);
Python:
# apply binary thresholding
ret, thresh = cv2.threshold(img_gray, 150, 255, cv2.THRESH_BINARY)
3.3 查找对象轮廓
C++:
// detect the contours on the binary image using cv2.CHAIN_APPROX_NONEvector<vector<Point>> contours;vector<Vec4i> hierarchy;findContours(thresh, contours, hierarchy, RETR_TREE, CHAIN_APPROX_NONE);########## 两种轮廓检测方法,所以有两段对应的代码// Now let's try with CHAIN_APPROX_SIMPLE`// detect the contours on the binary image using cv2.CHAIN_APPROX_NONEvector<vector<Point>> contours1;vector<Vec4i> hierarchy1;findContours(thresh, contours1, hierarchy1, RETR_TREE, CHAIN_APPROX_SIMPLE);
Python:
# detect the contours on the binary image using cv2.CHAIN_APPROX_NONE
contours, hierarchy = cv2.findContours(image=thresh, mode=cv2.RETR_TREE, method=cv2.CHAIN_APPROX_NONE)########## 两种轮廓检测方法,所以有两段对应的代码
# detect the contours on the binary image using cv2.ChAIN_APPROX_SIMPLE
contours1, hierarchy1 = cv2.findContours(thresh, cv2.RETR_TREE, cv2.CHAIN_APPROX_SIMPLE)
3.4 绘制对象轮廓
C++:
// draw contours on the original imageMat image_copy = image.clone();drawContours(image_copy, contours, -1, Scalar(0, 255, 0), 2);imshow("None approximation", image_copy);########## 两种轮廓检测方法,所以有两段对应的代码// draw contours on the original imageMat image_copy1 = image.clone();drawContours(image_copy1, contours1, -1, Scalar(0, 255, 0), 2);imshow("Simple approximation", image_copy1);
Python:
# draw contours on the original image
image_copy = image.copy()
cv2.drawContours(image=image_copy, contours=contours, contourIdx=-1, color=(0, 255, 0), thickness=2, lineType=cv2.LINE_AA)
# see the results
cv2.imshow('None approximation', image_copy)########## 两种轮廓检测方法,所以有两段对应的代码
# draw contours on the original image for `CHAIN_APPROX_SIMPLE`
image_copy1 = image.copy()
cv2.drawContours(image_copy1, contours1, -1, (0, 255, 0), 2, cv2.LINE_AA)
# see the results
cv2.imshow('Simple approximation', image_copy1)
3.5 效果
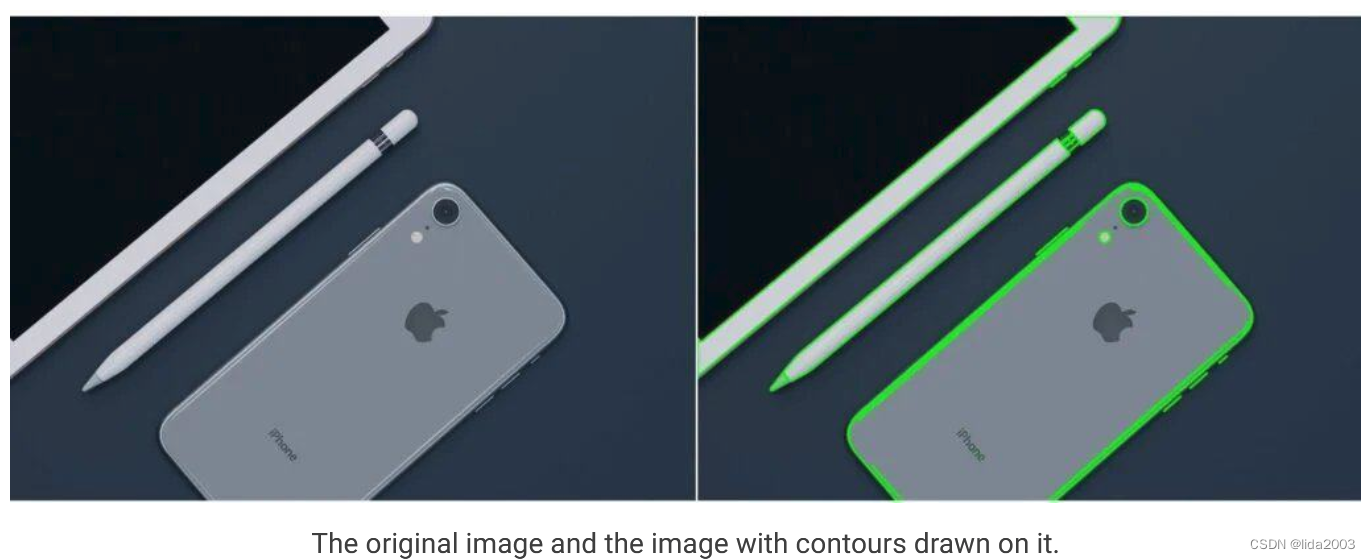
该算法生成的轮廓很好地识别了每个对象的边界。然而,如果你仔细观察手机,你会发现它包含不止一个轮廓。已经为与相机镜头和光线相关的圆形区域确定了单独的轮廓。沿着手机边缘的部分,也有“次要”轮廓。
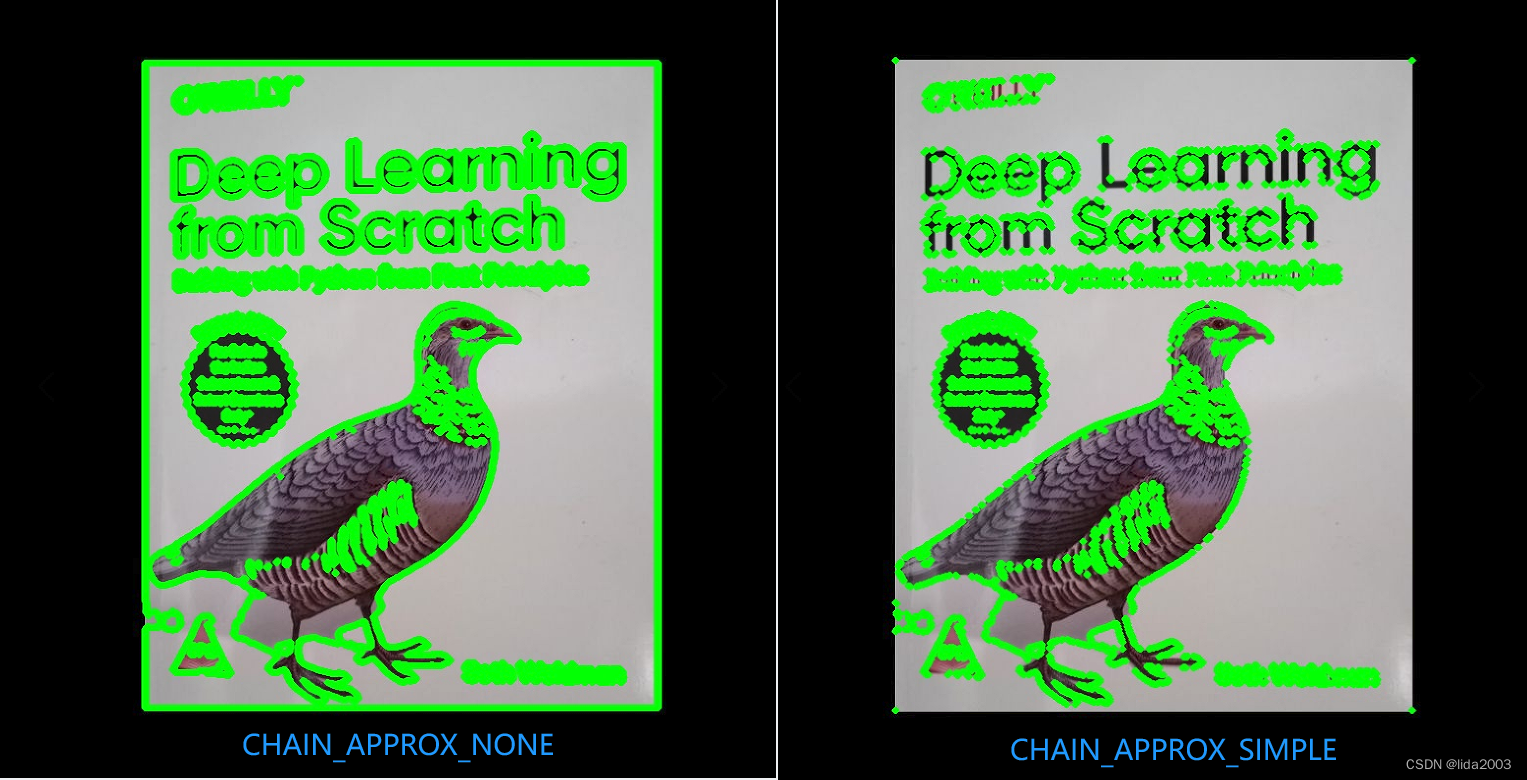
3.6 CHAIN_APPROX_SIMPLE v.s.CHAIN_APPROX_NONE
轮廓算法的准确性和质量在很大程度上取决于所提供的二进制图像的质量。某些场景需要高质量的轮廓,因此在创建二进制图像时使用不同的阈值进行实验,看看这是否会改善生成的轮廓。
另外,两种方法执行完后,将轮廓进行描点,可以发现:CHAIN_APPROX_NONE点数多于CHAIN_APPROX_SIMPLE
CHAIN_APPROX_SIMPLE算法沿轮廓压缩水平、垂直和对角线段,只保留它们的端点。这意味着沿着直线路径的任何点都将被忽略,将只剩下终点。
例如,考虑一个沿着矩形的轮廓。除四个角点外,所有轮廓点都将被忽略。此方法比CHAIN_APPROX_NONE更快,因为该算法不存储所有点,使用更少的内存,因此执行所需时间更少。
4. channel_experiments应用
在OpenCV中检测和绘制轮廓的步骤如下所示:
- 读取图像并将其转换为单通道:红色、绿色或蓝色
- 查找对象轮廓
- 绘制对象轮廓
4.1 读取图像并将其转换为单通道
C++:
// read the imageMat image = imread("../../input/image_1.jpg");// B, G, R channel splittingMat channels[3];split(image, channels);
Python:
# read the image
image = cv2.imread('../../input/image_1.jpg')# B, G, R channel splitting
blue, green, red = cv2.split(image)
4.2 查找对象轮廓
C++:
// detect contours using blue channel and without thresholdingvector<vector<Point>> contours1;vector<Vec4i> hierarchy1;findContours(channels[0], contours1, hierarchy1, RETR_TREE, CHAIN_APPROX_NONE);// detect contours using green channel and without thresholdingvector<vector<Point>> contours2;vector<Vec4i> hierarchy2;findContours(channels[1], contours2, hierarchy2, RETR_TREE, CHAIN_APPROX_NONE);// detect contours using red channel and without thresholdingvector<vector<Point>> contours3;vector<Vec4i> hierarchy3;findContours(channels[2], contours3, hierarchy3, RETR_TREE, CHAIN_APPROX_NONE);
Python:
# detect contours using blue channel and without thresholding
contours1, hierarchy1 = cv2.findContours(image=blue, mode=cv2.RETR_TREE, method=cv2.CHAIN_APPROX_NONE)# detect contours using green channel and without thresholding
contours2, hierarchy2 = cv2.findContours(image=green, mode=cv2.RETR_TREE, method=cv2.CHAIN_APPROX_NONE)# detect contours using red channel and without thresholding
contours3, hierarchy3 = cv2.findContours(image=red, mode=cv2.RETR_TREE, method=cv2.CHAIN_APPROX_NONE)
4.3 绘制对象轮廓
C++:
// draw contours on the original imageMat image_contour_blue = image.clone();drawContours(image_contour_blue, contours1, -1, Scalar(0, 255, 0), 2);imshow("Contour detection using blue channels only", image_contour_blue);// draw contours on the original imageMat image_contour_green = image.clone();drawContours(image_contour_green, contours2, -1, Scalar(0, 255, 0), 2);imshow("Contour detection using green channels only", image_contour_green);// draw contours on the original imageMat image_contour_red = image.clone();drawContours(image_contour_red, contours3, -1, Scalar(0, 255, 0), 2);imshow("Contour detection using red channels only", image_contour_red);
Python:
# draw contours on the original image
image_contour_blue = image.copy()
cv2.drawContours(image=image_contour_blue, contours=contours1, contourIdx=-1, color=(0, 255, 0), thickness=2, lineType=cv2.LINE_AA)
# see the results
cv2.imshow('Contour detection using blue channels only', image_contour_blue)# draw contours on the original image
image_contour_green = image.copy()
cv2.drawContours(image=image_contour_green, contours=contours2, contourIdx=-1, color=(0, 255, 0), thickness=2, lineType=cv2.LINE_AA)
# see the results
cv2.imshow('Contour detection using green channels only', image_contour_green)# draw contours on the original image
image_contour_red = image.copy()
cv2.drawContours(image=image_contour_red, contours=contours3, contourIdx=-1, color=(0, 255, 0), thickness=2, lineType=cv2.LINE_AA)
# see the results
cv2.imshow('Contour detection using red channels only', image_contour_red)
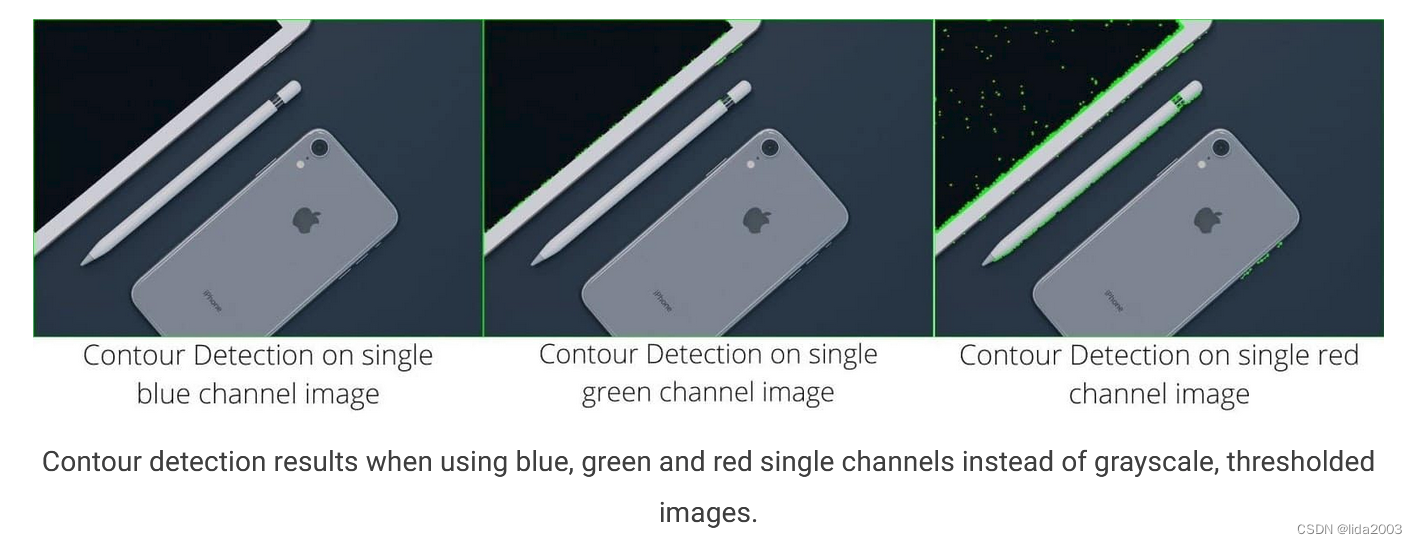
4.4 效果
在下面的图像中,我们可以看到轮廓检测算法不能正确地找到轮廓。这是因为它不能正确地检测对象的边界,而且像素之间的强度差也没有很好地定义。这就是我们更喜欢使用灰度和二进制阈值图像来检测轮廓的原因。
另外,CHAIN_APPROX_SIMPLE和CHAIN_APPROX_NONE并没有差异,同样无法找到轮廓。
5. contour_extraction应用
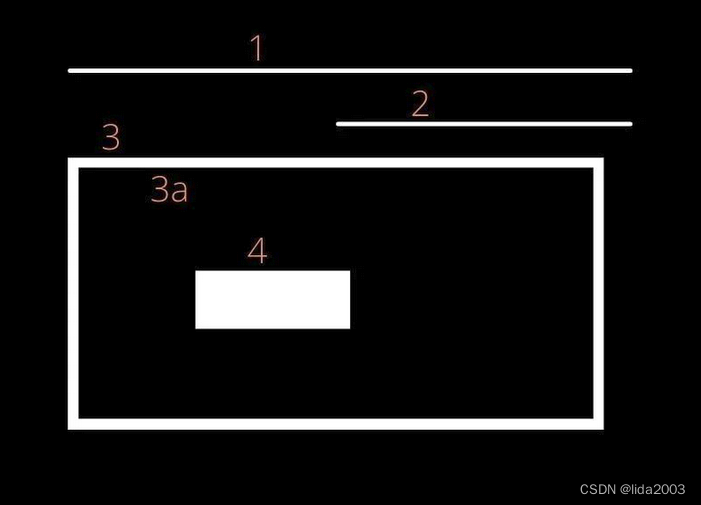
1. 轮廓之间的层次结构表示为父子关系:
- 1、2、3和4是独立的对象
- 3a是3个孩子
- 1、2和4都是父形状,没有任何关联的子形状,因此它们的编号可以是任意的
2. 轮廓层次表示为一个数组,该数组又包含四个值的数组。它表示为:
[Next, Previous, First_Child, Parent]
- Next:轮廓表示图像中处于相同层级的下一个轮廓。因此,
对于轮廓1,与其处于相同层级的下一个轮廓是2。在这里,Next 将是2。
. 相应地,轮廓3没有与其自身处于相同层级的轮廓。因此,它的 Next 值将是 -1。
-
Previous:轮廓表示相同层级上的上一个轮廓。这意味着轮廓1的上一个值始终为 -1。
-
First_Child:表示我们当前考虑的轮廓的第一个子轮廓。
轮廓1和2根本没有子轮廓。因此,它们的 First_Child 的索引值将为 -1。
但是轮廓3有一个子轮廓。因此,对于轮廓3,First_Child 的位置值将是3a的索引位置。
- Parent: 表示当前轮廓的父轮廓的索引位置。
轮廓1和2,显而易见地,没有任何父轮廓。
对于轮廓3a,其父轮廓将是轮廓3。
对于轮廓4,父轮廓是轮廓3a。
目前,有四种不同的轮廓检索技术:
- RETR_LIST
- RETR_EXTERNAL
- RETR_CCOMP
- RETR_TREE
5.1 RETR_LIST
RETR_LIST 轮廓检索方法不会在提取的轮廓之间创建任何父子关系。因此,对于检测到的所有轮廓区域,First_Child 和 Parent 索引位置值始终为 -1。
LIST: [[[ 1 -1 -1 -1]
[ 2  0 -1 -1]
[ 3  1 -1 -1]
[ 4  2 -1 -1]
[-1  3 -1 -1]]]
C++:
findContours(thresh2, contours3, hierarchy3, RETR_LIST, CHAIN_APPROX_NONE);
Python:
contours3, hierarchy3 = cv2.findContours(thresh2, cv2.RETR_LIST, cv2.CHAIN_APPROX_NONE)
5.2 RETR_EXTERNAL
RETR_EXTERNAL 轮廓检索方法非常有趣。它只检测父轮廓,并忽略任何子轮廓。因此,所有内部轮廓,如3a和4,将不会在其上绘制任何点。
EXTERNAL: [[[ 1 -1 -1 -1]
[ 2  0 -1 -1]
[-1  1 -1 -1]]]
 上述输出图像仅显示在轮廓1、2和3上绘制的点。轮廓3a和4被省略,因为它们是子轮廓。
C++:
findContours(thresh2, contours4, hierarchy4, RETR_EXTERNAL, CHAIN_APPROX_NONE);
Python:
contours4, hierarchy4 = cv2.findContours(thresh2, cv2.RETR_EXTERNAL, cv2.CHAIN_APPROX_NONE)
5.3 RETR_CCOMP
与 RETR_EXTERNAL 不同,RETR_CCOMP 检索图像中的所有轮廓。除此之外,它还对图像中所有形状或对象应用了两级层次结构。
CCOMP: [[[ 1 -1 -1 -1]
[ 3  0  2 -1]
[-1 -1 -1  1]
[ 4  1 -1 -1]
[-1  3 -1 -1]]]
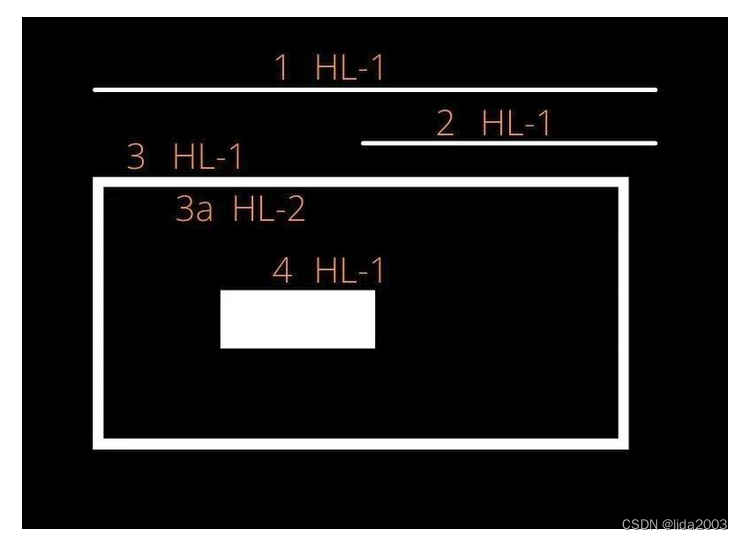 上面的图像显示了层次级别为HL-1或HL-2,分别表示级别1和级别2。现在,让我们来看一下代码和输出的层次结构数组。
C++:
findContours(thresh2, contours5, hierarchy5, RETR_CCOMP, CHAIN_APPROX_NONE);
Python:
contours5, hierarchy5 = cv2.findContours(thresh2, cv2.RETR_CCOMP, cv2.CHAIN_APPROX_NONE)
5.4 RETR_TREE
就像 RETR_CCOMP 一样,RETR_TREE 也检索图像中的所有轮廓。它还创建了一个完整的层次结构,其级别不限于1或2。每个轮廓都可以有自己的层次结构,与其所在级别和相应的父子关系一致。
TREE: [[[ 3 -1  1 -1]
[-1 -1  2  0]
[-1 -1 -1  1]
[ 4  0 -1 -1]
[-1  3 -1 -1]]]
 从上图可以明确看出:
- 轮廓1、2和3位于同一级别,即级别0。
- 轮廓3a位于层次级别1,因为它是轮廓3的子轮廓。
- 轮廓4是一个新的轮廓区域,所以其层次级别是2。
C++:
findContours(thresh2, contours6, hierarchy6, RETR_TREE, CHAIN_APPROX_NONE);
Python:
contours6, hierarchy6 = cv2.findContours(thresh2, cv2.RETR_TREE, cv2.CHAIN_APPROX_NONE)
5.5 运行时间比较
注:不同的计算机时间可能有所差异,这里仅仅做一个相对比较。
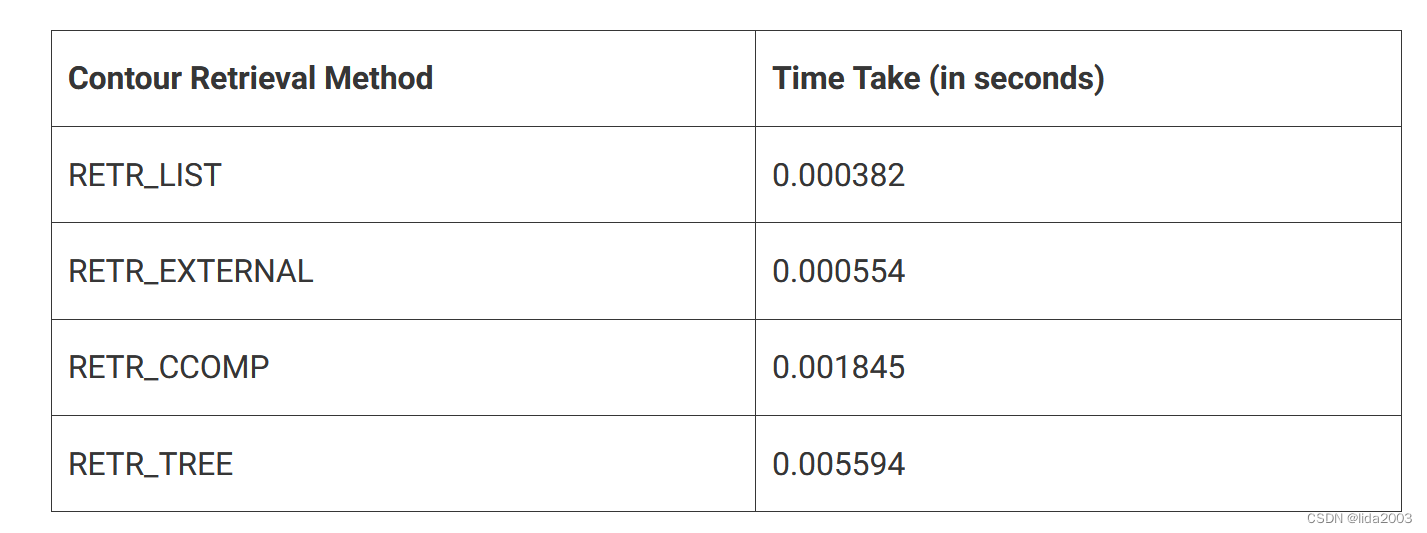
- RETR_LIST 和 RETR_EXTERNAL 执行时间最短,因为 RETR_LIST 不定义任何层次结构,而 RETR_EXTERNAL 仅检索父轮廓。
- RETR_CCOMP 执行时间次之。它检索所有轮廓并定义了一个两级层次结构。
- RETR_TREE 执行时间最长,因为它检索所有轮廓,并为每个父子关系定义独立的层次级别。
6. 总结
本文通过findContours和drawContours来实现在OpenCV下寻找轮廓,在图像上绘制轮廓边界凸显物体的方法。同时,也讨论了关于轮廓之间的父子关系,为后续物体识别奠定一定的基础。
- findContours(image, contours, hierarchy, mode, method)
- image: The binary input image obtained in the previous step.
- mode: This is the contour-retrieval mode.
- method: This defines the contour-approximation method.
- drawContours(image, contours, contourIdx, color, thickness, lineType)
- image: This is the input RGB image on which you want to draw the contour.
- contours: Indicates the contours obtained from the findContours() function.
- contourIdx: The pixel coordinates of the contour points are listed in the obtained contours. Using this argument, you can specify the index position from this list, indicating exactly which contour point you want to draw. Providing a negative value will draw all the contour points.
- color: This indicates the color of the contour points you want to draw. We are drawing the points in green.
- thickness: This is the thickness of contour points.
7. 参考资料
【1】ubuntu22.04@laptop OpenCV Get Started
【2】ubuntu22.04@laptop OpenCV安装
【3】ubuntu22.04@laptop OpenCV定制化安装
8. 补充
学习是一种过程,对于前面章节学习讨论过的,就不在文中重复了。
有兴趣了解更多的朋友,请从《ubuntu22.04@laptop OpenCV Get Started》开始,一个章节一个章节的了解,循序渐进。
这篇关于ubuntu22.04@laptop OpenCV Get Started: 013_contour_detection的文章就介绍到这儿,希望我们推荐的文章对编程师们有所帮助!


