本文主要是介绍[SWIG] HelloSWIG,希望对大家解决编程问题提供一定的参考价值,需要的开发者们随着小编来一起学习吧!
文本代码地址:https://github.com/geodoer/swig-examples/tree/main/A-HelloSWIG
原文地址:https://www.yuque.com/cppdev/swig/gxz6qc
SWIG系列笔记:https://www.yuque.com/cppdev/swig
看完这篇文章,你能了解SWIG的原理,并知道如何简单的使用它。
文章目录
- 第一步:编写cpp的代码
- 第二步:编写SWIG的接口描述文件
- simplePINVOKE.cs
- simple.cs(接口文件)
- 总结
- 第三步:编译wrap.cxx文件
- 第四步:C#调用
- 附:为.i文件添加编译配置
- 相关概念
A-HelloSWIG
├── simple
|   ├── example.h
│   ├── example.cpp
│   ├── example.i
│   ├── simple.vcxproj
│   └── simple.vcxproj.filters
├── usesimple
|		├── Program.cs
|   └── usesimple.csproj
└── A-HelloSWIG.sln
新建一个名字为HelloSWIG的Visual studio工程
第一步:编写cpp的代码
创建一个名字为simple的子工程,类型改为动态库
编写C++代码
.\simple\example.h
#pragma once
//全局变量
double Foo = 0;//函数
int gcd(int x, int y);
.\simple\example.cpp
#include"example.h"#include<iostream>/* 计算正整数的最大公约数 */
int gcd(int x, int y) {int g;g = y;while (x > 0) {g = x;x = y % x;y = g;}return g;
}
编译simple子工程,生成simple.dll
此时的simple.dll内部包含了example.h的相关代码
第二步:编写SWIG的接口描述文件
SWIG的接口描述文件,是用来告诉SWIG,接口的导出内容、信息与规则等等。后缀名一般为.i
我们的目的是将example.h暴露给C#,让C#能够调用example.h
所以,需要根据example.h编写.i文件(即example.i)
/* 模块名 */
%module simple/* 以下内容会被原封不动的,拷贝到*_wrap.cxx中 */
%{
//**************************************
//SWIG接口文件中拷贝过来的内容
extern int    gcd(int x, int y);
extern double Foo;
//**************************************
%}/* 指定需要解析的头文件,并生成包装器的代码 */
%include"example.h"
编写完.i文件之后,我们就能用命令行运行SWIG,生成包装代码和接口代码
swig.exe -c++ -csharp example.i
SWIG生成了以下文件
HelloSWIG
├── simple
|   ├── ...
│   ├── example_wrap.cxx
│   ├── simple.cs
|   └── simplePINVOKE.cs
├── ...
我们一个一个文件来看,看看SWIG做了些什么。<br /><br />
<a name="zIHBh"></a>
#### example_wrap.cxx(包装器)
`example_wrap.cxx`其实就是`SWIG`名字中的`SW`。Simplified Wrapper简单的包装器。<br />它将`example.h`中的内容,简单的封装了一层,这一层将被C#(客户端语言)使用。
```cpp
//..... //前部分是SWIG的固定代码//**************************************
//SWIG接口文件中拷贝过来的内容
extern int gcd(int x, int y);
extern double Foo;
//**************************************#ifdef __cplusplus
extern "C" {
#endifexample.h中的double Foo全局变量,SWIG为它包了一层
//Foo的设置函数
SWIGEXPORT void SWIGSTDCALL CSharp_Foo_set(double jarg1) {double arg1 ;arg1 = (double)jarg1; Foo = arg1;
}
//Foo的get函数
SWIGEXPORT double SWIGSTDCALL CSharp_Foo_get() {double jresult ;double result;result = (double)Foo;jresult = result; return jresult;
}example.h中的gcd,SWIG为它包了一层
SWIGEXPORT int SWIGSTDCALL CSharp_gcd(int jarg1, int jarg2) {int jresult ;int arg1 ;int arg2 ;int result;arg1 = (int)jarg1; arg2 = (int)jarg2; result = (int)gcd(arg1,arg2);jresult = result; return jresult;
}//....
simplePINVOKE.cs
simplePINVOKE.cs将从dll中装载C++相关代码,实现对C++的调用。
class simplePINVOKE {protected class SWIGExceptionHelper {//...}protected static SWIGExceptionHelper swigExceptionHelper = new SWIGExceptionHelper();public class SWIGPendingException {//...}protected class SWIGStringHelper {//...}static protected SWIGStringHelper swigStringHelper = new SWIGStringHelper();static simplePINVOKE() {}//从simple.dll中导入名为CSharp_Foo_set的函数//映射为C#的Foo_set函数[global::System.Runtime.InteropServices.DllImport("simple", EntryPoint="CSharp_Foo_set")]public static extern void Foo_set(double jarg1);//从simple.dll中导入CSharp_Foo_get函数//映射为C#的Foo_get函数[global::System.Runtime.InteropServices.DllImport("simple", EntryPoint="CSharp_Foo_get")]public static extern double Foo_get();//从simple.dll中导入CSharp_gcd函数,映射为C#的gcd函数[global::System.Runtime.InteropServices.DllImport("simple", EntryPoint="CSharp_gcd")]public static extern int gcd(int jarg1, int jarg2);
}
这里有一个重点:
DllImport("simple", EntryPoint="CSharp_Foo_set")中的simple其实就是.i文件中的模块名!- 所以,
.i文件的模块名需要与*_wrap.cxx所在dll的名字相同
simple.cs(接口文件)
此文件可以说是SWIG名字中的I,即Interface,是C#使用C++代码的接口文件。
public class simple {public static double Foo {set {simplePINVOKE.Foo_set(value);} get {double ret = simplePINVOKE.Foo_get();return ret;} }public static int gcd(int x, int y) {int ret = simplePINVOKE.gcd(x, y);return ret;}
}
可以看出,这个文件,又是一个代理层。
- 它将
simplePINVOKE.cs又封装了一层,写了一个simple类,内部的接口与example.h完全相同。 - 如此,在C#中使用,接口在C++中的一致!
这里也能发现一点。simple.cs的名字与.i中所指定的模块名相同。
总结
整体逻辑如下:
example.h <-- example_wrap.cxx <-- example_wrapperPINVOKE.cs <-- example_wrapper.cs <-- C# code(client)
C++代码		 C++代理层				C#从dll中加载C++的函数			C#的代理层				C#调用层
第三步:编译wrap.cxx文件
在上面的内容中(《simplePINVOKE.cs》),我们发现,SWIG生成的C#代码,会去模块名.dll中搜索对应的C++代码(如全局变量、函数、类)。
所以,我们要把*_wrap.cxx文件编译到模块名.dll中。
将example_wrap.cxx加入到sample工程中,再次编译。
第四步:C#调用
创建一个C#工程(Visual C# > .NET Core > 控制台应用)。
将SWIG生成的C#文件加入进来(simple.cs、simplePINVOKE.cs)
编写测试用例:
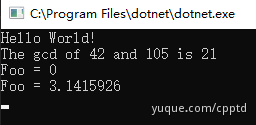
static void Main(string[] args){Console.WriteLine("Hello World!");// Call our gcd() functionint x = 42;int y = 105;int g = cppproject.gcd(x, y);Console.WriteLine("The gcd of " + x + " and " + y + " is " + g);// Manipulate the Foo global variable// Output its current valueConsole.WriteLine("Foo = " + cppproject.Foo);// Change its valuecppproject.Foo = 3.1415926;// See if the change took effectConsole.WriteLine("Foo = " + cppproject.Foo);Console.ReadLine();}
然后运行。
不出意外,你的程序会有一个异常(在simple.cs中)
System.TypeInitializationException:“The type initializer for 'simplePINVOKE' threw an exception.”DllNotFoundException: Unable to load DLL 'simple' or one of its dependencies: 找不到指定的模块。 (Exception from HRESULT: 0x8007007E)
这其实是因为Csharp的工程加载不到simple.dll引起的。我们手动将simple.dll拷贝到csharp运行目录中即可(.\A-HelloSWIG\usesimple\bin\Debug\netcoreapp2.1)
也可以为`simple`工程配置生成后事件,将生成的dll拷贝到指定目录下即可
1. 右键`simple`> 生成事件 > 生成后事件
2. 在命令行中输入:`copy "$(OutDir)$(projectname).dll" "$(SolutionDir)csharpproject/bin/$(Configuration)/netcoreapp2.1"`
附:为.i文件添加编译配置
如果更改了代码,就要打开命令行,重新运行SWIG命令,这很麻烦。
我们可以为.i文件添加编译配置,这样就不用在命令行运行SWIG命令了
编写完成后,需要做以下配置
- 右键.i文件 > 属性 > 常规 > 项类型 > 选择“自定义生成工具”
- 右键.i文件 > 属性 > 自定义生成工具 >
- 命令行:
swig.exe -c++ -csharp %(FullPath) - 输出:
%(Filename)_wrap.cxx;%(Outputs)
- 命令行:
配置完之后,右键example.i文件,点击“编译”
如此,就不用每次都打开命令行,运行命令了
相关概念
这里的C#,叫Target languages,目标语言
这篇关于[SWIG] HelloSWIG的文章就介绍到这儿,希望我们推荐的文章对编程师们有所帮助!


![[SWIG] 在VS中运行SWIG的官方示例](https://img-blog.csdnimg.cn/b46bac7c7cd146f88d9ff23c80aa22cc.png?x-oss-process=image/watermark,type_d3F5LXplbmhlaQ,shadow_50,text_Q1NETiBAZ2VvZG9lcg==,size_20,color_FFFFFF,t_70,g_se,x_16)
![[SWIG] SWIG对Class包装的原理(以C#为例)](https://img-blog.csdnimg.cn/1eb9defa47f04a4c87386d7bea576a6e.png)
![[SWIG] 源码编译与阅读](https://img-blog.csdnimg.cn/d27fd70c359a4070a3f01cde33bdf9f8.png?x-oss-process=image/watermark,type_d3F5LXplbmhlaQ,shadow_50,text_Q1NETiBAZ2VvZG9lcg==,size_20,color_FFFFFF,t_70,g_se,x_16)
![[SWIG] 多继承与接口(%interface、%interface_impl、%interface_custom)](https://img-blog.csdnimg.cn/db720e0254a64b7ea3ea980ea10e2cdd.png?x-oss-process=image/watermark,type_d3F5LXplbmhlaQ,shadow_50,text_Q1NETiBAZ2VvZG9lcg==,size_20,color_FFFFFF,t_70,g_se,x_16)