本文主要是介绍C# OpenCvSharp DNN 部署yolov4目标检测,希望对大家解决编程问题提供一定的参考价值,需要的开发者们随着小编来一起学习吧!
目录
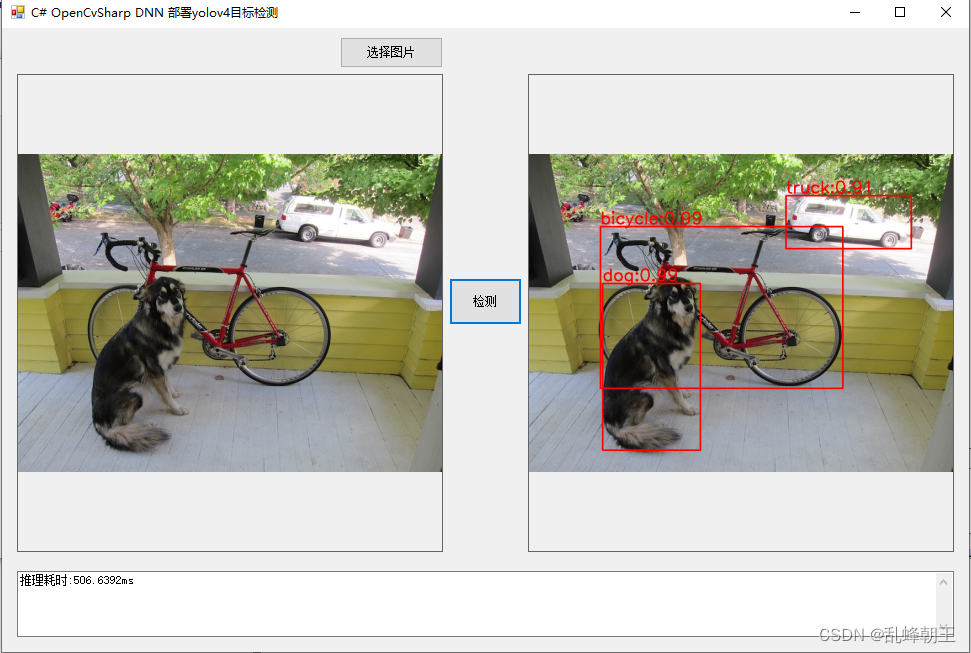
效果
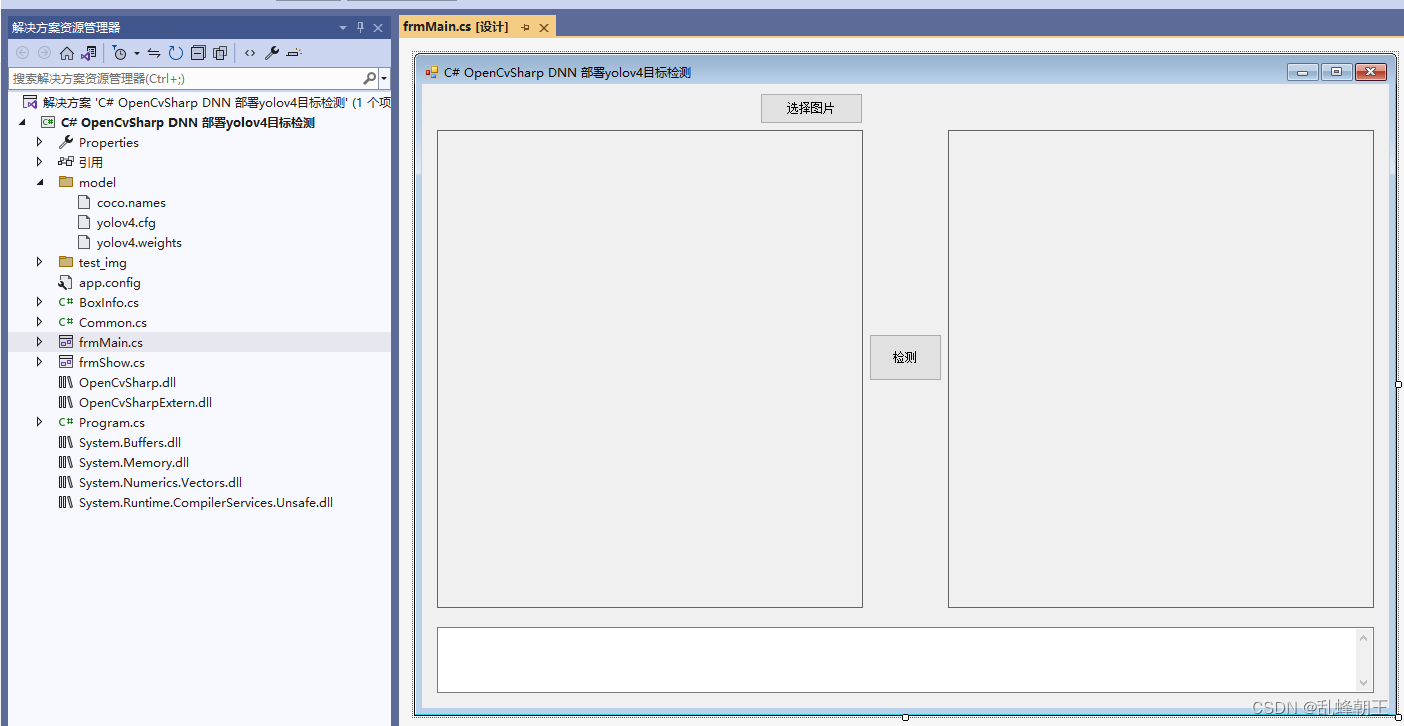
项目
代码
下载
效果
项目
代码
using OpenCvSharp;
using OpenCvSharp.Dnn;
using System;
using System.Collections.Generic;
using System.Drawing;
using System.IO;
using System.Linq;
using System.Windows.Forms;namespace OpenCvSharp_DNN_Demo
{public partial class frmMain : Form{public frmMain(){InitializeComponent();}string fileFilter = "*.*|*.bmp;*.jpg;*.jpeg;*.tiff;*.tiff;*.png";string image_path = "";DateTime dt1 = DateTime.Now;DateTime dt2 = DateTime.Now;float confThreshold;float nmsThreshold;int inpHeight;int inpWidth;List<string> class_names;int num_class;Net opencv_net;Mat BN_image;Mat image;Mat result_image;private void button1_Click(object sender, EventArgs e){OpenFileDialog ofd = new OpenFileDialog();ofd.Filter = fileFilter;if (ofd.ShowDialog() != DialogResult.OK) return;pictureBox1.Image = null;pictureBox2.Image = null;textBox1.Text = "";image_path = ofd.FileName;pictureBox1.Image = new Bitmap(image_path);image = new Mat(image_path);}private void Form1_Load(object sender, EventArgs e){confThreshold = 0.5f;nmsThreshold = 0.4f;inpHeight = 416;inpWidth = 416;opencv_net = CvDnn.ReadNetFromDarknet("model/yolov4.cfg", "model/yolov4.weights");class_names = new List<string>();StreamReader sr = new StreamReader("model/coco.names");string line;while ((line = sr.ReadLine()) != null){class_names.Add(line);}num_class = class_names.Count();image_path = "test_img/dog.jpg";pictureBox1.Image = new Bitmap(image_path);}private unsafe void button2_Click(object sender, EventArgs e){if (image_path == ""){return;}textBox1.Text = "检测中,请稍等……";pictureBox2.Image = null;Application.DoEvents();image = new Mat(image_path);BN_image = CvDnn.BlobFromImage(image, 1 / 255.0, new OpenCvSharp.Size(inpWidth, inpHeight), new Scalar(0, 0, 0), true, false);//配置图片输入数据opencv_net.SetInput(BN_image);//模型推理,读取推理结果var outNames = opencv_net.GetUnconnectedOutLayersNames();var outs = outNames.Select(_ => new Mat()).ToArray();dt1 = DateTime.Now;opencv_net.Forward(outs, outNames);dt2 = DateTime.Now;List<int> classIds = new List<int>();List<float> confidences = new List<float>();List<Rect> boxes = new List<Rect>();for (int i = 0; i < outs.Length; ++i){float* data = (float*)outs[i].Data;for (int j = 0; j < outs[i].Rows; ++j, data += outs[i].Cols){Mat scores = outs[i].Row(j).ColRange(5, outs[i].Cols);double minVal, max_class_socre;OpenCvSharp.Point minLoc, classIdPoint;// Get the value and location of the maximum scoreCv2.MinMaxLoc(scores, out minVal, out max_class_socre, out minLoc, out classIdPoint);if (max_class_socre > confThreshold){int centerX = (int)(data[0] * image.Cols);int centerY = (int)(data[1] * image.Rows);int width = (int)(data[2] * image.Cols);int height = (int)(data[3] * image.Rows);int left = centerX - width / 2;int top = centerY - height / 2;classIds.Add(classIdPoint.X);confidences.Add((float)max_class_socre);boxes.Add(new Rect(left, top, width, height));}}}int[] indices;CvDnn.NMSBoxes(boxes, confidences, confThreshold, nmsThreshold, out indices);result_image = image.Clone();for (int i = 0; i < indices.Length; ++i){int idx = indices[i];Rect box = boxes[idx];Cv2.Rectangle(result_image, new OpenCvSharp.Point(box.X, box.Y), new OpenCvSharp.Point(box.X + box.Width, box.Y + box.Height), new Scalar(0, 0, 255), 2);string label = class_names[classIds[idx]] + ":" + confidences[idx].ToString("0.00");Cv2.PutText(result_image, label, new OpenCvSharp.Point(box.X, box.Y - 5), HersheyFonts.HersheySimplex, 1, new Scalar(0, 0, 255), 2);}pictureBox2.Image = new Bitmap(result_image.ToMemoryStream());textBox1.Text = "推理耗时:" + (dt2 - dt1).TotalMilliseconds + "ms";}private void pictureBox2_DoubleClick(object sender, EventArgs e){Common.ShowNormalImg(pictureBox2.Image);}private void pictureBox1_DoubleClick(object sender, EventArgs e){Common.ShowNormalImg(pictureBox1.Image);}}
}
下载
源码下载
这篇关于C# OpenCvSharp DNN 部署yolov4目标检测的文章就介绍到这儿,希望我们推荐的文章对编程师们有所帮助!


