本文主要是介绍使用SPM_batch进行批量跑脚本(matlab.m),希望对大家解决编程问题提供一定的参考价值,需要的开发者们随着小编来一起学习吧!
软件:spm8+matlab2023b+win11
数据格式:
F:\ASL\HC\CBF\HC_caishaoqing\CBF.nii
F:\ASL\HC\CBF\HC_caishaoqing\T1.nii
F:\ASL\HC\CBF\HC_wangdonga\CBF.nii
F:\ASL\HC\CBF\HC_wangdonga\T1.nii
clear
spmdir='D:\AnalysisApps\spm8';
datadir='F:\ASL\HC\CBF';
cd(datadir);
allsubs=dir('HC*');for i=1:numel(allsubs)cursub=allsubs(i).name;matlabbatch{1}.spm.spatial.normalise.estwrite.subj.source = {fullfile(datadir,cursub,'CBF.nii')};matlabbatch{1}.spm.spatial.normalise.estwrite.subj.wtsrc = '';matlabbatch{1}.spm.spatial.normalise.estwrite.subj.resample = {fullfile(datadir,cursub,'CBF.nii')};matlabbatch{1}.spm.spatial.normalise.estwrite.eoptions.template = {'D:\AnalysisApps\spm8\templates\PET.nii,1'};matlabbatch{1}.spm.spatial.normalise.estwrite.eoptions.weight = '';matlabbatch{1}.spm.spatial.normalise.estwrite.eoptions.smosrc = 8;matlabbatch{1}.spm.spatial.normalise.estwrite.eoptions.smoref = 0;matlabbatch{1}.spm.spatial.normalise.estwrite.eoptions.regtype = 'mni';matlabbatch{1}.spm.spatial.normalise.estwrite.eoptions.cutoff = 25;matlabbatch{1}.spm.spatial.normalise.estwrite.eoptions.nits = 16;matlabbatch{1}.spm.spatial.normalise.estwrite.eoptions.reg = 1;matlabbatch{1}.spm.spatial.normalise.estwrite.roptions.preserve = 0;matlabbatch{1}.spm.spatial.normalise.estwrite.roptions.bb = [-78 -112 -5078 76 85];matlabbatch{1}.spm.spatial.normalise.estwrite.roptions.vox = [2 2 2];matlabbatch{1}.spm.spatial.normalise.estwrite.roptions.interp = 1;matlabbatch{1}.spm.spatial.normalise.estwrite.roptions.wrap = [0 0 0];matlabbatch{1}.spm.spatial.normalise.estwrite.roptions.prefix = 'w';spm_jobman('run',matlabbatch)
end
后面的脚本来自spm-view-show.m code

下面这里是show.m产生的原始脚本。可以看出我们只是把绿色部分用循环语句替换了。
matlabbatch{1}.spm.spatial.normalise.estwrite.subj.source = {'F:\ASL\HC\CBF\HC_caishaoqing\CBF.nii,1'};
matlabbatch{1}.spm.spatial.normalise.estwrite.subj.wtsrc = '';
matlabbatch{1}.spm.spatial.normalise.estwrite.subj.resample = {'F:\ASL\HC\CBF\HC_caishaoqing\CBF.nii,1'};
matlabbatch{1}.spm.spatial.normalise.estwrite.eoptions.template = {'D:\AnalysisApps\spm8\templates\PET.nii,1'};
matlabbatch{1}.spm.spatial.normalise.estwrite.eoptions.weight = '';
matlabbatch{1}.spm.spatial.normalise.estwrite.eoptions.smosrc = 8;
matlabbatch{1}.spm.spatial.normalise.estwrite.eoptions.smoref = 0;
matlabbatch{1}.spm.spatial.normalise.estwrite.eoptions.regtype = 'mni';
matlabbatch{1}.spm.spatial.normalise.estwrite.eoptions.cutoff = 25;
matlabbatch{1}.spm.spatial.normalise.estwrite.eoptions.nits = 16;
matlabbatch{1}.spm.spatial.normalise.estwrite.eoptions.reg = 1;
matlabbatch{1}.spm.spatial.normalise.estwrite.roptions.preserve = 0;
matlabbatch{1}.spm.spatial.normalise.estwrite.roptions.bb = [-78 -112 -5078 76 85];
matlabbatch{1}.spm.spatial.normalise.estwrite.roptions.vox = [2 2 2];
matlabbatch{1}.spm.spatial.normalise.estwrite.roptions.interp = 1;
matlabbatch{1}.spm.spatial.normalise.estwrite.roptions.wrap = [0 0 0];
matlabbatch{1}.spm.spatial.normalise.estwrite.roptions.prefix = 'w';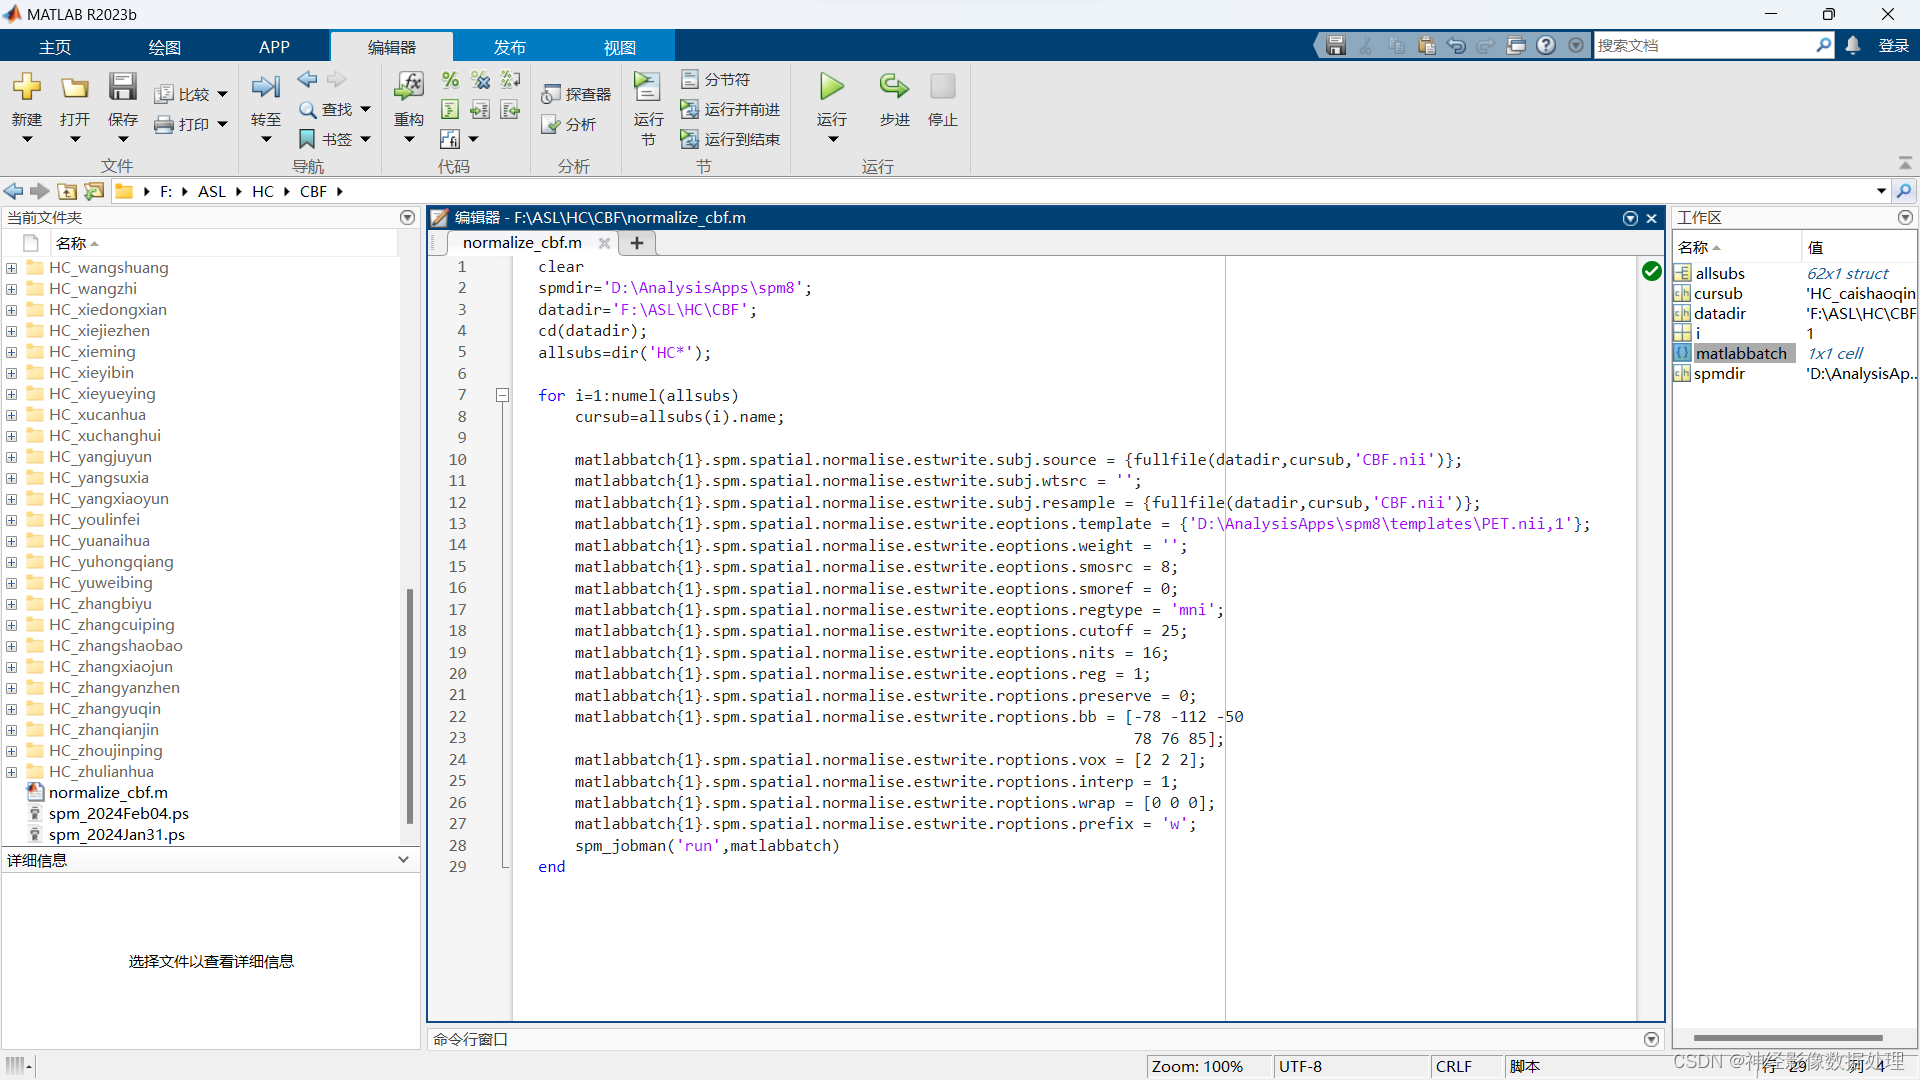
这篇关于使用SPM_batch进行批量跑脚本(matlab.m)的文章就介绍到这儿,希望我们推荐的文章对编程师们有所帮助!


