本文主要是介绍K8S部署Harbor镜像仓库(含离线安装包harbor-offline-installer国内下载链接),希望对大家解决编程问题提供一定的参考价值,需要的开发者们随着小编来一起学习吧!
天行健,君子以自强不息;地势坤,君子以厚德载物。
每个人都有惰性,但不断学习是好好生活的根本,共勉!
文章均为学习整理笔记,分享记录为主,如有错误请指正,共同学习进步。
文章目录
- 一、环境要求
- 1. 硬件要求
- 2. 软件要求
- 3. 网络端口
- 二、安装包下载
- 1. 官网下载地址(外网github)
- 2. 国内下载地址(更快)
- 三、软件安装
- 1. 安装Docker
- 2. 安装Docker Compose
- 2.1 yum命令安装docker compose
- 2.2 github官网资源安装docker-compose
- 2.3 备用方案安装docker-compose
- 2.4 配置执行权限
- 2.5 全局配置
- 3. 安装openssl
- 四、证书秘钥配置
- 1. 文件夹创建
- 2. 秘钥生成
- 3. 证书秘钥与IP绑定
- 4. 移动证书位置
- 五、部署Harbor
- 1. 安装包上传到服务器
- 2. 解压安装包
- 3. harbor.yml配置
- 3.1 备份
- 3.2 修改参数
- 4. Harbor配置生成
- 5. Harbor安装
- 6. Harbor服务查看
- 7. Harbor服务重启
- 六、使用Harbor
- 1. 访问
- 2. 登录
- 3. 项目创建
- 3.1 私有项目test01创建
- 3.2 公开项目test02创建
- 4. Docker配置Harbor(所有节点)
- 4.1 insecure-registries
- 4.2 Docker登录Harbor
- 5. hello-world镜像拉取
- 6. 公开项目的镜像推送和拉取
- 6.1 镜像上传
- 6.1.1 打标签
- 6.1.2 镜像推送
- 6.2 镜像拉取
- 6.2.1 查看镜像
- 6.2.2 删除tag的镜像
- 6.2.3 拉取harbor仓库的镜像
- 7. 私有项目的镜像推送和拉取(为了验证有无区别还是操作一遍私有的)
- 7.1 镜像上传
- 7.1.1 打标签
- 7.1.2 镜像推送
- 7.2 镜像拉取
- 7.2.1 查看镜像
- 7.2.2 删除tag的镜像
- 7.2.3 拉取harbor仓库的镜像
- 8. 可能遇到的问题
- 9. 镜像仓库相关Docker命令汇总
- 9.1 登录Harbor
- 9.2 重启Harbor
- 9.2.1 直接重启命令
- 9.2.2 指定文件路径重启命令
- 9.3 拉取镜像
- 9.4 查看镜像
- 9.5 为镜像打标签
- 9.6 推送镜像到Harbor
- 9.7 删除镜像
- 9.7 从Harbor中拉取镜像到本地
- 10. 卸载Harbor
- 10.1 停止Harbor服务相关容器
- 10.2 删除Harbor服务相关容器
- 10.3 删除harbor服务相关镜像
- 10.4 删除harbor相关数据
一、环境要求
参考官网文档:https://goharbor.io/docs/2.5.0/install-config/installation-prereqs/
1. 硬件要求
以下为最低要求和建议要求参数表
| 资源 | 最低配置 | 建议配置 |
|---|---|---|
| CPU | 2 CPU | 4 CPU |
| Mem | 4 GB | 8 GB |
| Disk | 40 GB | 160 GB |
2. 软件要求
软件版本最低要求参数表
| 软件名称 | 软件版本最低配置 | 建议版本 | 描述 |
|---|---|---|---|
| Docker engine | 17.06.0 | 最新版本 | 可参考官网安装,用于操作容器 |
| Docker Compose | 1.18.0 | 最新版本 | 可参考官网安装,用于操作harbor |
| Openssl | 最新版本 | 最新版本 | 用于生成harbor仓库的证书certificate和秘钥key |
3. 网络端口
网络端口要求,可根据需要修改配置文件中的端口并开放服务器对应的端口
(本篇使用https,后面会修改配置文件中https和http对应的端口)
| 端口号 | 协议 | 描述 |
|---|---|---|
| 443 | HTTPS | 用于访问harbor仓库和核心API的https的请求端口,也可以在配置文件中修改此端口 |
| 4443 | HTTPS | 用于连接到harbor仓库的Docker内容信任的服务,仅当启用Notary时需要,可在配置文件中修改此端口 |
| 80 | HTTP | 用于访问harbor仓库和核心API的http请求的端口,也可以在配置文件中修改此端口 |
二、安装包下载
1. 官网下载地址(外网github)
离线安装包harbor-offline-installer-v2.10.0.tgz官网下载链接
如果电脑可访问外网github网址则可在服务器中使用wget命令直接下载到服务器
wget https://github.com/goharbor/harbor/releases/download/v2.10.0/harbor-offline-installer-v2.10.0.tgz
2. 国内下载地址(更快)
离线安装包harbor-offline-installer-v2.10.0.tgz国内下载链接
三、软件安装
1. 安装Docker
这个应该没有什么问题,大多数用k8s的施主应该都装了Docker
不过依然附上一个参考文章:K8S集群中安装Docker
2. 安装Docker Compose
主要用于管理harbor的多个docker实例
2.1 yum命令安装docker compose
yum install -y docker-compose
2.2 github官网资源安装docker-compose
若yum命令执行失败,执行以下方式安装
sudo curl -L "https://github.com/docker/compose/releases/download/v2.5.1/docker-compose-$(uname -s)-$(uname -m)" -o /usr/local/bin/docker-compose
2.3 备用方案安装docker-compose
若以上两种方式都无法获取,可参考文章使用加速地址安装docker-compose:Linux系统安装docker-compose
安装后可使用docker-compose version查看版本来确保安装完成
2.4 配置执行权限
将安装的docker-compose设置为可执行
sudo chmod +x /usr/local/bin/docker-compose
2.5 全局配置
将docker-compose配置为全局可执行,即任何路径都可运行该命令
sudo ln -s /usr/local/bin/docker-compose /usr/bin/docker-compose
后面好像需要指定docker-compose.yml文件位置来全局使用,先不管,直接执行上面这个命令
3. 安装openssl
主要用于生成https访问harbor的证书和秘钥,如只需要使用http访问harbor的施主可以不安装
yum install -y openssl

四、证书秘钥配置
此部分用于设置https安全访问所需要的证书秘钥
harbor仓库基础访问方式有两种,一种http一种https
仅使用http访问harbor的施主可以跳过,本篇执行
1. 文件夹创建
创建文件夹用于存放生成的证书秘钥文件
mkdir -p /harbor/certs/

2. 秘钥生成
可在当前位置生成后再将文件移动到certs文件夹中,也可cd命令直接进入certs文件夹中生成
本篇在当前位置生成后再移动到certs文件夹
openssl genrsa -out ca.key 4096

注意:该文件的生成位置,后续就要在同样的路径下进行第3步的操作,在别的路径下执行会找不到ca.key文件
如我在/harbor/certs路径下执行第2步,就要在该路径下执行第3步
ls命令查看生成的ca.key

3. 证书秘钥与IP绑定
生成证书秘钥并绑定ip以及配置地区和有效期
ip填写你自己的harbor安装位置服务器的ip,如有ip对应的域名也可填域名,本篇未设域名仅用ip配置
openssl req -x509 -new -nodes -sha512 -days 3650 \-subj "/C=CN/ST=Beijing/L=Beijing/O=example/OU=Personal/CN=172.30.0.224" \-key ca.key \-out ca.crt

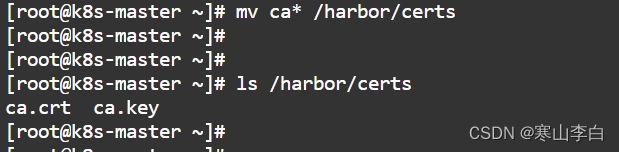
4. 移动证书位置
将证书秘钥移动到我们前面创建的certs文件夹中
mv ca* /harbor/certs
这里是将ca开头的文件移动到指定位置,如ca开头的文件还有别的,可写证书文件的全称来移动文件
五、部署Harbor
本篇是在k8s集群的master节点中部署harbor
1. 安装包上传到服务器
首先在服务器当前根目录下创建harbor文件夹用于存储压缩文件
mkdir -p /harbor

将下载的安装包上传到服务器的/harbor文件夹中(可用ftp工具或者oss工具下载文件)
我这里是先将压缩包上传到oss然后再使用oss工具下载到服务器中的harbor文件夹中
可参考上方oss工具链接,操作如下
ossutil cp oss://com-hs-dev/hslb/34_Harbor_installer_tgz/harbor-offline-installer-v2.10.0.tgz /harbor/

查看已下载的压缩包
ls /harbor

2. 解压安装包
解压文件,解压到指定目录/opt目录下
tar -zxvf /harbor/harbor-offline-installer-v2.10.0.tgz -C /opt
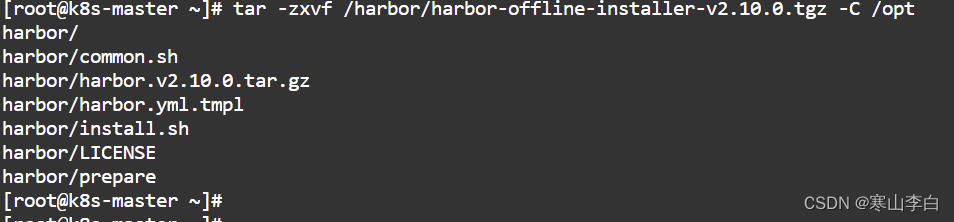
解压后/opt目录下会多出一个harbor文件夹,harbor相关文件都在该文件夹中,共六个文件
ls /opt/harbor/

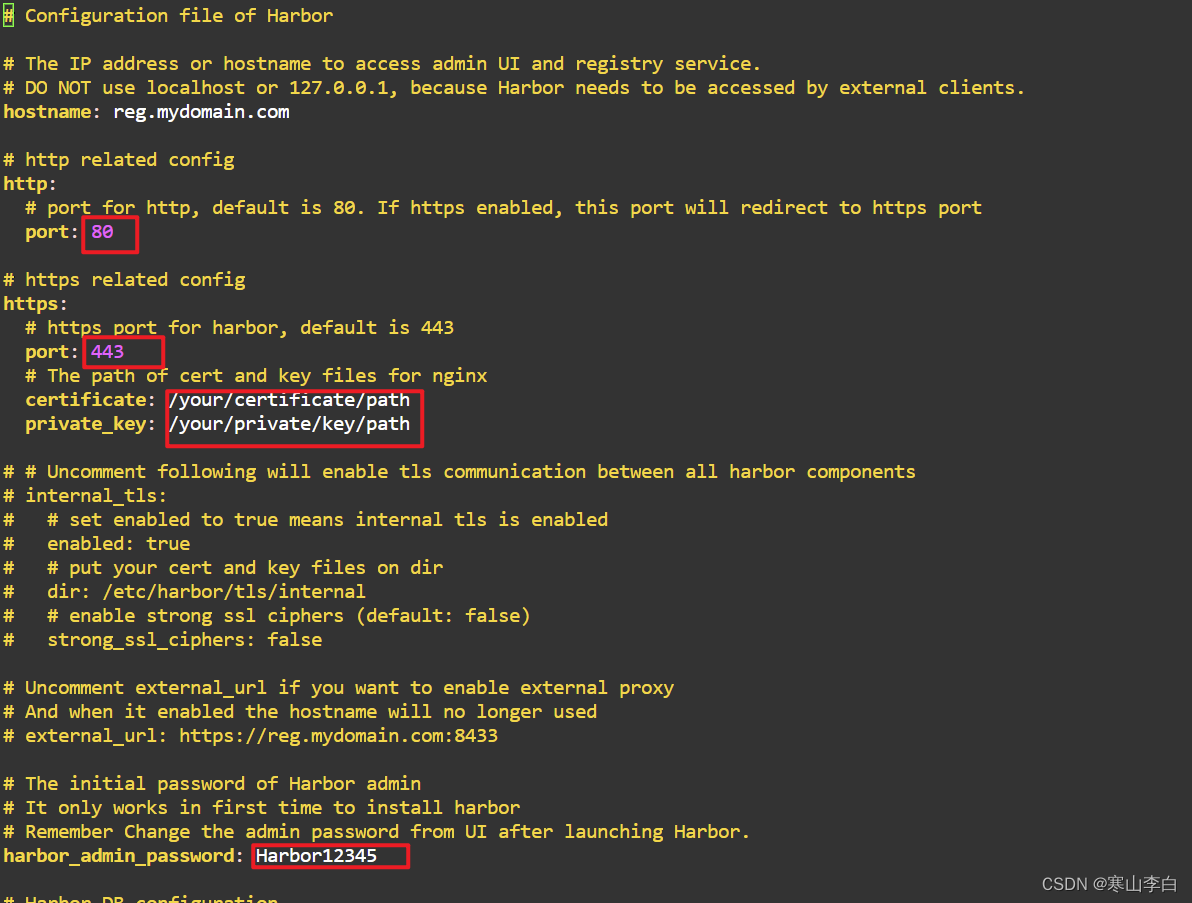
3. harbor.yml配置
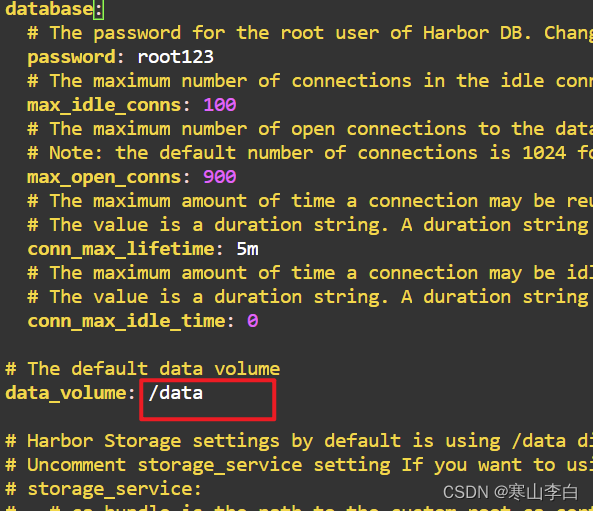
配置harbor.yml文件中的参数,主要是端口号、IP地址、证书秘钥、数据存储位置的配置
3.1 备份
文件夹中有harbor.yml.tmpl模板文件,将其复制为harbor.yml,后续我们使用的就是这个文件
cp /opt/harbor/harbor.yml.tmpl /opt/harbor/harbor.yml

3.2 修改参数
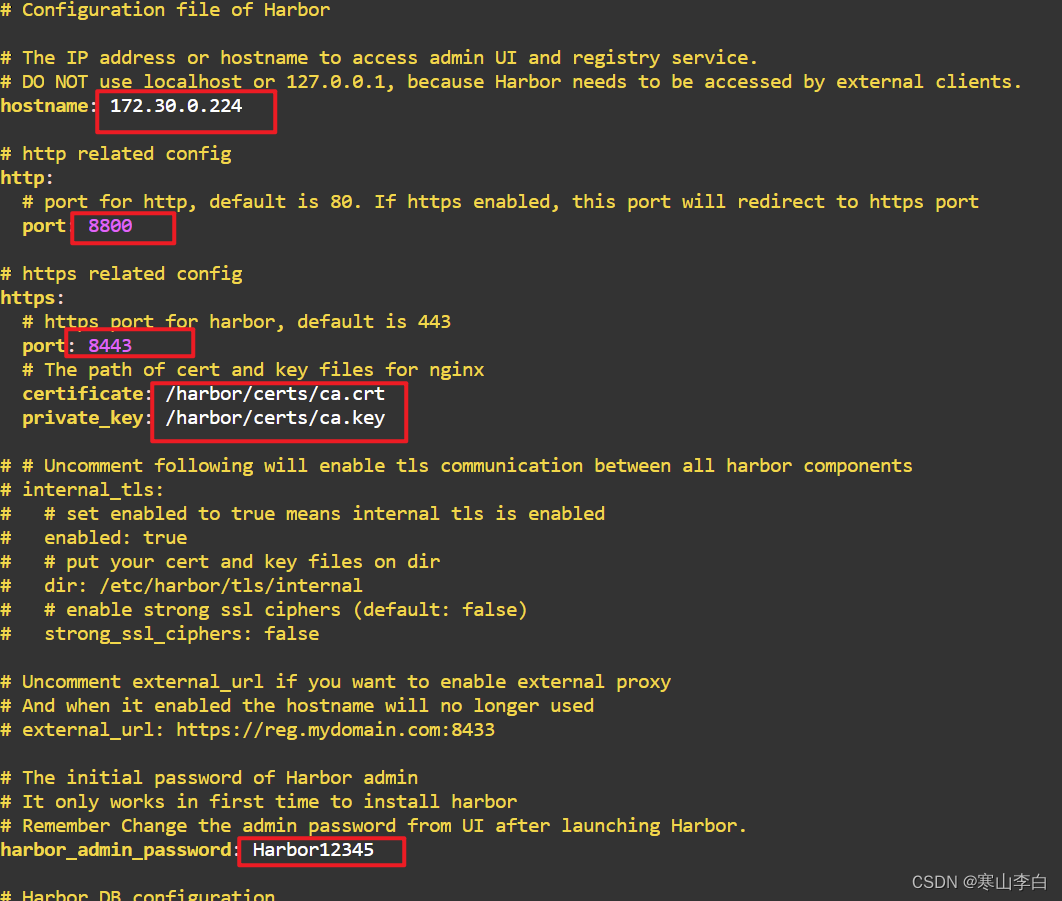
修改IP地址、http和https对应的端口号、证书位置路径、数据目录
vim /opt/harbor/harbor.yml
修改如下:
hostname域名修改为自己要安装harbor的服务器的ip
http端口修改为8800
https端口修改为8443
证书位置修改
certificate: 证书路径修改为/harbor/certs/ca.crt
private_key: 秘钥路径修改为/harbor/certs/ca.key
harbor_admin_password: 默认Harbor密码,不修改,就用默认的Harbor12345
data_value: 修改为/data/harbor,这里默认为/data,建议修改一下,我这里没改,是因为我忘了,当然后续也可以改了之后重启harbor
注:如果只用http访问的施主可将https对应部分注释掉,因为配置https后,即使你以http请求访问也会跳转到https
修改前截图(域名ip忘记框了见谅)
修改后截图
修改后Esc退出编辑,shift+zz快捷保存退出
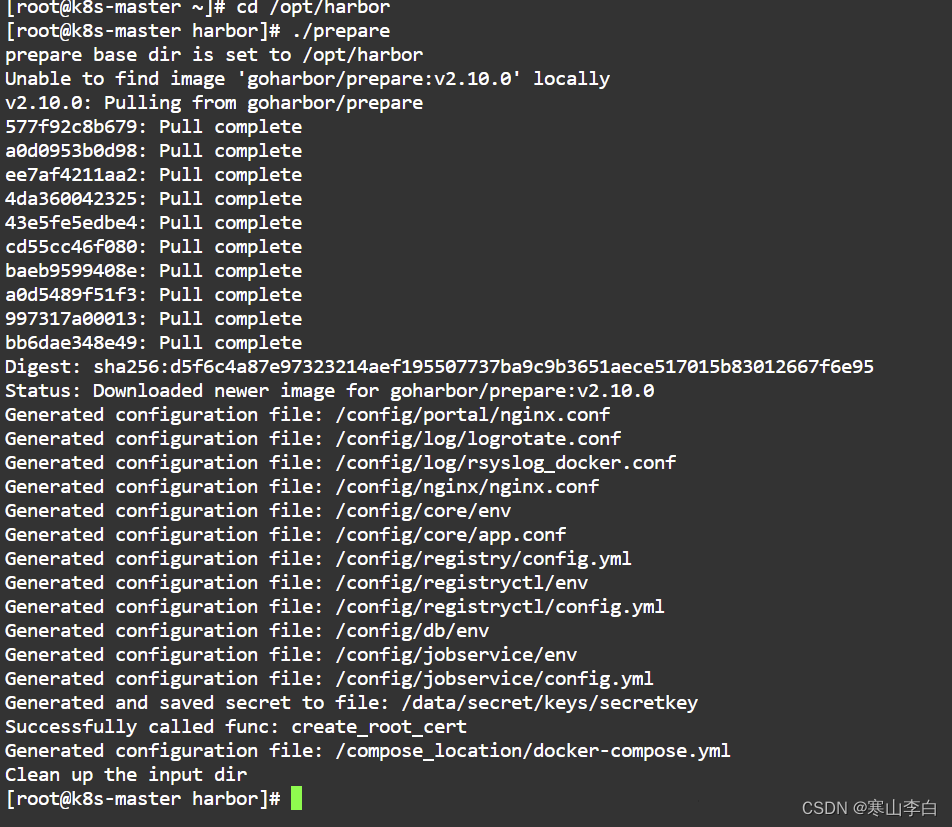
4. Harbor配置生成
通过prepare文件来执行命令生成Harbor所需配置文件
进入/opt/harbor目录
cd /opt/harbor

执行prepare命令生成配置文件
./prepare
执行命令后输出的代码如下
[root@k8s-master ~]# cd /opt/harbor
[root@k8s-master harbor]# ./prepare
prepare base dir is set to /opt/harbor
Unable to find image 'goharbor/prepare:v2.10.0' locally
v2.10.0: Pulling from goharbor/prepare
577f92c8b679: Pull complete
a0d0953b0d98: Pull complete
ee7af4211aa2: Pull complete
4da360042325: Pull complete
43e5fe5edbe4: Pull complete
cd55cc46f080: Pull complete
baeb9599408e: Pull complete
a0d5489f51f3: Pull complete
997317a00013: Pull complete
bb6dae348e49: Pull complete
Digest: sha256:d5f6c4a87e97323214aef195507737ba9c9b3651aece517015b83012667f6e95
Status: Downloaded newer image for goharbor/prepare:v2.10.0
Generated configuration file: /config/portal/nginx.conf
Generated configuration file: /config/log/logrotate.conf
Generated configuration file: /config/log/rsyslog_docker.conf
Generated configuration file: /config/nginx/nginx.conf
Generated configuration file: /config/core/env
Generated configuration file: /config/core/app.conf
Generated configuration file: /config/registry/config.yml
Generated configuration file: /config/registryctl/env
Generated configuration file: /config/registryctl/config.yml
Generated configuration file: /config/db/env
Generated configuration file: /config/jobservice/env
Generated configuration file: /config/jobservice/config.yml
Generated and saved secret to file: /data/secret/keys/secretkey
Successfully called func: create_root_cert
Generated configuration file: /compose_location/docker-compose.yml
Clean up the input dir
[root@k8s-master harbor]#
截图如下
5. Harbor安装
同样在/opt/harbor目录下执行安装命令
./install.sh
出现最后一行成功安装的输出即表示安装成功,如下

完整输出内容:
执行命令后输出的代码如下
[root@k8s-master harbor]# ./install.sh[Step 0]: checking if docker is installed ...Note: docker version: 24.0.7[Step 1]: checking docker-compose is installed ...Note: Docker Compose version v2.21.0[Step 2]: loading Harbor images ...
7570a78aea36: Loading layer [==================================================>] 9.08MB/9.08MB
04774e0e84f2: Loading layer [==================================================>] 4.096kB/4.096kB
8a42710a9f5a: Loading layer [==================================================>] 3.072kB/3.072kB
f1990e77f8e5: Loading layer [==================================================>] 197MB/197MB
172f5af926be: Loading layer [==================================================>] 17.6MB/17.6MB
2bef5dd17a10: Loading layer [==================================================>] 215.4MB/215.4MB
Loaded image: goharbor/trivy-adapter-photon:v2.10.0
Loaded image: goharbor/prepare:v2.10.0
a36cb8a4e510: Loading layer [==================================================>] 126.1MB/126.1MB
fd72ef63aacc: Loading layer [==================================================>] 3.584kB/3.584kB
162d9960a2b9: Loading layer [==================================================>] 3.072kB/3.072kB
b71508b0d586: Loading layer [==================================================>] 2.56kB/2.56kB
18c685e189cb: Loading layer [==================================================>] 3.072kB/3.072kB
84690af2e82b: Loading layer [==================================================>] 3.584kB/3.584kB
8d7eb73e8207: Loading layer [==================================================>] 20.48kB/20.48kB
Loaded image: goharbor/harbor-log:v2.10.0
001da4979db8: Loading layer [==================================================>] 8.562MB/8.562MB
275281f671bf: Loading layer [==================================================>] 4.096kB/4.096kB
f6856e2d539f: Loading layer [==================================================>] 17.4MB/17.4MB
557317f3c1c5: Loading layer [==================================================>] 3.072kB/3.072kB
942b8c3060c6: Loading layer [==================================================>] 32.81MB/32.81MB
b2bc30e737e7: Loading layer [==================================================>] 51MB/51MB
Loaded image: goharbor/harbor-registryctl:v2.10.0
d5e5478da184: Loading layer [==================================================>] 116.8MB/116.8MB
Loaded image: goharbor/nginx-photon:v2.10.0
74a7f6a8de8c: Loading layer [==================================================>] 11.58MB/11.58MB
46523ccaf371: Loading layer [==================================================>] 27.6MB/27.6MB
3cea6b428022: Loading layer [==================================================>] 4.608kB/4.608kB
9815d4ae0f06: Loading layer [==================================================>] 28.39MB/28.39MB
Loaded image: goharbor/harbor-exporter:v2.10.0
7d7e15ae8ca1: Loading layer [==================================================>] 15.93MB/15.93MB
e13b0ff80947: Loading layer [==================================================>] 111.8MB/111.8MB
da74a4230588: Loading layer [==================================================>] 3.072kB/3.072kB
89240f6f343b: Loading layer [==================================================>] 59.9kB/59.9kB
7b00214da46a: Loading layer [==================================================>] 61.95kB/61.95kB
Loaded image: goharbor/redis-photon:v2.10.0
345fdbd05997: Loading layer [==================================================>] 8.562MB/8.562MB
5c4443929555: Loading layer [==================================================>] 4.096kB/4.096kB
605c9788ef17: Loading layer [==================================================>] 3.072kB/3.072kB
b2ab56de0e45: Loading layer [==================================================>] 17.4MB/17.4MB
950eb2734789: Loading layer [==================================================>] 18.19MB/18.19MB
Loaded image: goharbor/registry-photon:v2.10.0
7693164e30e0: Loading layer [==================================================>] 116.8MB/116.8MB
6b50b5d516aa: Loading layer [==================================================>] 6.531MB/6.531MB
5aea217650ad: Loading layer [==================================================>] 246.8kB/246.8kB
0b3de92ff70b: Loading layer [==================================================>] 1.477MB/1.477MB
Loaded image: goharbor/harbor-portal:v2.10.0
b79ac58f353c: Loading layer [==================================================>] 11.58MB/11.58MB
18c4c015e339: Loading layer [==================================================>] 3.584kB/3.584kB
c6eef6a39935: Loading layer [==================================================>] 2.56kB/2.56kB
03db56130352: Loading layer [==================================================>] 58.57MB/58.57MB
78c9748f2d29: Loading layer [==================================================>] 5.632kB/5.632kB
e1732f90232a: Loading layer [==================================================>] 123.4kB/123.4kB
6b733e4833c8: Loading layer [==================================================>] 80.38kB/80.38kB
fe6828cc147a: Loading layer [==================================================>] 59.56MB/59.56MB
8e1349c44768: Loading layer [==================================================>] 2.56kB/2.56kB
Loaded image: goharbor/harbor-core:v2.10.0
02b0385778eb: Loading layer [==================================================>] 15.93MB/15.93MB
ac2be26232ee: Loading layer [==================================================>] 175MB/175MB
1e3e9dba5eaa: Loading layer [==================================================>] 25.47MB/25.47MB
c7fa85d79c1c: Loading layer [==================================================>] 18.14MB/18.14MB
f9ef6596c7ce: Loading layer [==================================================>] 5.12kB/5.12kB
e35036cc139f: Loading layer [==================================================>] 6.144kB/6.144kB
0cb7ded8041a: Loading layer [==================================================>] 3.072kB/3.072kB
5d178abacde0: Loading layer [==================================================>] 2.048kB/2.048kB
67fe09fd709b: Loading layer [==================================================>] 2.56kB/2.56kB
d0b4aac335c4: Loading layer [==================================================>] 7.68kB/7.68kB
Loaded image: goharbor/harbor-db:v2.10.0
fced8697b2c7: Loading layer [==================================================>] 11.58MB/11.58MB
af968b902c26: Loading layer [==================================================>] 3.584kB/3.584kB
7caaebde63bc: Loading layer [==================================================>] 2.56kB/2.56kB
d6e3c7a6ef36: Loading layer [==================================================>] 44.96MB/44.96MB
bc8a8ef654ea: Loading layer [==================================================>] 45.75MB/45.75MB
Loaded image: goharbor/harbor-jobservice:v2.10.0[Step 3]: preparing environment ...[Step 4]: preparing harbor configs ...
prepare base dir is set to /opt/harbor
Clearing the configuration file: /config/nginx/nginx.conf
Clearing the configuration file: /config/portal/nginx.conf
Clearing the configuration file: /config/core/app.conf
Clearing the configuration file: /config/core/env
Clearing the configuration file: /config/db/env
Clearing the configuration file: /config/jobservice/config.yml
Clearing the configuration file: /config/jobservice/env
Clearing the configuration file: /config/log/logrotate.conf
Clearing the configuration file: /config/log/rsyslog_docker.conf
Clearing the configuration file: /config/registry/passwd
Clearing the configuration file: /config/registry/config.yml
Clearing the configuration file: /config/registryctl/config.yml
Clearing the configuration file: /config/registryctl/env
Generated configuration file: /config/portal/nginx.conf
Generated configuration file: /config/log/logrotate.conf
Generated configuration file: /config/log/rsyslog_docker.conf
Generated configuration file: /config/nginx/nginx.conf
Generated configuration file: /config/core/env
Generated configuration file: /config/core/app.conf
Generated configuration file: /config/registry/config.yml
Generated configuration file: /config/registryctl/env
Generated configuration file: /config/registryctl/config.yml
Generated configuration file: /config/db/env
Generated configuration file: /config/jobservice/env
Generated configuration file: /config/jobservice/config.yml
loaded secret from file: /data/secret/keys/secretkey
Generated configuration file: /compose_location/docker-compose.yml
Clean up the input dirNote: stopping existing Harbor instance ...[Step 5]: starting Harbor ...
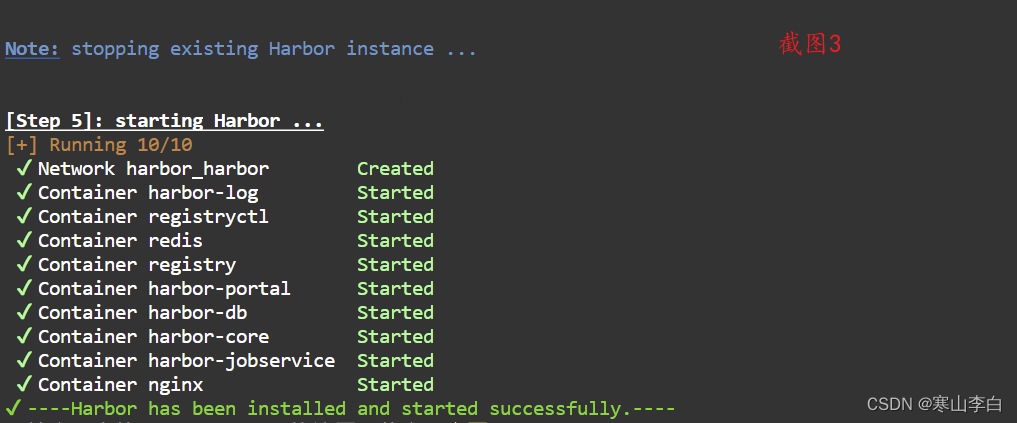
[+] Running 10/10✔ Network harbor_harbor Created 0.0s ✔ Container harbor-log Started 0.0s ✔ Container registryctl Started 0.0s ✔ Container redis Started 0.0s ✔ Container registry Started 0.0s ✔ Container harbor-portal Started 0.0s ✔ Container harbor-db Started 0.0s ✔ Container harbor-core Started 0.0s ✔ Container harbor-jobservice Started 0.0s ✔ Container nginx Started 0.0s
✔ ----Harbor has been installed and started successfully.----
[root@k8s-master harbor]#
截图如下
6. Harbor服务查看
这个查看可以用docker也可以用docker-compose,后者可进行多数量容器管理
我们用docker命令查看我们运行的harbor相关容器
docker ps


docker-compose命令只显示其管理的harbor容器
docker-compose -f /opt/harbor/docker-compose.yml ps

7. Harbor服务重启
如果docker-compose命令报错no configuration file provided: not found表示无法找到配置文件
可到docker-compose.yml所在目录下执行命令,该文件本篇位于/opt/harbor/目录下
docker-compose命令可参考下方链接文章中第5步:
Linux系统安装docker-compose
如果harbor服务出问题,可使用docker-compose一键重启所有服务,如命令无法使用可加-f参数
docker-compose restart
当然了,也可以先停再启,这种是比较保险的,毕竟重启有时候会有问题
docker-compose stop
docker-compose start
六、使用Harbor
1. 访问
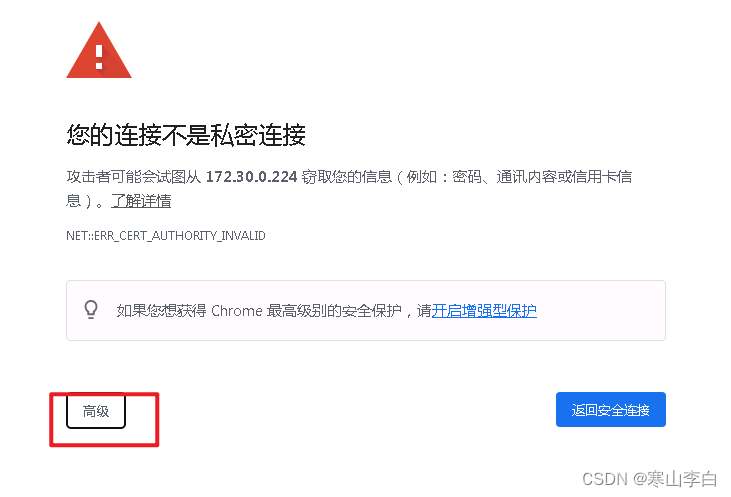
前面配置安装完成后,可通过https://172.30.0.224:8443访问我们的Harbor镜像仓库
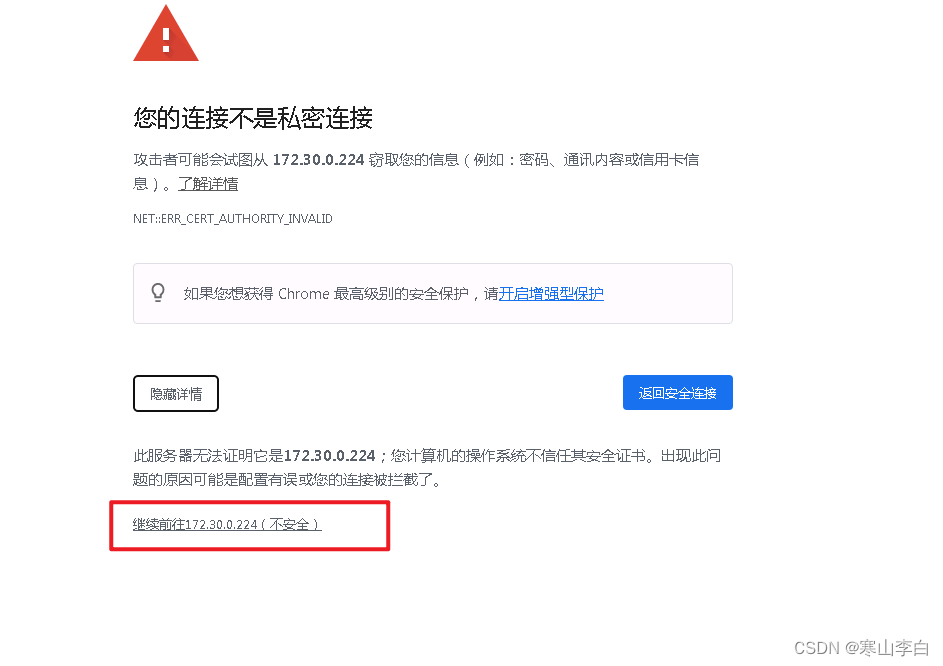
会出现以下界面,选高级
继续前往
2. 登录
看到Harbor登录界面
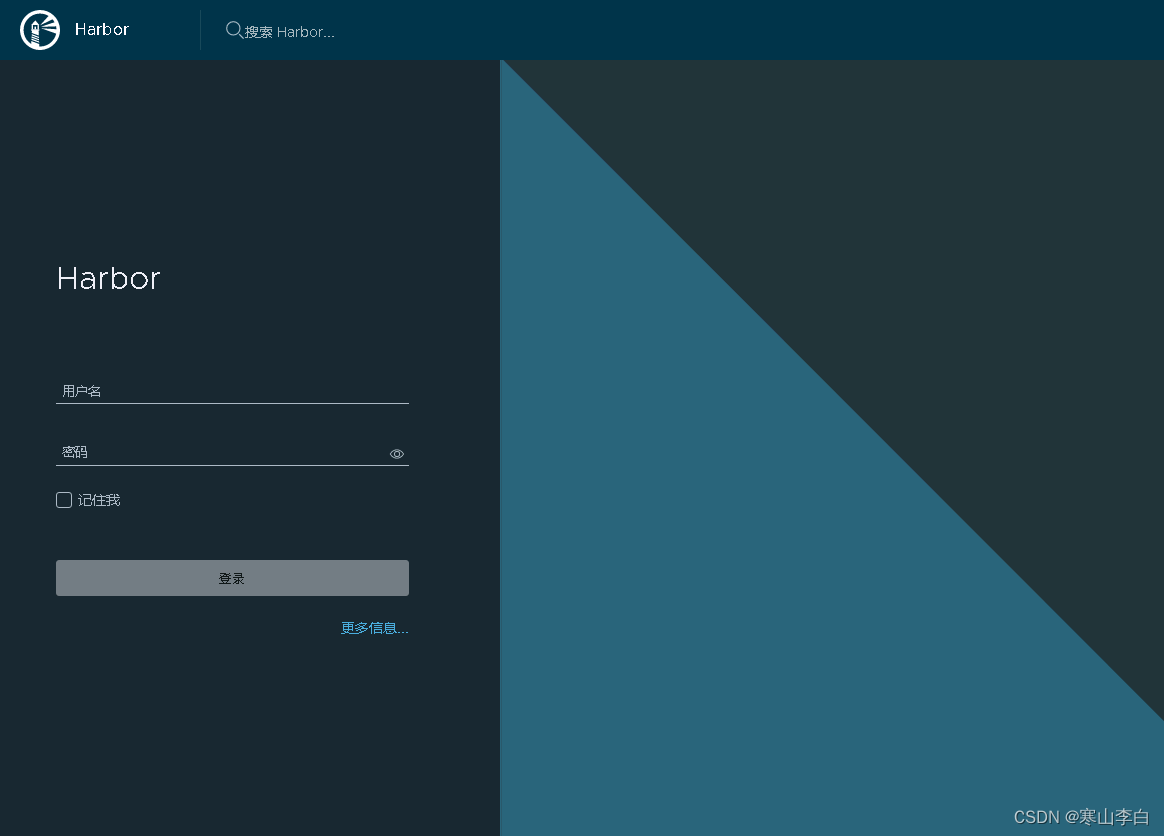
输入账号密码即可登录
默认账号为admin
默认密码为Harbor12345
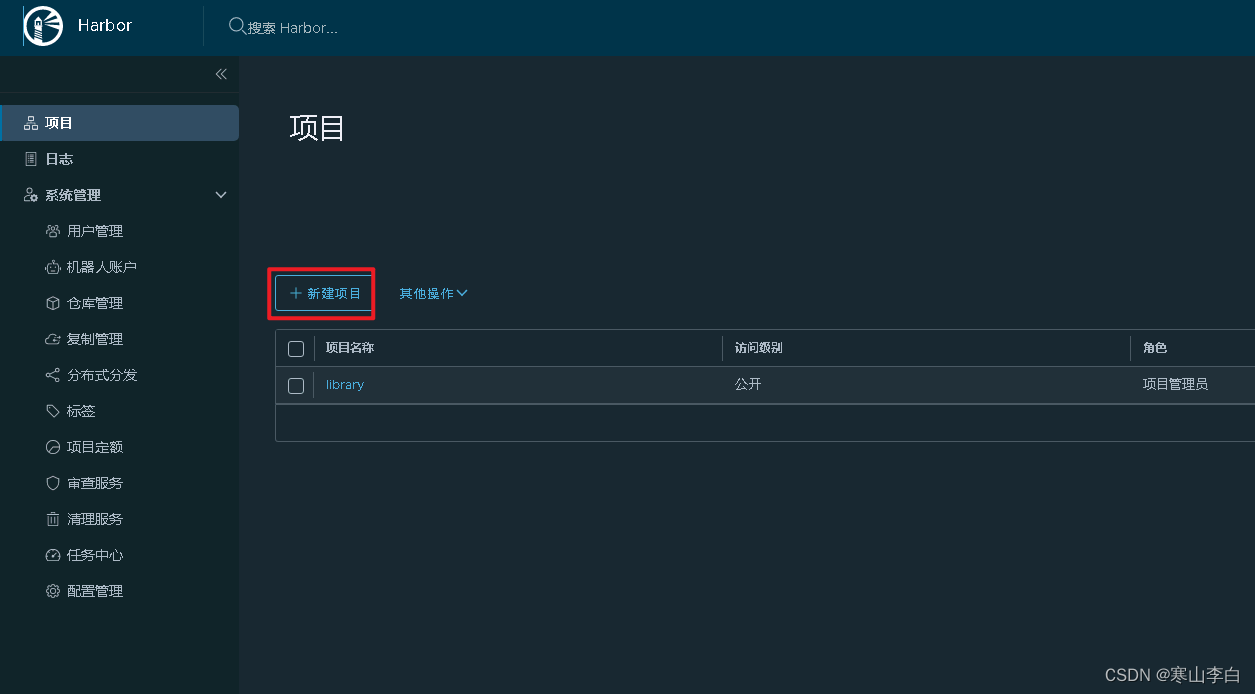
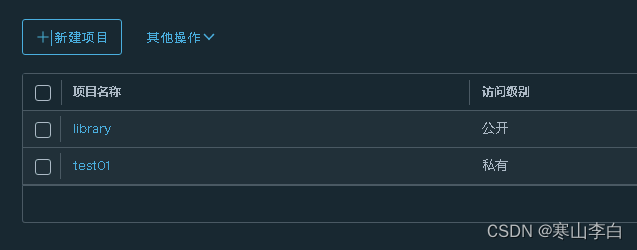
登录成功后可看到有一个默认的项目library,接下来就可以正常使用Harbor了

3. 项目创建
在项目一栏中选择新建新建项目,用于存储镜像,我们创建两个项目,一个私有一个公开
注:
由于我配置的是https访问harbor仓库,就是安全配置访问,不管是公开的还是私有的都需要在docker中配置信任harbor后登陆harbor才可以操作镜像仓库中的镜像
如果你想别人也能随便用你的镜像仓库(这种情况应该不多,大多数人还是自己管控自己的镜像),可以配置http方式,不用https的安全配置,这样公开的项目应该能被别人拉取使用,总之这部分的区别有待大家去探索,我也是小小尝试了一下。
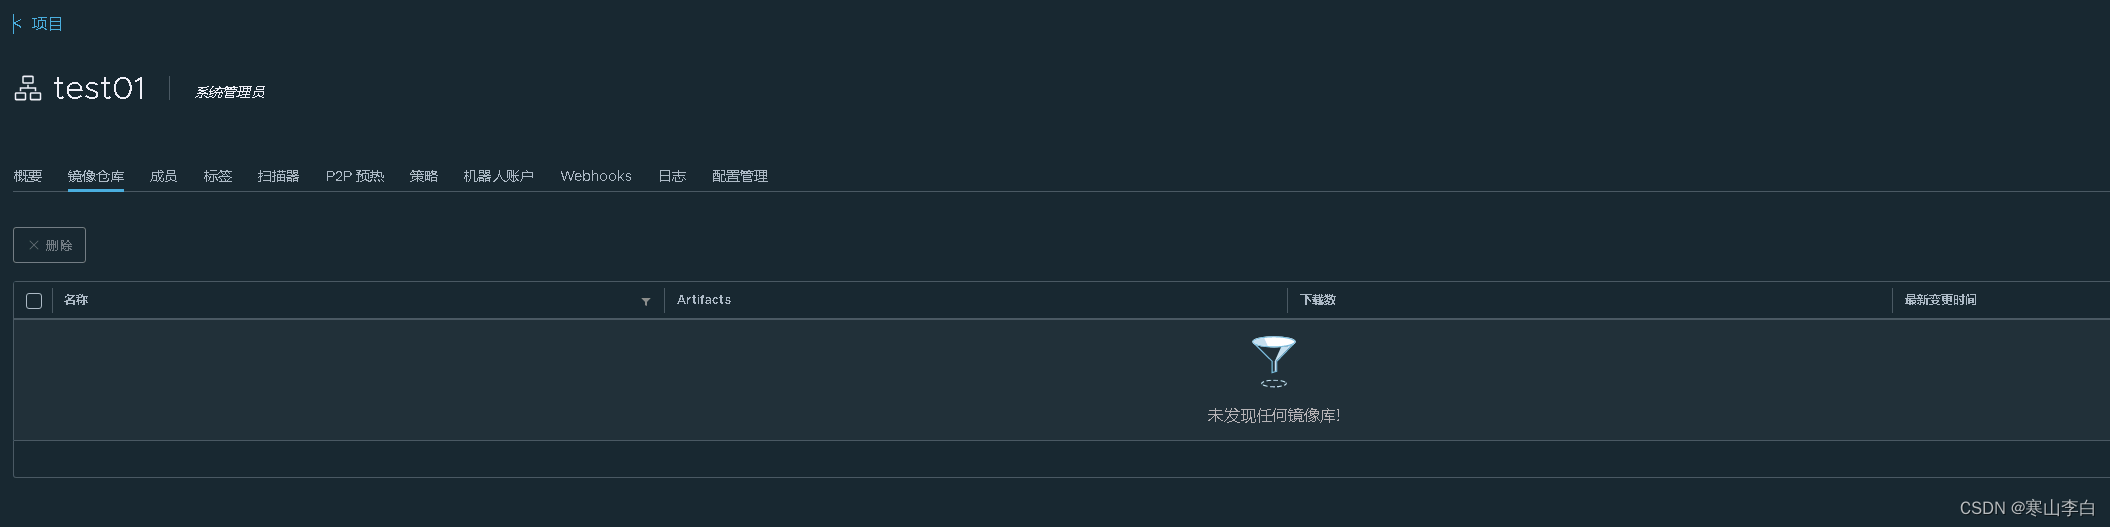
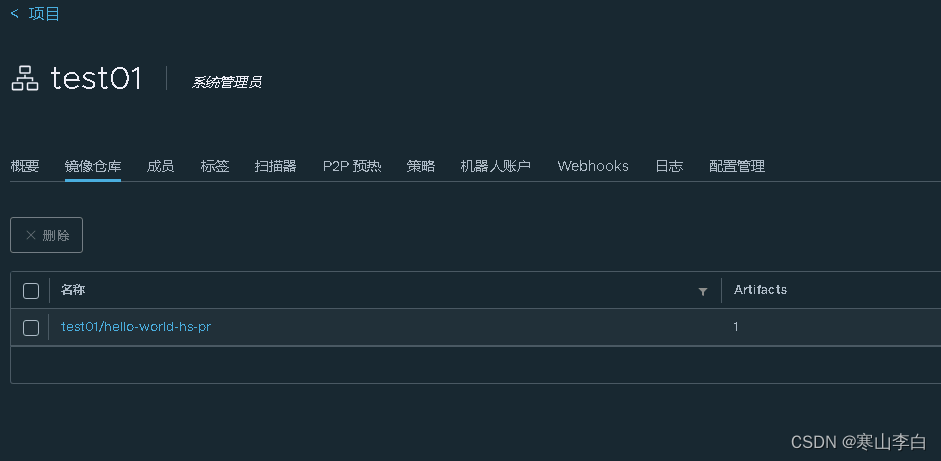
3.1 私有项目test01创建
填写项目名称其余默认,公开不点就是私有,确定
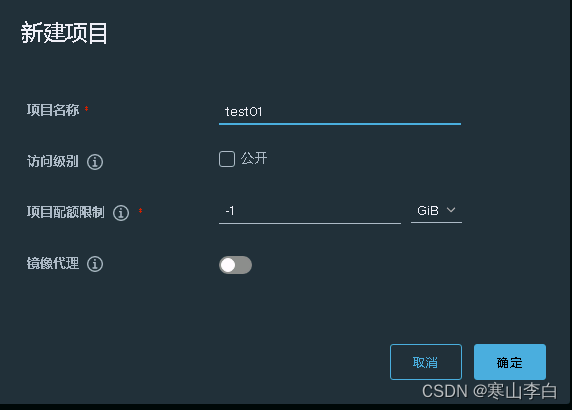
创建成功
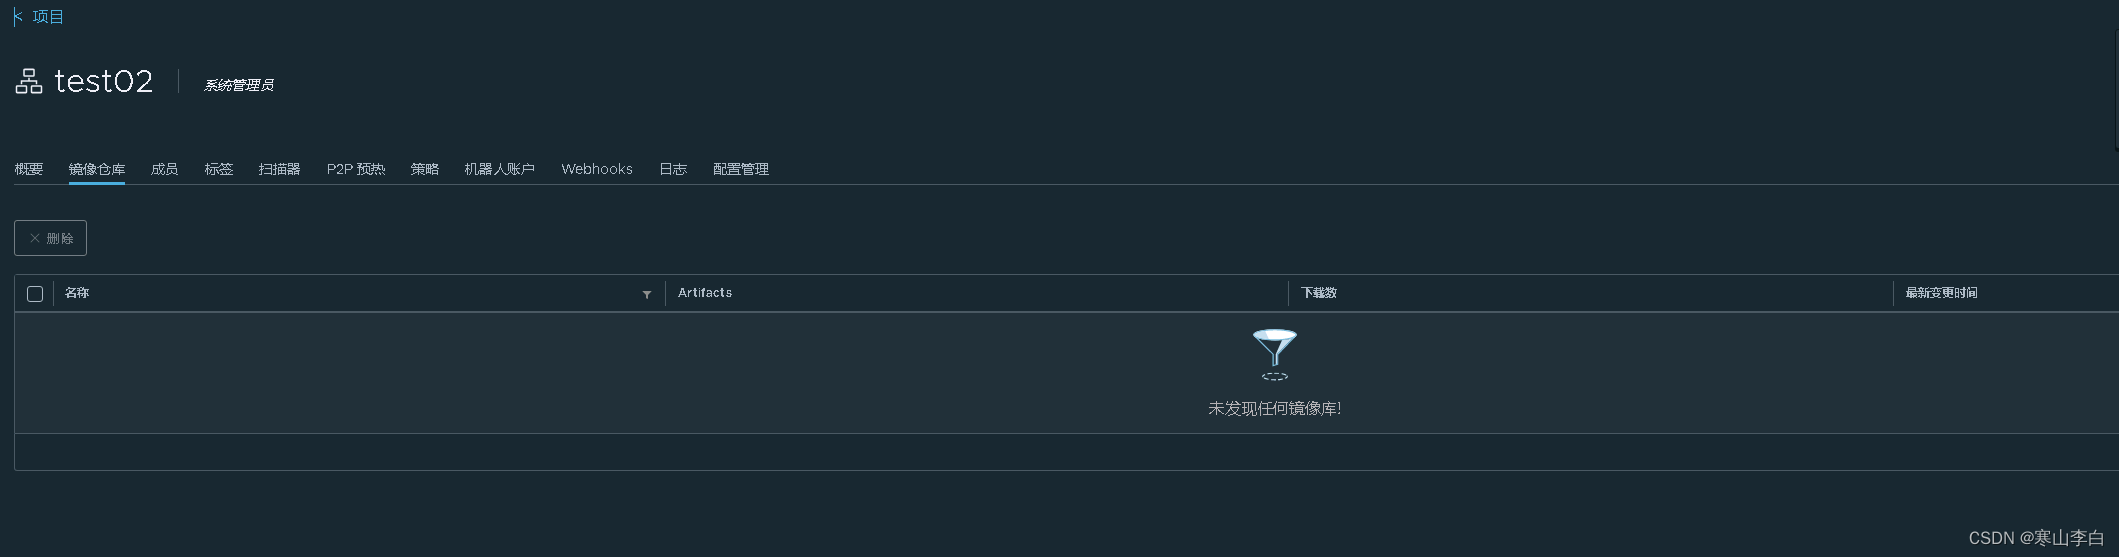
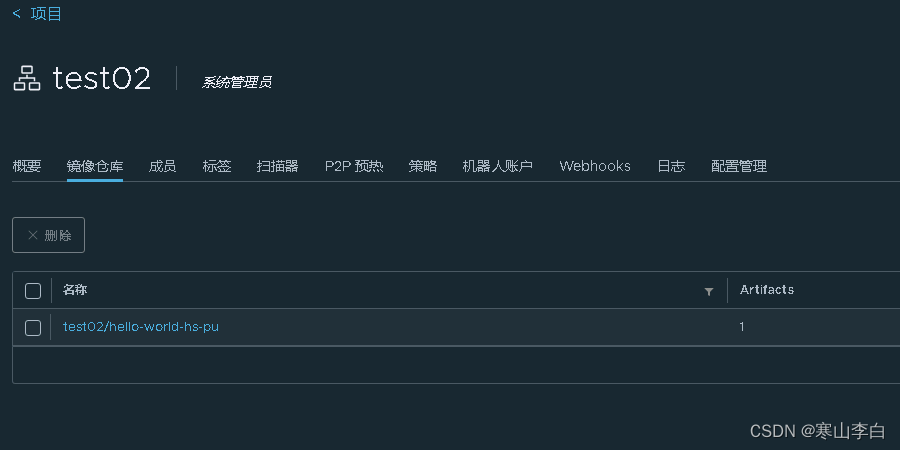
3.2 公开项目test02创建
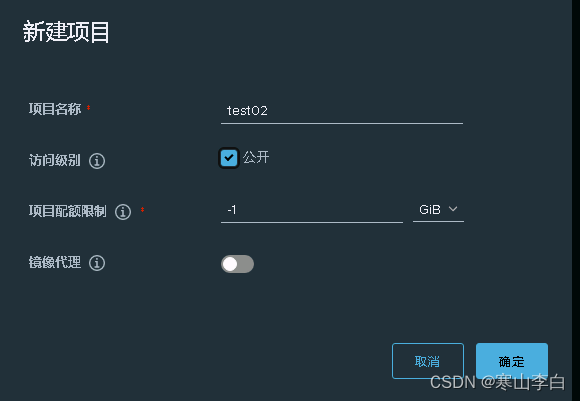
创建成功
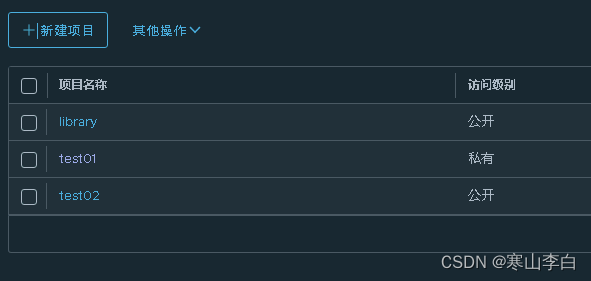
点进去打开test01和test02,里面都是空的,接下来我们推送镜像到这两个项目中
现在我们可以到服务器中使用docker将镜像推送到我们新建的test01和test02项目中
4. Docker配置Harbor(所有节点)
为了能在集群中任何一个节点服务器上使用docker推送或拉取Harbor上的镜像,我们需要给所有节点的docker配置信任Harbor并登录
4.1 insecure-registries
让docker信任harbor镜像仓库
在daemon.json文件中添加insecure-registries参数,注意拼写,不要错了,不然在不自知的情况下可能会查很久
vim /etc/docker/daemon.json
i进入编辑
{"exec-opts": ["native.cgroupdriver=systemd"],"insecure-registries": ["https://172.30.0.224:8443"]
}
编辑完后Esc退出编辑模式
shift+zz快捷保存退出
最后不要忘了重启docker让配置生效
systemctl daemon-reload
systemctl restart docker
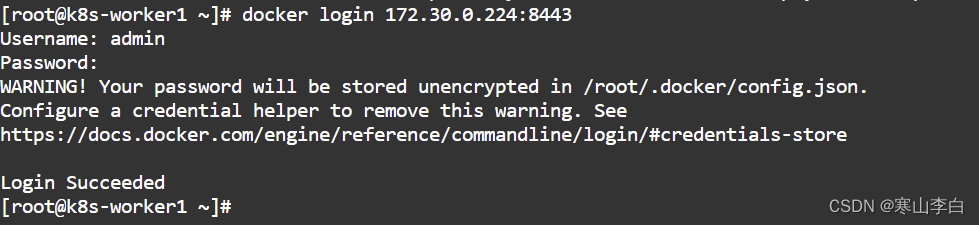
4.2 Docker登录Harbor
在docker中登录Harbor以便可正常推送拉取镜像
docker login 172.30.0.224:8443 -u admin -p Harbor12345

或者交互式登录
docker login 172.30.0.224:8443
然后输入账号和密码,不过密码看不到,建议还是用第一种命令登录
5. hello-world镜像拉取
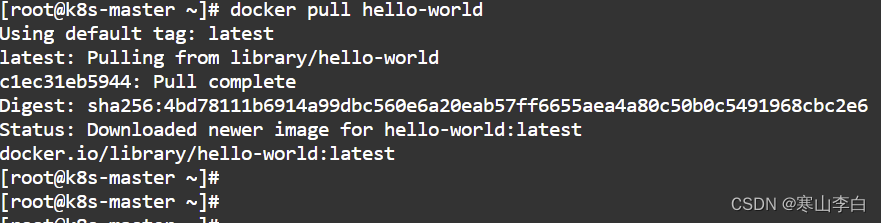
我们要推送镜像就要先有一个镜像,我们去docker中拉取hello-world镜像来演示接下来的推送拉取操作
首先在harbor所在的服务器中使用docker命令拉取hello-world镜像
docker pull hello-world
不加版本号默认拉取最新版本latest
查看镜像
docker images
6. 公开项目的镜像推送和拉取
公开项目的镜像推送和拉取
根据上一小节拉取hello-world镜像到从节点k8s-worker1服务器
6.1 镜像上传
6.1.1 打标签
将hello-world镜像打标签,即以什么名称什么版本放到什么位置
如下就是将hello-world:latest镜像存放到test02项目中,名称为hello-world-hs-pu版本为20240130
docker tag hello-world:latest 172.30.0.224:8443/test02/hello-world-hs-pu:20240130

打完标签后可docker images查看打标签的镜像
6.1.2 镜像推送
将打过标签的镜像上传到我们Harbor镜像仓库创建的test02项目中
docker push 172.30.0.224:8443/test02/hello-world-hs-pu:20240130
推送成功

然后去镜像仓库test02项目中查看镜像,可以看到已经在了
6.2 镜像拉取
和镜像推送相似,从harbor仓库的test02项目中将镜像拉取到当前服务器中
6.2.1 查看镜像
查看含有hello名称的镜像
docker images | grep hello

6.2.2 删除tag的镜像
首先我们先把刚才tag过的镜像删除
docker rmi -f 172.30.0.224:8443/test02/hello-world-hs-pu:20240130

6.2.3 拉取harbor仓库的镜像
现在拉取harbor仓库test02中的hello-world-hs-pu:20240130镜像
docker pull 172.30.0.224:8443/test02/hello-world-hs-pu:20240130
一秒不到完成,相当丝滑,终于体验到使用自己镜像仓库的酸爽了

然后使用命令查看镜像就可以看到镜像已经存在
7. 私有项目的镜像推送和拉取(为了验证有无区别还是操作一遍私有的)
私有项目的镜像推送和拉取
7.1 镜像上传
7.1.1 打标签
将hello-world镜像打标签,即以什么名称什么版本放到什么位置
如下就是将hello-world:latest镜像存放到test01项目中,名称为hello-world-hs-pr版本为20240131
docker tag hello-world:latest 172.30.0.224:8443/test01/hello-world-hs-pr:20240131

打完标签后可docker images查看打标签的镜像
7.1.2 镜像推送
将打过标签的镜像上传到我们Harbor镜像仓库创建的test01项目中
docker push 172.30.0.224:8443/test01/hello-world-hs-pr:20240131
推送成功

然后去镜像仓库test01项目中查看镜像,可以看到已经在了
7.2 镜像拉取
和镜像推送相似,从harbor仓库的test01项目中将镜像拉取到当前服务器中
7.2.1 查看镜像
查看含有hello名称的镜像
docker images | grep hello

7.2.2 删除tag的镜像
首先我们先把刚才tag过的镜像删除
docker rmi -f 172.30.0.224:8443/test01/hello-world-hs-pr:20240131

7.2.3 拉取harbor仓库的镜像
现在拉取harbor仓库test01中的hello-world-hs-pr:20240131镜像
docker pull 172.30.0.224:8443/test01/hello-world-hs-pr:20240131
很快,已经pull下来了

然后使用命令查看镜像就可以看到镜像已经存在
小节:
可以看到,在使用https配置的harbor镜像仓库时,对私有和公开项目中镜像的推送和拉取是没什么区别的,不过对于大多数项目内部使用的镜像仓库来说,https配置的harbor可能会更好吧。
8. 可能遇到的问题
可能报错的内容如下,可直接点击链接查看解决:
报错1:Get “https://198.30.0.111:8443/v2/”: tls: failed to verify certificate: x509: certificate relies on legacy Common Name field, use SANs instead
报错2:invalid reference format
报错3:unauthorized: unauthorized to access repository: test02/hello-world-hs-pu, action: push: unauthorized to access repository: test02/hello-world-hs-pu, action: push
9. 镜像仓库相关Docker命令汇总
9.1 登录Harbor
换成你自己的ip端口及账号密码
docker login 172.30.0.224:8443 -u admin -p Harbor12345
9.2 重启Harbor
当harbor服务有问题或者修改了配置需要重启harbor时
9.2.1 直接重启命令
该命令需要再docker-compose.yml文件所在目录下执行
docker-compose restart
9.2.2 指定文件路径重启命令
在任意路径下可用-f指定docker-compose.yml文件路径来执行重启
docker-compose -f /opt/harbor/docker-compose.yml restart
注:一定要根据自己的docker-compose.yml文件路径来执行
9.3 拉取镜像
拉取hello-world镜像,不加版本号默认拉取最新
docker pull hello-world
9.4 查看镜像
可查看全部
docker images
查看镜像名称中含有指定字段的镜像
docker images | grep 字段
如查看含有h字母的镜像
docker images | grep h
9.5 为镜像打标签
将hello-world:latest镜像打标签为172.30.0.224:8443/test01/hello-world:v240131
docker tag hello-world:latest 172.30.0.224:8443/test01/hello-world-test:v240131
执行后会在docker中多出一个REPOSITORY名称为172.30.0.224:8443/test01/hello-world-test,TAG为v240131的镜像
9.6 推送镜像到Harbor
将打过标签的镜像推送到harbor镜像仓库,下方命令表示将镜像hello-world-test:v240131推送到仓库的test01项目中
docker push 172.30.0.224:8443/test01/hello-world-test:v240131
9.7 删除镜像
docker rmi 172.30.0.224:8443/test01/hello-world-test:v240131
也可加-f参数强制删除
9.7 从Harbor中拉取镜像到本地
将我们harbor中的镜像拉取到本地
docker pull 172.30.0.224:8443/test01/hello-world-test:v240131
10. 卸载Harbor
10.1 停止Harbor服务相关容器
可用docker ps | grep goharbor查看正在运行的harbor服务相关的容器
docker stop 容器名
10.2 删除Harbor服务相关容器
docker ps -a | grep "goharbor" | awk '{print "docker rm "$1}'
10.3 删除harbor服务相关镜像
docker images | grep "goharbor" | awk '{print "docker rmi "$1":"$2}'
10.4 删除harbor相关数据
如果不删除相关数据,再次安装harbor可能会报错,默认数据位置/data,如果根据本篇修改过则为/data/harbor
rm -f /data/harbor
到这应该卸载完成可重新安装harbor了
感谢阅读,祝君暴富!
这篇关于K8S部署Harbor镜像仓库(含离线安装包harbor-offline-installer国内下载链接)的文章就介绍到这儿,希望我们推荐的文章对编程师们有所帮助!


