本文主要是介绍XGB-1:XGBoost安装及快速上手,希望对大家解决编程问题提供一定的参考价值,需要的开发者们随着小编来一起学习吧!
XGBoost是“Extreme Gradient Boosting”的缩写,是一种高效的机器学习算法,用于分类、回归和排序问题。它由陈天奇(Tianqi Chen)在2014年首次提出,并迅速在数据科学竞赛和工业界获得广泛应用。XGBoost基于梯度提升框架,但通过引入一系列优化来提升性能和效率。
XGBoost的主要特点:
- 性能高效:XGBoost通过并行处理和核外计算来优化计算速度,同时保持高预测精度。
- 灵活性:支持自定义目标函数和评估准则,适用于多种类型的问题。
- 鲁棒性:包括处理缺失值的功能,能够处理不完整的数据。
- 正则化:通过L1和L2正则化避免过拟合,提高模型的泛化能力。
- 剪枝:在树构建过程中进行预剪枝和后剪枝,减少过拟合的风险。
- 稀疏意识:在处理稀疏数据时更加高效,减少计算量。
应用场景:
- 分类问题:如邮件分类(垃圾邮件/非垃圾邮件)、图像识别等。
- 回归问题:如房价预测、股票价格预测等。
- 排序问题:如搜索引擎结果排序、推荐系统等。
如何使用XGBoost:
- 安装:通过Python的
pip安装xgboost库。 - 数据准备:准备训练数据和标签。
- 模型训练:使用
xgboost库中的XGBClassifier或XGBRegressor进行模型训练。 - 模型评估:使用交叉验证等方法评估模型性能。
- 参数调优:通过调整学习率、树的数量和深度等参数来优化模型。
XGBoost因其强大的功能和优异的性能,在众多机器学习算法中脱颖而出,成为解决复杂数据问题的有力工具。
安装指南
XGBoost提供了一些语言绑定的二进制软件包,这些二进制软件包支持在具有NVIDIA GPU的机器上使用GPU算法(设备为cuda:0)。请注意,仅在Linux平台上支持使用多个GPU进行训练。
Python
已经上传了预先构建的二进制软件包到PyPI(Python Package Index)以供每个发布版本使用。支持的平台包括Linux(x86_64、aarch64)、Windows(x86_64)和MacOS(x86_64、Apple Silicon)。
# 需要 Pip 21.3+
pip install xgboost
如果遇到权限错误,可能需要使用 --user 标志运行该命令,或者在虚拟环境中运行。
注意
Windows用户需要安装Visual C++ Redistributable
XGBoost需要Visual C++ Redistributable中的DLL文件才能正常运行,请确保安装它。例外情况:如果您已安装了Visual Studio,则已经可以访问必要的库,因此无需安装Visual C++ Redistributable。
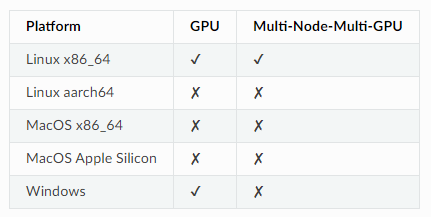
每个平台的二进制软件包的功能:

Conda
可以使用Conda包管理器安装XGBoost:
conda install -c conda-forge py-xgboost
Conda应该能够检测到机器上是否存在GPU,并安装XGBoost的正确变体。如果遇到问题,请尝试明确指定变体:
# 仅CPU
conda install -c conda-forge py-xgboost-cpu
# 使用NVIDIA GPU
conda install -c conda-forge py-xgboost-gpu
请访问Miniconda网站获取Conda。
注意
在Windows上不提供
py-xgboost-gpu
py-xgboost-gpu目前在Windows上不可用。如果使用Windows,请使用pip安装具有GPU支持的XGBoost
R
从CRAN:
install.packages("xgboost")
注意
在Mac OSX上使用所有CPU核心(线程)
如果使用的是Mac OSX,应该首先安装OpenMP库(libomp),方法是运行
brew install libomp然后运行
install.packages("xgboost")。没有安装OpenMP,XGBoost将仅使用单个CPU核心,导致训练速度不理想。
还提供了带有GPU支持的实验性预构建二进制文件。使用此二进制文件,将能够在不从源代码构建XGBoost的情况下使用GPU算法。从Releases页面下载二进制软件包。文件名将采用xgboost_r_gpu_[os]_[version].tar.gz 的形式,其中[os]可以是linux或win64,然后通过运行以下命令安装XGBoost:
# 安装依赖项
R -q -e "install.packages(c('data.table', 'jsonlite'))"
# 安装XGBoost
R CMD INSTALL ./xgboost_r_gpu_linux.tar.gz
JVM
- XGBoost4j/XGBoost4j-Spark
Maven
<properties>...<!-- 在包名中指定 Scala 版本 --><scala.binary.version>2.12</scala.binary.version>
</properties><dependencies>...<dependency><groupId>ml.dmlc</groupId><artifactId>xgboost4j_${scala.binary.version}</artifactId><version>latest_version_num</version></dependency><dependency><groupId>ml.dmlc</groupId><artifactId>xgboost4j-spark_${scala.binary.version}</artifactId><version>latest_version_num</version></dependency>
</dependencies>
sbt
libraryDependencies ++= Seq("ml.dmlc" %% "xgboost4j" % "latest_version_num","ml.dmlc" %% "xgboost4j-spark" % "latest_version_num"
)
- XGBoost4j-GPU/XGBoost4j-Spark-GPU
Maven
<properties>...<!-- 在包名中指定 Scala 版本 --><scala.binary.version>2.12</scala.binary.version>
</properties><dependencies>...<dependency><groupId>ml.dmlc</groupId><artifactId>xgboost4j-gpu_${scala.binary.version}</artifactId><version>latest_version_num</version></dependency><dependency><groupId>ml.dmlc</groupId><artifactId>xgboost4j-spark-gpu_${scala.binary.version}</artifactId><version>latest_version_num</version></dependency>
</dependencies>
sbt
libraryDependencies ++= Seq("ml.dmlc" %% "xgboost4j-gpu" % "latest_version_num","ml.dmlc" %% "xgboost4j-spark-gpu" % "latest_version_num"
)
这将从 Maven 中央仓库获取最新的稳定版本。
要启用 GPU 算法(device='cuda'),改用 xgboost4j-gpu_2.12 和 xgboost4j-spark-gpu_2.12 这两个构件(请注意 gpu 后缀)。
注意
不支持 Windows 的 JVM 包
目前,XGBoost4J-Spark 不支持 Windows 平台,因为 Windows 上的分布式训练算法无法正常运行
快速开始
这是一个快速入门教程,其中包含一些片段,让您可以快速尝试在二分类任务的演示数据集上使用 XGBoost。
Python
from xgboost import XGBClassifier
from sklearn.datasets import load_iris
from sklearn.model_selection import train_test_split
from sklearn.metrics import classification_reportdata = load_iris()
X_train, X_test, y_train, y_test = train_test_split(data['data'], data['target'], test_size=.2)# create model instance
bst = XGBClassifier(n_estimators=2, max_depth=2, learning_rate=1, objective='binary:logistic')# fit model
bst.fit(X_train, y_train)# make predictions
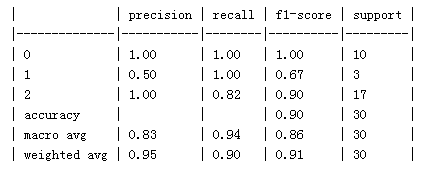
preds = bst.predict(X_test)classification_report(preds, y_test)

R
# load data
data(agaricus.train, package='xgboost')
data(agaricus.test, package='xgboost')
train <- agaricus.train
test <- agaricus.test
# fit model
bst <- xgboost(data = train$data, label = train$label, max.depth = 2, eta = 1, nrounds = 2,nthread = 2, objective = "binary:logistic")
# predict
pred <- predict(bst, test$data)
Julia
using XGBoost
# read data
train_X, train_Y = readlibsvm("demo/data/agaricus.txt.train", (6513, 126))
test_X, test_Y = readlibsvm("demo/data/agaricus.txt.test", (1611, 126))
# fit model
num_round = 2
bst = xgboost(train_X, num_round, label=train_Y, eta=1, max_depth=2)
# predict
pred = predict(bst, test_X)
Scala
import ml.dmlc.xgboost4j.scala.DMatrix
import ml.dmlc.xgboost4j.scala.XGBoostobject XGBoostScalaExample {def main(args: Array[String]) {// read trainining data, available at xgboost/demo/dataval trainData =new DMatrix("/path/to/agaricus.txt.train")// define parametersval paramMap = List("eta" -> 0.1,"max_depth" -> 2,"objective" -> "binary:logistic").toMap// number of iterationsval round = 2// train the modelval model = XGBoost.train(trainData, paramMap, round)// run predictionval predTrain = model.predict(trainData)// save model to the file.model.saveModel("/local/path/to/model")}
}
参考
- Awesome XGBoost
- awesome-machine-learning
- https://xgboost.readthedocs.io
这篇关于XGB-1:XGBoost安装及快速上手的文章就介绍到这儿,希望我们推荐的文章对编程师们有所帮助!


