本文主要是介绍基于c++和Python的单像空间后方交会,希望对大家解决编程问题提供一定的参考价值,需要的开发者们随着小编来一起学习吧!
学习摄影测量之后一直都很想用代码实现一下这个特别经典的,难度又不是很大的课堂案例,但是由于一直在看其他开源项目的代码,一直被搁置,趁着暑假完成一下曾经的小目标。
没想到这东西看起来步骤清晰且简单,实现起来竟然踩了特别多的坑,主要就是Python中的数组和基于OpenCV的c++Mat这两者用起来差别有点大,搞得我晕头转向的,很难受......
一、Python实现:
我先用Python代码实现了一下,毕竟python代码比较......
#空间后方交会
import numpy as np
m = 50000#比例尺分母
limit = 0.0001#迭代限差
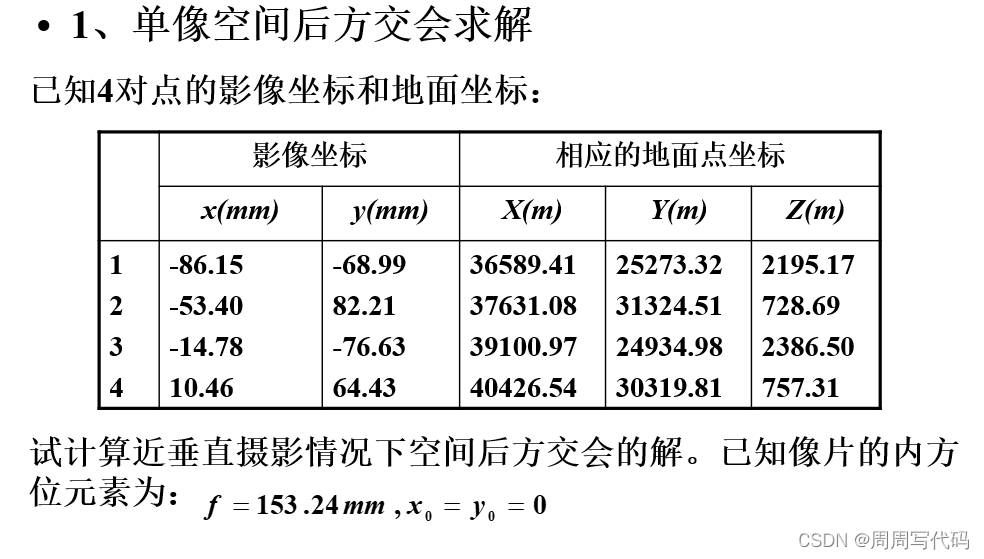
def Space_resection(f, X, Y, Z, x, y, H):#初始化x = np.array(x, dtype=np.float32)y = np.array(y, dtype=np.float32)X = np.array(X, dtype=np.float32)Y = np.array(Y, dtype=np.float32)Z = np.array(Z, dtype=np.float32)phi = 0omg = 0kappa = 0Xs = sum(X) / 4Ys = sum(Y) / 4Zs = m * fiteration_num = 50000for i in range(iteration_num):#计算旋转矩阵元素a1 = np.cos(phi) * np.cos(kappa) - np.sin(phi) * np.sin(omg) * np.sin(kappa)a2 = -np.cos(phi) * np.sin(kappa) - np.sin(phi) * np.sin(omg) * np.cos(kappa)a3 = -np.sin(phi) * np.cos(omg)b1 = np.cos(omg) * np.sin(kappa)b2 = np.cos(omg) * np.cos(kappa)b3 = -np.sin(omg)c1 = np.sin(phi) * np.cos(kappa) + np.cos(phi) * np.sin(omg) * np.sin(kappa)c2 = -np.sin(phi) * np.sin(kappa) + np.cos(phi) * np.sin(omg) * np.cos(kappa)c3 = np.cos(phi) * np.cos(omg)R = np.mat([[a1, a2, a3], [b1, b2, b3], [c1, c2, c3]])# print(R)num = len(x)#物点/像点数量# print(num)for j in range(num):#初始化系数矩阵a,常数项矩阵l和近似值x,ya11 = np.zeros(num, dtype=np.float32)a12 = np.zeros(num, dtype=np.float32)a13 = np.zeros(num, dtype=np.float32)a14 = np.zeros(num, dtype=np.float32)a15 = np.zeros(num, dtype=np.float32)a16 = np.zeros(num, dtype=np.float32)a21 = np.zeros(num, dtype=np.float32)a22 = np.zeros(num, dtype=np.float32)a23 = np.zeros(num, dtype=np.float32)a24 = np.zeros(num, dtype=np.float32)a25 = np.zeros(num, dtype=np.float32)a26 = np.zeros(num, dtype=np.float32)l11 = np.zeros(num, dtype=np.float32)l12 = np.zeros(num, dtype=np.float32)appro_x = np.zeros(num, dtype=np.float32)appro_y = np.zeros(num, dtype=np.float32)for j in range(num):#计算每个点的系数矩阵a,常数项矩阵l和近似值x,yappro_x[j] = -f * (a1 * (X[j] - Xs) + b1 * (Y[j] - Ys) + c1 * (Z[j] - Zs)) / (a3 * (X[j] - Xs) + b3 * (Y[j] - Ys) + c3 * (Z[j] - Zs))appro_y[j] = -f * (a2 * (X[j] - Xs) + b2 * (Y[j] - Ys) + c2 * (Z[j] - Zs)) / (a3 * (X[j] - Xs) + b3 * (Y[j] - Ys) + c3 * (Z[j] - Zs))# print(appro_x[j],appro_y[j])a11[j] = -f / Ha12[j] = 0a13[j] = -x[j] / Ha14[j] = -f * (1 + (x[j] * x[j]) / (f * f))a15[j] = -x[j] * y[j] / fa16[j] = y[j]a21[j] = 0a22[j] = -f / Ha23[j] = -y[j] / Ha24[j] = -x[j] * y[j] / fa25[j] = -f * (1 + (y[j] * y[j]) / (f * f))a26[j] = -x[j]#组合A,LA = np.zeros((2 * num, 6), dtype=np.float32)for j in range(num):A[2 * j:2 * j + 2, :] = np.array([[a11[j], a12[j], a13[j], a14[j], a15[j], a16[j]], [a21[j], a22[j], a23[j], a24[j], a25[j], a26[j]]])#print(A)L = np.zeros((2 * num, 1), dtype=np.float32)for j in range(num):L[2 * j:2 * j + 2, :] = np.mat([[x[j] - appro_x[j]], [y[j] - appro_y[j]]])#print(L)#计算ATA,ATL以及改正数X=(ATA)-1(ATL)ATA = np.dot(A.T, A)ATL = np.dot(A.T, L)X_mid = np.dot(np.linalg.inv(ATA), A.T)result = np.dot(X_mid, L)#求新值Xs += result[0,0]Ys += result[1,0]Zs += result[2,0]phi += result[3,0]omg += result[4,0]kappa += result[5,0]if (abs(result[0,0]) < limit and abs(result[1,0]) < limit and abs(result[2,0]) < limit and abs(result[3,0]) < limit and abs(result[4,0]) < limit and abs(result[5,0]) < limit):print("精度满足")return (Xs,Ys,Zs,phi,omg,kappa)else:print(i)print("继续")# print(result)
def main():f = 153.24 / 1000H = f * m#航高x = [-86.15 / 1000, -53.40 / 1000, -14.78 / 1000, 10.46 / 1000]y = [-68.99 / 1000, 82.21 / 1000, -76.63 / 1000, 64.43 / 1000]X = [36589.41, 37631.08, 39100.97, 40426.54]Y = [25273.32, 31324.51, 24934.98, 30319.81]Z = [2195.17, 728.69, 2386.50, 757.31]result = Space_resection(f, X, Y, Z, x, y, H)print(result)
if __name__ == '__main__':main()
运行结果是这样的:

二、c++实现:
#include <iostream>
#include<fstream>
#include<opencv2/opencv.hpp>
using namespace std;
using namespace cv;
const int m = 50000;//比例尺分母
const double limit = 0.000001;//迭代限差
const int N = 4;//物点/像点个数,根据实际情况修改
const int iteration_num = 50000;//设定的迭代次数
Mat Space_resection(double f, double* x, double* y, double* X, double* Y, double* Z, double H, Mat& result)
{double sumX = 0.0, sumY = 0.0;for (int i = 0; i < N; i++){sumX += *(X + i);}for (int i = 0; i < N; i++){sumY += *(Y + i);}//参数初始化double phi = 0.0, omg = 0.0, kappa = 0.0;double Xs = sumX / 4;double Ys = sumY / 4;double Zs = m * f;for (int times = 1; times <= iteration_num; times++)//开始迭代{//计算旋转矩阵double a1 = cos(phi) * cos(kappa) - sin(phi) * sin(omg) * sin(kappa);double a2 = -cos(phi) * sin(kappa) - sin(phi) * sin(omg) * cos(kappa);double a3 = -sin(phi) * cos(omg);double b1 = cos(omg) * sin(kappa);double b2 = cos(omg) * cos(kappa);double b3 = -sin(omg);double c1 = sin(phi) * cos(kappa) + cos(phi) * sin(omg) * sin(kappa);double c2 = -sin(phi) * sin(kappa) + cos(phi) * sin(omg) * cos(kappa);double c3 = cos(phi) * cos(omg);Mat R = (Mat_<double>(3, 3) << a1, a2, a3, b1, b2, b3, c1, c2, c3);//初始化A,Ldouble appro_x[N] = { 0 };double appro_y[N] = { 0 };double a11[N] = { 0 };double a12[N] = { 0 };double a13[N] = { 0 };double a14[N] = { 0 };double a15[N] = { 0 };double a16[N] = { 0 };double a21[N] = { 0 };double a22[N] = { 0 };double a23[N] = { 0 };double a24[N] = { 0 };double a25[N] = { 0 };double a26[N] = { 0 };double lx[N] = { 0 };double ly[N] = { 0 };//逐点计算A,Lfor (int j = 0; j < N; j++){appro_x[j] = -f * (a1 * (*(X+j) - Xs) + b1 * (*(Y+j) - Ys) + c1 * (*(Z + j) - Zs)) /(a3 * (*(X + j) - Xs) + b3 * (*(Y + j) - Ys) + c3 * (*(Z + j) - Zs));appro_y[j] = -f * (a2 * (*(X + j) - Xs) + b2 * (*(Y + j) - Ys) + c2 * (*(Z + j) - Zs)) /(a3 * (*(X + j) - Xs) + b3 * (*(Y + j) - Ys) + c3 * (*(Z + j) - Zs));lx[j] = *(x + j) - appro_x[j];ly[j] = *(y + j) - appro_y[j];a11[j] = -f / H;a12[j] = 0;a13[j] = -*(x + j) / H;a14[j] = -f * (1 + (*(x + j) *  *(x + j)) / (f * f));a15[j] = -*(x + j) * *(y + j) / f;a16[j] = *(y + j);a21[j] = 0;a22[j] = -f / H;a23[j] = -*(y + j) / H;a24[j] = -*(x + j) * *(y + j) / f;a25[j] = -f * (1 + (*(y + j) * *(y + j)) / (f * f));a26[j] = -*(x + j);}//组合总的A,LMat A(2 * N, 6,CV_64F);Mat L(2 * N, 1, CV_64F);int t = 0, t2 = 0;for (int j = 0; j < 2 * N; j += 2){Mat mid = (Mat_<double>(2, 6) << a11[t], a12[t], a13[t], a14[t], a15[t], a16[t], a21[t], a22[t], a23[t], a24[t], a25[t], a26[t]);for (int row = 0; row < 2; row++){for (int col = 0; col < 6; col++){A.at<double>(row + 2 * t, col) = mid.at<double>(row, col);}}t++;}for (int j = 0; j < 2 * N; j += 2){Mat mid = (Mat_<double>(2, 1) << lx[t2], ly[t2]);for (int row = 0; row < 2; row++){for (int col = 0; col < 1; col++){L.at<double>(row + 2 * t2, col) = mid.at<double>(row, col);}}t2++;}//计算ATA,ATL和XMat ATA = A.t() * A;Mat ATL = A.t() * L;Mat X = (ATA).inv() * A.t()*L;//求新值Xs += X.at<double>(0, 0);Ys += X.at<double>(1, 0);Zs += X.at<double>(2, 0);phi += X.at<double>(3, 0);omg += X.at<double>(4, 0);kappa += X.at<double>(5, 0);//与限差比较if (fabs(X.at<double>(0, 0)) < limit && fabs(X.at<double>(1, 0)) < limit && fabs(X.at<double>(2, 0)) < limit && fabs(X.at<double>(3, 0)) < limit && fabs(X.at<double>(4, 0)) < limit && fabs(X.at<double>(5, 0)) < limit){cout << times << endl;cout << "精度满足";result = (Mat_<double>(6, 1) << Xs, Ys, Zs, phi, omg, kappa);return result;}else{result = (Mat_<double>(6, 1) << X.at<double>(0, 0), X.at<double>(1, 0), X.at<double>(2, 0), X.at<double>(3, 0), X.at<double>(4, 0), X.at<double>(5, 0));}}//return result;
}
int main()
{double f = 153.24 / 1000;double H = f * m;ifstream fin1;ifstream fin2;//从文件中读取物点坐标,像点坐标fin1.open("D:\\Software\\VS2019\\source\\repos\\摄影测量与三维重建\\单片空间后方交会\\像点坐标.txt");fin2.open("D:\\Software\\VS2019\\source\\repos\\摄影测量与三维重建\\单片空间后方交会\\物点坐标.txt");double x[N];double y[N];double X[N];double Y[N];double Z[N];char strx, stry, strX, strY, strZ;fin1 >> strx >> stry;for (int i = 0; i < N; i++){fin1 >> x[i] >> y[i];x[i] /= 1000;y[i] /= 1000;}fin2 >> strX >> strY >> strZ;for (int i = 0; i < N; i++){fin2 >> X[i] >> Y[i] >> Z[i];}Mat result=Mat::zeros(Size(6,1), CV_64F);Mat final_result(6, 1, CV_64F);final_result = Space_resection(f, x, y, X, Y, Z, H, result);cout << final_result;return 0;
}
这个代码要跑起来需要配置OpenCV库,我用的OpenCV里面的Mat,具体配置过程参考这个吧VS配置OpenCV库。
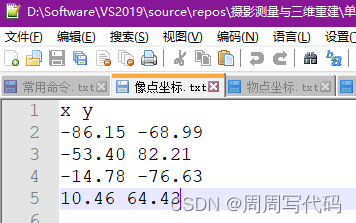
然后就是考虑到这只是一个小案例,实际生产生活中我们有海量的物点和像点,所以我采用了读取文件的方式,这两个文本文件格式如下:

然后对照着我的代码,应该很容易能看明白。
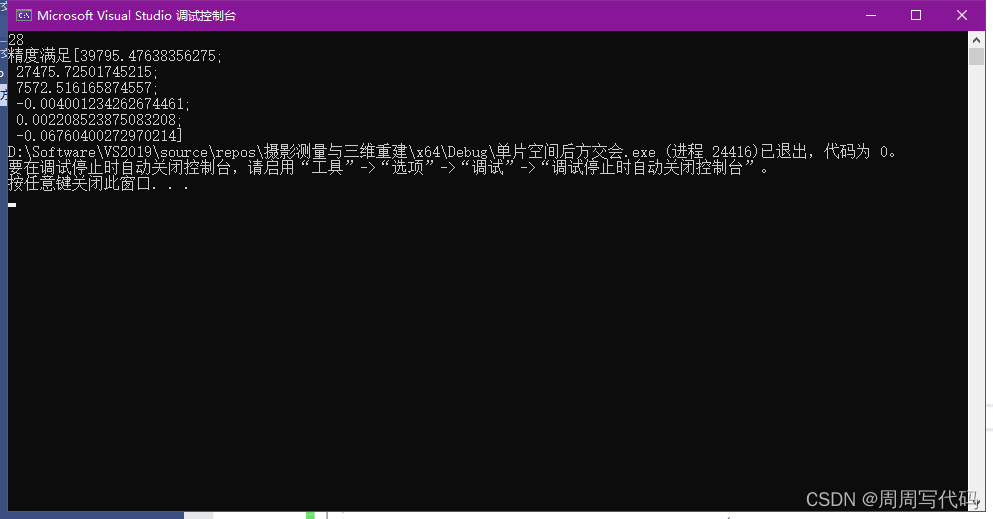
运行结果如下:和Python的结果差不多,但是就这么一个小程序我都能明显感觉到c++确实比Python运行的快很多。
这篇关于基于c++和Python的单像空间后方交会的文章就介绍到这儿,希望我们推荐的文章对编程师们有所帮助!


