本文主要是介绍使用tensorflow hub洋红色在5分钟内快速进行神经样式转换,希望对大家解决编程问题提供一定的参考价值,需要的开发者们随着小编来一起学习吧!
Before we start the tutorial: If you are reading this article, we probably share similar interests and are/will be in similar industries. So let’s connect via Linkedin! Please do not hesitate to send a contact request! Orhan G. Yalçın — Linkedin
在开始本教程之前:如果您正在阅读本文,则我们可能有相似的兴趣,并且将/将要从事类似的行业。 因此,让我们通过Linkedin连接! 请不要犹豫,发送联系请求! Orhan G.Yalçın— Linkedin
I am sure you have come across to deep learning projects on transferring styles of famous painters to new photos. Well, I have been thinking about working on a similar project, but I realized that you can make neural style transfer within minutes, like the one in Figure 1. I will show you how in a second. But, let’s cover some basics first:
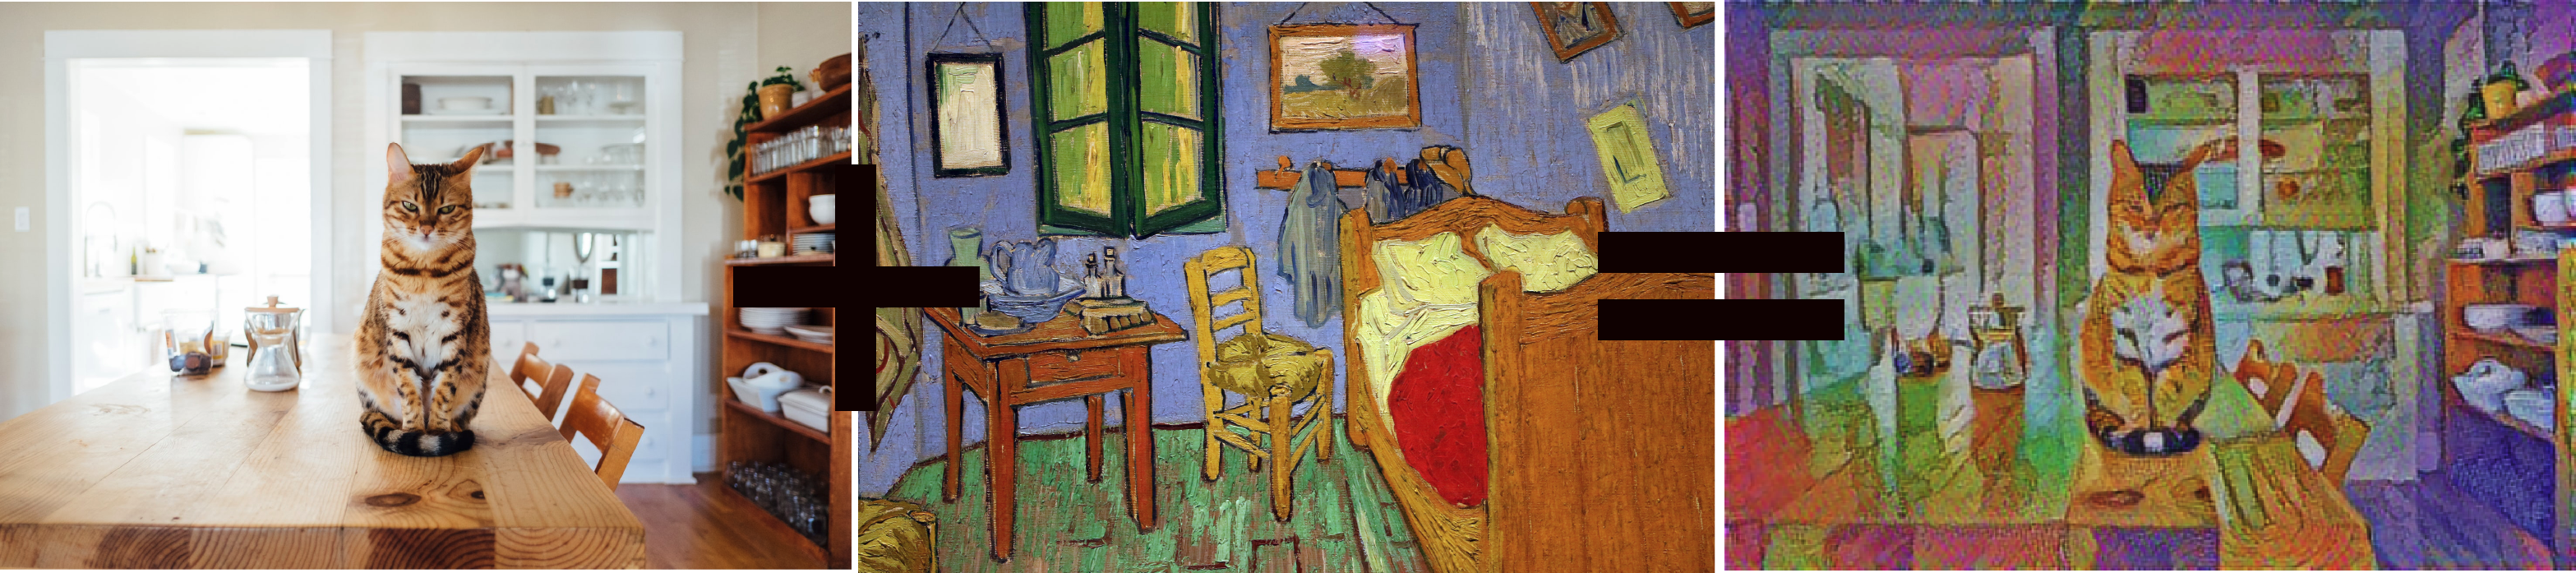
我敢肯定,您会遇到有关将著名画家的风格转换为新照片的深度学习项目。 好吧,我一直在考虑进行类似的项目,但是我意识到您可以在几分钟内完成神经样式的转换,如图1所示。我将在一秒钟内向您展示如何进行。 但是,让我们先介绍一些基本知识:
神经风格转换(NST) (Neural Style Transfer (NST))
Neural style transfer is a method to blend two images and create a new image from a content image by copying the style of another image, called style image. This newly created image is often referred to as the stylized image.
Ñeural样式转移到混合两个图像,并通过复制另一图像的样式,称为风格图像创建从内容图像的新图像的方法。 该新创建的图像通常称为风格化图像。
NST的历史 (History of NST)
Image stylization is a two-decade-old problem in the field of non-photorealistic rendering. Non-photorealistic rendering is the opposite of photorealism, which is the study of reproducing an image as realistically as possible. The output of a neural style transfer model is an image that looks similar to the content image but in painting form in the style of the style image.
图像样式化是非照片级真实感渲染领域中的两个世纪的问题。 非真实感渲染与真实感相反,真实感是对尽可能逼真的图像进行再现的研究。 神经样式转移模型的输出是一个看起来与内容图像相似的图像,但是以样式图像的样式绘画。

Neural style transfer (NST) was first published in the paper “A Neural Algorithm of Artistic Style” by Gatys et al., originally released in 2015. The novelty of the NST method was the use of deep learning to separate the representation of the content of an image from its style of depiction. To achieve this, Gatys et al. used VGG-19 architecture, which was pre-trained on the ImageNet dataset. Even though we can build a custom model following the same methodology, for this tutorial, we will benefit from the models provided in TensorFlow Hub.
神经风格转换(NST)最初发表于Gatys等人的论文“艺术风格的神经算法”中,该论文最初于2015年发布。NST方法的新颖之处在于使用深度学习来分离内容的表示形式图片的描绘风格。 为了实现这一点,盖蒂斯等。 使用了VGG-19架构,该架构已在ImageNet数据集上进行了预训练。 即使我们可以使用相同的方法构建自定义模型,但对于本教程而言,我们将从TensorFlow Hub中提供的模型中受益。
影像类比 (Image Analogy)
Before the introduction of NST, the most prominent solution to image stylization was the image analogy method. Image Analogy is a method of creating a non-photorealistic rendering filter automatically from training data. In this process, the transformation between photos (A) and non-photorealistic copies (A’) are learned. After this learning process, the model can produce a non-photorealistic copy (B’) from another photo (B). However, NST methods usually outperform image analogy due to the difficulty of finding training data for the image analogy models. Therefore, we can talk about the superiority of NST over image analogy in real-world applications, and that’s why we will focus on the application of an NST model.
在引入NST之前,图像样式化最突出的解决方案是图像类比方法。 图像类比是一种根据训练数据自动创建非真实感渲染滤镜的方法。 在此过程中,将学习照片(A)和非真实感副本(A')之间的转换。 在学习过程之后,模型可以从另一张照片(B)生成非照片级的副本(B')。 但是,由于难以找到图像类比模型的训练数据,因此NST方法通常优于图像类比。 因此,在实际应用中,我们可以谈论NST优于图像类比的原因,这就是为什么我们将专注于NST模型的应用。
是艺术吗?(Is it Art?)
Well, once we build the model, you will see that creating non-photorealistic images with Neural Style Transfer is a very easy task. You can create a lot of samples by blending beautiful photos with the paintings of talented artists. There has been a discussion about whether these outputs are regarded as art because of the little work the creator needs to add to the end product. Feel free to build the model, generate your samples, and share your thoughts in the comments section.
好的,一旦我们建立了模型,您将看到使用Neural Style Transfer创建非真实感图像是一项非常容易的任务。 您可以通过将精美的照片与才华横溢的画家的画作融合来创建大量样本。 由于创建者需要向最终产品添加的工作量很少,因此已经讨论了这些输出是否被视为艺术品。 随时构建模型,生成样本并在评论部分分享您的想法。
Now that you know the basics of Neural Style Transfer, we can move on to TensorFlow Hub, the repository that we use for our NST work.
既然您已经了解了神经样式转换的基础知识,我们就可以继续进行TensorFlow Hub,这是我们用于NST工作的存储库。
TensorFlow集线器 (TensorFlow Hub)
TensorFlow Hub is a collection of trained machine learning models that you can use with ease. TensorFlow’s official description for the Hub is as follows:
TensorFlow Hub是一组训练有素的机器学习模型,您可以轻松使用它们。 TensorFlow对Hub的官方描述如下:
TensorFlow Hub is a repository of trained machine learning models ready for fine-tuning and deployable anywhere. Reuse trained models like BERT and Faster R-CNN with just a few lines of code.
TensorFlow Hub是训练有素的机器学习模型的存储库,可以随时进行微调和部署。 仅需几行代码即可重用BERT和Faster R-CNN等经过训练的模型。
Apart from pre-trained models such as BERT or Faster R-CNN, there are a good amount of pre-trained models. The one we will use is Magenta’s Arbitrary Image Stylization network. Let’s take a look at what Magenta is.
除了诸如BERT或Faster R-CNN之类的预训练模型外,还有大量的预训练模型。 我们将使用的是Magenta的任意图像样式化网络。 让我们看看什么是洋红色。
洋红色和任意图像样式化 (Magenta and Arbitrary Image Stylization)
什么是洋红色?(What is Magenta?)

Magenta is an open-source research project, backed by Google, which aims to provide machine learning solutions to musicians and artists. Magenta has support in both Python and Javascript. Using Magenta, you can create songs, paintings, sounds, and more. For this tutorial, we will use a network trained and maintained by the Magenta team for Arbitrary Image Stylization.
Magenta是由Google支持的开源研究项目,旨在为音乐家和艺术家提供机器学习解决方案。 洋红色支持Python和Javascript。 使用洋红色,您可以创作歌曲,绘画,声音等。 在本教程中,我们将使用由Magenta团队培训和维护的网络进行任意图像样式化。
任意图像样式化 (Arbitrary Image Stylization)
After observing that the original work for NST proposes a slow optimization for style transfer, the Magenta team developed a fast artistic style transfer method, which can work in real-time. Even though the customizability of the model is limited, it is satisfactory enough to perform a non-photorealistic rendering work with NST. Arbitrary Image Stylization under TensorFlow Hub is a module that can perform fast artistic style transfer that may work on arbitrary painting styles.
在观察到NST的原始作品提出了缓慢的样式转移优化之后,Magenta团队开发了一种快速的艺术样式转移方法,该方法可以实时工作。 即使模型的可定制性受到限制,使用NST执行非照片级渲染工作也足够令人满意。 TensorFlow Hub下的任意图像样式化是一个模块,可以执行快速的艺术风格转换,可以在任意绘画风格上使用。
By now, you already know what Neural Style Transfer is. You also know that we will benefit from the Arbitrary Image Stylization module developed by the Magenta team, which is maintained in TensorFlow Hub.
到目前为止,您已经知道什么是神经样式转换。 您还知道,我们将从受益于Magenta团队开发的任意图像样式化模块中受益,该模块在TensorFlow Hub中维护。
Now it is time to code!
现在是时候编写代码了!
获取图像路径 (Get the Image Paths)
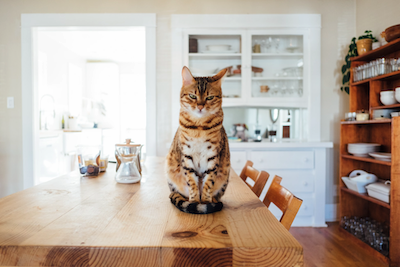
We will start by selecting two image files. I will directly load these image files from URLs. You are free to choose any photo you want. Just change the filename and URL in the code below. The content image I selected for this tutorial is the photo of a cat staring at the camera, as you can see in Figure 5.
我们将从选择两个图像文件开始。 我将直接从URL加载这些图像文件。 您可以自由选择任何想要的照片。 只需在下面的代码中更改文件名和URL。 我在本教程中选择的内容图像是一只猫盯着相机的照片,如图5所示。
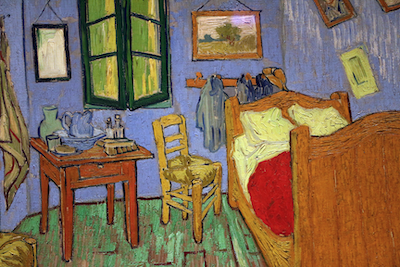
I would like to transfer the style of van Gogh. So, I chose one of his famous paintings: Bedroom in Arles, which he painted in 1889 while staying in Arles, Bouches-du-Rhône, France. Again, you are free to choose any painting of any artist you want. You can even use your own drawings.
我要转移梵高的风格。 因此,我选择了他的一幅著名画作:《阿尔勒的卧室》 ,他于1889年在法国Bouches-du-Rhône的阿尔勒住过时画的。 同样,您可以自由选择想要的任何艺术家的绘画。 您甚至可以使用自己的图纸。
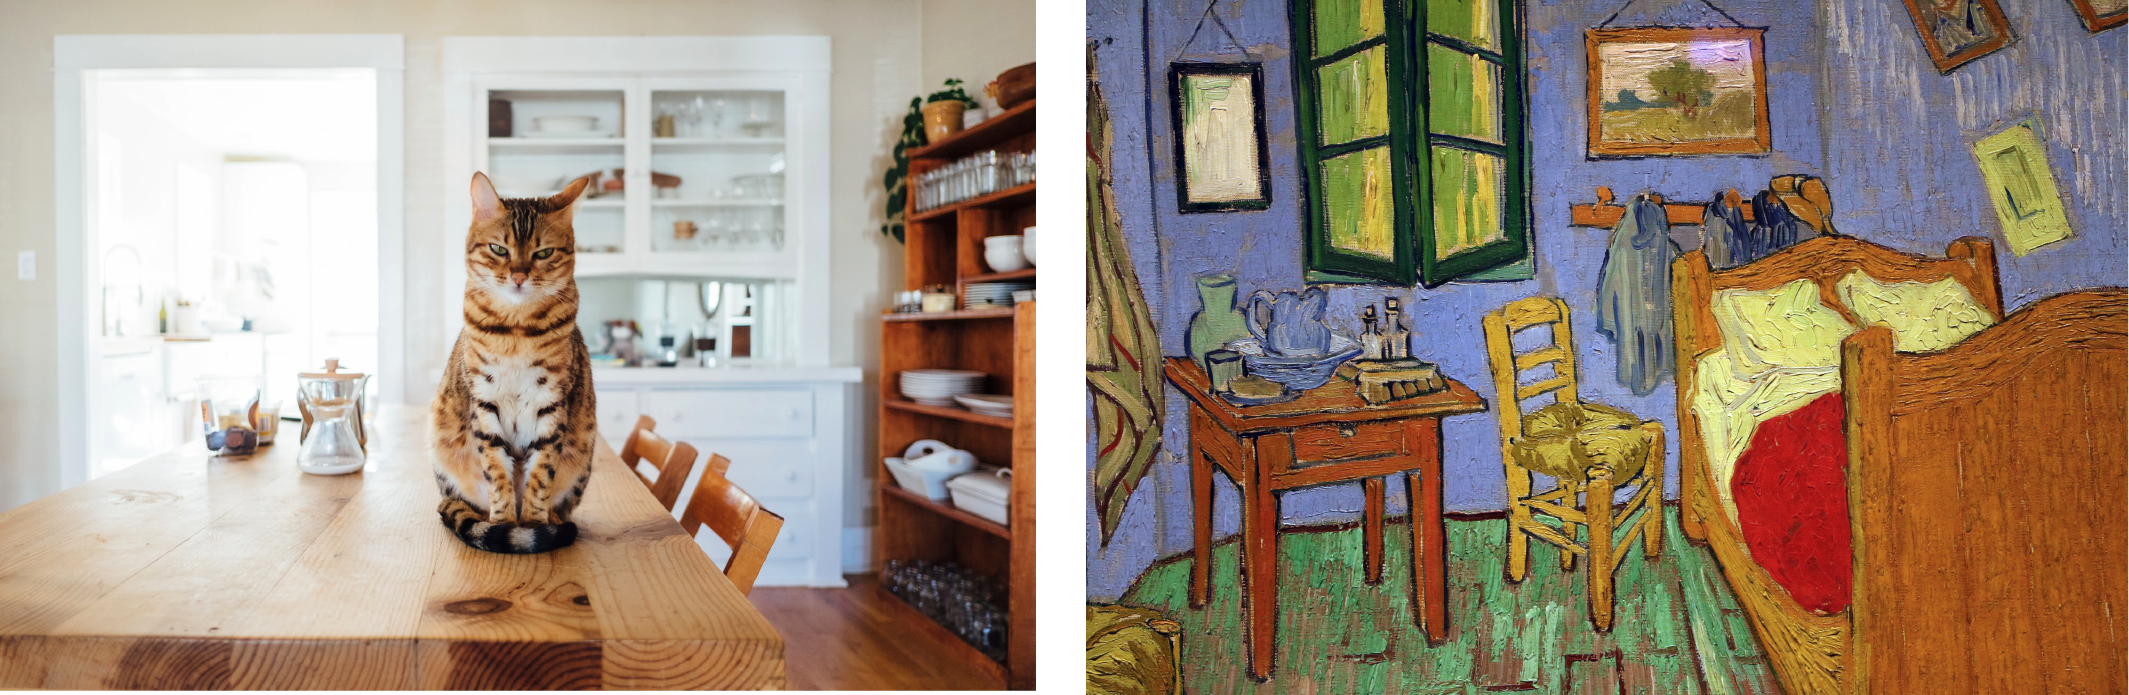
The below code sets the path to get the image files shown in Figure 5 and Figure 6.
以下代码设置获取图像文件的路径,如图5和图6所示。
import tensorflow as tfcontent_path = tf.keras.utils.get_file('photo-1501820488136-72669149e0d4', 'https://images.unsplash.com/photo-1501820488136-72669149e0d4')style_path = tf.keras.utils.get_file('Vincent_van_gogh%2C_la_camera_da_letto%2C_1889%2C_02.jpg','https://upload.wikimedia.org/wikipedia/commons/8/8c/Vincent_van_gogh%2C_la_camera_da_letto%2C_1889%2C_02.jpg')自定义图像缩放功能(Custom Function for Image Scaling)
One thing I noticed that, even though we are very limited with model customization, by rescaling the images, we can change the style transferred to the photo. In fact, I found out that the smaller the images, the better the model transfers the style. Just play with the max_dim parameter if you would like to experiment. Just note that a larger max_dim means, it will take slightly longer to generate the stylized image.
我注意到的一件事是,即使我们在模型定制方面非常有限,但通过重新缩放图像,我们仍可以更改传送到照片的样式。 实际上,我发现图像越小,模型传递样式的效果就越好。 如果您想尝试,只需使用max_dim参数即可。 只需注意,较大的max_dim表示,生成样式化图像所花的时间会稍长一些。
def img_scaler(image, max_dim = 512):# Casts a tensor to a new type.original_shape = tf.cast(tf.shape(image)[:-1], tf.float32)# Creates a scale constant for the imagescale_ratio = max_dim / max(original_shape)# Casts a tensor to a new type.new_shape = tf.cast(original_shape * scale_ratio, tf.int32)# Resizes the image based on the scaling constant generated abovereturn tf.image.resize(image, new_shape)We will call the img_scaler function below, inside the load_img function.
我们将在load_img函数内部调用以下img_scaler函数。
用于预处理图像的自定义功能 (Custom Function for Preprocessing the Image)
Now that we set our image paths to load and img_scaler function to scale the loaded image, we can actually load our image files with the custom function below.
现在,我们将图像路径设置为load,并且将img_scaler函数设置为缩放已加载的图像,我们实际上可以使用下面的自定义函数来加载图像文件了。
Every line in the Gist below is explained with comments. Please read carefully.
下面的要点中的每一行都有注释说明。 请仔细阅读。
def load_img(path_to_img):# Reads and outputs the entire contents of the input filename.img = tf.io.read_file(path_to_img)# Detect whether an image is a BMP, GIF, JPEG, or PNG, and # performs the appropriate operation to convert the input # bytes string into a Tensor of type dtypeimg = tf.image.decode_image(img, channels=3)# Convert image to dtype, scaling (MinMax Normalization) its values if needed.img = tf.image.convert_image_dtype(img, tf.float32)# Scale the image using the custom function we createdimg = img_scaler(img)# Adds a fourth dimension to the Tensor because# the model requires a 4-dimensional Tensorreturn img[tf.newaxis, :]Now our custom image loading function, load_img, is also created. All we have to do is to call it.
现在,我们的自定义图像加载功能load_img也已创建。 我们要做的就是调用它。
加载内容和样式图像 (Load the Content and Style Images)
For content image and style image, we need to call the load_img function once and the result will be a 4-dimensional Tensor, which is what will be required by our model below. The below lines is for this operation.
对于内容图像和样式图像,我们需要调用一次load_img函数,结果将是一个4维Tensor,这是下面我们的模型所需要的。 以下几行是用于此操作的。
content_image = load_img(content_path)
style_image = load_img(style_path)
Now that we successfully loaded our images, we can plot them with matplotlib, as shown below:
现在我们已经成功加载了图像,我们可以使用matplotlib绘制它们,如下所示:
import matplotlib.pyplot as pltplt.figure(figsize=(12, 12))
plt.subplot(1, 2, 1)
plt.imshow(content_image[0])
plt.title('Content Image')
plt.subplot(1, 2, 2)
plt.imshow(style_image[0])
plt.title('Style Image')plt.show()
and here is the output:
这是输出:
You are not gonna believe this, but the difficult part is over. Now we can create our network and pass these image Tensors as arguments for NST operation.
您不会相信这一点,但是困难的部分已经过去。 现在我们可以创建网络并将这些图像张量作为NST操作的参数传递。
加载任意图像样式化网络 (Load the Arbitrary Image Stylization Network)
We need to import the tensorflow_hub library so that we can use the modules containing the pre-trained models. After importing tensorflow_hub, we can use the load function to load the Arbitrary Image Stylization module as shown below. Finally, as shown in the documentation, we can pass the content and style images as arguments in tf.constant object format. The module returns our stylized image in an array format.
我们需要导入tensorflow_hub库,以便我们可以使用包含预训练模型的模块。 导入tensorflow_hub之后,我们可以使用load函数来加载任意图像样式化模块,如下所示。 最后,如文档所示,我们可以将内容和样式图像作为参数传递给tf.constant对象格式。 该模块以数组格式返回我们的风格化图像。
import tensorflow_hub as hub# Load Magenta's Arbitrary Image Stylization network from TensorFlow Hub
hub_module = hub.load('https://tfhub.dev/google/magenta/arbitrary-image-stylization-v1-256/1')# Pass content and style images as arguments in TensorFlow Constant object format
stylized_image = hub_module(tf.constant(content_image), tf.constant(style_image))[0]
All we have to do is to use this array and plot it with matplotlib. The below lines create a plot free from all the axis and large enough for you to review the image.
我们要做的就是使用此数组,并使用matplotlib对其进行绘制。 下面的几行创建了一个没有所有轴的图,并且足够大,您可以查看图像。
# Set the size of the plot figure
plt.figure(figsize=(12, 12))# Plot the stylized image
plt.imshow(stylized_image[0])# Add title to the plot
plt.title('Stylized Image')# Hide axes
plt.axis('off')# Show the plot
plt.show()
… And here is our stylized image:
…这是我们的风格化图片:

Figure 9 summarizes what we have done in this tutorial:
图9总结了我们在本教程中所做的工作:
恭喜啦(Congratulations)
As you can see, with a minimal amount of code (we did not even train a model), we did a pretty good Neural Style Transfer on a random image we took from Unsplash using a painting from Vincent van Gogh. Try different photos and paintings to discover the capabilities of the Arbitrary Image Stylization network. Also, play around with max_dim size, you will see that the style transfer changes to a great extent.
如您所见,只需最少的代码(我们甚至都没有训练模型),我们就使用Vincent van Gogh的画作对Unsplash拍摄的随机图像进行了很好的神经样式转换。 尝试不同的照片和绘画,以发现任意图像风格化网络的功能。 另外,使用max_dim大小,您会发现样式转换在很大程度上发生了变化。
订阅邮件列表以获取完整代码 (Subscribe to the Mailing List for the Full Code)
If you would like to have access to full code on Google Colab and have access to my latest content, subscribe to the mailing list:✉️
如果您想访问Google Colab上的完整代码并访问我的最新内容,请订阅邮件列表:✉️
演示地址
翻译自: https://towardsdatascience.com/fast-neural-style-transfer-in-5-minutes-with-tensorflow-hub-magenta-110b60431dcc
相关文章:
这篇关于使用tensorflow hub洋红色在5分钟内快速进行神经样式转换的文章就介绍到这儿,希望我们推荐的文章对编程师们有所帮助!


