本文主要是介绍我的 Serverless 实战—SCF构建小型服务端并结合uni-app,希望对大家解决编程问题提供一定的参考价值,需要的开发者们随着小编来一起学习吧!
【本文正在参与“100%有奖|我的Serverless 实战”征稿活动】,活动地址:https://marketing.csdn.net/p/15940c87f66c68188cfe5228cf4a0c3f
使用腾讯云SCF构建小型服务端并结合uni-app()小程序
我们这里手写了一个nodejs环境下的用户体系
使用了之前写的一个数据库连接插件dmhq-mysql-pool比较垃圾 凑合用
文档地址为 https://github.com/dmhsq/dmhsq-mysql-pool/blob/main/README.md
也使用了md5 npm install js-md5
这里使用邮箱发送验证码
先在本地写好 再上传云函数
配置数据库连接
安装 npm install dmhsq-mysql-pool
新建一个文件db.js
const database = require("dmhsq-mysql-pool");
const configs = {host: 'xxxx',port: 'xxxx',user: 'xxxx',password: 'xxxx',database: "xxxx"
}
let user = new database(configs).table("user")
let codes = new database(configs).table("email")
module.exports = {user,codes
};
用户数据表名 user

验证码表 名email 由于只用到邮箱验证码

配置邮箱发送模块
这里的user 和 pass 为STMP获取 在各大邮箱的设置可以找到
邮箱转发服务 npm install nodemailer
nodemailer文档
const nodemailer = require('nodemailer')const transporter = nodemailer.createTransport({service: 'qq', // no need to set host or port etc.auth: {user: 'xxxxx@qq.com',pass: 'xxxxxxx'}
});const sendCode = async (email,code,time) => {let message = {from: "验证码<xxxxx@qq.com>",to: email,subject: "验证码服务",html: `<html><head><meta charset="utf-8"><title></title></head><body><div><p style="font-size: 20px;">欢迎您使用,您的验证码为 <span style="color: blue;font-size: 30px;font-weight: 800;">${code}</span> ,有效时间为${time/60}分钟, 请勿泄露并及时验证</p><div style="margin-top: 50px;"></div><p style="color: red;font-size: 25px;">请勿回复</p></div></body></html>`};await transporter.sendMail(message)return {code:0,msg:"邮件已发送,如果没有收到,请检查邮箱"}
}module.exports = {sendCode};
编写简单用户体系
const {user,codes
} = require("./db.js");
const {sendCode
} = require("./email.js");
const md5 = require("js-md5")//注册模块
const sign = async (username, password) => {const dfp = passwordpassword = md5(password);let isH = await user.where({username}).get();if(isH.data.length>0){return {code: 5742,msg: "用户名已被占用",}}const _id = md5(Math.random().toString(36)).substr(0, 10);let res = await user.add({username,password,_id}).get();let rsp = {code: 5741,msg: "注册失败",}if (res.code == 0) {let userRes = await login(username, dfp);rsp = {code: 0,msg: "注册成功"}if (userRes.code == 0) {rsp.data = userRes.userInfo}}return rsp;
}//登陆模块
const login = async (username, password) => {password = md5(password)let res = await user.where({username,password}).get()if (!res.data.length) {return {code: 9001,msg: "用户名或者密码错误"}} else {let token = md5(md5(Math.random().toString(36)) + md5(Math.random().toString(36)));const tokenExpired = parseInt(Date.parse(new Date()).toString().substr(0, 10)) + 72000;const last_login_time = parseInt(Date.parse(new Date()).toString().substr(0, 10));let qres = await user.updata({token_expired: tokenExpired,token,last_login_time}).where({username}).get();if (qres.code == 0) {return {code: 0,userInfo: {token,tokenExpired,username}}} else {return {code: 9002,msg: "登陆失败",data: qres}}}
}//邮箱发送模块
const sendEmailCode = async (email, type) => {const randomStr = '00000' + Math.floor(Math.random() * 1000000)const code = randomStr.substring(randomStr.length - 6);let time = 3600const check_time = parseInt(Date.parse(new Date()).toString().substr(0, 10)) + time;let res = {}res = await sendCode(email, code, time)if (res.code == 0) {await codes.add({email,code,check_time,state: 0,type}).get();} else {res = {code: 4046,msg: "发送失败"}}return res
}//验证码校验
const checkCode = async (email, code, type) => {let result = await codes.where({email,code,type}).sort({check_time: "DESC"}).get();let data = result.data;let res = {}if (data.length == 0) {res = {code: 4048,msg: "验证码错误"}} else {data = data[0]const check_times = parseInt(Date.parse(new Date()).toString().substr(0, 10));if (data.state == 0 & data.check_time > check_times) {await codes.updata({state: 1}).where({email}).get()res = {code: 0,msg: "验证通过"}} else if (data.check_time < check_times) {res = {code: 4044,msg: "验证码失效"}} else if (data.state == 1) {res = {code: 4045,msg: "验证码已经验证"}} else {res = {code: 4048,msg: "验证码错误"}}}return res;
}//邮箱绑定
const bind = async (username, email, code) => {const check_code = await checkCode(email, code, "bind");const check_user = await user.where({username,email}).get();let res = {}if (check_user.data.length > 0) {res = {code: 74174,msg: "用户已经绑定邮箱"}} else {if (check_code.code == 0) {const datas = await user.updata({email}).where({username}).get();if (datas.code == 0) {res = {code: 0,msg: "绑定成功"}}}else{res = check_code}}return res;
}//邮箱解除绑定
const unbind = async (username, email, code) => {const check_code = await checkCode(email, code, "unbind");const check_user = await user.where({username,email}).get();let res = {}if (check_user.data.length == 0) {res = {code: 74175,msg: "用户还未绑定邮箱"}} else {if (check_code.code == 0) {const datas = await user.updata({email: ""}).where({username}).get();if (datas.code == 0) {res = {code: 0,msg: "解除绑定成功"}}}else{res = check_code}}return res;
}//邮箱校检登录
const checkCodeLogin = async (email, code) => {const ress = await checkCode(email, code, "login")const isH = await user.where({email}).get();if(isH.data.length==0){return {code:9003,msg:"非法邮箱(邮箱未绑定用户)"}}if (ress.code == 0) {let token = md5(md5(Math.random().toString(36)) + md5(Math.random().toString(36)));const tokenExpired = parseInt(Date.parse(new Date()).toString().substr(0, 10)) + 72000;const last_login_time = parseInt(Date.parse(new Date()).toString().substr(0, 10));let qres = await user.updata({token_expired: tokenExpired,token,last_login_time}).where({email}).get();if (qres.code == 0) {res = {code: 0,userInfo: {token,tokenExpired,email}}} else {res = {code: 9002,msg: "登陆失败",data: qres}}}return res;
}//token校检
const checkToken = async (token) => {const reqs = await user.where({token}).get();let res = {}if (reqs.data.length > 0) {const userInfos = reqs.data[0]const check_time = userInfos.token_expired;const now_time = parseInt(Date.parse(new Date()).toString().substr(0, 10));if (check_time > now_time) {res = {code: 0,userInfo: {username: userInfos.username}}} else {res = {code: 7412,msg: "token过期"}}} else {res = {code: 7417,msg: "token非法"}}return res;
}module.exports = {sign,login,sendEmailCode,checkCode,bind,unbind,checkCodeLogin,checkToken
}
编写主程序
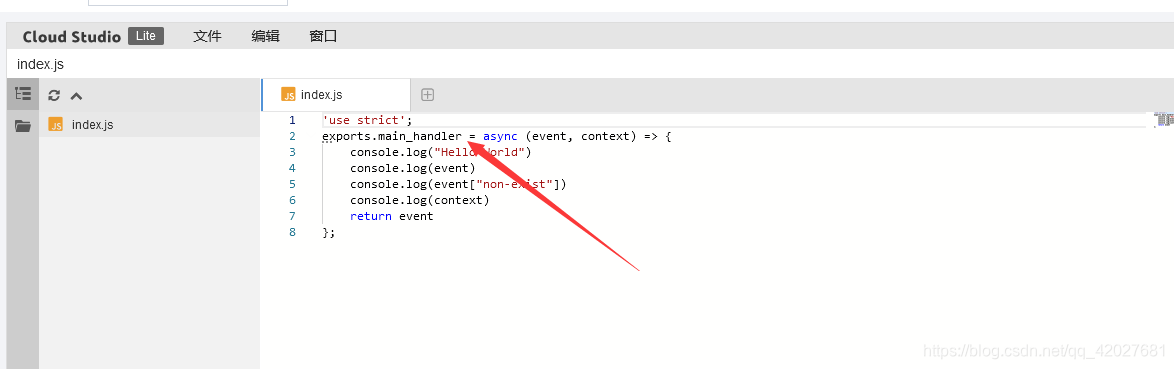
const userCenter = require("./user.js")index.main_handler = async (event, context) => {let noCheckAction = ['sign', 'checkToken', 'login', 'checkCode', 'loginByEmail', 'emailCode']let params = event.queryString;let res = {}const {action} = paramsif (noCheckAction.indexOf(action) === -1) {if (!params.token) {res = {code: 401,msg: '缺少token'}return res;}else{let datas = await userCenter.checkToken(params.token)if (datas.code != 0) {res = datasreturn res;}else{params.username = datas.userInfo.username;}}}switch (action) {case "sign": {const {username,password} = params;res = await userCenter.sign(username, password);break;}case "login": {const {username,password} = params;res = await userCenter.login(username, password)break;}case "emailCode": {const {email,type} = params;res = await userCenter.sendEmailCode(email, type)break;}case "checkCode": {const {email,code,type} = params;res = await userCenter.checkCode(email, code, type)break;}case "bind": {const {username,email,code} = params;res = await userCenter.bind(username, email, code)break;}case "unbind": {const {username,email,code} = params;res = await userCenter.unbind(username, email, code)break;}case "loginByEmail": {const {email,code} = params;res = await userCenter.checkCodeLogin(email, code)break;}case "checkToken": {const {token} = params;res = await userCenter.checkToken(token)break;}default: {res = {code: 403,msg: "非法访问"};break;}}return res;
}
创建云函数
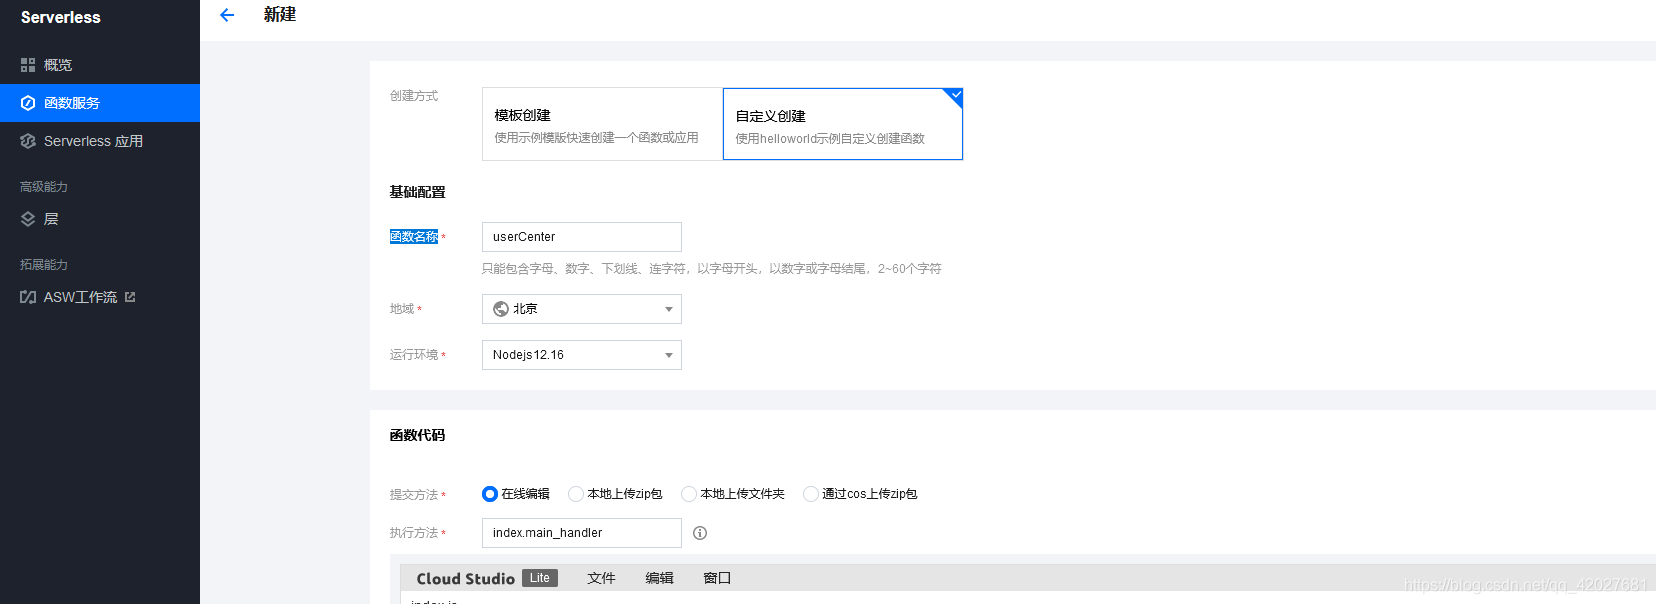
注意这里的执行方法
选择我们的项目文件夹

上传文件夹
部署
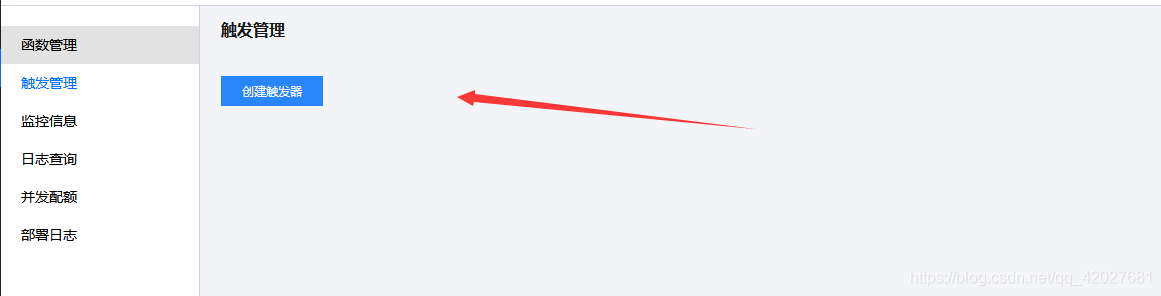
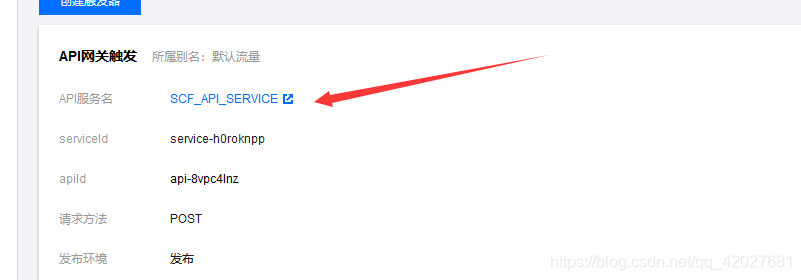
创建触发器
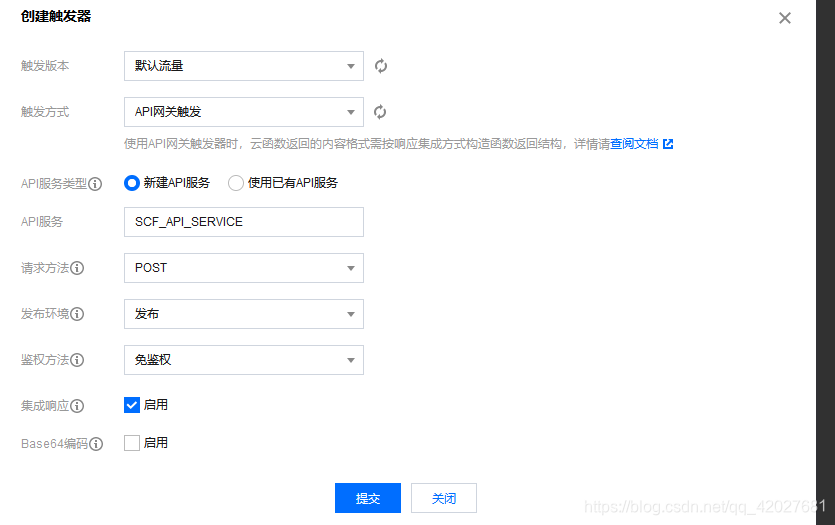
点击api名称管理
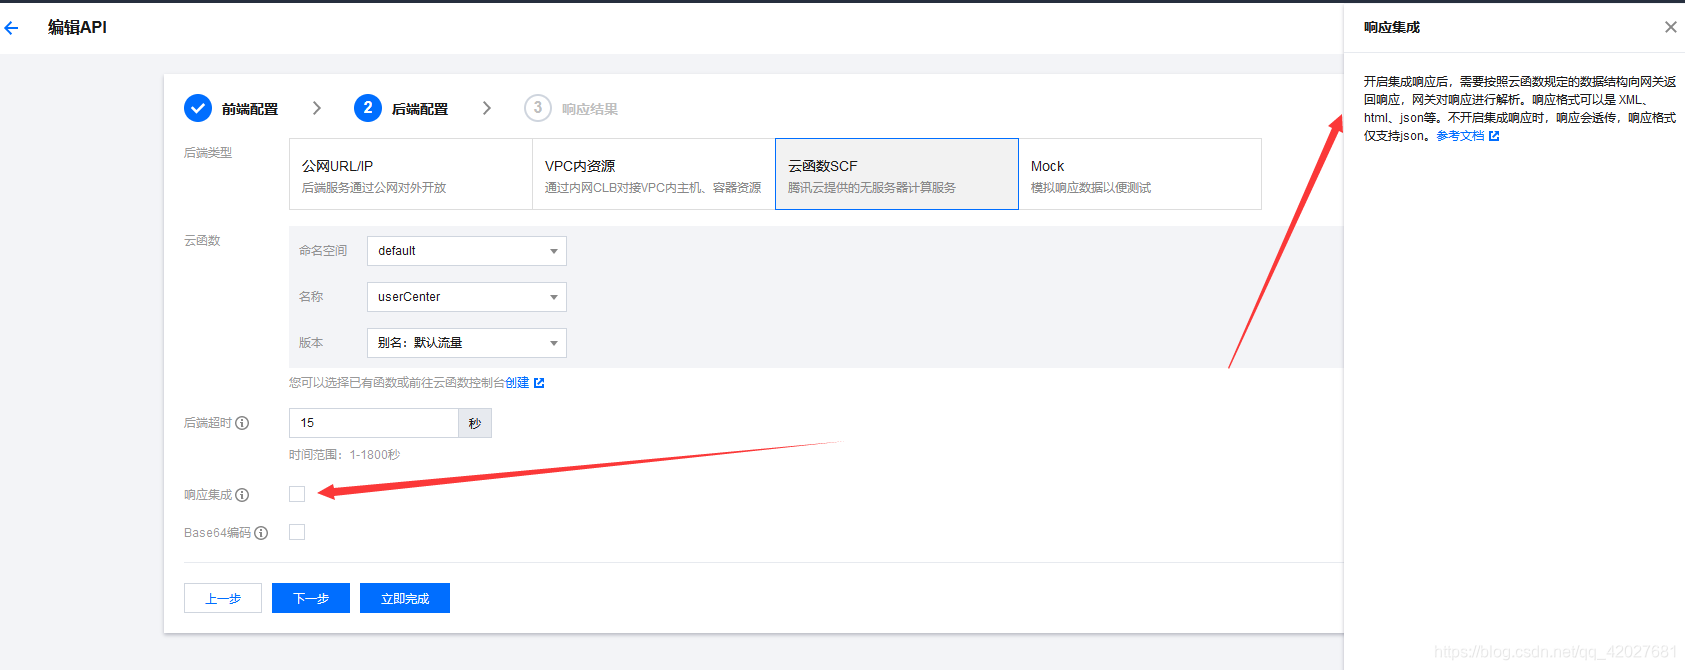
编辑触发器

关闭集成响应
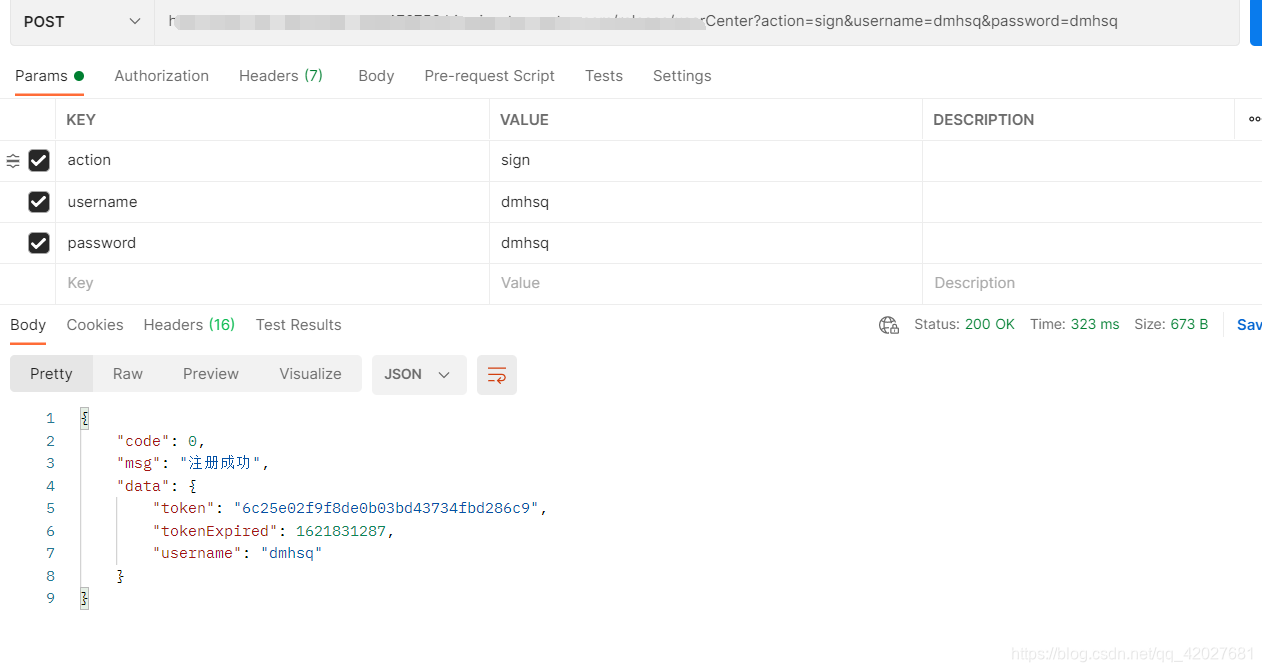
测试
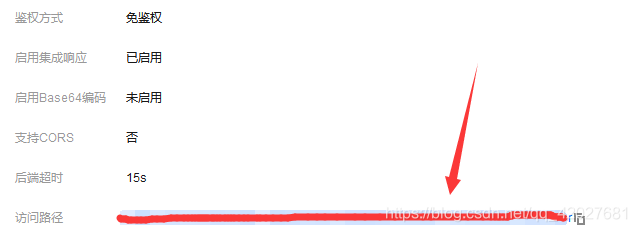
触发器 拿到请求地址
测试注册
做个小程序
这里使用 uni-app做微信小程序
由于我们只用了 用户模块 那么我们就整合用户模块
页面很简单 登录 注册 邮箱登录 邮箱绑定 邮箱解绑

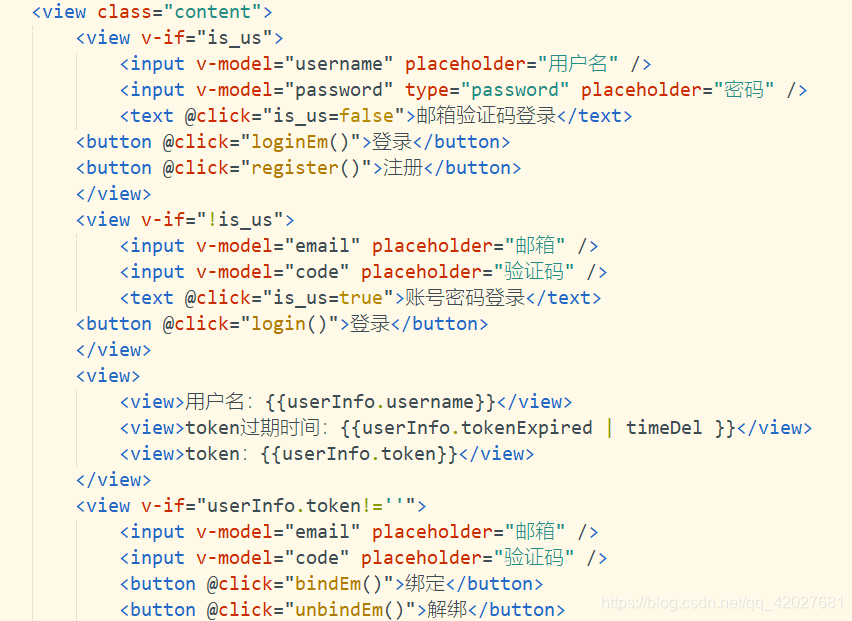
页面代码
<template><view class="content"><view v-if="is_us"><input v-model="username" placeholder="用户名" /><input v-model="password" type="password" placeholder="密码" /><text @click="is_us=false">邮箱验证码登录</text><button @click="login()">登录</button><button @click="register()">注册</button></view><view v-if="!is_us"><input v-model="email" placeholder="邮箱" /><input v-model="code" placeholder="验证码" /><text @click="is_us=true">账号密码登录</text><button @click="sendEmail('login')">发送验证码</button><button @click="loginEm()">登录</button></view><view><view>用户名:{{userInfo.username}}</view><view>token过期时间:{{userInfo.tokenExpired | timeDel }}</view><view>token:{{userInfo.token}}</view></view><view v-if="userInfo.token!=''"><input v-model="email" placeholder="邮箱" /><input v-model="code" placeholder="验证码" /><button @click="sendEmail('bind')">发送绑定验证码</button><button @click="sendEmail('unbind')">发送解绑验证码</button><button @click="bindEm()">绑定</button><button @click="unbindEm()">解绑</button></view><view><view>{{userInfoG}}</view><button @click="getUserInfo()">获取信息</button></view></view>
</template><script>export default {data() {return {title: 'Hello',is_us: true,username:"",password:"",email:"",code:"",userInfo: {username: "未登录",token:"",tokenExpired:""},userInfoG:{}}},filters:{timeDel(val) {if(!val){return ""}var date = new Date(val*1000); //时间戳为10位需*1000,时间戳为13位的话不需乘1000var Y = date.getFullYear() + '-';var M = (date.getMonth() + 1 < 10 ? '0' + (date.getMonth() + 1) : date.getMonth() + 1) + '-';var D = (date.getDate() < 10 ? '0' + date.getDate() : date.getDate()) + ' ';var h = (date.getHours() < 10 ? '0' + date.getHours() : date.getHours()) + ':';var m = (date.getMinutes() < 10 ? '0' + date.getMinutes() : date.getMinutes()) + ':';var s = date.getSeconds() < 10 ? '0' + date.getSeconds() : date.getSeconds();return Y + M + D + h + m + s;}},onLoad() {},methods: {req(action,other){return new Promise(resolve=>{uni.request({method:'POST',url:`xxx/userCenter?action=${action}&${other}`,success:res=>{resolve(res.data)}})})},getUserInfo(){let tokens = uni.getStorageSync('token')this.req('checkToken',`token=${tokens}`).then(res=>{uni.showToast({title:res.msg,icon:'none'})this.userInfoG = JSON.stringify(res)})},register(){this.req('sign',`username=${this.username}&password=${this.password}`).then(res=>{uni.showToast({title:res.msg,icon:'none'})if(res.code==0){let userInfo = res.datauni.setStorageSync("token",userInfo.token)uni.setStorageSync("tokenExpired",userInfo.tokenExpired)this.userInfo = userInfo}})},login(){this.req('login',`username=${this.username}&password=${this.password}`).then(res=>{console.log(res)uni.showToast({title:res.msg,icon:'none'})if(res.code==0){let userInfo = res.userInfouni.setStorageSync("token",userInfo.token)uni.setStorageSync("tokenExpired",userInfo.tokenExpired)this.userInfo = userInfo}})},sendEmail(type){this.req('emailCode',`email=${this.email}&type=${type}`).then(res=>{uni.showToast({title:res.msg,icon:'none'})})},loginEm(){this.req('loginByEmail',`email=${this.email}&code=${this.code}`).then(res=>{console.log(res)uni.showToast({title:res.msg,icon:'none'})if(res.code==0){let userInfo = res.userInfouni.setStorageSync("token",userInfo.token)uni.setStorageSync("tokenExpired",userInfo.tokenExpired)this.userInfo = userInfo}})},bindEm(){let tokens = uni.getStorageSync('token')this.req('bind',`username=${this.username}&email=${this.email}&code=${this.code}&token=${tokens}`).then(res=>{console.log(res)uni.showToast({title:res.msg,icon:'none'})})},unbindEm(){let tokens = uni.getStorageSync('token')this.req('unbind',`username=${this.username}&email=${this.email}&code=${this.code}&token=${tokens}`).then(res=>{console.log(res)uni.showToast({title:res.msg,icon:'none'})})}}}
</script><style>.content {display: flex;flex-direction: column;align-items: center;justify-content: center;}.logo {height: 200rpx;width: 200rpx;margin-top: 200rpx;margin-left: auto;margin-right: auto;margin-bottom: 50rpx;}.text-area {display: flex;justify-content: center;}.title {font-size: 36rpx;color: #8f8f94;}
</style>
测试
注册

登录

获取个人信息

绑定/解除绑定邮箱

邮箱验证码登录
没有绑定则邮箱非法

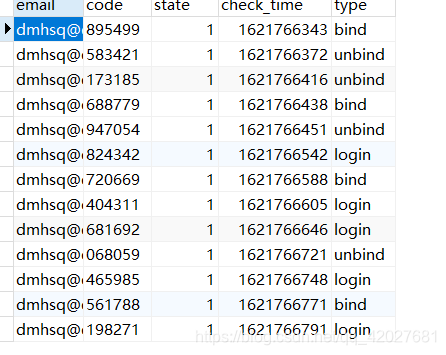
数据库状态

【本文正在参与“100%有奖|我的Serverless 实战”征稿活动】,活动地址:https://marketing.csdn.net/p/15940c87f66c68188cfe5228cf4a0c3f
这篇关于我的 Serverless 实战—SCF构建小型服务端并结合uni-app的文章就介绍到这儿,希望我们推荐的文章对编程师们有所帮助!


