本文主要是介绍ROS 使用pymodbus-rtu和stm32从机通信,希望对大家解决编程问题提供一定的参考价值,需要的开发者们随着小编来一起学习吧!
环境:
已有设备:
正点原子stm32f4开发板、windows10设备、使用VisualBox安装好了Ubuntu20.04、ros环境。
安装虚拟机参考链接:1.2 ROS安装 · Autolabor-ROS机器人入门课程《ROS理论与实践》零基础教程
需要注意的是在这一章中要安装好USB插件,之后在虚拟机中才能找到STM32的串口:1.2.3 安装 ubuntu · Autolabor-ROS机器人入门课程《ROS理论与实践》零基础教程
STM32从机:
原博说他是站在巨人的肩膀上,那我就是站在他的肩膀上😀
参考链接:基于STM32CubeMX+STM32F407ZGT6+FreeRTOS+freeMODBUS_RTU的移植_基于stm32cubemx的stm32f407移植freemodbus-CSDN博客![]() https://blog.csdn.net/qq_41252980/article/details/116709983
https://blog.csdn.net/qq_41252980/article/details/116709983
一、STM32CubeMX初始环境配置
1.Project

2.MCU

在1处输入自己的MUC型号,随后双击2处对应型号的芯片
3.Reset and Clock Controler
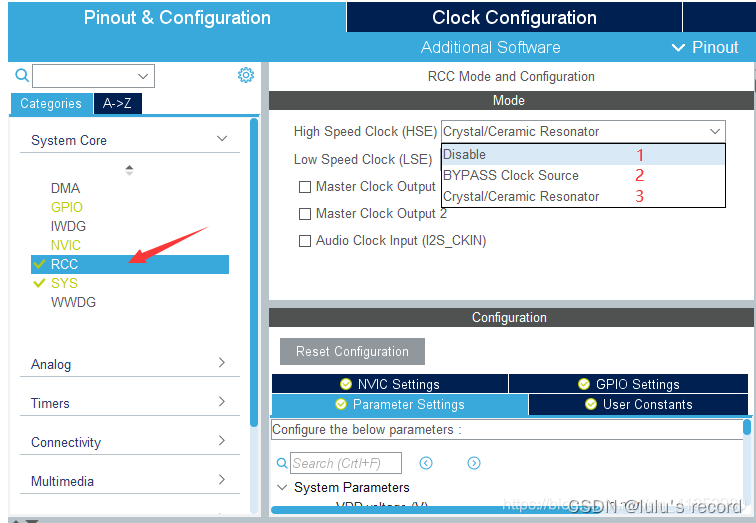
外部时钟源RCC选项中,1表示禁用,2表示旁路时钟源,3表示石英/陶瓷 晶振,此处选择3石英/陶瓷 晶振
4.System
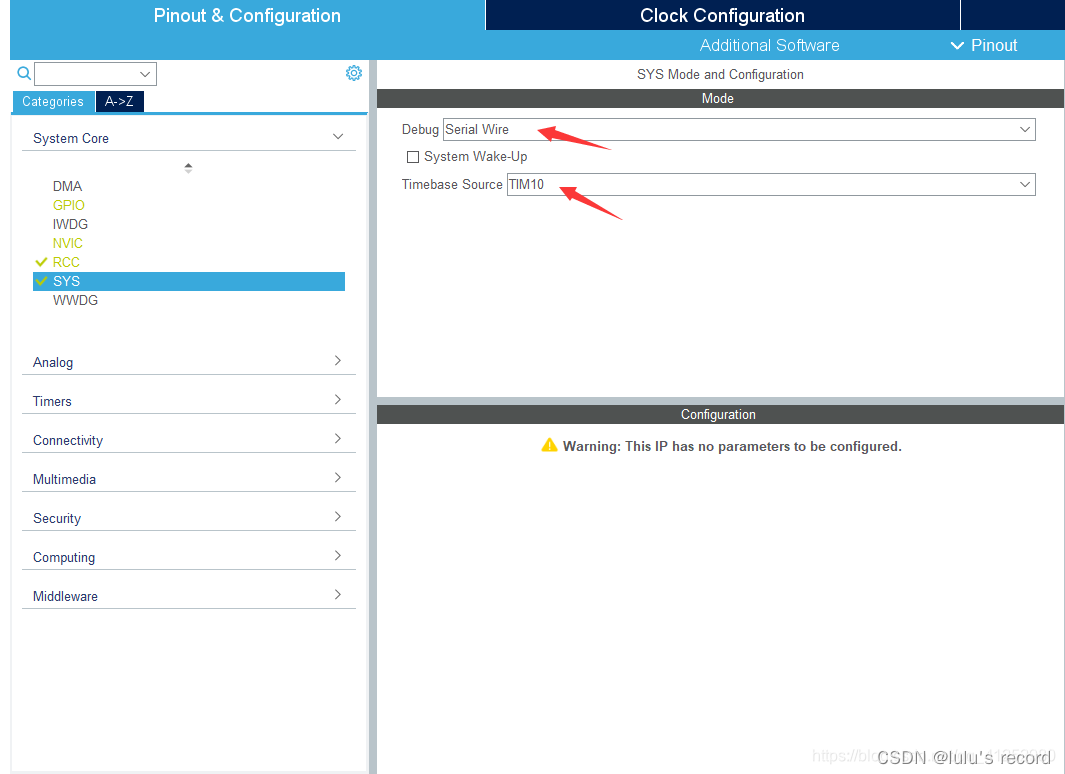
Debug选项由于是使用STlink下载所以选择Serial Wire
我们需要使能FreeRtos,所以此处将HAL库的1ms定时中断采用的定时器改为TIM10,因为Systick要用作FreeRTOS的时基定时
5.Clock Configuration
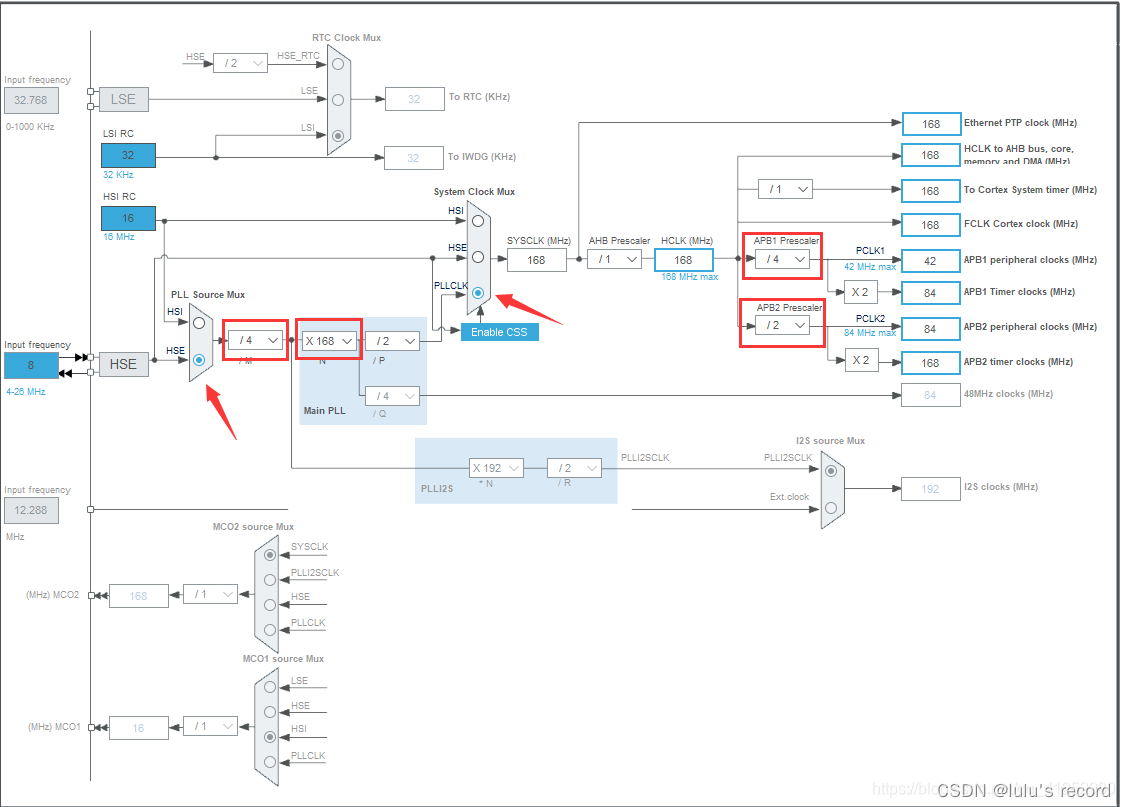
采用外部时钟源,主频配置了168MHz
6.Timer
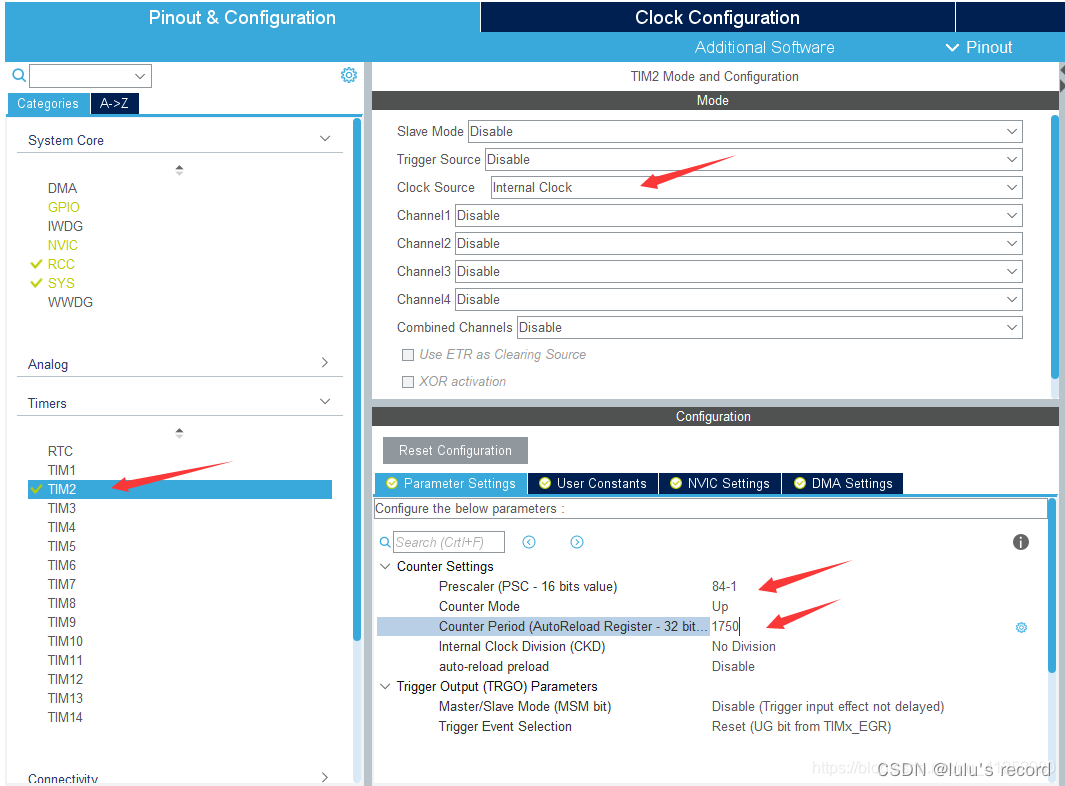
已知在freemodbus中默认定义:当波特率大于19200时,判断一帧数据超时时间固定为1750us,当波特率小于19200时,超时时间为3.5个字符时间。这里移植的是115200,所以一帧数据超时时间为1750us
这里采用TIM2,TIM2挂载在ABP1上,主频为84MHz。我们此处取预分频系数84-1,可以得到对应的分频频率为1MHz,即0.000001s=0.001ms=1us,自动重载值设置为1750,得到超时时间1750us
7.USART
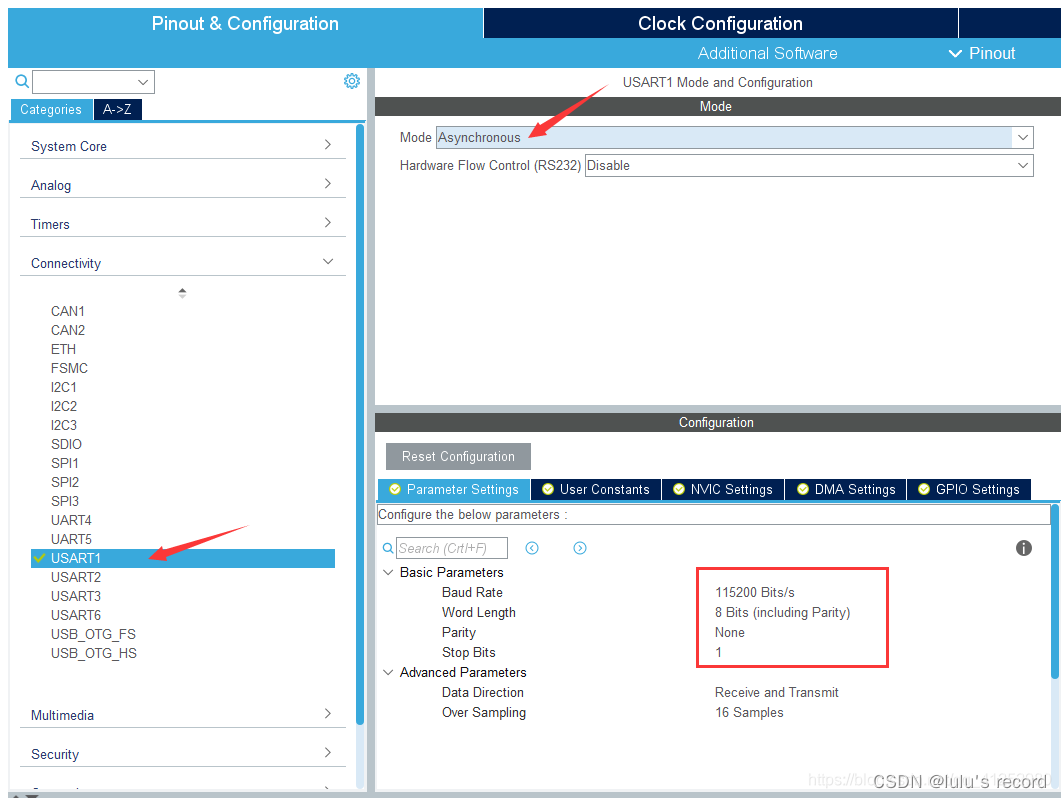
采用异步通信方式,通讯参数此处为默认值,按需要更改。
8.FreeRtos
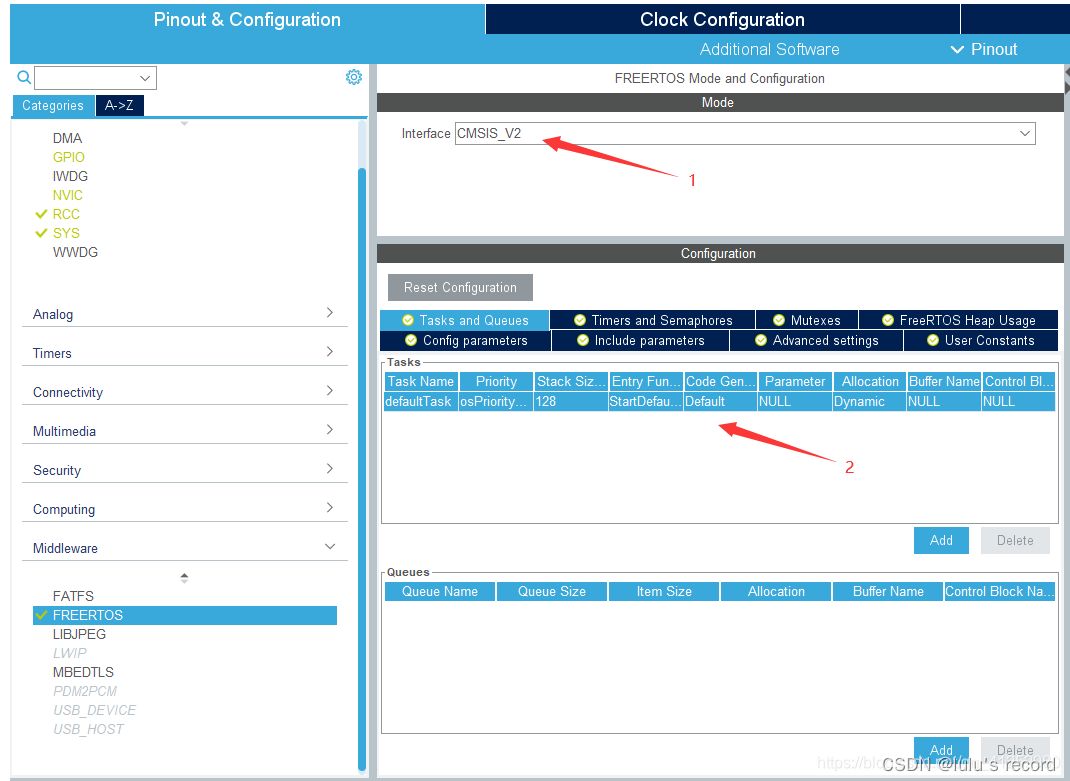
在1处选择FreeRtos版本,有CMSIS_V1和CMSIS_V2两个版本可供选择
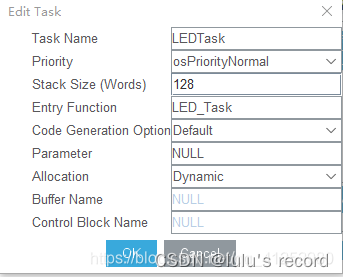
Tasks and Queues一栏中可创建任务函数,双击2处:
Task Name:任务名
Priority:任务优先级
Stack Size:分配堆栈大小
Entry Function:任务函数名
9.NVIC
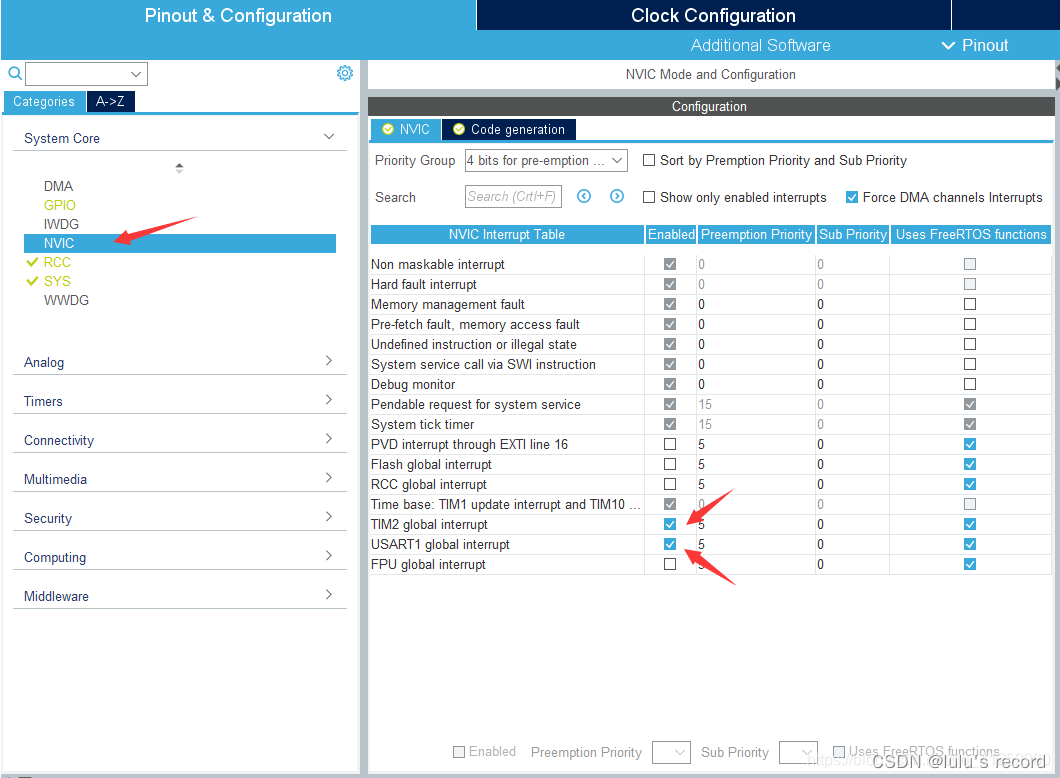
使能定时器2和串口1的中断
10.GPIO
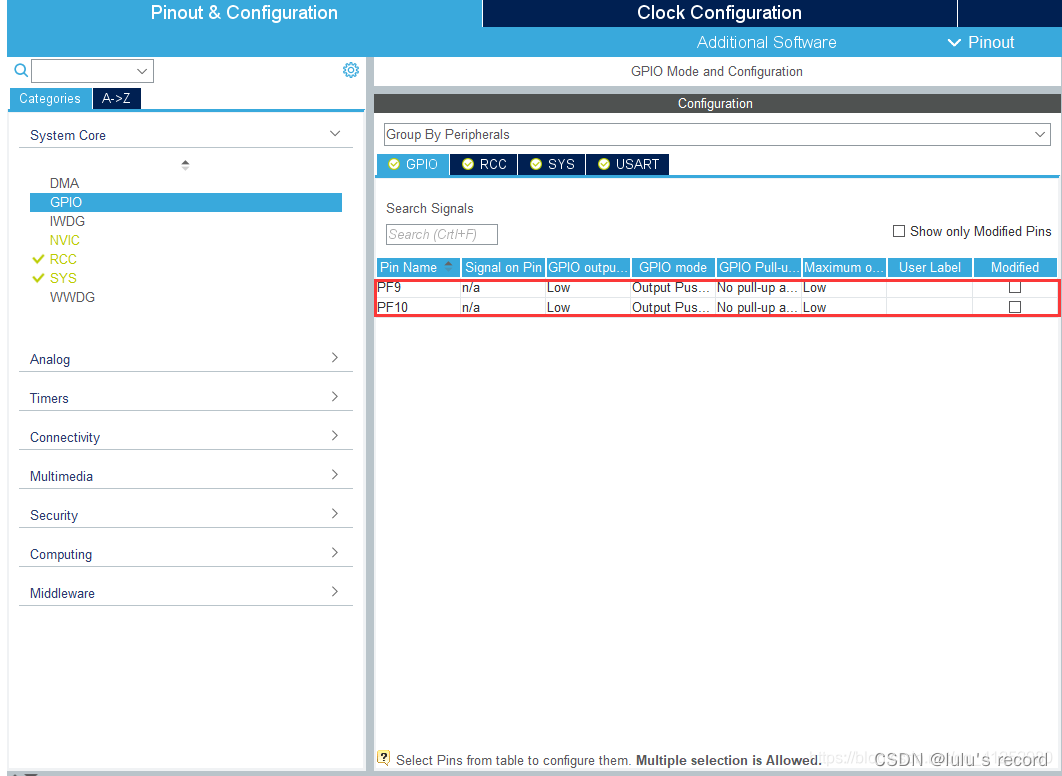
探索者开发板上PF9,PF10两个引脚控制LED灯,所以此处将PF9,PF10设置为输出引脚
11.Porject Manager

此处工程文件名自定义,IDE选择MDK-ARM,注意工程路径中不要有中文,不然STM32CubeMX会在生成项目时会报错
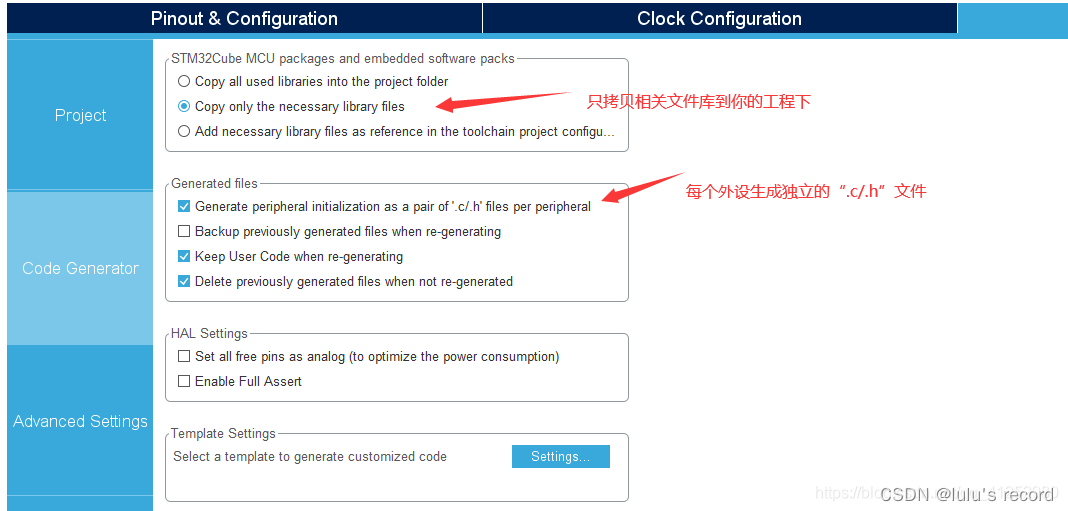
12.Code Generator
13.GENERATE CODE
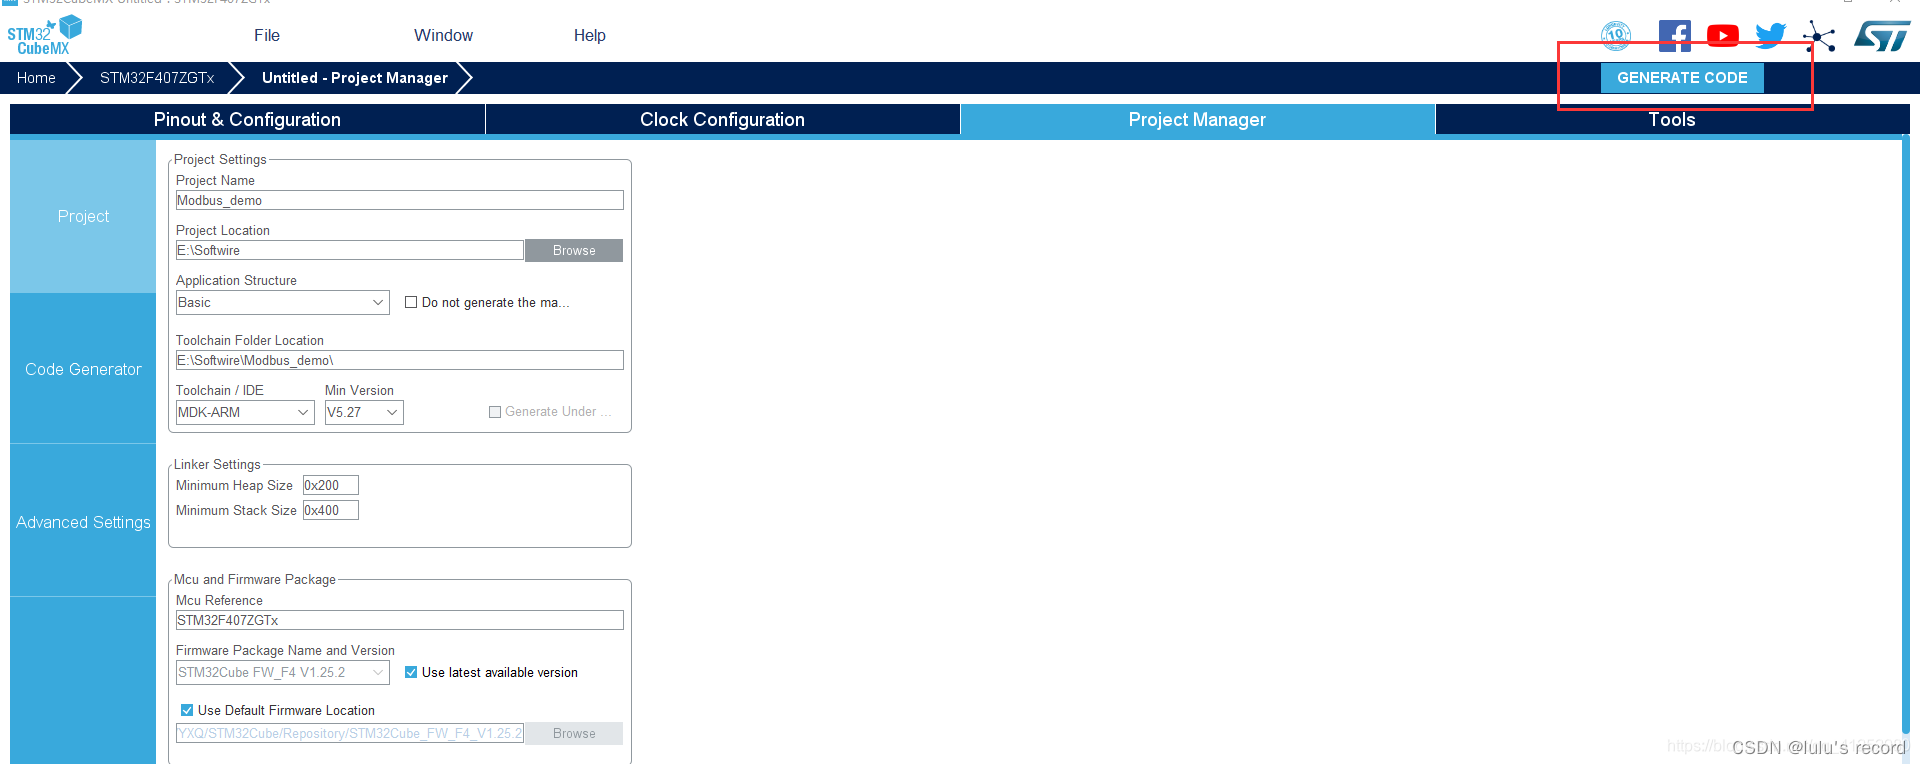
到此处基础STM32Cubemx工程文件配置完成
二、FreeModbus工程代码移植
1.将FreeModbus官方源码移植到上述配置的工程文件中
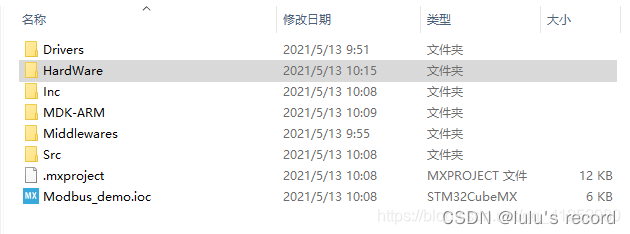
在工程目录文件夹下新建一个HardWare文件夹用于存放外设的库文件

打开事先下载好的freemodbus-v1.6文件夹,需要此次移植需要用到的为上图中所标注出的两处。

在HardWare文件夹下新建一个STModBus文件夹用于存放freemodbus需要移植的文件
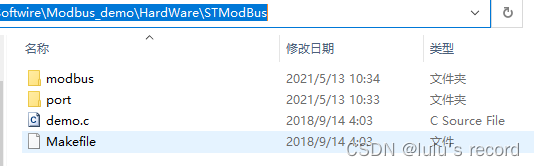
将freemodbus-v1.6文件夹下modbus文件夹整体复制到STModBus中
然后把freemodbus-v1.6\demo\BARE文件夹下的port、demo.c以及Makefile同样也复制到STModBus中
2.修改Keil5中工程配置文件
![]()
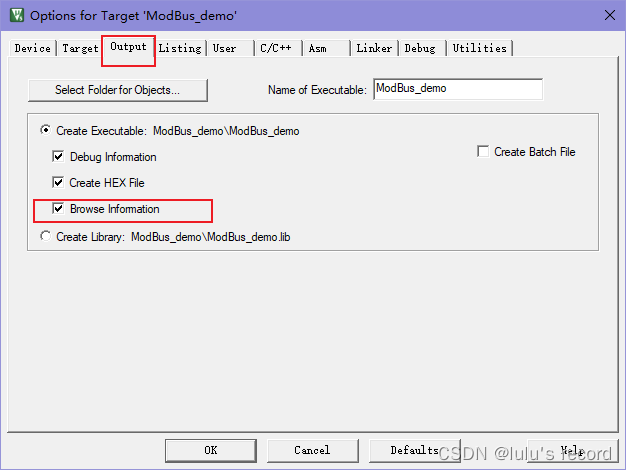
个人习惯,不打钩就可以节省不少编译时间,但是无法使用Go To Definition这个功能


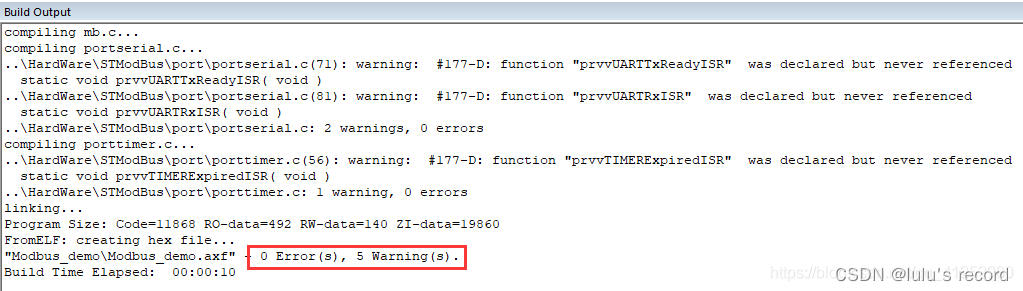
由于STM32CubeMx生成的工程文件默认是不勾选Reset and Run,导致生成了代码,编译也通过了,0 Error(s),0 Waring(s) ,但是点击load的时候程序却不运行,需要手动复位一下。
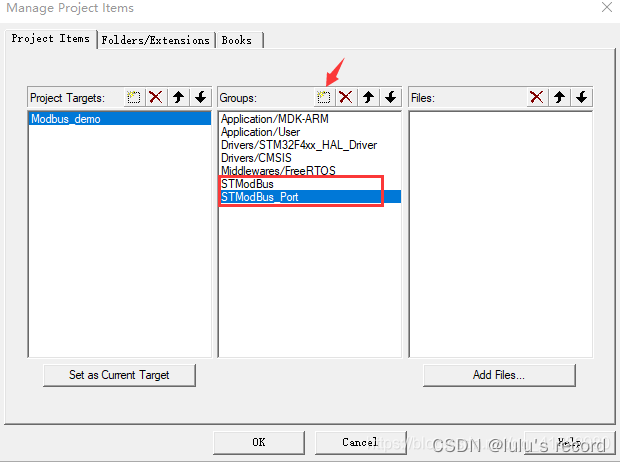
点击此处,增加STModBus以及STModBus_Port这两个组
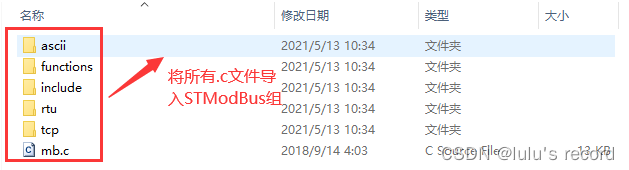
将Modbus_demo\HardWare\STModBus\modbus目录下所有.c文件以及Modbus_demo\HardWare\STModBus目录下demo.c文件导入STModBus组
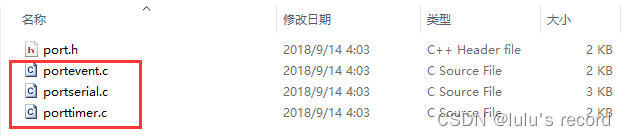
将Modbus_demo\HardWare\STModBus\port目录下portevent.c、portserial.c、porttimer.c文件导入STModBus_Port组

添加完毕后如上图所示
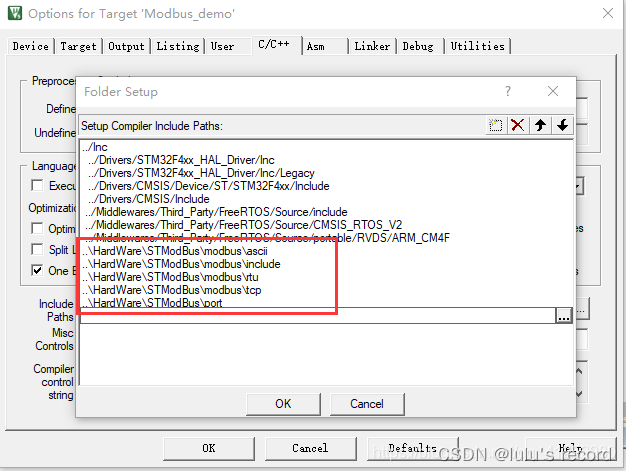
将前面移植的文件夹添加到头文件路径中
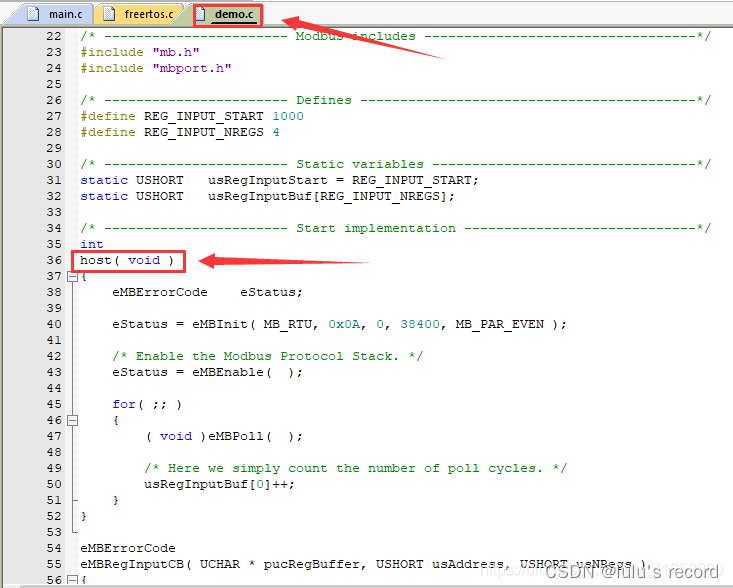
修改demo.c的main函数名为host,然后编译,此时已经可以编译通过。
3.FreeModBus配置以及修改
(1)修改portserial.c文件
#include "port.h"
/* ----------------------- 新增 STM32  includes ----------------------------------*/
#include "stm32f4xx_hal.h"
#include "usart.h"/* ----------------------- Modbus includes ----------------------------------*/
#include "mb.h"
#include "mbport.h"/* ----------------------- static functions ---------------------------------*/
//将此处的静态函数声明注释掉
//static void prvvUARTTxReadyISR( void );
//static void prvvUARTRxISR( void );/* ----------------------- Start implementation -----------------------------*/
void
vMBPortSerialEnable( BOOL xRxEnable, BOOL xTxEnable )
{//该函数实现[STM32]串口发送中断和接收中断的使能。/* If xRXEnable enable serial receive interrupts. If xTxENable enable* transmitter empty interrupts.*/if (xRxEnable){__HAL_UART_ENABLE_IT(&huart1,UART_IT_RXNE);	}else{__HAL_UART_DISABLE_IT(&huart1,UART_IT_RXNE);}if (xTxEnable){__HAL_UART_ENABLE_IT(&huart1,UART_IT_TXE);}else{__HAL_UART_DISABLE_IT(&huart1,UART_IT_TXE);}}BOOL
xMBPortSerialInit( UCHAR ucPORT, ULONG ulBaudRate, UCHAR ucDataBits, eMBParity eParity )
{//该函数对UART串口进行初始化,由eMBRTUInit函数进行调用。在cubeMX中已经配置完成,故不需要配置直接返回TRUE即可return TRUE;
}BOOL
xMBPortSerialPutByte( CHAR ucByte )
{//串口发送函数,将STM32串口发送函数进行封装,供协议栈使用,在UARTs传输缓冲区中放置一个字节的代码/* Put a byte in the UARTs transmit buffer. This function is called* by the protocol stack if pxMBFrameCBTransmitterEmpty( ) has been* called. */if(HAL_UART_Transmit (&huart1 ,(uint8_t *)&ucByte,1,0x01) != HAL_OK )return FALSE;elsereturn TRUE;
}BOOL
xMBPortSerialGetByte( CHAR * pucByte )
{//串口接收函数,将STM32串口接收函数进行封装,供协议栈使用,返回UARTs接收缓冲区中的字节的代码/* Return the byte in the UARTs receive buffer. This function is called* by the protocol stack after pxMBFrameCBByteReceived( ) has been called.*/if(HAL_UART_Receive (&huart1 ,(uint8_t *)pucByte,1,0x01) != HAL_OK )return FALSE;elsereturn TRUE;
}/* Create an interrupt handler for the transmit buffer empty interrupt* (or an equivalent) for your target processor. This function should then* call pxMBFrameCBTransmitterEmpty( ) which tells the protocol stack that* a new character can be sent. The protocol stack will then call * xMBPortSerialPutByte( ) to send the character.*/
//把static修饰词注释,方便在串口中断使用
//static
void prvvUARTTxReadyISR( void )
{pxMBFrameCBTransmitterEmpty(  );
}/* Create an interrupt handler for the receive interrupt for your target* processor. This function should then call pxMBFrameCBByteReceived( ). The* protocol stack will then call xMBPortSerialGetByte( ) to retrieve the* character.*/
//static
void prvvUARTRxISR( void )
{pxMBFrameCBByteReceived(  );
}
(2)修改porttimer.c文件
/* ----------------------- Platform includes --------------------------------*/
#include "port.h"/* ----------------------- STM32  includes ----------------------------------*/
//引入所需要的头文件
#include "stm32f4xx_hal.h"
#include "tim.h"/* ----------------------- Modbus includes ----------------------------------*/
#include "mb.h"
#include "mbport.h"/* ----------------------- static functions ---------------------------------*/
//将此处的静态函数声明注释掉
//static void prvvTIMERExpiredISR( void );/* ----------------------- Start implementation -----------------------------*/
BOOL
xMBPortTimersInit( USHORT usTim1Timerout50us )
{//定时器初始化函数,初始化定时器50us一次中断,已经在cubeMX设置过了,直接返回True即可return TRUE;
}inline void
vMBPortTimersEnable(  )
{//使能定时器中断,此处使用的是TIM2,所以为&htim2/* Enable the timer with the timeout passed to xMBPortTimersInit( ) */__HAL_TIM_CLEAR_IT(&htim2,TIM_IT_UPDATE);__HAL_TIM_ENABLE_IT(&htim2,TIM_IT_UPDATE);__HAL_TIM_SET_COUNTER(&htim2,0);__HAL_TIM_ENABLE(&htim2);
}inline void
vMBPortTimersDisable(  )
{//禁止定时器中断,禁用任何挂起的定时器/* Disable any pending timers. */__HAL_TIM_DISABLE(&htim2);__HAL_TIM_SET_COUNTER(&htim2,0);__HAL_TIM_DISABLE_IT(&htim2,TIM_IT_UPDATE);__HAL_TIM_CLEAR_IT(&htim2,TIM_IT_UPDATE);
}/* Create an ISR which is called whenever the timer has expired. This function* must then call pxMBPortCBTimerExpired( ) to notify the protocol stack that* the timer has expired.*/
//把static修饰词注释,方便在中断内使用
//static
void prvvTIMERExpiredISR( void )
{( void )pxMBPortCBTimerExpired(  );
}
(3)修改port.h文件
#ifndef _PORT_H
#define _PORT_H#include <assert.h>
#include <inttypes.h>#include "stm32f4xx_hal.h" //头文件也需要修改,包含stm32的头文件#define	INLINE                      inline
#define PR_BEGIN_EXTERN_C           extern "C" {
#define	PR_END_EXTERN_C             }//#define ENTER_CRITICAL_SECTION( )
//#define EXIT_CRITICAL_SECTION( )
//开关总中断代码,这里和平台相关的有一个,就是进出临界区的定义,不同的MCU的定义不同,STM32修改如下:
#define ENTER_CRITICAL_SECTION( )   __set_PRIMASK(1) //关总中断
#define EXIT_CRITICAL_SECTION( )    __set_PRIMASK(0) //开总中断typedef uint8_t BOOL;typedef unsigned char UCHAR;
typedef char CHAR;typedef uint16_t USHORT;
typedef int16_t SHORT;typedef uint32_t ULONG;
typedef int32_t LONG;#ifndef TRUE
#define TRUE            1
#endif#ifndef FALSE
#define FALSE           0
#endif#endif
(4)修改stm32f4xx_it.c文件
由于STM32CubeMX在每次生成代码后会将不按规范要求编写代码的区域对代码做删除处理,所以在对STM32CubeMX所生成的文件进行修改时,切记要在用户区内编写用户代码!切记要在用户区内编写用户代码!切记要在用户区内编写用户代码!重要的事说三遍!
/* USER CODE BEGIN Header */
/********************************************************************************* @file stm32f4xx_it.c* @brief Interrupt Service Routines.******************************************************************************* @attention** <h2><center>© Copyright (c) 2023 STMicroelectronics.* All rights reserved.</center></h2>** This software component is licensed by ST under Ultimate Liberty license* SLA0044, the "License"; You may not use this file except in compliance with* the License. You may obtain a copy of the License at:* www.st.com/SLA0044********************************************************************************/
/* USER CODE END Header *//* Includes ------------------------------------------------------------------*/
#include "main.h"
#include "stm32f4xx_it.h"
/* Private includes ----------------------------------------------------------*/
/* USER CODE BEGIN Includes */
/* USER CODE END Includes *//* Private typedef -----------------------------------------------------------*/
/* USER CODE BEGIN TD *//* USER CODE END TD *//* Private define ------------------------------------------------------------*/
/* USER CODE BEGIN PD *//* USER CODE END PD *//* Private macro -------------------------------------------------------------*/
/* USER CODE BEGIN PM *//* USER CODE END PM *//* Private variables ---------------------------------------------------------*/
/* USER CODE BEGIN PV *//* USER CODE END PV *//* Private function prototypes -----------------------------------------------*/
/* USER CODE BEGIN PFP */
extern void prvvUARTTxReadyISR(void);
extern void prvvUARTRxISR(void);
/* USER CODE END PFP *//* Private user code ---------------------------------------------------------*/
/* USER CODE BEGIN 0 *//* USER CODE END 0 *//* External variables --------------------------------------------------------*/
extern TIM_HandleTypeDef htim2;
extern UART_HandleTypeDef huart1;
extern TIM_HandleTypeDef htim10;/* USER CODE BEGIN EV *//* USER CODE END EV *//******************************************************************************/
/* Cortex-M4 Processor Interruption and Exception Handlers */
/******************************************************************************/
/*** @brief This function handles Non maskable interrupt.*/
void NMI_Handler(void)
{/* USER CODE BEGIN NonMaskableInt_IRQn 0 *//* USER CODE END NonMaskableInt_IRQn 0 *//* USER CODE BEGIN NonMaskableInt_IRQn 1 */while (1){}/* USER CODE END NonMaskableInt_IRQn 1 */
}/*** @brief This function handles Hard fault interrupt.*/
void HardFault_Handler(void)
{/* USER CODE BEGIN HardFault_IRQn 0 *//* USER CODE END HardFault_IRQn 0 */while (1){/* USER CODE BEGIN W1_HardFault_IRQn 0 *//* USER CODE END W1_HardFault_IRQn 0 */}
}/*** @brief This function handles Memory management fault.*/
void MemManage_Handler(void)
{/* USER CODE BEGIN MemoryManagement_IRQn 0 *//* USER CODE END MemoryManagement_IRQn 0 */while (1){/* USER CODE BEGIN W1_MemoryManagement_IRQn 0 *//* USER CODE END W1_MemoryManagement_IRQn 0 */}
}/*** @brief This function handles Pre-fetch fault, memory access fault.*/
void BusFault_Handler(void)
{/* USER CODE BEGIN BusFault_IRQn 0 *//* USER CODE END BusFault_IRQn 0 */while (1){/* USER CODE BEGIN W1_BusFault_IRQn 0 *//* USER CODE END W1_BusFault_IRQn 0 */}
}/*** @brief This function handles Undefined instruction or illegal state.*/
void UsageFault_Handler(void)
{/* USER CODE BEGIN UsageFault_IRQn 0 *//* USER CODE END UsageFault_IRQn 0 */while (1){/* USER CODE BEGIN W1_UsageFault_IRQn 0 *//* USER CODE END W1_UsageFault_IRQn 0 */}
}/*** @brief This function handles Debug monitor.*/
void DebugMon_Handler(void)
{/* USER CODE BEGIN DebugMonitor_IRQn 0 *//* USER CODE END DebugMonitor_IRQn 0 *//* USER CODE BEGIN DebugMonitor_IRQn 1 *//* USER CODE END DebugMonitor_IRQn 1 */
}/******************************************************************************/
/* STM32F4xx Peripheral Interrupt Handlers */
/* Add here the Interrupt Handlers for the used peripherals. */
/* For the available peripheral interrupt handler names, */
/* please refer to the startup file (startup_stm32f4xx.s). */
/******************************************************************************//*** @brief This function handles TIM1 update interrupt and TIM10 global interrupt.*/
void TIM1_UP_TIM10_IRQHandler(void)
{/* USER CODE BEGIN TIM1_UP_TIM10_IRQn 0 *//* USER CODE END TIM1_UP_TIM10_IRQn 0 */HAL_TIM_IRQHandler(&htim10);/* USER CODE BEGIN TIM1_UP_TIM10_IRQn 1 *//* USER CODE END TIM1_UP_TIM10_IRQn 1 */
}/*** @brief This function handles TIM2 global interrupt.*/
void TIM2_IRQHandler(void)
{/* USER CODE BEGIN TIM2_IRQn 0 *//* USER CODE END TIM2_IRQn 0 */HAL_TIM_IRQHandler(&htim2);/* USER CODE BEGIN TIM2_IRQn 1 *//* USER CODE END TIM2_IRQn 1 */
}/*** @brief This function handles USART1 global interrupt.*/
void USART1_IRQHandler(void)
{/* USER CODE BEGIN USART1_IRQn 0 *//* USER CODE END USART1_IRQn 0 */HAL_UART_IRQHandler(&huart1);/* USER CODE BEGIN USART1_IRQn 1 */if(__HAL_UART_GET_IT_SOURCE(&huart1, UART_IT_RXNE)!= RESET){prvvUARTRxISR();//接收中断}if(__HAL_UART_GET_IT_SOURCE(&huart1, UART_IT_TXE)!= RESET) {prvvUARTTxReadyISR();//发送中断}HAL_NVIC_ClearPendingIRQ(USART1_IRQn);HAL_UART_IRQHandler(&huart1);/* USER CODE END USART1_IRQn 1 */
}/* USER CODE BEGIN 1 *//* USER CODE END 1 */
/************************ (C) COPYRIGHT STMicroelectronics *****END OF FILE****/
(5)修改demo.c文件
/** FreeModbus Libary: BARE Demo Application* Copyright (C) 2006 Christian Walter <wolti@sil.at>** This program is free software; you can redistribute it and/or modify* it under the terms of the GNU General Public License as published by* the Free Software Foundation; either version 2 of the License, or* (at your option) any later version.** This program is distributed in the hope that it will be useful,* but WITHOUT ANY WARRANTY; without even the implied warranty of* MERCHANTABILITY or FITNESS FOR A PARTICULAR PURPOSE. See the* GNU General Public License for more details.** You should have received a copy of the GNU General Public License* along with this program; if not, write to the Free Software* Foundation, Inc., 51 Franklin St, Fifth Floor, Boston, MA 02110-1301 USA** File: $Id$*//* ----------------------- Modbus includes ----------------------------------*/
#include "mb.h"
#include "mbport.h"/* ----------------------- Defines ------------------------------------------*/
#define REG_INPUT_START 1
#define REG_INPUT_NREGS 10#define REG_HOLDING_START 1
#define REG_HOLDING_NREGS 100
/* ----------------------- Static variables ---------------------------------*/
static USHORT usRegInputStart = REG_INPUT_START;
//static USHORT usRegInputBuf[REG_INPUT_NREGS];
static USHORT usRegHoldingStart = REG_HOLDING_START;
/* ----------------------- Variables -----------------------------*/
uint16_t usRegHoldingBuf[REG_HOLDING_NREGS];
uint16_t usRegInputBuf[REG_INPUT_NREGS];
uint16_t InputBuff[5];
/* ----------------------- Start implementation -----------------------------*/
//int
//host( void )
//{
// eMBErrorCode eStatus;// eStatus = eMBInit( MB_RTU, 0x0A, 0, 38400, MB_PAR_EVEN );// /* Enable the Modbus Protocol Stack. */
// eStatus = eMBEnable( );// for( ;; )
// {
// ( void )eMBPoll( );// /* Here we simply count the number of poll cycles. */
// usRegInputBuf[0]++;
// }
//}eMBErrorCode
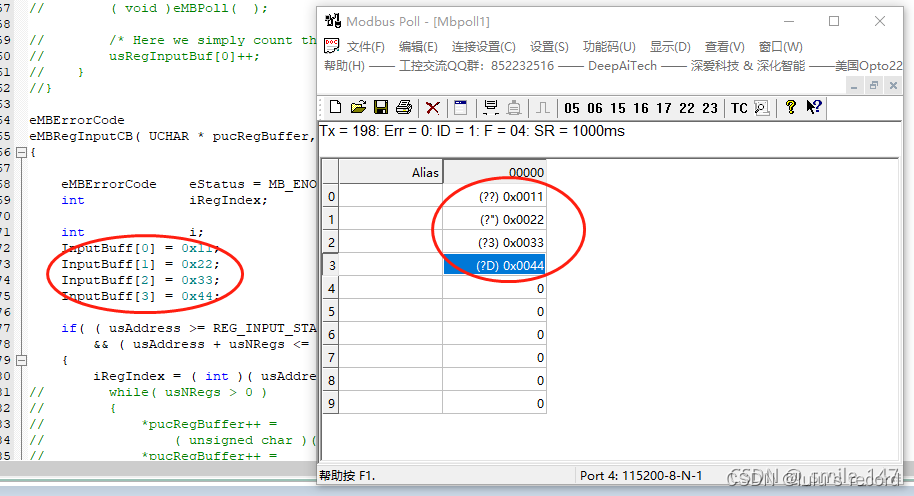
eMBRegInputCB( UCHAR * pucRegBuffer, USHORT usAddress, USHORT usNRegs )//读寄存器的值
{eMBErrorCode eStatus = MB_ENOERR;int iRegIndex;/*----------------------------change part------------------------------*/int i;InputBuff[0]=0x31;InputBuff[1]=0x32;InputBuff[2]=0x33;InputBuff[3]=0x34;/*----------------------------change part------------------------------*/if( ( usAddress >= REG_INPUT_START )&& ( usAddress + usNRegs <= REG_INPUT_START + REG_INPUT_NREGS ) ){iRegIndex = ( int )( usAddress - usRegInputStart );
// while( usNRegs > 0 )
// {
// *pucRegBuffer++ =
// ( unsigned char )( usRegInputBuf[iRegIndex] >> 8 );
// *pucRegBuffer++ =
// ( unsigned char )( usRegInputBuf[iRegIndex] & 0xFF );
// iRegIndex++;
// usNRegs--;
// }for(i=0;i<usNRegs;i++){*pucRegBuffer=InputBuff[i+usAddress-1]>>8;pucRegBuffer++;*pucRegBuffer=InputBuff[i+usAddress-1]&0xff;pucRegBuffer++;}}else{eStatus = MB_ENOREG;}return eStatus;
}eMBErrorCode
eMBRegHoldingCB( UCHAR * pucRegBuffer, USHORT usAddress, USHORT usNRegs, //写入寄存器的值eMBRegisterMode eMode )
{eMBErrorCode eStatus = MB_ENOERR;int iRegIndex;if( ( usAddress >= REG_HOLDING_START ) && ( usAddress + usNRegs <= REG_HOLDING_START + REG_HOLDING_NREGS ) ){iRegIndex = ( int )( usAddress - usRegHoldingStart );switch ( eMode ){case MB_REG_READ:while( usNRegs > 0 ){*pucRegBuffer++ = ( unsigned char )( usRegHoldingBuf[iRegIndex] >> 8 );*pucRegBuffer++ = ( unsigned char )( usRegHoldingBuf[iRegIndex] & 0xFF );iRegIndex++;usNRegs--;}break;case MB_REG_WRITE:while( usNRegs > 0 ){usRegHoldingBuf[iRegIndex] = *pucRegBuffer++ << 8;usRegHoldingBuf[iRegIndex] |= *pucRegBuffer++;iRegIndex++;usNRegs--;}}}else{eStatus = MB_ENOREG;}return eStatus;
// return MB_ENOREG;
}eMBErrorCode
eMBRegCoilsCB( UCHAR * pucRegBuffer, USHORT usAddress, USHORT usNCoils,//读写多个开关量的值eMBRegisterMode eMode )
{return MB_ENOREG;
}eMBErrorCode
eMBRegDiscreteCB( UCHAR * pucRegBuffer, USHORT usAddress, USHORT usNDiscrete )//读多个离散开关量
{return MB_ENOREG;
}
(6)修改main.c文件
/* USER CODE BEGIN Header */
/********************************************************************************* @file : main.c* @brief : Main program body******************************************************************************* @attention** <h2><center>© Copyright (c) 2023 STMicroelectronics.* All rights reserved.</center></h2>** This software component is licensed by ST under Ultimate Liberty license* SLA0044, the "License"; You may not use this file except in compliance with* the License. You may obtain a copy of the License at:* www.st.com/SLA0044********************************************************************************/
/* USER CODE END Header */
/* Includes ------------------------------------------------------------------*/
#include "main.h"
#include "cmsis_os.h"
#include "tim.h"
#include "usart.h"
#include "gpio.h"/* Private includes ----------------------------------------------------------*/
/* USER CODE BEGIN Includes */
#include "mb.h"
#include "mbport.h"
/* USER CODE END Includes *//* Private typedef -----------------------------------------------------------*/
/* USER CODE BEGIN PTD *//* USER CODE END PTD *//* Private define ------------------------------------------------------------*/
/* USER CODE BEGIN PD */
/* USER CODE END PD *//* Private macro -------------------------------------------------------------*/
/* USER CODE BEGIN PM *//* USER CODE END PM *//* Private variables ---------------------------------------------------------*//* USER CODE BEGIN PV *//* USER CODE END PV *//* Private function prototypes -----------------------------------------------*/
void SystemClock_Config(void);
void MX_FREERTOS_Init(void);
/* USER CODE BEGIN PFP */
extern void prvvTIMERExpiredISR( void );
/* USER CODE END PFP *//* Private user code ---------------------------------------------------------*/
/* USER CODE BEGIN 0 *//* USER CODE END 0 *//*** @brief The application entry point.* @retval int*/
int main(void)
{/* USER CODE BEGIN 1 *//* USER CODE END 1 *//* MCU Configuration--------------------------------------------------------*//* Reset of all peripherals, Initializes the Flash interface and the Systick. */HAL_Init();/* USER CODE BEGIN Init *//* USER CODE END Init *//* Configure the system clock */SystemClock_Config();/* USER CODE BEGIN SysInit *//* USER CODE END SysInit *//* Initialize all configured peripherals */MX_GPIO_Init();MX_TIM2_Init();MX_USART1_UART_Init();/* USER CODE BEGIN 2 */eMBInit( MB_RTU,0x01, 1, 115200, MB_PAR_NONE);//选择要使用的模式及设置参数,如果选择的是TCP模式,需要调用到eMBErrorCode eMBTCPInit( USHORT usTCPPort )只需要制定端口号即可。eMBEnable( );//使能modbus协议栈/* USER CODE END 2 *//* Init scheduler */osKernelInitialize(); /* Call init function for freertos objects (in freertos.c) */MX_FREERTOS_Init();/* Start scheduler */osKernelStart();/* We should never get here as control is now taken by the scheduler *//* Infinite loop *//* USER CODE BEGIN WHILE */while (1){/* USER CODE END WHILE *//* USER CODE BEGIN 3 */}/* USER CODE END 3 */
}/*** @brief System Clock Configuration* @retval None*/
void SystemClock_Config(void)
{RCC_OscInitTypeDef RCC_OscInitStruct = {0};RCC_ClkInitTypeDef RCC_ClkInitStruct = {0};/** Configure the main internal regulator output voltage*/__HAL_RCC_PWR_CLK_ENABLE();__HAL_PWR_VOLTAGESCALING_CONFIG(PWR_REGULATOR_VOLTAGE_SCALE1);/** Initializes the RCC Oscillators according to the specified parameters* in the RCC_OscInitTypeDef structure.*/RCC_OscInitStruct.OscillatorType = RCC_OSCILLATORTYPE_HSE;RCC_OscInitStruct.HSEState = RCC_HSE_ON;RCC_OscInitStruct.PLL.PLLState = RCC_PLL_ON;RCC_OscInitStruct.PLL.PLLSource = RCC_PLLSOURCE_HSE;RCC_OscInitStruct.PLL.PLLM = 4;RCC_OscInitStruct.PLL.PLLN = 168;RCC_OscInitStruct.PLL.PLLP = RCC_PLLP_DIV2;RCC_OscInitStruct.PLL.PLLQ = 4;if (HAL_RCC_OscConfig(&RCC_OscInitStruct) != HAL_OK){Error_Handler();}/** Initializes the CPU, AHB and APB buses clocks*/RCC_ClkInitStruct.ClockType = RCC_CLOCKTYPE_HCLK|RCC_CLOCKTYPE_SYSCLK|RCC_CLOCKTYPE_PCLK1|RCC_CLOCKTYPE_PCLK2;RCC_ClkInitStruct.SYSCLKSource = RCC_SYSCLKSOURCE_PLLCLK;RCC_ClkInitStruct.AHBCLKDivider = RCC_SYSCLK_DIV1;RCC_ClkInitStruct.APB1CLKDivider = RCC_HCLK_DIV4;RCC_ClkInitStruct.APB2CLKDivider = RCC_HCLK_DIV2;if (HAL_RCC_ClockConfig(&RCC_ClkInitStruct, FLASH_LATENCY_5) != HAL_OK){Error_Handler();}
}/* USER CODE BEGIN 4 *//* USER CODE END 4 *//*** @brief Period elapsed callback in non blocking mode* @note This function is called when TIM10 interrupt took place, inside* HAL_TIM_IRQHandler(). It makes a direct call to HAL_IncTick() to increment* a global variable "uwTick" used as application time base.* @param htim : TIM handle* @retval None*/
void HAL_TIM_PeriodElapsedCallback(TIM_HandleTypeDef *htim)
{/* USER CODE BEGIN Callback 0 *//* USER CODE END Callback 0 */if (htim->Instance == TIM10) {HAL_IncTick();}/* USER CODE BEGIN Callback 1 */if(htim->Instance == TIM2){prvvTIMERExpiredISR();}/* USER CODE END Callback 1 */
}/*** @brief This function is executed in case of error occurrence.* @retval None*/
void Error_Handler(void)
{/* USER CODE BEGIN Error_Handler_Debug *//* User can add his own implementation to report the HAL error return state */__disable_irq();while (1){}/* USER CODE END Error_Handler_Debug */
}#ifdef USE_FULL_ASSERT
/*** @brief Reports the name of the source file and the source line number* where the assert_param error has occurred.* @param file: pointer to the source file name* @param line: assert_param error line source number* @retval None*/
void assert_failed(uint8_t *file, uint32_t line)
{/* USER CODE BEGIN 6 *//* User can add his own implementation to report the file name and line number,ex: printf("Wrong parameters value: file %s on line %d\r\n", file, line) *//* USER CODE END 6 */
}
#endif /* USE_FULL_ASSERT *//************************ (C) COPYRIGHT STMicroelectronics *****END OF FILE****/
(7)修改freertos.c文件
/* USER CODE BEGIN Header */
/********************************************************************************* File Name : freertos.c* Description : Code for freertos applications******************************************************************************* @attention** <h2><center>© Copyright (c) 2023 STMicroelectronics.* All rights reserved.</center></h2>** This software component is licensed by ST under Ultimate Liberty license* SLA0044, the "License"; You may not use this file except in compliance with* the License. You may obtain a copy of the License at:* www.st.com/SLA0044********************************************************************************/
/* USER CODE END Header *//* Includes ------------------------------------------------------------------*/
#include "FreeRTOS.h"
#include "task.h"
#include "main.h"
#include "cmsis_os.h"/* Private includes ----------------------------------------------------------*/
/* USER CODE BEGIN Includes */
#include "mb.h"
#include "mbport.h"
/* USER CODE END Includes *//* Private typedef -----------------------------------------------------------*/
/* USER CODE BEGIN PTD *//* USER CODE END PTD *//* Private define ------------------------------------------------------------*/
/* USER CODE BEGIN PD *//* USER CODE END PD *//* Private macro -------------------------------------------------------------*/
/* USER CODE BEGIN PM *//* USER CODE END PM *//* Private variables ---------------------------------------------------------*/
/* USER CODE BEGIN Variables *//* USER CODE END Variables */
/* Definitions for defaultTask */
//osThreadId_t defaultTaskHandle;
//const osThreadAttr_t defaultTask_attributes = {
// .name = "defaultTask",
// .stack_size = 128 * 4,
// .priority = (osPriority_t) osPriorityNormal,
//};
/* Definitions for LEDTask */
osThreadId_t LEDTaskHandle;
const osThreadAttr_t LEDTask_attributes = {.name = "LEDTask",.stack_size = 128 * 4,.priority = (osPriority_t) osPriorityLow,
};
/* Definitions for LEDTask02 */
osThreadId_t LEDTask02Handle;
const osThreadAttr_t LEDTask02_attributes = {.name = "LEDTask02",.stack_size = 128 * 4,.priority = (osPriority_t) osPriorityNormal,
};/* Private function prototypes -----------------------------------------------*/
/* USER CODE BEGIN FunctionPrototypes *//* USER CODE END FunctionPrototypes *///void StartDefaultTask(void *argument);
void LED_Task(void *argument);
void StartTask03(void *argument);void MX_FREERTOS_Init(void); /* (MISRA C 2004 rule 8.1) *//*** @brief FreeRTOS initialization* @param None* @retval None*/
void MX_FREERTOS_Init(void) {/* USER CODE BEGIN Init *//* USER CODE END Init *//* USER CODE BEGIN RTOS_MUTEX *//* add mutexes, ... *//* USER CODE END RTOS_MUTEX *//* USER CODE BEGIN RTOS_SEMAPHORES *//* add semaphores, ... *//* USER CODE END RTOS_SEMAPHORES *//* USER CODE BEGIN RTOS_TIMERS *//* start timers, add new ones, ... *//* USER CODE END RTOS_TIMERS *//* USER CODE BEGIN RTOS_QUEUES *//* add queues, ... *//* USER CODE END RTOS_QUEUES *//* Create the thread(s) *//* creation of defaultTask */
// defaultTaskHandle = osThreadNew(StartDefaultTask, NULL, &defaultTask_attributes);/* creation of LEDTask */LEDTaskHandle = osThreadNew(LED_Task, NULL, &LEDTask_attributes);/* creation of LEDTask02 */LEDTask02Handle = osThreadNew(StartTask03, NULL, &LEDTask02_attributes);/* USER CODE BEGIN RTOS_THREADS *//* add threads, ... *//* USER CODE END RTOS_THREADS *//* USER CODE BEGIN RTOS_EVENTS *//* add events, ... *//* USER CODE END RTOS_EVENTS */}/* USER CODE BEGIN Header_StartDefaultTask */
/*** @brief Function implementing the defaultTask thread.* @param argument: Not used* @retval None*/
/* USER CODE END Header_StartDefaultTask */
//void StartDefaultTask(void *argument)
//{
// /* USER CODE BEGIN StartDefaultTask */
// /* Infinite loop */
// osDelay(1);
// /* USER CODE END StartDefaultTask */
//}/* USER CODE BEGIN Header_LED_Task */
/**
* @brief Function implementing the LEDTask thread.
* @param argument: Not used
* @retval None
*/
/* USER CODE END Header_LED_Task */
void LED_Task(void *argument)
{/* USER CODE BEGIN LED_Task *//* Infinite loop */for(;;){eMBPoll();//用来检测协议栈状态用于处理消息osDelay(10);}/* USER CODE END LED_Task */
}/* USER CODE BEGIN Header_StartTask03 */
/**
* @brief Function implementing the LEDTask02 thread.
* @param argument: Not used
* @retval None
*/
/* USER CODE END Header_StartTask03 */
void StartTask03(void *argument)
{/* USER CODE BEGIN StartTask03 */UCHAR pucRegBuffer1[4] = {0xFF,0x01,0x02,0x03};UCHAR pucRegBuffer2[4];for(;;){eMBRegHoldingCB(&pucRegBuffer1[0],1,1,MB_REG_WRITE);eMBRegHoldingCB(&pucRegBuffer2[0],2,1,MB_REG_READ);if( pucRegBuffer2[0] == 0xF1 && pucRegBuffer2[1] == 0x1F){eMBRegHoldingCB(&pucRegBuffer1[2],3,1,MB_REG_WRITE);}osDelay(10);}/* Infinite loop */
// for(;;)
// {
// osDelay(1);
// }/* USER CODE END StartTask03 */
}/* Private application code --------------------------------------------------*/
/* USER CODE BEGIN Application *//* USER CODE END Application *//************************ (C) COPYRIGHT STMicroelectronics *****END OF FILE****/
到这里STM32的从机代码就写好了,然后编译下载
三、验证
电脑端打开Modbus Poll 软件-->连接设置-->连接,原则相应配置,确保与自己程序要能对应上,然后点击确认


点击软件上方的设置-->读写定义,如下配置

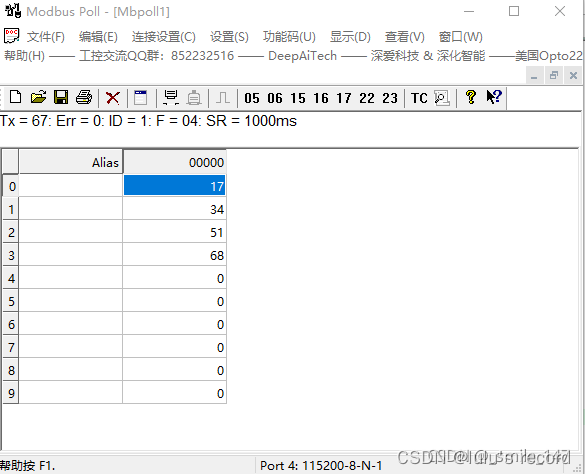
已经能正确接收到输入寄存器的值
然后依次进行如下操作

把数值显示改成16进制,这样看的会更加明显,
ROS
一、安装pymodbus
PyModbus - A Python Modbus Stack — PyModbus 3.6.2 documentation
Install with github
On github, fork GitHub - pymodbus-dev/pymodbus: A full modbus protocol written in python
Clone the source, and make a virtual environment:
-
Fetch pyModbus source code
cd ~ git clone git://github.com/pymodbus-dev/pymodbus cd pymodbus && git checkout v3.5.2 -
Prepare install requirements
sudo apt install python3-pip
pip install -r requirements.txt
If errors occur when executing above commands and these errors are related to versions of
docutils, the following commands may help a little.pip install --upgrade docutils==0.18.1 pip install -r requirements.txt -
Install pyModbus
pip install -e . pre-commit install -
Make a confirmation about the installation
pip show pymodbus - make a virtual environmen
-
python3 -m venv .venv
-
Activate the virtual environment, this command needs repeated in every new terminal:
source .venv/bin/activate
或者直接在终端中安装。
pip install pymodbus==3.5.2我使用的是第一种方法,因为不知道为什么在我的ROS中直接安装pymodbus时,import头文件时不能识别该包,使用第一种方案,可以直接把路径在头文件中声明。
二、创建一个工作空间
在目录下创建一个名为mb_485_ws的工作空间目录

双击进入该目录,右键在终端中打开

输入下列命令:
其中ROS_prj是根目录下我的ros项目的位置,需要根据实际情况进行变更
mkdir -p ~/ROS_prj/mb_485_ws/src
在该终端中输入catkinmake建立工程文件。
catkin_make在该终端中打开VScode
code .选中src目录,ctrl+shift+B,在弹出的命令框中电机catkin_make_isolated:build的设置按钮:
 将其中的代码替换为,然后保存,这一步的目的是为了使用ctrl+shift+B快捷编译:
{
// 有关 tasks.json 格式的文档,请参见// https://go.microsoft.com/fwlink/?LinkId=733558"version": "2.0.0","tasks": [{"label": "catkin_make:debug", //代表提示的描述性信息"type": "shell",  //可以选择shell或者process,如果是shell代码是在shell里面运行一个命令,如果是process代表作为一个进程来运行"command": "catkin_make",//这个是我们需要运行的命令"args": [],//如果需要在命令后面加一些后缀,可以写在这里,比如-DCATKIN_WHITELIST_PACKAGES=“pac1;pac2”"group": {"kind":"build","isDefault":true},"presentation": {"reveal": "always"//可选always或者silence,代表是否输出信息},"problemMatcher": "$msCompile"}]
}
三、创建一个ROS包
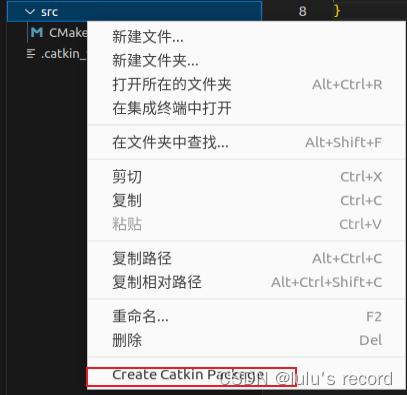
在src上右键 然后选中Create Catkin Package
输入包名mb

输入依赖文件名:

在mb目录下新建一个名为scripts的文件夹。
新建一个名为modbus_485.py的文件
代码如下:
#!/usr/bin/env python
import rospy
from pymodbus.client import ModbusSerialClient as ModbusClient
from pymodbus.exceptions import ModbusExceptionclient = ModbusClient(port='/dev/ttyUSB0', baudrate=115200,timeout=5)try:if client.connect():print("Connected")try:response = client.read_holding_registers(address=0, count=1, slave=1)# slave=1 is importantif not response.isError():print("Register Values: ", hex(response.registers[0]))else:print("Failed to read registers")client.write_register(address=1, value=0xF11F, slave=1)response2 = client.read_holding_registers(address=2, count=1, slave=1)# slave=1 is importantif not response2.isError():print("Register2 Values: ", hex(response2.registers[0]))else:print("Failed to read registers")# print(response.function_code)except ModbusException as ex:print("Modbus Exception:", str(ex))else:print("Failed to connect")finally:client.close()print("Modbus RTU Client Connection Closed")
需要注意的是,在读写命令的时候,必须为slave=1 ,使用unit=1会出现连接不上的情况
使用该代码,预期返回response=0xff01 response2=0x0203
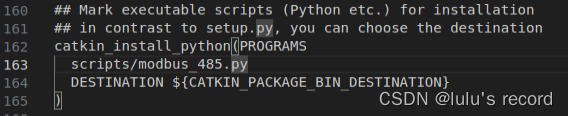
编辑CMakeList,把执行文件加入
此时,ros程序就编写完成了
硬件连接
stm32开发板通过usb连至电脑
在虚拟机中安装mbpollhttps://github.com/epsilonrt/mbpoll
使用以下命令确认是否连接成功
sudo mbpoll -c 1 -t 4:hex -r 1 -1 -b 115200 -s 1 -d 8 -p none /dev/ttyUSB0正常情况下,能返回1号寄存器的正确值:

如果需要权限:
sudo chmod a+rw /dev/ttyUSB0当返回正确值后就说明硬件链路没有问题,运行ros节点即可。
结束~今天也学到了新的知识!!!
这篇关于ROS 使用pymodbus-rtu和stm32从机通信的文章就介绍到这儿,希望我们推荐的文章对编程师们有所帮助!


