本文主要是介绍shadertoy生成PBR场景,希望对大家解决编程问题提供一定的参考价值,需要的开发者们随着小编来一起学习吧!
前言
Shadertoy不支持VBO,因此shadertoy下的建模需要借助SDF(符号距离函数)的方式,渲染借助步进式光线追踪(Ray-marching)算法,结合Blinn-Phong或PBR光照模型,渲染场景。
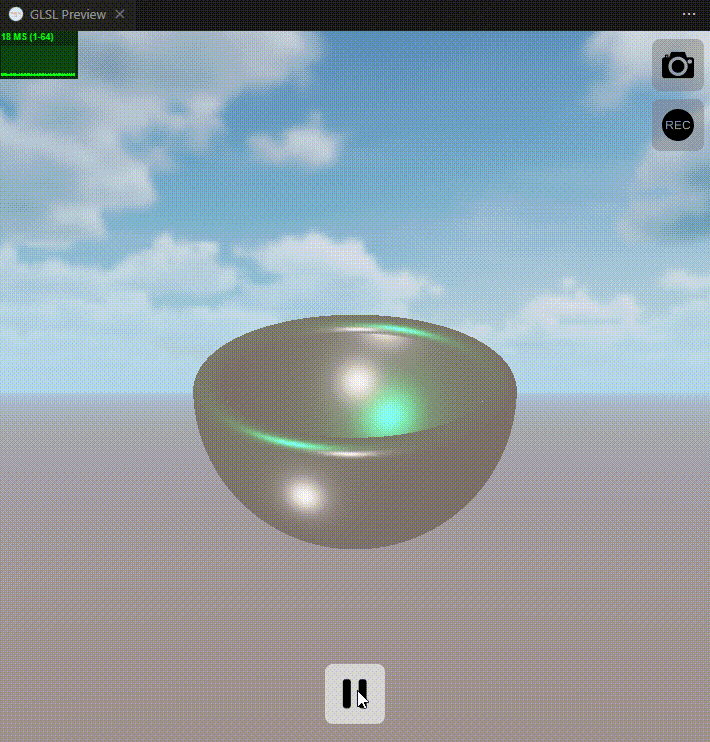
下面是实现效果图:
关键词:
- SDF(符号距离函数)
- Ray-marching算法
- 光照模型:
- Blinn-Phong
- PBR
Shadertoy使用
两种方式使用:
- 在线预览shader:Shadertoy官网
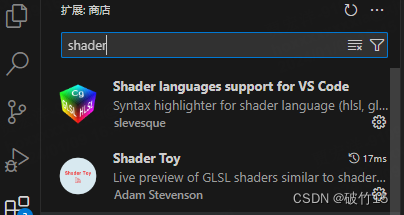
- VSCode安装两个插件,预览shader:
编辑好shader后,右键代码区点击

本文以VSCode下预览shadertoy为例:
添加天空盒
使用iChannelX来加载立方体贴图
#iChannel0 "file://../skybox/skybox_{}.jpg" // Note the wildcard '{}'
#iChannel0::Type "CubeMap"
{}通配符将通过替换为以下任何一组的值来解析
- [ ‘e’, ‘w’, ‘u’, ‘d’, ‘n’, ‘s’ ],
- [ ‘east’, ‘west’, ‘up’, ‘down’, ‘north’, ‘south’ ],
- [ ‘px’, ‘nx’, ‘py’, ‘ny’, ‘pz’, ‘nz’ ]
- [ ‘posx’, ‘negx’, ‘posy’, ‘negy’, ‘posz’, ‘negz’ ].
| CUBE_MAP纹理目标 | 方位 |
|---|---|
| POSITIVE_X | 右 |
| NEGATIVE_X | 左 |
| POSITIVE_Y | 上 |
| NEGATIVE_Y | 下 |
| POSITIVE_Z | 后 |
| NEGATIVE_Z | 前 |
#iChannel0 "file://../skybox/skybox_{}.jpg" // Note the wildcard '{}'
#iChannel0::Type "CubeMap"const int MAX_MARCHING_STEPS = 255;
const float MIN_DIST = 0.0;
const float MAX_DIST = 100.0;
const float EPSILON = 0.0001;
创建简单sdf模型
球体
/*** 中心位于原点半径为1的球体的符号距离函数定义*/
float sphereSDF(vec3 samplePoint) {return length(samplePoint) - 1.0;
}
立方体
/*** Signed distance function for a cube centered at the origin* with width = height = length = 2.0*/
float cubeSDF(vec3 p) {// If d.x < 0, then -1 < p.x < 1, and same logic applies to p.y, p.z// So if all components of d are negative, then p is inside the unit cubevec3 d = abs(p) - vec3(1.0, 1.0, 1.0);// Assuming p is inside the cube, how far is it from the surface?// Result will be negative or zero.float insideDistance = min(max(d.x, max(d.y, d.z)), 0.0);// Assuming p is outside the cube, how far is it from the surface?// Result will be positive or zero.float outsideDistance = length(max(d, 0.0));return insideDistance + outsideDistance;
}
CSG (构造实体)操作
/*
* 构造实体形状(CSG)操作
*/
float intersectSDF(float distA, float distB) {return max(distA, distB);
}float unionSDF(float distA, float distB) {return min(distA, distB);
}float differenceSDF(float distA, float distB) {return max(distA, -distB);
}
SDF描述场景
/*** 用SDF描述场景*/
float sceneSDF(vec3 samplePoint) {// return sphereSDF(samplePoint);float sphereDist = sphereSDF(samplePoint ) ;float cubeDist = cubeSDF(samplePoint);return intersectSDF(cubeDist, sphereDist);
}
简单的光线追踪算法
/*** 返回最短距离函数* * eye: 射线的起点,可理解为相机* marchingDirection: 射线的标准化方向向量* start: 从相机开始的最短距离* end: 最远距离*/
float shortestDistanceToSurface(vec3 eye, vec3 marchingDirection, float start, float end) {float depth = start;for (int i = 0; i < MAX_MARCHING_STEPS; i++) {float dist = sceneSDF(eye + depth * marchingDirection);if (dist < EPSILON) {return depth;}depth += dist;if (depth >= end) {return end;}}return end;
}
根据给定的垂直fov大小盒image大小,计算光追视线的方向
/*** 返回相机的标准化方向向量* * fieldOfView: 垂直视野的角度* size: 输出图像的分辨率* fragCoord: 输出图像中的像素坐标*/
vec3 rayDirection(float fieldOfView, vec2 size, vec2 fragCoord) {vec2 xy = fragCoord - size / 2.0;float z = size.y / tan(radians(fieldOfView) / 2.0);return normalize(vec3(xy, -z));
}
sdf距离场下利用距离梯度近似计算物体上某一点的法线
/*** 对于那些SDF求出来在曲面上的点求标准化的法线向量*/
vec3 estimateNormal(vec3 p) {return normalize(vec3(sceneSDF(vec3(p.x + EPSILON, p.y, p.z)) - sceneSDF(vec3(p.x - EPSILON, p.y, p.z)),sceneSDF(vec3(p.x, p.y + EPSILON, p.z)) - sceneSDF(vec3(p.x, p.y - EPSILON, p.z)),sceneSDF(vec3(p.x, p.y, p.z  + EPSILON)) - sceneSDF(vec3(p.x, p.y, p.z - EPSILON))));
}
计算冯氏光照
/*** Lighting contribution of a single point light source via Phong illumination.* * The vec3 returned is the RGB color of the light's contribution.** k_a: 环境色* k_d: 漫反射颜色* k_s: 镜面颜色* alpha: 光泽系数* p: position of point being lit* eye: 相机的位置* lightPos: 光的位置* lightIntensity: 光的颜色/强度** See https://en.wikipedia.org/wiki/Phong_reflection_model#Description*/
vec3 phongContribForLight(vec3 k_d, vec3 k_s, float alpha, vec3 p, vec3 eye, vec3 lightPos, vec3 lightIntensity) {vec3 N = estimateNormal(p);vec3 L = normalize(lightPos - p);vec3 V = normalize(eye - p);vec3 R = normalize(reflect(-L, N));float dotLN = dot(L, N);float dotRV = dot(R, V);if (dotLN < 0.0) {// Light not visible from this point on the surfacereturn vec3(0.0, 0.0, 0.0);} if (dotRV < 0.0) {// Light reflection in opposite direction as viewer, apply only diffuse// componentreturn lightIntensity * (k_d * dotLN);}return lightIntensity * (k_d * dotLN + k_s * pow(dotRV, alpha));
}
计算多个点光源的冯氏光照颜色
/*** Lighting via Phong illumination.* * The vec3 returned is the RGB color of that point after lighting is applied.* k_a: 环境色* k_d: 漫反射颜色* k_s: 镜面颜色* alpha: 光泽系数* p: position of point being lit* eye: 相机的位置** See https://en.wikipedia.org/wiki/Phong_reflection_model#Description*/
vec3 phongIllumination(vec3 k_a, vec3 k_d, vec3 k_s, float alpha, vec3 p, vec3 eye) {const vec3 ambientLight = 0.5 * vec3(1.0, 1.0, 1.0);vec3 color = ambientLight * k_a;vec3 light1Pos = vec3(4.0 * sin(iTime),2.0, 4.0 * cos(iTime));vec3 light1Intensity = vec3(0.4, 0.4, 0.4);color += phongContribForLight(k_d, k_s, alpha, p, eye, light1Pos, light1Intensity);vec3 light2Pos = vec3(2.0 * sin(0.37 * iTime),2.0 * cos(0.37 * iTime),2.0);vec3 light2Intensity = vec3(0.4, 0.4, 0.4);color += phongContribForLight(k_d, k_s, alpha, p, eye,light2Pos,light2Intensity);    return color;
}
相机的LookAt矩阵
/*** Return a transform matrix that will transform a ray from view space* to world coordinates, given the eye point, the camera target, and an up vector.** This assumes that the center of the camera is aligned with the negative z axis in* view space when calculating the ray marching direction. See rayDirection.*/
mat4 viewMatrix2(vec3 eye, vec3 center, vec3 up) {// Based on gluLookAt man pagevec3 f = normalize(center - eye);vec3 s = normalize(cross(f, up));vec3 u = cross(s, f);return mat4(vec4(s, 0.0),vec4(u, 0.0),vec4(-f, 0.0),vec4(0.0, 0.0, 0.0, 1));
}const float PI = 3.14159265359;
BRDF
法线分布函数
float DistributionGGX(vec3 N, vec3 H, float roughness)
{float a = roughness*roughness;float a2 = a*a;float NdotH = max(dot(N, H), 0.0);float NdotH2 = NdotH*NdotH;float nom   = a2;float denom = (NdotH2 * (a2 - 1.0) + 1.0);denom = PI * denom * denom;return nom / denom;
}
几何函数(阴影遮蔽)
float GeometrySchlickGGX(float NdotV, float roughness)
{float r = (roughness + 1.0);float k = (r*r) / 8.0;float nom   = NdotV;float denom = NdotV * (1.0 - k) + k;return nom / denom;
}
// ----------------------------------------------------------------------------
float GeometrySmith(vec3 N, vec3 V, vec3 L, float roughness)
{float NdotV = max(dot(N, V), 0.0);float NdotL = max(dot(N, L), 0.0);float ggx2 = GeometrySchlickGGX(NdotV, roughness);float ggx1 = GeometrySchlickGGX(NdotL, roughness);return ggx1 * ggx2;
}
菲涅尔方程
vec3 fresnelSchlick(float cosTheta, vec3 F0)
{return F0 + (1.0 - F0) * pow(clamp(1.0 - cosTheta, 0.0, 1.0), 5.0);
}
生成光源位置和颜色
// lights
vec3 lightPositions[2];
vec3 lightColors[2];void updateLight(){lightPositions[0] = vec3(4.0 * sin(iTime),2.0, 4.0 * cos(iTime));lightColors[0] = vec3(1.0, 0., 0.);lightPositions[1] = vec3(2.0 * sin(0.37 * iTime),2.0 * cos(0.37 * iTime),2.0);lightColors[1] = vec3(1.0, 1.0, 0);
}
pbr材质参数
vec3 albedo=vec3(0.3f, 1.0f, 0.f);
float metallic = 0.7f;
float roughness = 0.3f;
float ao = 0.7f;
计算pbr颜色
void pbrColor(out vec4 FragColor,in vec3 WorldPos,in vec3 Normal,in vec3 camPos
){		vec3 N = normalize(Normal);vec3 V = normalize(camPos - WorldPos);// calculate reflectance at normal incidence; if dia-electric (like plastic) use F0 // of 0.04 and if it's a metal, use the albedo color as F0 (metallic workflow)    vec3 F0 = vec3(0.04); F0 = mix(F0, albedo, metallic);// reflectance equationvec3 Lo = vec3(0.0);for(int i = 0; i < 2; ++i) {// calculate per-light radiancevec3 L = normalize(lightPositions[i] - WorldPos);vec3 H = normalize(V + L);float distance = length(lightPositions[i] - WorldPos);float attenuation = 1.0 / (distance * distance);vec3 radiance = lightColors[i] * attenuation;// Cook-Torrance BRDFfloat NDF = DistributionGGX(N, H, roughness);   float G   = GeometrySmith(N, V, L, roughness);      vec3 F    = fresnelSchlick(clamp(dot(H, V), 0.0, 1.0), F0);vec3 numerator    = NDF * G * F; float denominator = 4.0 * max(dot(N, V), 0.0) * max(dot(N, L), 0.0) + 0.0001; // + 0.0001 to prevent divide by zerovec3 specular = numerator / denominator;// kS is equal to Fresnelvec3 kS = F;// for energy conservation, the diffuse and specular light can't// be above 1.0 (unless the surface emits light); to preserve this// relationship the diffuse component (kD) should equal 1.0 - kS.vec3 kD = vec3(1.0) - kS;// multiply kD by the inverse metalness such that only non-metals // have diffuse lighting, or a linear blend if partly metal (pure metals// have no diffuse light).kD *= 1.0 - metallic;	  // scale light by NdotLfloat NdotL = max(dot(N, L), 0.0);        // add to outgoing radiance LoLo += (kD * albedo / PI + specular) * radiance * NdotL;  // note that we already multiplied the BRDF by the Fresnel (kS) so we won't multiply by kS again}// ambient lighting (note that the next IBL tutorial will replace // this ambient lighting with environment lighting).vec3 ambient = vec3(0.03) * albedo * ao;vec3 color = ambient + Lo;// HDR tonemappingcolor = color / (color + vec3(1.0));// gamma correctcolor = pow(color, vec3(1.0/2.2)); FragColor = vec4(color, 1.0);
}void mainImage( out vec4 fragColor, in vec2 fragCoord )
{updateLight();vec3 viewDir = rayDirection(45.0, iResolution.xy, fragCoord);vec3 eye = vec3(8.0, 5.0, 7.0);mat4 viewToWorld = viewMatrix2(eye, vec3(0.0, 0.0, 0.0), vec3(0.0, 1.0, 0.0));vec3 worldDir = (viewToWorld * vec4(viewDir, 0.0)).xyz;float dist = shortestDistanceToSurface(eye, worldDir, MIN_DIST, MAX_DIST);//skyboxvec2 uv=(fragCoord-.5*iResolution.xy)/iResolution.y;vec4 s=vec4(0.,0.,2.,1.);  float t=iTime*.5;vec3 cam_pos=s.xyz+vec3(sin(t),0.,cos(t))*5.;vec3 cam_dir=normalize(s.xyz-cam_pos);vec3 cam_r=-cross(cam_dir,vec3(0,1,0));vec3 cam_u=-cross(cam_r,cam_dir);vec3 r=normalize(uv.x*cam_r+uv.y*cam_u+1.*cam_dir);// r= normalize();if (dist > MAX_DIST - EPSILON) {// Didn't hit anythingfragColor =texture(iChannel0,r);return;}// The closest point on the surface to the eyepoint along the view rayvec3 p = eye + dist * worldDir;//冯氏光照vec3 K_a = vec3(0.2, 0.2, 0.2);vec3 K_d = vec3(0.7, 0.2, 0.2);vec3 K_s = vec3(1.0, 1.0, 1.0);float shininess = 10.0;vec3 color = phongIllumination(K_a, K_d, K_s, shininess, p, eye);fragColor = vec4(color, 1.0);//pbrpbrColor(fragColor,p,estimateNormal(p),eye);
}
理论知识可查看前面两篇文章
参考链接
SDF
https://iquilezles.org/articles/distfunctions/
https://iquilezles.org/articles/distfunctions2d/
Ray-marching
http://www.scratchapixel.com/lessons/3d-basic-rendering/introduction-to-ray-tracing/how-does-it-work
PBR辐射度量学
https://www.pbr-book.org/3ed-2018/Color_and_Radiometry/Radiometry
Shadertoy官网
http://shadertoy.com/
这篇关于shadertoy生成PBR场景的文章就介绍到这儿,希望我们推荐的文章对编程师们有所帮助!


