本文主要是介绍gem5学习(11):将缓存添加到配置脚本中——Adding cache to the configuration script,希望对大家解决编程问题提供一定的参考价值,需要的开发者们随着小编来一起学习吧!
目录
一、Creating cache objects
1、Classic caches and Ruby
二、Cache
1、导入SimObject(s)
2、创建L1Cache
3、创建L1Cache子类
4、创建L2Cache
5、L1Cache添加连接函数
6、为L1ICache和L1DCache添加连接函数
7、为L2Cache添加内存侧和CPU侧的连接函数
完整代码
三、Adding caches to the simple config file
1、导入caches
2、创建L1Cache
3、连接缓存和CPU
4、创建L2XBar
完整代码
四、Adding parameters to your script
测试
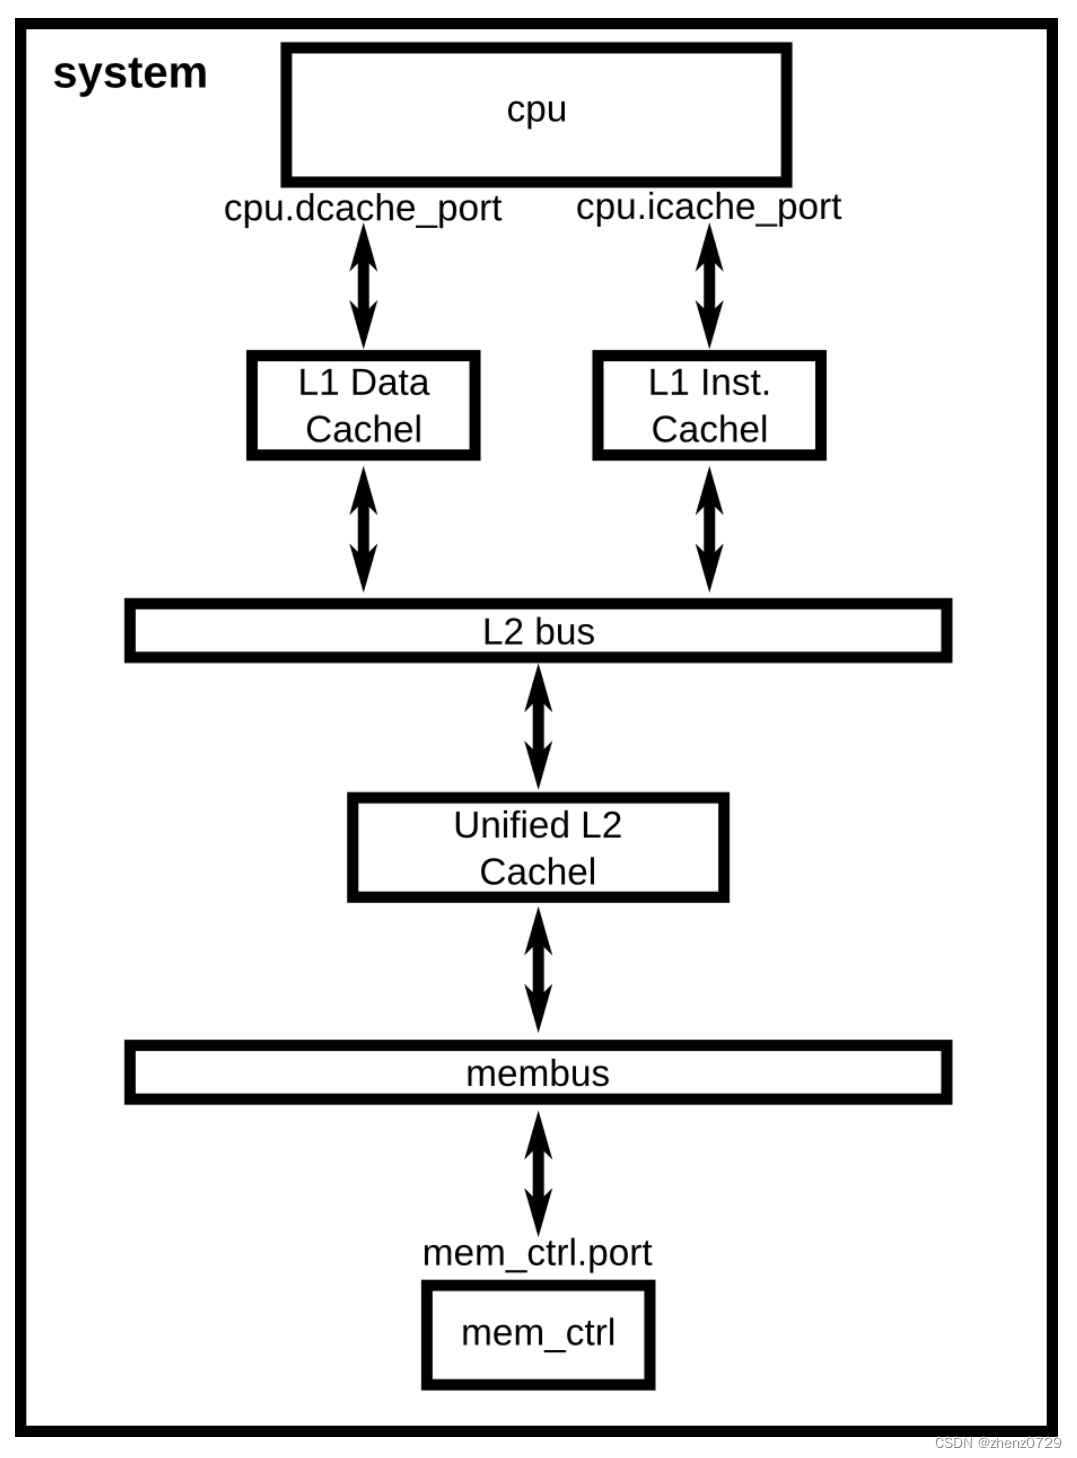
以上一教程的配置脚本作为起点,本章将详细介绍一个更复杂的配置。
将根据下图所示添加一个缓存层次结构到系统中。
此外,本教程还将介绍如何理解gem5的统计输出,并向你的脚本中添加命令行参数。
一、Creating cache objects
因为我们正在建模一个单核心CPU系统,,不关心建模缓存一致性。所以这个教程中,将使用经典缓存(Classic caches)而不是Ruby入门章节(ruby-intro-chapter)。教程将扩展Cache SimObject并对其进行系统配置。首先,需要了解用于配置Cache对象的参数。
1、Classic caches and Ruby
gem5目前有两个完全不同的子系统用于模拟系统中的片上缓存,即“经典缓存”和“Ruby”。这是由于gem5是密歇根大学的m5和威斯康辛大学的GEMS的结合体。GEMS使用Ruby作为其缓存模型,而经典缓存来自m5代码库(因此称为“经典”)。这两种模型的区别在于Ruby被设计用于详细模拟缓存一致性。Ruby的一部分是SLICC,一种用于定义缓存一致性协议的语言。而经典缓存则实现了简化且不灵活的MOESI一致性协议。
在选择使用哪个模型时,应考虑正在建模的内容侧重点。如果正在建模缓存一致性协议的更改,或者一致性协议对结果有重要影响,使用Ruby。如果一致性协议不重要,使用经典缓存。
gem5的长期目标是将这两种缓存模型统一为一个综合模型。
二、Cache
Cache SimObject的声明可以在src/mem/cache/Cache.py中找到。这个Python文件定义了可以设置SimObject的参数。在内部,当实例化SimObject时,这些参数会传递给该对象的C++实现。Cache SimObject继承自下面显示的BaseCache对象。
在BaseCache类中,有许多参数。例如,assoc是一个整数参数。一些参数,比如write_buffers,在这种情况下有一个默认值,为8。默认参数是Param.*的第一个参数,除非第一个参数是一个字符串。每个参数的字符串参数是该参数的描述(例如,tag_latency = Param.Cycles("Tag lookup latency")表示tag_latency控制着“此缓存的命中延迟”)。
许多这些参数没有默认值,所以在调用m5.instantiate()之前需要设置这些参数。
为了使用特定的参数创建缓存,首先要在与configs/tutorial/part1/simple.py相同目录中创建一个名为caches.py的新文件。
1、导入SimObject(s)
第一步是导入将在此文件中扩展的SimObject(s)。
from m5.objects import Cache2、创建L1Cache
接下来,可以像处理其他Python类一样处理BaseCache对象并进行扩展。可以根据需要给新的缓存取任意名称,创建一个L1缓存。
class L1Cache(Cache):assoc = 2tag_latency = 2data_latency = 2response_latency = 2mshrs = 4tgts_per_mshr = 20在这里,扩展了BaseCache并设置了大多数在BaseCache SimObject中没有默认值的参数。BaseCache的部分参数没有默认值,就需要设置。如果要查看所有可能的配置选项,并找出哪些是必需的,哪些是可选的,必须查看SimObject的源代码。
3、创建L1Cache子类
接下来,创建两个L1Cache的子类,一个是L1DCache,一个是L1ICache。
class L1ICache(L1Cache):size = '16kB'class L1DCache(L1Cache):size = '64kB'4、创建L2Cache
创建一个带有部分参数的L2缓存
class L2Cache(Cache):size = '256kB'assoc = 8tag_latency = 20data_latency = 20response_latency = 20mshrs = 20tgts_per_mshr = 12现在,已经指定了BaseCache所需的所有必要参数,只需要实例化子类并将缓存连接到互连网络。但如果将大量对象连接到复杂的互连网络,可能会导致配置脚本文件的规模增大,同时脚本配置文件的可读性降低。因此,首先在Cache的子类中添加一些辅助函数(上述的类都是python类)。
5、L1Cache添加连接函数
对于L1缓存,添加两个函数:connectCPU将CPU连接到缓存,connectBus将缓存连接到总线。我们需要将以下代码添加到L1Cache类中。
def connectCPU(self, cpu):# need to define this in a base class!raise NotImplementedErrordef connectBus(self, bus):self.mem_side = bus.cpu_side_ports6、为L1ICache和L1DCache添加连接函数
接下来,需要为指令缓存和数据缓存分别定义单独的connectCPU函数,因为I-cache和D-cache端口有不同的名称。此时的L1ICache和L1DCache类变成如下:
class L1ICache(L1Cache):size = '16kB'def connectCPU(self, cpu):self.cpu_side = cpu.icache_portclass L1DCache(L1Cache):size = '64kB'def connectCPU(self, cpu):self.cpu_side = cpu.dcache_port7、为L2Cache添加内存侧和CPU侧的连接函数
分别为L2Cache添加连接到内存侧和CPU侧总线的函数。
def connectCPUSideBus(self, bus):self.cpu_side = bus.mem_side_portsdef connectMemSideBus(self, bus):self.mem_side = bus.cpu_side_ports完整代码
import m5
from m5.objects import Cache# Add the common scripts to our path
m5.util.addToPath("../../")from common import SimpleOpts# Some specific options for caches
# For all options see src/mem/cache/BaseCache.pyclass L1Cache(Cache):"""Simple L1 Cache with default values"""assoc = 2tag_latency = 2data_latency = 2response_latency = 2mshrs = 4tgts_per_mshr = 20def __init__(self, options=None):super(L1Cache, self).__init__()passdef connectBus(self, bus):"""Connect this cache to a memory-side bus"""self.mem_side = bus.cpu_side_portsdef connectCPU(self, cpu):"""Connect this cache's port to a CPU-side portThis must be defined in a subclass"""raise NotImplementedErrorclass L1ICache(L1Cache):"""Simple L1 instruction cache with default values"""# Set the default sizesize = "16kB"SimpleOpts.add_option("--l1i_size", help=f"L1 instruction cache size. Default: {size}")def __init__(self, opts=None):super(L1ICache, self).__init__(opts)if not opts or not opts.l1i_size:returnself.size = opts.l1i_sizedef connectCPU(self, cpu):"""Connect this cache's port to a CPU icache port"""self.cpu_side = cpu.icache_portclass L1DCache(L1Cache):"""Simple L1 data cache with default values"""# Set the default sizesize = "64kB"SimpleOpts.add_option("--l1d_size", help=f"L1 data cache size. Default: {size}")def __init__(self, opts=None):super(L1DCache, self).__init__(opts)if not opts or not opts.l1d_size:returnself.size = opts.l1d_sizedef connectCPU(self, cpu):"""Connect this cache's port to a CPU dcache port"""self.cpu_side = cpu.dcache_portclass L2Cache(Cache):"""Simple L2 Cache with default values"""# Default parameterssize = "256kB"assoc = 8tag_latency = 20data_latency = 20response_latency = 20mshrs = 20tgts_per_mshr = 12SimpleOpts.add_option("--l2_size", help=f"L2 cache size. Default: {size}")def __init__(self, opts=None):super(L2Cache, self).__init__()if not opts or not opts.l2_size:returnself.size = opts.l2_sizedef connectCPUSideBus(self, bus):self.cpu_side = bus.mem_side_portsdef connectMemSideBus(self, bus):self.mem_side = bus.cpu_side_ports三、Adding caches to the simple config file
将上一教程的最终完整代码文件复制在同目录,并命名为two_level.py。
cp ./configs/tutorial/part1/simple.py ./configs/tutorial/part1/two_level.py1、导入caches
首先,在文件的顶部(m5.objects导入之后)添加以下内容,将caches.py文件中的名称导入到命名空间中。
from caches import *2、创建L1Cache
在创建CPU之后,创建L1缓存:
system.cpu.icache = L1ICache()
system.cpu.dcache = L1DCache()
3、连接缓存和CPU
使用上述创建的连接函数将缓存连接到CPU上:
system.cpu.icache.connectCPU(system.cpu)
system.cpu.dcache.connectCPU(system.cpu)
删除原文件中用于直接将缓存端口连接到内存总线上的两行。
system.cpu.icache_port = system.membus.cpu_side_ports
system.cpu.dcache_port = system.membus.cpu_side_ports
4、创建L2XBar
L2缓存只允许一个端口与其连接,所以不能直接将L1缓存连接到L2缓存。因此,需要创建一个L2总线,将L1缓存间接连接到L2缓存。然后,可以使用辅助函数将L1缓存连接到L2总线。
system.l2bus = L2XBar()system.cpu.icache.connectBus(system.l2bus)
system.cpu.dcache.connectBus(system.l2bus)
需要注意的是,在system.l2cache.connectMemSideBus之前,已经定义了system.membus = SystemXBar(),因此可以将其传递给system.l2cache.connectMemSideBus。文件中的其他部分保持不变。
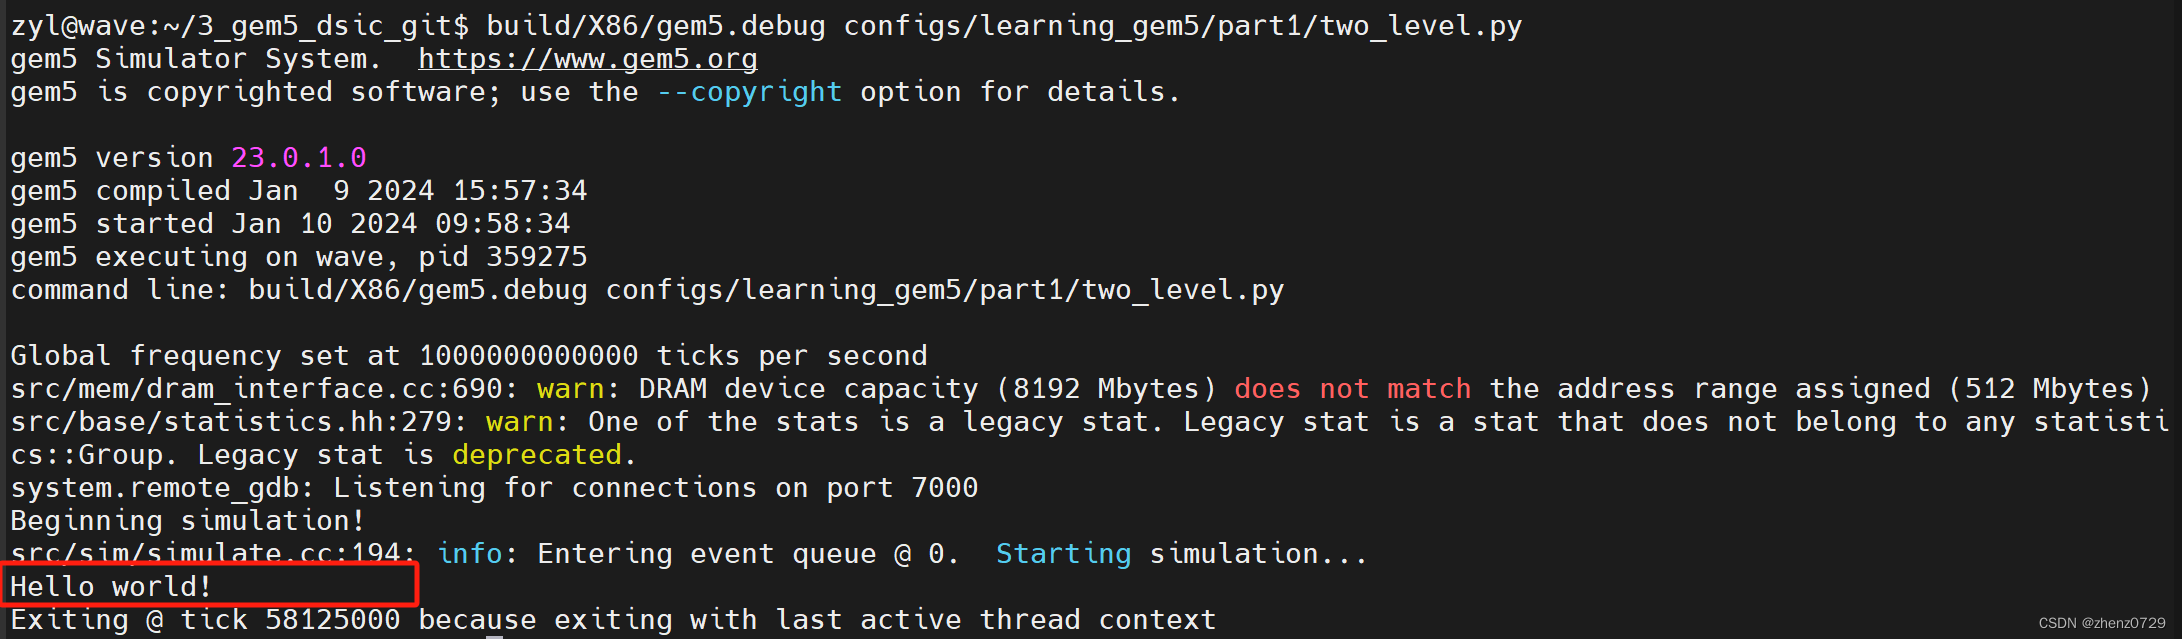
现在有了一个完整的配置,包含了一个两级缓存层次结构。如果运行当前文件,hello程序应该在57467000个时钟周期内完成。完整的脚本保存在gem5源代码的configs/learning_gem5/part1/two_level.py中。
完整代码
# import the m5 (gem5) library created when gem5 is built
import m5# import all of the SimObjects
from m5.objects import *
from gem5.runtime import get_runtime_isa# Add the common scripts to our path
m5.util.addToPath("../../")# import the caches which we made
from caches import *# import the SimpleOpts module
from common import SimpleOpts# Default to running 'hello', use the compiled ISA to find the binary
# grab the specific path to the binary
thispath = os.path.dirname(os.path.realpath(__file__))
default_binary = os.path.join(thispath,"../../../","tests/test-progs/hello/bin/x86/linux/hello",
)# Binary to execute
SimpleOpts.add_option("binary", nargs="?", default=default_binary)# Finalize the arguments and grab the args so we can pass it on to our objects
args = SimpleOpts.parse_args()# create the system we are going to simulate
system = System()# Set the clock frequency of the system (and all of its children)
system.clk_domain = SrcClockDomain()
system.clk_domain.clock = "1GHz"
system.clk_domain.voltage_domain = VoltageDomain()# Set up the system
system.mem_mode = "timing"  # Use timing accesses
system.mem_ranges = [AddrRange("512MB")]  # Create an address range# Create a simple CPU
system.cpu = X86TimingSimpleCPU()# Create an L1 instruction and data cache
system.cpu.icache = L1ICache(args)
system.cpu.dcache = L1DCache(args)# Connect the instruction and data caches to the CPU
system.cpu.icache.connectCPU(system.cpu)
system.cpu.dcache.connectCPU(system.cpu)# Create a memory bus, a coherent crossbar, in this case
system.l2bus = L2XBar()# Hook the CPU ports up to the l2bus
system.cpu.icache.connectBus(system.l2bus)
system.cpu.dcache.connectBus(system.l2bus)# Create an L2 cache and connect it to the l2bus
system.l2cache = L2Cache(args)
system.l2cache.connectCPUSideBus(system.l2bus)# Create a memory bus
system.membus = SystemXBar()# Connect the L2 cache to the membus
system.l2cache.connectMemSideBus(system.membus)# create the interrupt controller for the CPU
system.cpu.createInterruptController()
system.cpu.interrupts[0].pio = system.membus.mem_side_ports
system.cpu.interrupts[0].int_requestor = system.membus.cpu_side_ports
system.cpu.interrupts[0].int_responder = system.membus.mem_side_ports# Connect the system up to the membus
system.system_port = system.membus.cpu_side_ports# Create a DDR3 memory controller
system.mem_ctrl = MemCtrl()
system.mem_ctrl.dram = DDR3_1600_8x8()
system.mem_ctrl.dram.range = system.mem_ranges[0]
system.mem_ctrl.port = system.membus.mem_side_portssystem.workload = SEWorkload.init_compatible(args.binary)# Create a process for a simple "Hello World" application
process = Process()
# Set the command
# cmd is a list which begins with the executable (like argv)
process.cmd = [args.binary]
# Set the cpu to use the process as its workload and create thread contexts
system.cpu.workload = process
system.cpu.createThreads()# set up the root SimObject and start the simulation
root = Root(full_system=False, system=system)
# instantiate all of the objects we've created above
m5.instantiate()print("Beginning simulation!")
exit_event = m5.simulate()
print("Exiting @ tick %i because %s" % (m5.curTick(), exit_event.getCause()))
测试结果
四、Adding parameters to your script
在使用gem5进行实验时,为了避免每次想要使用不同的参数测试系统时都需要编辑配置脚本。可以在gem5配置脚本中添加命令行参数。
注意:由于配置脚本是Python代码,可以使用支持参数解析的Python库。尽管pyoptparse官方上已经被弃用,但因为gem5的最低Python版本曾经是2.5,gem5附带的许多配置脚本仍然使用它,而不是新版的pyargparse。现在gem5的最低Python版本是3.6,因此在编写不需要与当前gem5脚本交互的新脚本时,可以选择Python的pyargparse。
-
Pyargparse是Python标准库中的argparse模块,而pyoptparse是gem5自己实现的一个选项解析库。Pyargparse提供了更丰富的功能和更好的用户体验,并在Python社区中广泛使用。
-
Pyargparse在Python 2.7版本之后成为标准库的一部分,而pyoptparse是为了与较旧版本的Python兼容而创建的。由于gem5的最低Python版本现在是3.6,因此pyargparse是更好的选择,特别是对于编写新的脚本。
-
Pyargparse提供了更简洁、更直观的API,并且支持更丰富的参数类型和选项配置。它具有更好的错误处理和帮助信息生成。
为了向我们的两级缓存配置添加选项,在导入缓存之后,让我们添加一些选项。
import argparseparser = argparse.ArgumentParser(description='A simple system with 2-level cache.')
parser.add_argument("binary", default="", nargs="?", type=str,help="Path to the binary to execute.")
parser.add_argument("--l1i_size",help=f"L1 instruction cache size. Default: 16kB.")
parser.add_argument("--l1d_size",help="L1 data cache size. Default: Default: 64kB.")
parser.add_argument("--l2_size",help="L2 cache size. Default: 256kB.")options = parser.parse_args()
如果想像上面所示的方式传递二进制文件的路径,并通过选项(options)使用它,可以将其指定为options.binary。
system.workload = SEWorkload.init_compatible(options.binary)使用build/X86/gem5.debug configs/learning_gem5/part1/two_level.py --help可以显示刚刚添加的选项。

接下来,需要将这些选项传递给配置脚本中创建的缓存。为了实现这一点,我们将简单地修改two_level_opts.py脚本,将选项作为参数传递给缓存的构造函数,并添加一个合适的构造函数。
system.cpu.icache = L1ICache(options)
system.cpu.dcache = L1DCache(options)
...
system.l2cache = L2Cache(options)
在caches.py文件中,需要为每个类添加构造函数(Python中的__init__函数)。从基本L1缓存开始,因为没有任何适用于基本L1缓存的参数,所以只需添加一个空的构造函数。但在这种情况下,不能忘记调用父类的构造函数。如果省略对父类构造函数的调用,gem5的SimObject属性查找函数将失败,并且在尝试实例化缓存对象时会出现"RuntimeError: maximum recursion depth exceeded"的错误。因此,在L1Cache类中,需要在静态类成员之后添加以下内容。
def __init__(self, options=None):super(L1Cache, self).__init__()pass接下来,在L1ICache中,需要使用创建的选项(l1i_size)来设置大小。在下面的代码中,对于没有将选项传递给L1ICache构造函数和在命令行上没有指定选项的情况,有相应的保护代码。在这些情况下,将使用我们指定的大小默认值。
def __init__(self, options=None):super(L1ICache, self).__init__(options)if not options or not options.l1i_size:returnself.size = options.l1i_size可以在L1DCache使用相同的代码:
def __init__(self, options=None):super(L1DCache, self).__init__(options)if not options or not options.l1d_size:returnself.size = options.l1d_size在L2Cache使用相同的代码:
def __init__(self, options=None):super(L2Cache, self).__init__()if not options or not options.l2_size:returnself.size = options.l2_size测试
build/X86/gem5.debug configs/learning_gem5/part1/two_level.py --l2_size='2MB' --l1d_size='128kB'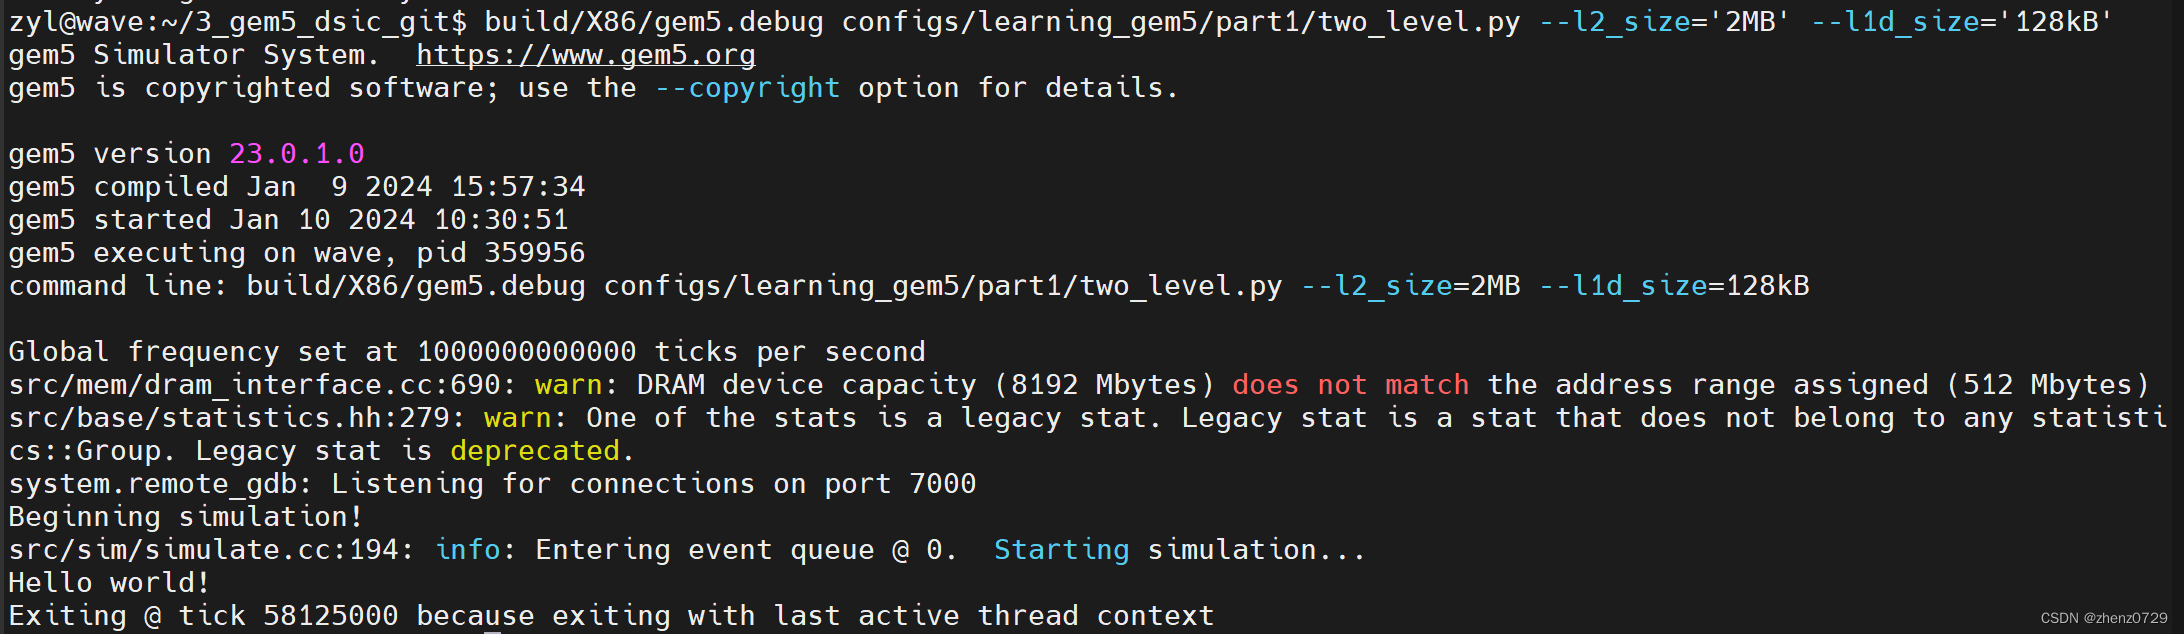
这篇关于gem5学习(11):将缓存添加到配置脚本中——Adding cache to the configuration script的文章就介绍到这儿,希望我们推荐的文章对编程师们有所帮助!


