本文主要是介绍算法笔记(七)扩大感受野SPP/ASPP/RBF,希望对大家解决编程问题提供一定的参考价值,需要的开发者们随着小编来一起学习吧!
1.空洞卷积
想要获取较大感受野需要用较大的卷积核或池化时采用较大的stride,对于前者计算量太大,后者会损失分辨率。然而想要对图片提取的特征具有较大的感受野,并且又想让特征图的分辨率不下降太多(分辨率损失太多会丢失许多关于图像边界的细节信息),但这两个是矛盾的。而空洞卷积就是用来解决这个矛盾的。即可让其获得较大感受野,又可让分辨率不损失太多。空洞卷积如下图:

- (a)是rate=1的空洞卷积,卷积核的感受野为3×3,其实就是普通的卷积。
- (b)是rate=2,padding=2的空洞卷积,卷积核的感受野为7x7
- (c)是rate=4,padding=4的空洞卷积,卷积核的感受野为15x15
计算公式:
- 正常的感受野计算: R F i = R F i − 1 + ( k − 1 ) ∗ S i − 1 , r a w = 1 RF_i=RF_{i-1}+(k-1)*S_{i-1},raw=1 RFi=RFi−1+(k−1)∗Si−1,raw=1
raw=1
第一层使用3*3卷积核的感受野为1+(3-1)*1=3,即(3*3);
第二层进一步使用3*3,则感受野为3+(3-1)*1=5,即(5*5)。 - 假设,正常的空洞卷积,空洞卷积率为dr:
感 受 野 尺 寸 = ( d r − 1 ) ∗ ( k − 1 ) + k 感受野尺寸= (dr-1)∗(k−1)+k 感受野尺寸=(dr−1)∗(k−1)+k - padding的空洞卷积:
感 受 野 尺 寸 = 2 ( d r − 1 ) ∗ ( k − 1 ) + k 感受野尺寸=2 (dr-1)∗(k−1)+k 感受野尺寸=2(dr−1)∗(k−1)+k假如使用3*3卷积核,rate=2:则感受野为(2-1)*(3-1)+3=5,
假如padding=2:则感受野为2*(2-1)*(3-1)+3=7。
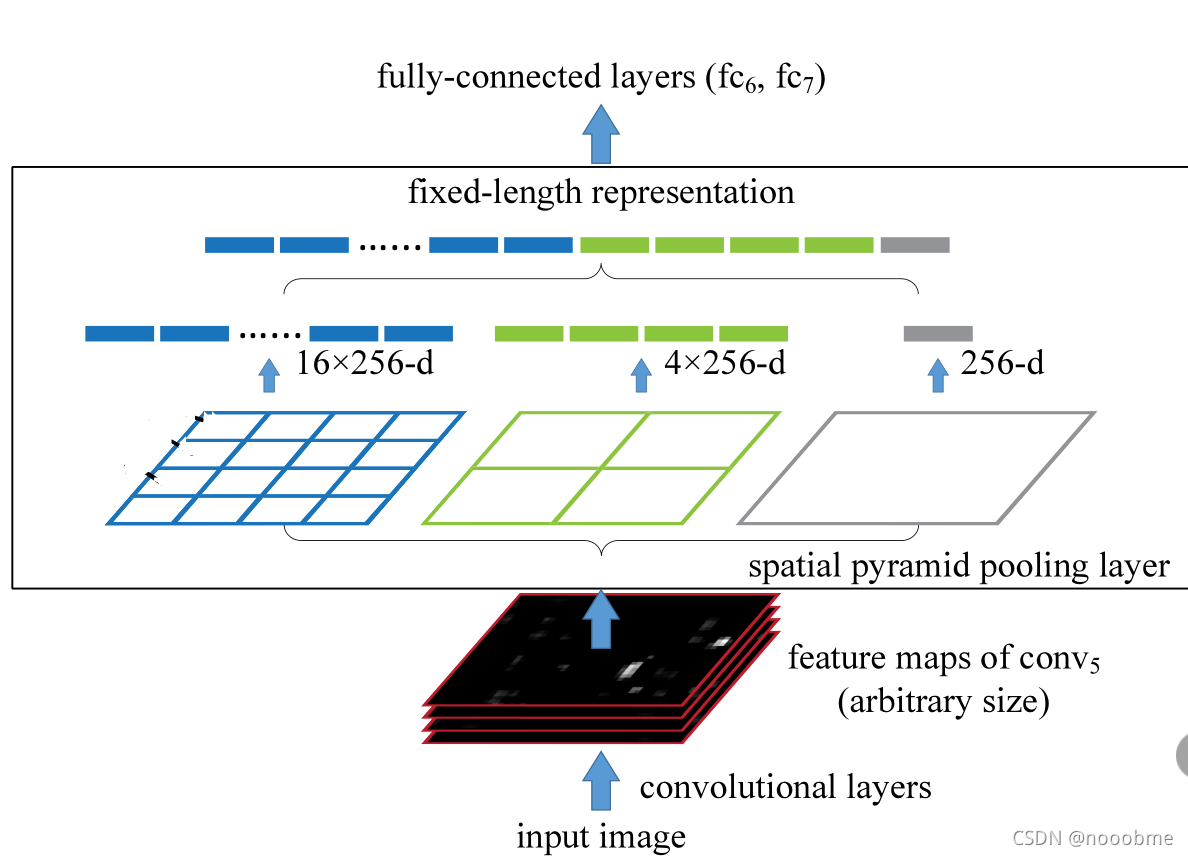
2. SPP 空间金字塔池化
-
设计背景:
由于CNN网络后面接的全连接层需要固定的输入大小,故往往通过将输入图像resize,裁剪(crop)或拉伸(warp)等操作,将输入固定大小的方式输入卷积网络,这会造成几何失真影响精度。

-
设计思路:
通过三种尺度的池化,将任意大小的特征图固定为相同长度的特征向量,传输给全连接层,这样全连接层可以得到固定的输入。对输入的特征图,分成3份(4*4,2*2,1*1)进行池化,取每个池化块中的最大值,所以变成了(16*256,4*256,1*256),其中256是通道数,然后拼接成(21*256),这样展平后输入到全连接层的参数就可以设置成21*256=10752了。
其中k为池化核大小,s为步长,p为填充数,w为输入的尺寸, w o u t w_{out} wout为池化后输出的尺寸。
K = ⌈ w n ⌉ , S = ⌈ w n ⌉ , p = ⌈ k ∗ n − w + 1 2 ⌉ , w o u t = 2 ∗ p w + w , \begin{aligned} K&=\lceil{\frac{w}{n}}\rceil, \\ S&=\lceil{\frac{w}{n}}\rceil, \\ p&=\lceil{\frac{k∗n−w+1}{2}}\rceil,\\ w_{out}&=2∗p_w+w, \end{aligned} KSpwout=⌈nw⌉,=⌈nw⌉,=⌈2k∗n−w+1⌉,=2∗pw+w,
假如输入大小为是(10,7,11), 池化数量为(4,4)
则:Kernel大小为(2,3),Stride大小为(2,3),所以Padding为(1,1)。
#coding=utf-8import math
import torch
import torch.nn.functional as F# 构建SPP层(空间金字塔池化层)
class SPPLayer(torch.nn.Module):def __init__(self, num_levels, pool_type='max_pool'):super(SPPLayer, self).__init__()self.num_levels = num_levelsself.pool_type = pool_typedef forward(self, x):num, c, h, w = x.size() # num:样本数量 c:通道数 h:高 w:宽for i in range(self.num_levels):level = i+1kernel_size = (math.ceil(h / level), math.ceil(w / level))stride = (math.ceil(h / level), math.ceil(w / level))pooling = (math.floor((kernel_size[0]*level-h+1)/2), math.floor((kernel_size[1]*level-w+1)/2))# 选择池化方式 if self.pool_type == 'max_pool':tensor = F.max_pool2d(x, kernel_size=kernel_size, stride=stride, padding=pooling).view(num, -1)else:tensor = F.avg_pool2d(x, kernel_size=kernel_size, stride=stride, padding=pooling).view(num, -1)# 展开、拼接if (i == 0):x_flatten = tensor.view(num, -1)else:x_flatten = torch.cat((x_flatten, tensor.view(num, -1)), 1)return x_flatten
3. ASPP
SPP的扩展,使用了空洞卷积。

整体的 ASPP 结构就是图中黄色框中的部分。
- (A)对输入的特征图经过自适应平均池化层和1*1的卷积层,然后上采样到size(x.shape[2:])大小,得到image_features。
- (B)对输入的特征图经过四个空洞卷积后分别得到四个尺度的特征图。
- (1, 1),1×1的卷积相当于rate很大的空洞卷积,因为rate越大,卷积核的有效参数就越小,这个1×1的卷积核就相当于大rate卷积核的中心的参数。
- (3, 1, padding=6, dilation=6)
- (3, 1, padding=12, dilation=12)
- (3, 1, padding=18, dilation=18)
- 然后将image_features和四个尺度的特征图在channel上concat起来,最终经过1*1的卷积核(depth * 5->depth)得到最终的输出。
class ASPP(nn.Module):def __init__(self, in_channel=512, depth=256):super(ASPP,self).__init__()# global average pooling : init nn.AdaptiveAvgPool2d ;also forward torch.mean(,,keep_dim=True)self.mean = nn.AdaptiveAvgPool2d((1, 1))self.conv = nn.Conv2d(in_channel, depth, 1, 1)# k=1 s=1 no padself.atrous_block1 = nn.Conv2d(in_channel, depth, 1, 1)self.atrous_block6 = nn.Conv2d(in_channel, depth, 3, 1, padding=6, dilation=6)self.atrous_block12 = nn.Conv2d(in_channel, depth, 3, 1, padding=12, dilation=12)self.atrous_block18 = nn.Conv2d(in_channel, depth, 3, 1, padding=18, dilation=18)self.conv_1x1_output = nn.Conv2d(depth * 5, depth, 1, 1)def forward(self, x):size = x.shape[2:]image_features = self.mean(x)image_features = self.conv(image_features)image_features = F.upsample(image_features, size=size, mode='bilinear')atrous_block1 = self.atrous_block1(x)atrous_block6 = self.atrous_block6(x)atrous_block12 = self.atrous_block12(x)atrous_block18 = self.atrous_block18(x)net = self.conv_1x1_output(torch.cat([image_features, atrous_block1, atrous_block6,atrous_block12, atrous_block18], dim=1))return net
4. RBF(Receptive Field Block)
设计思路:模拟人类视觉的感受野进行设计,例如使用(1,3,5)卷积叠加的感受野效果(最后一列的下图)和人类的视觉(最后一列的上图)是差不多的。

RBF主要是在Inception的基础上加入了空洞卷积,以下是Inception原图:

以下是两种RFB结构示意图:

主要改进:
- (a)RFB:整体结构上借鉴了Inception的思想,主要不同点在于使用3个(3*3)且不同dilated的卷积层代替了原先的(1,3,5)的卷积,这也是这篇文章增大感受野的主要方式之一。
- (b)RFB-s:1. 使用3×3卷积层代替5×5卷积层;2. 使用1×3和3×1卷积层代替3×3卷积层,主要目的应该是为了减少计算量。
class BasicConv(nn.Module):def __init__(self, in_planes, out_planes, kernel_size, stride=1, padding=0, dilation=1, groups=1, relu=True, bn=True):super(BasicConv, self).__init__()self.out_channels = out_planesif bn:self.conv = nn.Conv2d(in_planes, out_planes, kernel_size=kernel_size, stride=stride, padding=padding, dilation=dilation, groups=groups, bias=False)self.bn = nn.BatchNorm2d(out_planes, eps=1e-5, momentum=0.01, affine=True)self.relu = nn.ReLU(inplace=True) if relu else Noneelse:self.conv = nn.Conv2d(in_planes, out_planes, kernel_size=kernel_size, stride=stride, padding=padding, dilation=dilation, groups=groups, bias=True)self.bn = Noneself.relu = nn.ReLU(inplace=True) if relu else Nonedef forward(self, x):x = self.conv(x)if self.bn is not None:x = self.bn(x)if self.relu is not None:x = self.relu(x)return x
class BasicRFB(nn.Module):def __init__(self, in_planes, out_planes, stride=1, scale=0.1, map_reduce=8, vision=1, groups=1):super(BasicRFB, self).__init__()self.scale = scaleself.out_channels = out_planesinter_planes = in_planes // map_reduceself.branch0 = nn.Sequential(BasicConv(in_planes, inter_planes, kernel_size=1, stride=1, groups=groups, relu=False),BasicConv(inter_planes, 2 * inter_planes, kernel_size=(3, 3), stride=stride, padding=(1, 1), groups=groups),BasicConv(2 * inter_planes, 2 * inter_planes, kernel_size=3, stride=1, padding=vision + 1, dilation=vision + 1, relu=False, groups=groups))self.branch1 = nn.Sequential(BasicConv(in_planes, inter_planes, kernel_size=1, stride=1, groups=groups, relu=False),BasicConv(inter_planes, 2 * inter_planes, kernel_size=(3, 3), stride=stride, padding=(1, 1), groups=groups),BasicConv(2 * inter_planes, 2 * inter_planes, kernel_size=3, stride=1, padding=vision + 2, dilation=vision + 2, relu=False, groups=groups))self.branch2 = nn.Sequential(BasicConv(in_planes, inter_planes, kernel_size=1, stride=1, groups=groups, relu=False),BasicConv(inter_planes, (inter_planes // 2) * 3, kernel_size=3, stride=1, padding=1, groups=groups),BasicConv((inter_planes // 2) * 3, 2 * inter_planes, kernel_size=3, stride=stride, padding=1, groups=groups),BasicConv(2 * inter_planes, 2 * inter_planes, kernel_size=3, stride=1, padding=vision + 4, dilation=vision + 4, relu=False, groups=groups))self.ConvLinear = BasicConv(6 * inter_planes, out_planes, kernel_size=1, stride=1, relu=False)self.shortcut = BasicConv(in_planes, out_planes, kernel_size=1, stride=stride, relu=False)self.relu = nn.ReLU(inplace=False)def forward(self, x):x0 = self.branch0(x)x1 = self.branch1(x)x2 = self.branch2(x)out = torch.cat((x0, x1, x2), 1)out = self.ConvLinear(out)short = self.shortcut(x)out = out * self.scale + shortout = self.relu(out)return out
5. PPM(Pyramid Pooling Module)

流程:输入特征图 x 0 x_0 x0,先自适应池化成4个大小的特征图 x 1 x_1 x1, x 2 x_2 x2, x 3 x_3 x3和 x 4 x_4 x4(金字塔),然后对池化后不同大小特征进行卷积操作,将通道数减少,最后将这四个特征图进行上采样操作变成和输入特征图一样的大小,并使用concat与原先特征图进行通道数上的concat,得到金字塔池化后的特征图。
class PyramidPooling(nn.Module):def __init__(self, in_channels, out_channels, **kwargs):super(PyramidPooling, self).__init__()inter_channels = int(in_channels / 4) #这里N=4与原文一致self.conv1 = _ConvBNReLU(in_channels, inter_channels, 1, **kwargs) # 四个1x1卷积用来减小channel为原来的1/Nself.conv2 = _ConvBNReLU(in_channels, inter_channels, 1, **kwargs)self.conv3 = _ConvBNReLU(in_channels, inter_channels, 1, **kwargs)self.conv4 = _ConvBNReLU(in_channels, inter_channels, 1, **kwargs)self.out = _ConvBNReLU(in_channels * 2, out_channels, 1) #最后的1x1卷积缩小为原来的channeldef pool(self, x, size):avgpool = nn.AdaptiveAvgPool2d(size) # 自适应的平均池化,目标size分别为1x1,2x2,3x3,6x6return avgpool(x)def upsample(self, x, size): #上采样使用双线性插值return F.interpolate(x, size, mode='bilinear', align_corners=True)def forward(self, x):size = x.size()[2:]feat1 = self.upsample(self.conv1(self.pool(x, 1)), size)feat2 = self.upsample(self.conv2(self.pool(x, 2)), size)feat3 = self.upsample(self.conv3(self.pool(x, 3)), size)feat4 = self.upsample(self.conv4(self.pool(x, 6)), size)x = torch.cat([x, feat1, feat2, feat3, feat4], dim=1) #concat 四个池化的结果x = self.out(x)return x
参考
博文1
这篇关于算法笔记(七)扩大感受野SPP/ASPP/RBF的文章就介绍到这儿,希望我们推荐的文章对编程师们有所帮助!


