本文主要是介绍CRC32的原理介绍以及查表法实现和多项式相除实现,希望对大家解决编程问题提供一定的参考价值,需要的开发者们随着小编来一起学习吧!
1、CRC32的生成多项式
多项式系数提取出来,改写位16进制数为:0x104C11DB7,如果转换为33个二进制数[1, 0, 0, 0, 0, 0, 1, 0, 0, 1, 1, 0, 0, 0, 0, 0, 1, 0, 0, 0, 1, 1,
1, 0, 1, 1, 0, 1, 1, 0, 1, 1, 1] ,那么从左到右对应于生成多项式的每个项目的系数(0或1)。
2 CRC32校验码的生成:
如果待校验的数据写成多项式的形式,也就是把数据先转换为二进制的数,然后每个二进制数对应一个多项式的一个系数;比如待校验的数据是0x85,那么对应二进制[1000 0101],对应多项式:,把这个多项式再乘以
,然后再除以G(x),最终的余数就是CRC校验码,也就是(
)*
/G(x)的余数。
3 CRC32校验码完整流程介绍:
- Invert bits on each byte,如果输入是多个字节的数据,每个字节的对应二进制数字要逆序排列,字节之间还是保持输入顺序;
- 经过上面处理的数据,需要在末尾增加0x00000000四个字节;相当于给输入数据的多项式乘以
- xor first four bytes with 0xFF (this is to avoid errors on the leading 0s),经过上面步骤处理后输入数据的前四个字节要和0xFFFFFFFF异或。如果输入数据不足4个字节,也没关系,因为步骤2末尾增加0x00000000四个字节,总长度是够4个字节的。
- Compute the reminder ,上面步骤生成的数据对应的多项式除以生成多项式G(x)后的余数
- Reverse the bits again,余数是4个字节,这4个字节对应的二进制数字要按一个整体逆序排列。
- xor the result again. 逆序后的4个字节再和0xFFFFFFFF异或,得到最终的CRC校验值。
上面步骤中,输入数据的逆序,余数的逆序,输入数据和0xFFFFFFFF的异或,以及余数和0xFFFFFFFF的异或,都是可选步骤,根据不同的应用,可能会有不同的选择。
CRC(循环冗余校验)在线计算_ip33.com
4 举例:
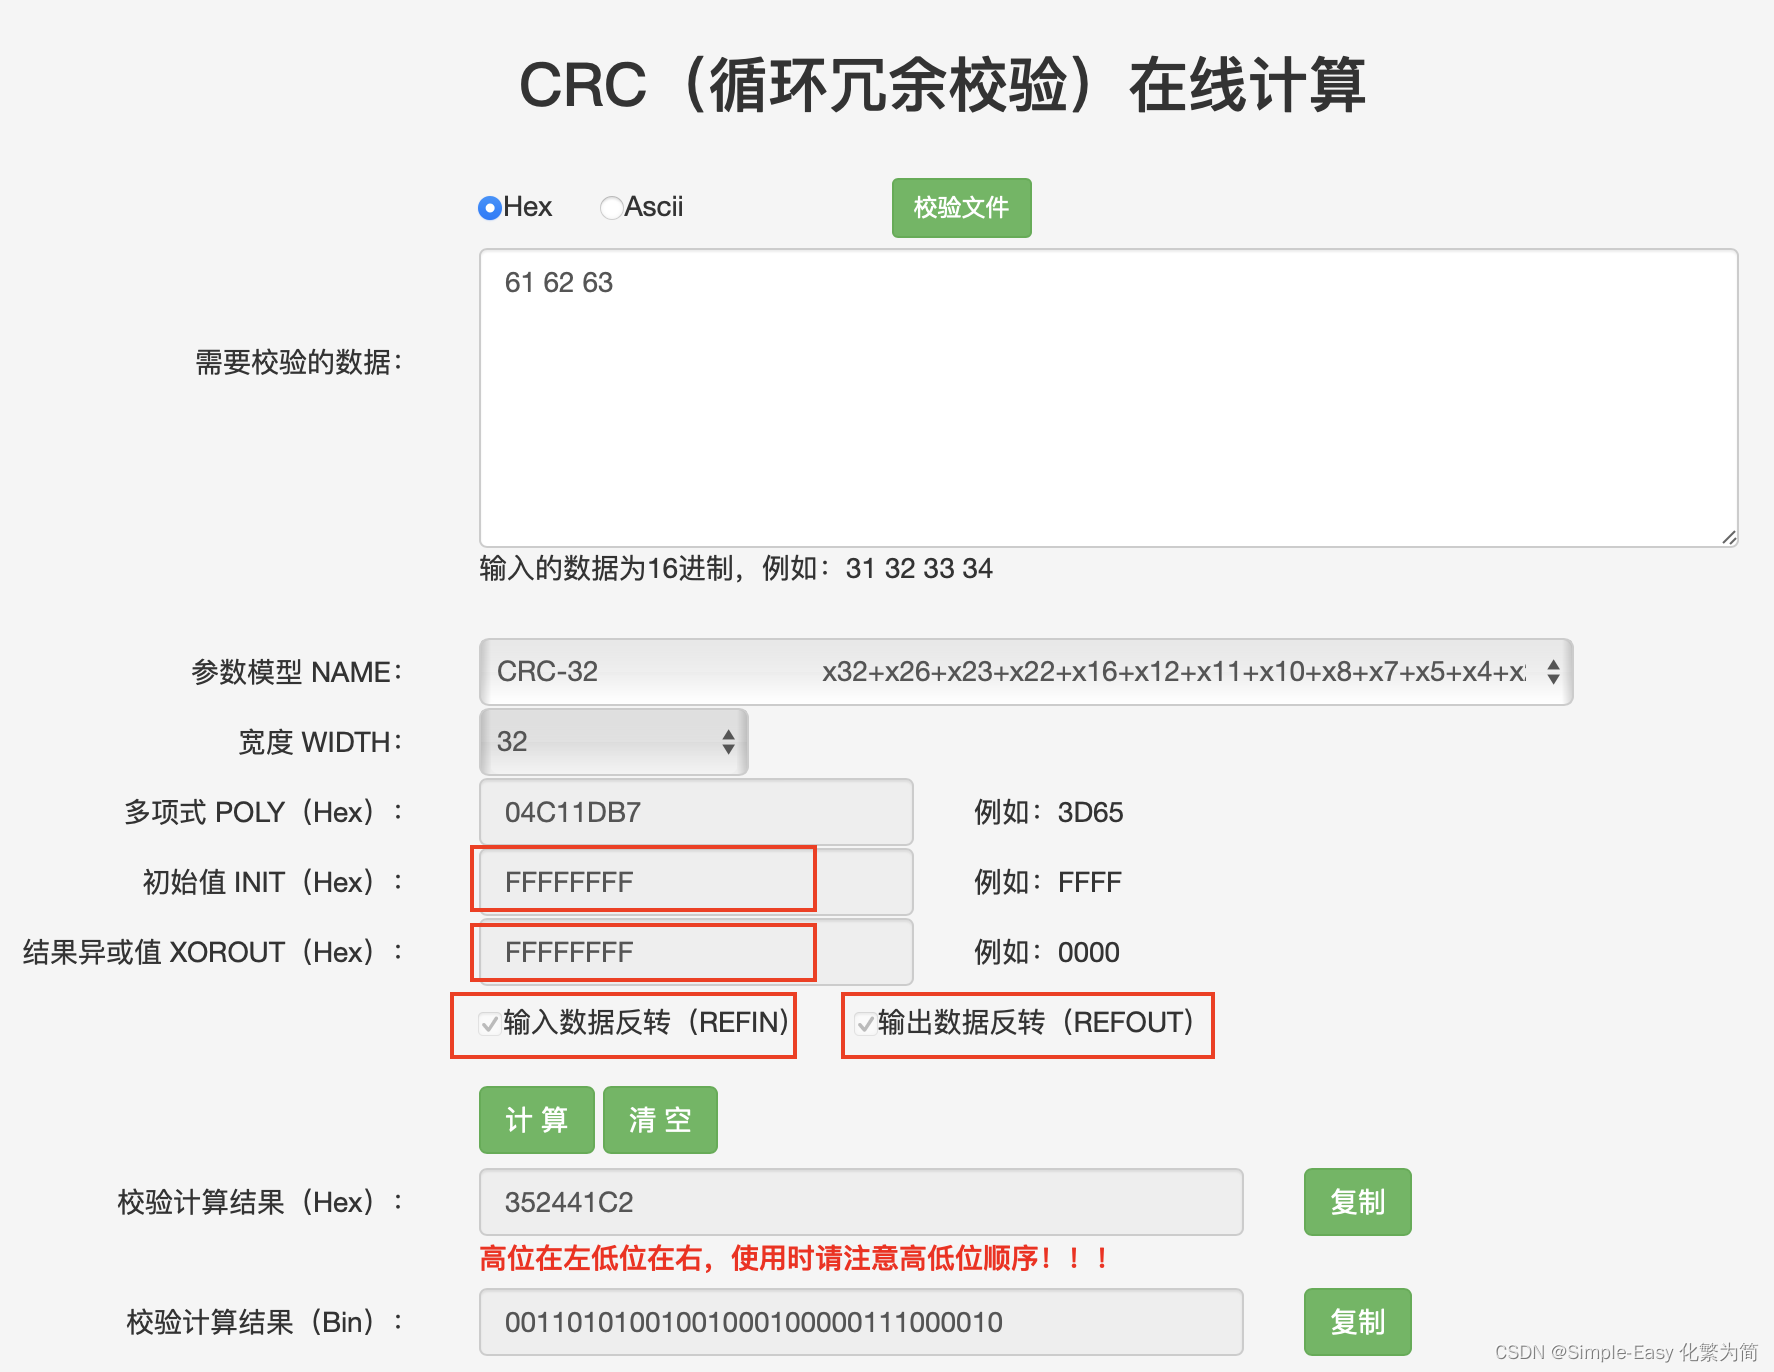
calculate the CRC-32 hash for the 'ANSI' string 'abc':inputs:
dividend: binary for 'abc': 0b011000010110001001100011 = 0x616263
polynomial: 0b100000100110000010001110110110111 = 0x104C11DB7start with the 3 bytes 'abc':
61 62 63 (as hex)
01100001 01100010 01100011 (as bin)reverse the bits in each byte:
10000110 01000110 11000110append 32 0 bits:
10000110010001101100011000000000000000000000000000000000XOR (exclusive or) the first 4 bytes with 0xFFFFFFFF:
(i.e. flip the first 32 bits:)
01111001101110010011100111111111000000000000000000000000next we will perform 'CRC division':a simple description of 'CRC division':
we put a 33-bit box around the start of a binary number,
start of process:
if the first bit is 1, we XOR the number with the polynomial,
if the first bit is 0, we do nothing,
we then move the 33-bit box right by 1 bit,
if we have reached the end of the number,
then the 33-bit box contains the 'remainder',
otherwise we go back to 'start of process'note: every time we perform a XOR, the number begins with a 1 bit,
and the polynomial always begins with a 1 bit,
1 XORed with 1 gives 0, so the resulting number will always begin with a 0 bit'CRC division':
'divide' by the polynomial 0x104C11DB7:
01111001101110010011100111111111000000000000000000000000100000100110000010001110110110111---------------------------------111000100010010111111010010010110100000100110000010001110110110111---------------------------------110000001000101011101001001000010100000100110000010001110110110111---------------------------------100001011101010011001111111101010100000100110000010001110110110111---------------------------------111101101000100000100101110100000100000100110000010001110110110111---------------------------------111010011101000101010110000101110100000100110000010001110110110111---------------------------------110101110110001110110001100110010100000100110000010001110110110111---------------------------------101010100000011001111110100001010100000100110000010001110110110111---------------------------------101000011001101111000001011110100100000100110000010001110110110111---------------------------------100011111110110100111110100001100100000100110000010001110110110111---------------------------------110110001101101100000101110110000100000100110000010001110110110111---------------------------------101101010111011100010110000001110100000100110000010001110110110111---------------------------------110111000101111001100011011100100100000100110000010001110110110111---------------------------------10111100011111011101101101010011we obtain the 32-bit remainder:
0b10111100011111011101101101010011 = 0xBC7DDB53note: the remainder is a 32-bit number, it may start with a 1 bit or a 0 bitXOR the remainder with 0xFFFFFFFF:
(i.e. flip the 32 bits:)
0b01000011100000100010010010101100 = 0x438224ACreverse bits:
bit-reverse the 4 bytes (32 bits), treating them as one entity:
(e.g. 'abcdefgh ijklmnop qrstuvwx yzABCDEF'
to 'FEDCBAzy xwvutsrq ponmlkji hgfedcba':)
0b00110101001001000100000111000010 = 0x352441C2thus the CRC-32 hash for the 'ANSI' string 'abc' is: 0x352441C2
5 查表法计算原理:
- 输入数据是多个字节,可以按照逐个字节的方式去计算CRC检验值
- 首先要对0-255这256个数字,计算每个数字对应的CRC检验值,形成一个表格,可以用0-255来索引校验值
- 对于第一个输入字节,首先进行逆序,然后逆序后取值作为索引去查表,获得校验值,得到校验值是4个字节,那么按照多项式的除法步骤,校验值4个字节的开头一个字节需要和第二个输入字节(逆序处理后的)进行二进制加法,也就是异或,然后用这个异或后的值作为索引去查表,得到新的校验值,然后再和下一个字节进行相同的处理,以此类推,直至所有输入数据处理完。
- 最后得到的4个字节校验值,进行整体逆序,然后和0xFFFFFFFF异或,得到最终的CRC32校验值。
6 多项式相除方法和查表方法的python代码:
mport numpy as nphex_num = "104C11DB7" # 要转换的十六进制数字
binary_num = bin(int(hex_num, 16))[2:] # 将十六进制转换为十进制再转换为二进制
print("二进制结果:", binary_num)
crc32_gen = np.array(list(binary_num), dtype=int)
print(crc32_gen)# 使用np.pad()函数进行补零操作myCRC32Table = np.zeros(0,dtype=int)for j in range(256):Bytes = bin(j)[2:]Bytes_bin_array = np.array(list(Bytes), dtype=int)Padded_Bytes_bin_array = np.pad(Bytes_bin_array,(0, 32), mode='constant')#print("\n补零后的数组:\n", Padded_Bytes_bin_array)for i in range(len(Padded_Bytes_bin_array)-33+1) :tmp_value = Padded_Bytes_bin_array[i:i+33]#print(tmp_value)if tmp_value[0] ==0:continueelse:Padded_Bytes_bin_array[i:i+33] =  tmp_value ^   crc32_gen#print(Padded_Bytes_bin_array[i:i+33]) remaider_of_Padded_Bytes_bin_array = Padded_Bytes_bin_array[-32:]        CRC32_bytes = int(''.join(map(str, remaider_of_Padded_Bytes_bin_array)),2)       myCRC32Table = np.append(myCRC32Table,CRC32_bytes)#hex_num = "EDB883208" # 要转换的十六进制数字#################   下面是查表法方法计算CRC32 ===================================
Message1 ='0102'
Message1_bin = bin(int(Message1, 16))[2:].zfill(len(Message1)*4) # 将十六进制转换为十进制再转换为二进制
Message1_bin_array = np.array(list(Message1_bin), dtype=int)##reverse the bits in each byte:Message1_bin_array_reverse = np.zeros(0,dtype=int)
for i in range(int(np.size(Message1_bin_array)/8)) :tmp_flip = np.flipud(Message1_bin_array[i*8:i*8+8])tmp_flip_number = int(''.join(map(str, tmp_flip)),2)Message1_bin_array_reverse = np.append(Message1_bin_array_reverse,tmp_flip_number)# 按照字节查询CRC32 table,前一个字节的CRC查表值的前8位需要和下个字节进行异或操作,算出来的新值作为新的查表索引值;每次查出的CRC值还需要和上一次查出的CRC值的高24位异或操作
crc32_result = 0
for i in range(int(np.size(Message1_bin_array_reverse))) :    if i < 4:Message1_bin_array_reverse[i] =Message1_bin_array_reverse[i] ^ 0xFFcrc32_result =myCRC32Table[(crc32_result >> 24) ^ Message1_bin_array_reverse[i]] ^ (crc32_result & 0x00FFFFFF)<<8   #### 如果输入数据小于4个字节,需要对FFFFFFFF剩余的FF特别处理下,比如原始输入数据1个字节,那么有3个0xFF没有在上面的代码中用到,所以要在下面的代码中异或上这三个FF
if int(np.size(Message1_bin_array_reverse)) < 4:if 4-int(np.size(Message1_bin_array_reverse))      ==1 :crc32_result = crc32_result ^ 0xFF000000if 4- int(np.size(Message1_bin_array_reverse))     ==2 :crc32_result = crc32_result ^ 0xFFFF0000                if 4- int(np.size(Message1_bin_array_reverse))     ==3 :crc32_result = crc32_result ^ 0xFFFFFF00# Reverse the result:
crc32_result_bin = bin(crc32_result)[2:].zfill(32)
crc32_result_array = np.array(list(crc32_result_bin), dtype=int)
crc32_result_reverse = np.flipud(crc32_result_array)
crc32_result_reverse = ''.join(map(str, crc32_result_reverse))
print('crc32_result_reverse =  ',hex(int(crc32_result_reverse,2)))crc32_result_reverse_complement  = int(crc32_result_reverse,2)^0xFFFFFFFF
print('crc32_result_reverse_complement',hex(crc32_result_reverse_complement))#################   下面是多项式相除方法计算CRC32 ===================================#Message ='8040C020'
Message ='0102'Message_bin = bin(int(Message, 16))[2:].zfill(len(Message)*4) # 将十六进制转换为十进制再转换为二进制
#Message_bin = '01111001101110010011100111111111000000000000000000000000'
Message_bin_array = np.array(list(Message_bin), dtype=int)############ Reverse input per byte
Message_bin_array_reverse = np.zeros(0,dtype=int)
for i in range(int(np.size(Message_bin_array)/8)) :tmp_flip = np.flipud(Message_bin_array[i*8:i*8+8])Message_bin_array_reverse = np.append(Message_bin_array_reverse,tmp_flip)outputXor = 'ffffffff'
outputXor_bin = bin(int(outputXor, 16))[2:]
outputXor_array = np.array(list(outputXor_bin), dtype=int)kk = len(Message)*4# 使用np.pad()函数进行补零操作
padded_message = np.pad(Message_bin_array_reverse,(0, 32), mode='constant')
print("\n补零后的数组:\n", padded_message)#padded_message = Message_bin_arraypadded_outputXor = np.pad(outputXor_array,(0, kk), mode='constant')#padded_message = padded_message^padded_outputXorfor i in range(len(padded_message)-33+1) :tmp_value = padded_message[i:i+33]print(tmp_value)if tmp_value[0] ==0:continueelse:padded_message[i:i+33] =  tmp_value ^ crc32_genprint(padded_message[i:i+33]) remaider_of_padded_message = padded_message[-32:]CRC32 = ''.join(map(str, remaider_of_padded_message))
print('remaider_of_padded_message = ',hex(int(CRC32,2)))remaider_of_padded_message_reverse = np.flipud(remaider_of_padded_message)
CRC32 = ''.join(map(str, remaider_of_padded_message_reverse))
print('remaider_of_padded_message_reverse = ',hex(int(CRC32,2)))for i in range(len(padded_outputXor)-33+1) :tmp_value = padded_outputXor[i:i+33]print(tmp_value)if tmp_value[0] ==0:continueelse:padded_outputXor[i:i+33] =  tmp_value ^   crc32_genprint(padded_outputXor[i:i+33])
remaider_of_padded_outputXor = padded_outputXor[-32:]
remaider_of_padded_outputXor_reverse = np.flipud(remaider_of_padded_outputXor)
CRC32 = ''.join(map(str, remaider_of_padded_outputXor_reverse))
print('remaider_of_padded_outputXor_reverse = ',hex(int(CRC32,2)))CRC32 = remaider_of_padded_message ^ remaider_of_padded_outputXor
CRC32_reverse = np.flipud(CRC32)print(CRC32)CRC32 = ''.join(map(str, CRC32))
print(hex(int(CRC32,2)))print(CRC32_reverse)CRC32_reverse = ''.join(map(str, CRC32_reverse))
print(hex(int(CRC32_reverse,2)))CRC32_reverse_complement  = int(CRC32_reverse,2)^0xFFFFFFFF
print('CRC32_reverse_complement=',hex(CRC32_reverse_complement))
注意:WLAN的MAC帧的FCS是完整的CRC32校验
这篇关于CRC32的原理介绍以及查表法实现和多项式相除实现的文章就介绍到这儿,希望我们推荐的文章对编程师们有所帮助!


