本文主要是介绍【java爬虫】首页显示沪深300指数走势图以及前后端整合部署方法,希望对大家解决编程问题提供一定的参考价值,需要的开发者们随着小编来一起学习吧!
添加首页
本文我们将在首页添加沪深300指数成立以来的整体走势数据展示,最后的效果是这样的

单独贴一张沪深300整体走势图

我感觉从总体上来看指数还是比较稳的,没有特别大的波动,当然,这只是相对而言哈哈。
首先是前端页面
<template><div><el-row class="container"><div class="left-grid"><el-card class="box-card"><template #header><div class="card-header"><span>更新沪深300成分股数据</span></div></template><el-form><el-form-item><el-text>信息更新状态:{{ update_status }}</el-text></el-form-item><el-form-item><el-text>操作:</el-text><el-button type="primary" size="medium" @click="updateCSI300">重新更新信息</el-button></el-form-item></el-form></el-card><el-card><el-tablev-loading="loading":data="table_data":show-header="true":max-height="430"stripe><el-table-columntype="index"label="序号"width="65%"></el-table-column><el-table-column prop="code" label="股票代码"></el-table-column><el-table-column prop="name" label="公司简称"></el-table-column><el-table-column prop="industry" label="所属行业"></el-table-column><el-table-column prop="weight" label="权重占比"></el-table-column></el-table></el-card></div><div class="right-grid" ref="myChart"></div></el-row></div>
</template><script>
import axios from "axios";
import { ElMessage } from "element-plus";
import { getCurrentInstance } from "vue";
export default {data() {return {update_status: "未开始",loading: true,table_data: [],pie_data: [],echarts: getCurrentInstance().appContext.config.globalProperties.$echarts,};},mounted() {this.init();},methods: {init() {var url = "http://localhost:9001/queryAll";axios.get(url).then((response) => {this.table_data = response.data;console.log(response);this.loading = false;}).catch((error) => {console.log(error);this.loading = false;});this.create_pie();},// 绘制饼状图create_pie() {var url = "http://localhost:9001/queryDist";axios.get(url).then((response) => {console.log(response);this.pie_data = [];for (var i = 0; i < response.data.length; i++) {this.pie_data.push({value: response.data[i].weight,name: response.data[i].industry,});}console.log(this.pie_data);var myChart = this.echarts.init(this.$refs["myChart"]);var option = {title: {text: "沪深300行业权重分布", //标题},toolbox: {feature: {dataZoom: {yAxisIndex: "none",},saveAsImage: {},},},legend: {y: 50,textStyle: {fontSize: 14,},},label: {show: true,},series: [{name: "分布", //数据的名字type: "pie", //表示柱状图radius: "70%", //圆的半径center: ["50%", "60%"],label: {formatter: function (params) {console.log(params.name + " " + params.value + "%");return params.name + " " + params.value + "%";},textStyle: {fontSize: 14,fontWeight: "bolder",},color: "inherit",},data: this.pie_data,selectedMode: "single", //选中效果,使选中区域偏离圆心一小段距离,single或者multipleselectedOffset: 10, //偏离圆心的一小段距离},],};// 使用刚指定的配置项和数据显示图表。myChart.setOption(option);}).catch((error) => {console.log(error);});},// 更新沪深300成分股数据updateCSI300() {var url = "http://localhost:9001/parse";this.update_status = "更新中";ElMessage("开始更新数据");axios.get(url).then((response) => {console.log(response);// 调用接口成功则返回成功提示框ElMessage({message: "更新数据成功",type: "success",});this.update_status = "更新成功";// 重新初始化数据this.loading = true;this.init();}).catch((error) => {console.log(error);this.update_status = "更新失败";// 调用接口失败则返回失败提示框ElMessage.error("更新数据失败");});},},
};
</script><style scoped>
.card-header {display: flex;justify-content: space-between;align-items: center;
}
.container {display: grid;grid-template-columns: 35% 65%;width: 100%;height: 80vh;
}
.left-grid {background-color: #f0f0f0;border-radius: 2%;padding: 10px;height: 95%;
}
.right-grid {background-color: #f9ecc3;border-radius: 2%;padding: 10px;height: 95%;
}
</style>
对应的后端接口就是添加了获取沪深300指数数据的代码,比较简单,这里不赘述了。
前后端整合部署
我们的项目是前后端分离的项目,但是部署的时候实际上可以将前端页面放到springboot中进行部署,springboot使用theamleaf引擎来分发页面。
这篇文章有介绍前后端整合部署的方法
vue+springboot前后端分离项目整合部署流程_springboot vue前后端分离项目部署-CSDN博客
下面我来介绍一下我们这个项目整合部署的方法
首先打开命令行,cd到前端项目目录,然后执行 npm run build 命令,执行成功后会看到如下的显示

我们去到项目目录,会看到多了一个dist文件夹

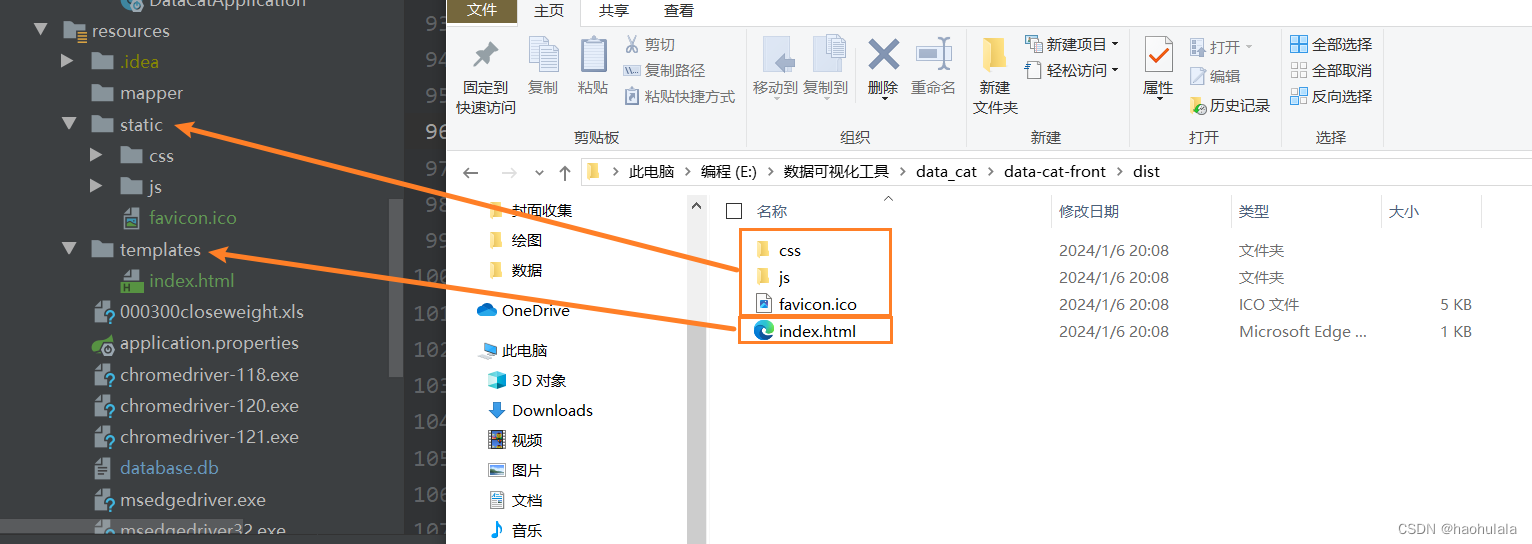
我们需要把文件夹中的内容复制到springboot项目中的resource文件夹下面

然后新建一个Controller类用来跳转,里面的内容如下
@Controller
public class IndexController {@RequestMapping("/")public String parse() {return "index";}}
这样一来我们编译出jar包后就可以直接用 9001 端口访问前端页面了。
这篇关于【java爬虫】首页显示沪深300指数走势图以及前后端整合部署方法的文章就介绍到这儿,希望我们推荐的文章对编程师们有所帮助!


