本文主要是介绍【 SuperPoint 】图像特征提取上的对比实验,希望对大家解决编程问题提供一定的参考价值,需要的开发者们随着小编来一起学习吧!
1. SIFT,SuperPoint 都具有提取图片特征点,并且输出特征描述子的特性,本篇文章从特征点的提取数量,特征点的正确匹配数量来探索一下二者的优劣。
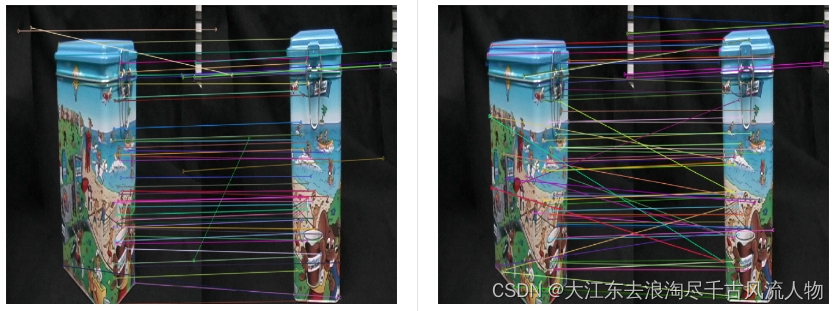
SuperPoint提取到的特征点数量要少一些,可以理解,我想原因大概是SuperPoint训练使用的是合成数据集,含有很多形状,并且只标出了线段的一些拐点,而sift对图像的像素值变化敏感。
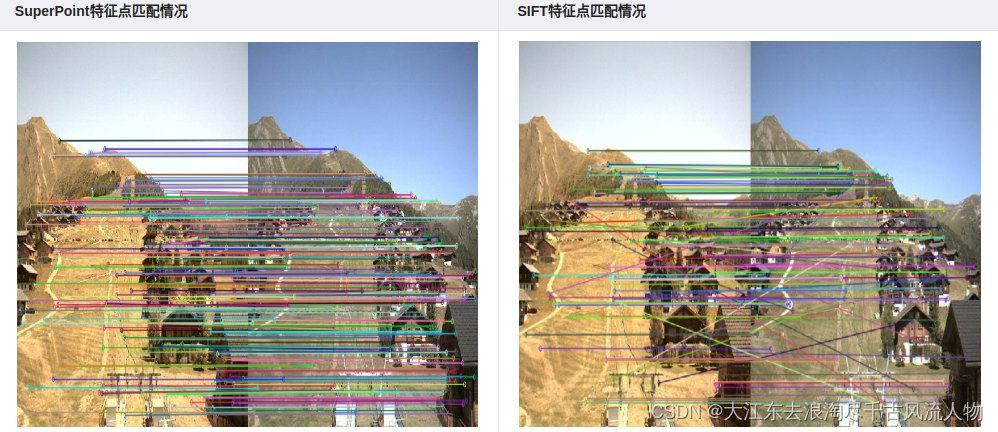
在特征点匹配上,感觉不出有什么明显的差异,但是很明显,SuperPoint的鲁棒性更高一些,sift匹配有很多的错点,比如SIFT第三幅图中的牛奶盒子,由于物体没有上下的起伏,可以认为连线中的斜线都是错匹配。
在形状较为复杂的情况下
正如上文所说,SuperPoint对形状较多的图片敏感。
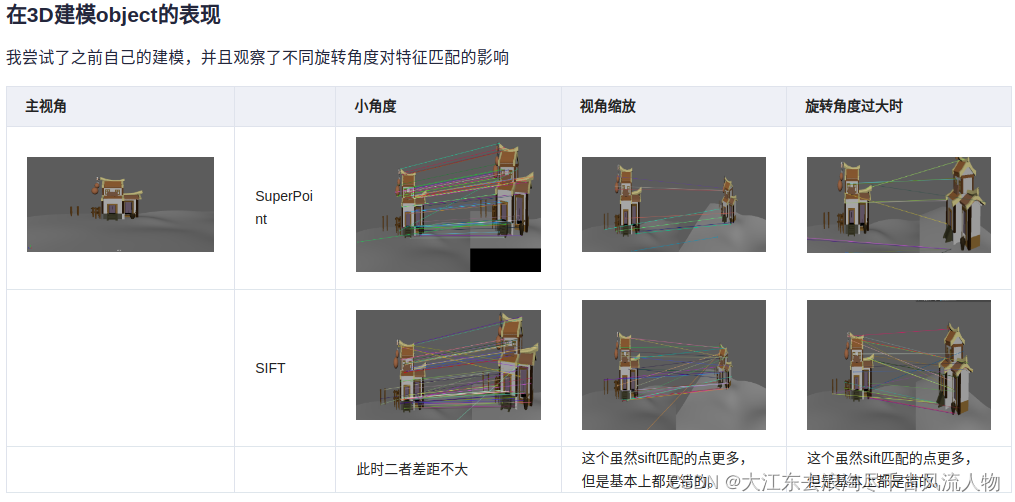
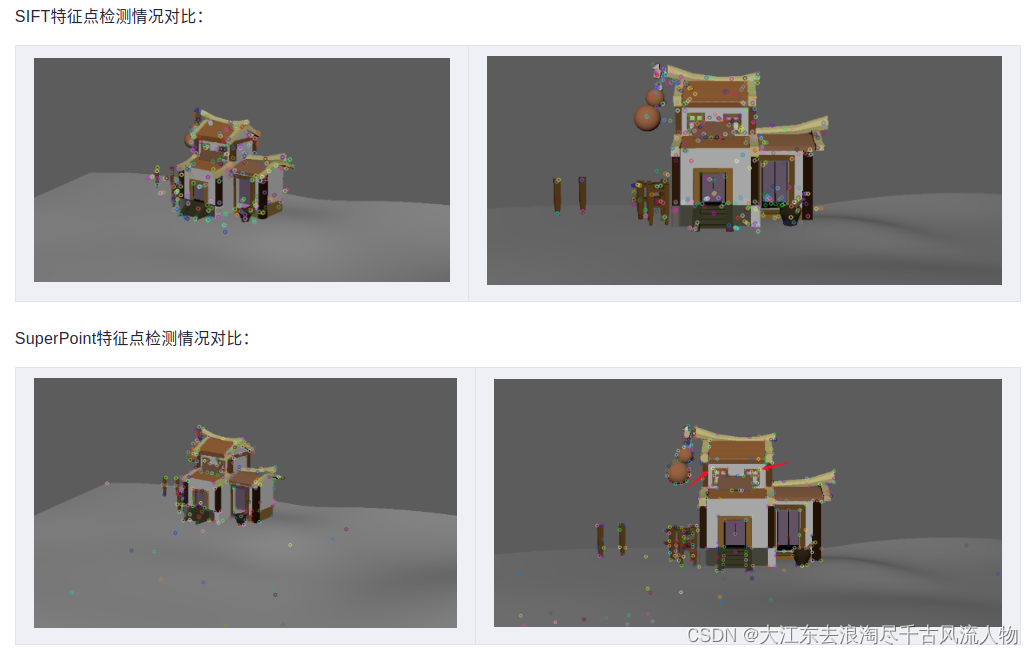
同样值得注意的是,第一张图的窗子的点,SuperPoint并没有检测出来。
2. 总结
在捕捉特征点的时候,SuperPoint对形状的特征点敏感,SIFT对像素的变化敏感
在进行特征点匹配的时候,SuperPoint的特征描述子鲁棒性更好一些
视角变化较大的情况下,二者的表现都差强人意
代码
SIFT.py:
from __future__ import print_function
import cv2 as cv
import numpy as np
import argparsepic1 = "./1.ppm"
pic2 = "./6.ppm"parser = argparse.ArgumentParser(description='Code for Feature Matching with FLANN tutorial.')
parser.add_argument('--input1', help='Path to input image 1.', default=pic1)
parser.add_argument('--input2', help='Path to input image 2.', default=pic2)
args = parser.parse_args()
img_object = cv.imread(pic1)
img_scene = cv.imread(pic2)
if img_object is None or img_scene is None:print('Could not open or find the images!')exit(0)#-- Step 1: Detect the keypoints using SURF Detector, compute the descriptors
minHessian = 600
detector = cv.xfeatures2d_SURF.create(hessianThreshold=minHessian)
keypoints_obj, descriptors_obj = detector.detectAndCompute(img_object, None)
keypoints_scene, descriptors_scene = detector.detectAndCompute(img_scene, None)#-- Step 2: Matching descriptor vectors with a FLANN based matcher
# Since SURF is a floating-point descriptor NORM_L2 is used
matcher = cv.DescriptorMatcher_create(cv.DescriptorMatcher_FLANNBASED)
knn_matches = matcher.knnMatch(descriptors_obj, descriptors_scene, 2)#-- Filter matches using the Lowe's ratio test
ratio_thresh = 0.75
good_matches = []
for m,n in knn_matches:if m.distance < ratio_thresh * n.distance:good_matches.append(m)print("The number of keypoints in image1 is", len(keypoints_obj))
print("The number of keypoints in image2 is", len(keypoints_scene))
#-- Draw matches
img_matches = np.empty((max(img_object.shape[0], img_scene.shape[0]), img_object.shape[1]+img_scene.shape[1], 3), dtype=np.uint8)
cv.drawMatches(img_object, keypoints_obj, img_scene, keypoints_scene, good_matches, img_matches, flags=cv.DrawMatchesFlags_NOT_DRAW_SINGLE_POINTS)cv.namedWindow("Good Matches of SIFT", 0)
cv.resizeWindow("Good Matches of SIFT", 1024, 1024)
cv.imshow('Good Matches of SIFT', img_matches)
cv.waitKey()
使用sift.py时,只需要修改第6,7行的图片路径即可。
SuperPoint
import numpy as np
import os
import cv2
import torch# Jet colormap for visualization.
myjet = np.array([[0., 0., 0.5],[0., 0., 0.99910873],[0., 0.37843137, 1.],[0., 0.83333333, 1.],[0.30044276, 1., 0.66729918],[0.66729918, 1., 0.30044276],[1., 0.90123457, 0.],[1., 0.48002905, 0.],[0.99910873, 0.07334786, 0.],[0.5, 0., 0.]])class SuperPointNet(torch.nn.Module):""" Pytorch definition of SuperPoint Network. """def __init__(self):super(SuperPointNet, self).__init__()self.relu = torch.nn.ReLU(inplace=True)self.pool = torch.nn.MaxPool2d(kernel_size=2, stride=2)c1, c2, c3, c4, c5, d1 = 64, 64, 128, 128, 256, 256# Shared Encoder.self.conv1a = torch.nn.Conv2d(1, c1, kernel_size=3, stride=1, padding=1)self.conv1b = torch.nn.Conv2d(c1, c1, kernel_size=3, stride=1, padding=1)self.conv2a = torch.nn.Conv2d(c1, c2, kernel_size=3, stride=1, padding=1)self.conv2b = torch.nn.Conv2d(c2, c2, kernel_size=3, stride=1, padding=1)self.conv3a = torch.nn.Conv2d(c2, c3, kernel_size=3, stride=1, padding=1)self.conv3b = torch.nn.Conv2d(c3, c3, kernel_size=3, stride=1, padding=1)self.conv4a = torch.nn.Conv2d(c3, c4, kernel_size=3, stride=1, padding=1)self.conv4b = torch.nn.Conv2d(c4, c4, kernel_size=3, stride=1, padding=1)# Detector Head.self.convPa = torch.nn.Conv2d(c4, c5, kernel_size=3, stride=1, padding=1)self.convPb = torch.nn.Conv2d(c5, 65, kernel_size=1, stride=1, padding=0)# Descriptor Head.self.convDa = torch.nn.Conv2d(c4, c5, kernel_size=3, stride=1, padding=1)self.convDb = torch.nn.Conv2d(c5, d1, kernel_size=1, stride=1, padding=0)def forward(self, x):""" Forward pass that jointly computes unprocessed point and descriptortensors.Inputx: Image pytorch tensor shaped N x 1 x H x W.Outputsemi: Output point pytorch tensor shaped N x 65 x H/8 x W/8.desc: Output descriptor pytorch tensor shaped N x 256 x H/8 x W/8."""# Shared Encoder.x = self.relu(self.conv1a(x))x = self.relu(self.conv1b(x))x = self.pool(x)x = self.relu(self.conv2a(x))x = self.relu(self.conv2b(x))x = self.pool(x)x = self.relu(self.conv3a(x))x = self.relu(self.conv3b(x))x = self.pool(x)x = self.relu(self.conv4a(x))x = self.relu(self.conv4b(x))# Detector Head.cPa = self.relu(self.convPa(x))semi = self.convPb(cPa)# Descriptor Head.cDa = self.relu(self.convDa(x))desc = self.convDb(cDa)dn = torch.norm(desc, p=2, dim=1)  # Compute the norm.desc = desc.div(torch.unsqueeze(dn, 1))  # Divide by norm to normalize.return semi, descclass SuperPointFrontend(object):""" Wrapper around pytorch net to help with pre and post image processing. """def __init__(self, weights_path, nms_dist, conf_thresh, nn_thresh,cuda=False):self.name = 'SuperPoint'self.cuda = cudaself.nms_dist = nms_distself.conf_thresh = conf_threshself.nn_thresh = nn_thresh  # L2 descriptor distance for good match.self.cell = 8  # Size of each output cell. Keep this fixed.self.border_remove = 4  # Remove points this close to the border.# Load the network in inference mode.self.net = SuperPointNet()if cuda:# Train on GPU, deploy on GPU.self.net.load_state_dict(torch.load(weights_path))self.net = self.net.cuda()else:# Train on GPU, deploy on CPU.self.net.load_state_dict(torch.load(weights_path,map_location=lambda storage, loc: storage))self.net.eval()def nms_fast(self, in_corners, H, W, dist_thresh):"""Run a faster approximate Non-Max-Suppression on numpy corners shaped:3xN [x_i,y_i,conf_i]^TAlgo summary: Create a grid sized HxW. Assign each corner location a 1, restare zeros. Iterate through all the 1's and convert them either to -1 or 0.Suppress points by setting nearby values to 0.Grid Value Legend:-1 : Kept.0 : Empty or suppressed.1 : To be processed (converted to either kept or supressed).NOTE: The NMS first rounds points to integers, so NMS distance might notbe exactly dist_thresh. It also assumes points are within image boundaries.Inputsin_corners - 3xN numpy array with corners [x_i, y_i, confidence_i]^T.H - Image height.W - Image width.dist_thresh - Distance to suppress, measured as an infinty norm distance.Returnsnmsed_corners - 3xN numpy matrix with surviving corners.nmsed_inds - N length numpy vector with surviving corner indices."""grid = np.zeros((H, W)).astype(int)  # Track NMS data.inds = np.zeros((H, W)).astype(int)  # Store indices of points.# Sort by confidence and round to nearest int.inds1 = np.argsort(-in_corners[2, :])corners = in_corners[:, inds1]rcorners = corners[:2, :].round().astype(int)  # Rounded corners.# Check for edge case of 0 or 1 corners.if rcorners.shape[1] == 0:return np.zeros((3, 0)).astype(int), np.zeros(0).astype(int)if rcorners.shape[1] == 1:out = np.vstack((rcorners, in_corners[2])).reshape(3, 1)return out, np.zeros((1)).astype(int)# Initialize the grid.for i, rc in enumerate(rcorners.T):grid[rcorners[1, i], rcorners[0, i]] = 1inds[rcorners[1, i], rcorners[0, i]] = i# Pad the border of the grid, so that we can NMS points near the border.pad = dist_threshgrid = np.pad(grid, ((pad, pad), (pad, pad)), mode='constant')# Iterate through points, highest to lowest conf, suppress neighborhood.count = 0for i, rc in enumerate(rcorners.T):# Account for top and left padding.pt = (rc[0] + pad, rc[1] + pad)if grid[pt[1], pt[0]] == 1:  # If not yet suppressed.grid[pt[1] - pad:pt[1] + pad + 1, pt[0] - pad:pt[0] + pad + 1] = 0grid[pt[1], pt[0]] = -1count += 1# Get all surviving -1's and return sorted array of remaining corners.keepy, keepx = np.where(grid == -1)keepy, keepx = keepy - pad, keepx - padinds_keep = inds[keepy, keepx]out = corners[:, inds_keep]values = out[-1, :]inds2 = np.argsort(-values)out = out[:, inds2]out_inds = inds1[inds_keep[inds2]]return out, out_indsdef run(self, img):""" Process a numpy image to extract points and descriptors.Inputimg - HxW numpy float32 input image in range [0,1].Outputcorners - 3xN numpy array with corners [x_i, y_i, confidence_i]^T.desc - 256xN numpy array of corresponding unit normalized descriptors.heatmap - HxW numpy heatmap in range [0,1] of point confidences."""assert img.ndim == 2, 'Image must be grayscale.'assert img.dtype == np.float32, 'Image must be float32.'H, W = img.shape[0], img.shape[1]inp = img.copy()inp = (inp.reshape(1, H, W))inp = torch.from_numpy(inp)inp = torch.autograd.Variable(inp).view(1, 1, H, W)if self.cuda:inp = inp.cuda()# Forward pass of network.outs = self.net.forward(inp)semi, coarse_desc = outs[0], outs[1]# Convert pytorch -> numpy.semi = semi.data.cpu().numpy().squeeze()# --- Process points.# C = np.max(semi)# dense = np.exp(semi - C)  # Softmax.# dense = dense / (np.sum(dense))  # Should sum to 1.dense = np.exp(semi)  # Softmax.dense = dense / (np.sum(dense, axis=0) + .00001)  # Should sum to 1.# Remove dustbin.nodust = dense[:-1, :, :]# Reshape to get full resolution heatmap.Hc = int(H / self.cell)Wc = int(W / self.cell)nodust = nodust.transpose(1, 2, 0)heatmap = np.reshape(nodust, [Hc, Wc, self.cell, self.cell])heatmap = np.transpose(heatmap, [0, 2, 1, 3])heatmap = np.reshape(heatmap, [Hc * self.cell, Wc * self.cell])xs, ys = np.where(heatmap >= self.conf_thresh)  # Confidence threshold.if len(xs) == 0:return np.zeros((3, 0)), None, Nonepts = np.zeros((3, len(xs)))  # Populate point data sized 3xN.pts[0, :] = yspts[1, :] = xspts[2, :] = heatmap[xs, ys]pts, _ = self.nms_fast(pts, H, W, dist_thresh=self.nms_dist)  # Apply NMS.inds = np.argsort(pts[2, :])pts = pts[:, inds[::-1]]  # Sort by confidence.# Remove points along border.bord = self.border_removetoremoveW = np.logical_or(pts[0, :] < bord, pts[0, :] >= (W - bord))toremoveH = np.logical_or(pts[1, :] < bord, pts[1, :] >= (H - bord))toremove = np.logical_or(toremoveW, toremoveH)pts = pts[:, ~toremove]# --- Process descriptor.D = coarse_desc.shape[1]if pts.shape[1] == 0:desc = np.zeros((D, 0))else:# Interpolate into descriptor map using 2D point locations.samp_pts = torch.from_numpy(pts[:2, :].copy())samp_pts[0, :] = (samp_pts[0, :] / (float(W) / 2.)) - 1.samp_pts[1, :] = (samp_pts[1, :] / (float(H) / 2.)) - 1.samp_pts = samp_pts.transpose(0, 1).contiguous()samp_pts = samp_pts.view(1, 1, -1, 2)samp_pts = samp_pts.float()if self.cuda:samp_pts = samp_pts.cuda()desc = torch.nn.functional.grid_sample(coarse_desc, samp_pts)desc = desc.data.cpu().numpy().reshape(D, -1)desc /= np.linalg.norm(desc, axis=0)[np.newaxis, :]return pts, desc, heatmapif __name__ == '__main__':print('==> Loading pre-trained network.')# This class runs the SuperPoint network and processes its outputs.fe = SuperPointFrontend(weights_path="superpoint_v1.pth",nms_dist=4,conf_thresh=0.015,nn_thresh=0.7,cuda=True)print('==> Successfully loaded pre-trained network.')pic1 = "./1.ppm"pic2 = "./6.ppm"image1_origin = cv2.imread(pic1)image2_origin = cv2.imread(pic2)image1 = cv2.imread(pic1, cv2.IMREAD_GRAYSCALE).astype(np.float32)image2 = cv2.imread(pic2, cv2.IMREAD_GRAYSCALE).astype(np.float32)image1 = image1 / 255.image2 = image2 / 255.if image1 is None or image2 is None:print('Could not open or find the images!')exit(0)# -- Step 1: Detect the keypoints using SURF Detector, compute the descriptorskeypoints_obj, descriptors_obj, h1 = fe.run(image1)keypoints_scene, descriptors_scene, h2 = fe.run(image2)## to transfer array ==> KeyPointskeypoints_obj = [cv2.KeyPoint(keypoints_obj[0][i], keypoints_obj[1][i], 1)for i in range(keypoints_obj.shape[1])]keypoints_scene = [cv2.KeyPoint(keypoints_scene[0][i], keypoints_scene[1][i], 1)for i in range(keypoints_scene.shape[1])]print("The number of keypoints in image1 is", len(keypoints_obj))print("The number of keypoints in image2 is", len(keypoints_scene))# -- Step 2: Matching descriptor vectors with a FLANN based matcher# Since SURF is a floating-point descriptor NORM_L2 is usedmatcher = cv2.DescriptorMatcher_create(cv2.DescriptorMatcher_FLANNBASED)knn_matches = matcher.knnMatch(descriptors_obj.T, descriptors_scene.T, 2)# -- Filter matches using the Lowe's ratio testratio_thresh = 0.75good_matches = []for m, n in knn_matches:if m.distance < ratio_thresh * n.distance:good_matches.append(m)# -- Draw matchesimg_matches = np.empty((max(image1_origin.shape[0], image2_origin.shape[0]), image1_origin.shape[1] + image2_origin.shape[1], 3),dtype=np.uint8)cv2.drawMatches(image1_origin, keypoints_obj, image2_origin, keypoints_scene, good_matches, img_matches,flags=cv2.DrawMatchesFlags_NOT_DRAW_SINGLE_POINTS)cv2.namedWindow("Good Matches of SuperPoint", 0)cv2.resizeWindow("Good Matches of SuperPoint", 1024, 1024)cv2.imshow('Good Matches of SuperPoint', img_matches)cv2.waitKey()
superpoint.py是基于官方给出的代码修改得到,使用步骤如下:
去官网下载模型的预训练文件,https://github.com/magicleap/SuperPointPretrainedNetwork

3. 笔者自己也操作跑了一个小视频:
4. https://download.csdn.net/download/Darlingqiang/88387732
参考:SIFT,SuperPoint在图像特征提取上的对比实验
这篇关于【 SuperPoint 】图像特征提取上的对比实验的文章就介绍到这儿,希望我们推荐的文章对编程师们有所帮助!


