本文主要是介绍HarmonyOS 开发实例—蜜蜂 AI 助手,希望对大家解决编程问题提供一定的参考价值,需要的开发者们随着小编来一起学习吧!
HarmonyOS 开发实例—蜜蜂 AI 助手
1. 前言
自华为宣布 HarmonyOS NEXT 全面启动,近期新浪、B 站、小红书、支付宝等各领域头部企业纷纷启动鸿蒙原生应用开发。据媒体统计,如今 Top20 的应用里,已经有近一半开始了鸿蒙原生应用开发。虽然目前 HarmonyOS NEXT 还未面向个人开发者开放,但我们可以体验并使用最新的 API9 和开发工具,尝试开发元服务,这个鸿蒙新的应用形态。体验未来在 HarmonyOS NEXT 上实现的应用开发。但需要注意的是, 基于 API9 开发的应用或元服务是不可以适配 HarmonyOS NEXT 版本的,大家也可以期待一下明年推出的适配 HarmonyOS NEXT 新版本。
本文主要是基于蜜蜂 AI 元服务的开发案例,主要的功能有
元服务内部功能:
1、提供两个 Tabs,首页和我的;
2、用户只有登录之后才可以去使用蜜蜂 AI 的功能;
3、目前现有的知识库包括知识百科小助手,节日小助手,文本翻译小助手,产品名称小助手,以及道歉信小助手等;
4、用户使用小助手之后,我们可以保存对话到列表内,下次快速的进行访问。
元服务卡片:
1、提供 2-4 的卡片,卡片界面展示每日妙语,点击即可刷新;
2、提供 1-2 的卡片,实现快速访问首页;
3、提供 2-2 卡片,可以快速使用包括知识百科小助手,节日小助手,文本翻译小助手,产品名称小助手;
4、提供 4-4 卡片,可以快速到达登陆页面,访问小助手等。
armonyOS 开发实例—蜜蜂 AI 助手演示视频
1.1 HarmonyOS
HarmonyOS 是华为公司开发的操作系统,它的设计理念是面向未来的全场景智慧体验,可在各种设备上运行,包括手机、平板电脑、智能手表、智能音箱等。HarmonyOS 采用分布式技术,可以将不同设备之间的计算资源连接起来,实现设备间的协同工作,提高系统的性能和稳定性。此外,HarmonyOS 还拥有高度自适应的界面、多屏协同等特性,使用户能够在不同设备上实现无缝的体验。
1.2 元服务
在万物互联时代,人均持有设备量不断攀升,设备和场景的多样性,使应用开发变得更加复杂、应用入口更加多样。在此背景下,应用提供方和用户迫切需要一种新的服务提供方式,使应用开发更简单、服务(如听音乐、打车等)的获取和使用更便捷。为此,HarmonyOS 除支持传统方式的需要安装的应用(以下简称传统应用)外,还支持更加方便快捷的免安装的应用(即元服务)。
1.3 介绍 AppGallery Connect(AGC)
AppGallery Connect(简称 AGC)致力于为应用的创意、开发、分发、运营、经营各环节提供一站式服务,构建全场景智慧化的应用生态体验。
1.4 蜜蜂 AI 元服务助手背景
目前 AI 正火,而我自己也有辛参与到大模型的训练中来,于是有了蜜蜂这个作品。
元服务与传统应用对比
| 项目 | 元服务 | 传统应用 |
|---|---|---|
| 软件包形态 | App Pack(.app) | App Pack(.app) |
| 分发平台 | 由应用市场(AppGallery)管理和分发 | 由应用市场(AppGallery)管理和分发 |
| 安装后有无桌面 icon | 无桌面 icon,但可手动添加到桌面,显示形式为服务卡片 | 有桌面 icon |
| HAP 免安装要求 | 所有HAP(包括 Entry HAP 和 Feature HAP)均需满足免安装要求 | 所有 HAP(包括 Entry HAP 和 Feature HAP)均为非免安装的 |
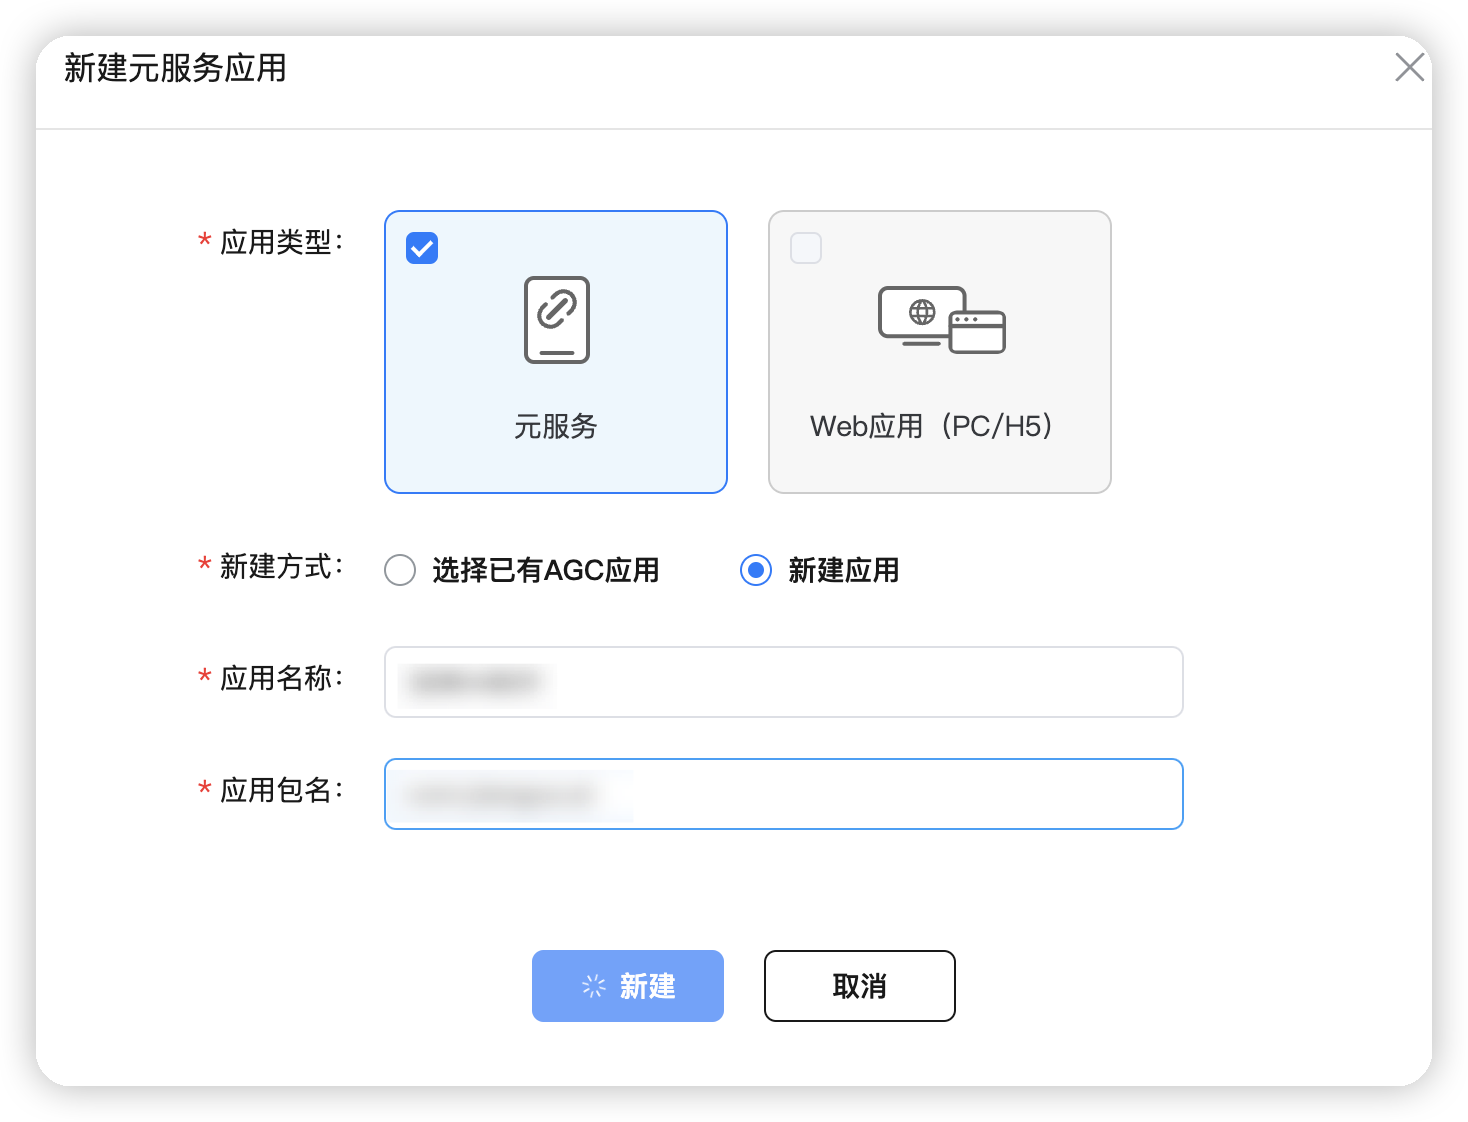
新建元服务应用
开通
AI 平台
https://fulitimes.com/
登陆账号
17752170152
https://ai.fulitimes.com/model?modelId=
如何运行
2. 准备工作
2.1 HarmonyOS 应用开发环境
工欲善其事,必先利其器,我们首先要做的就是搭建开发环境
这里面我们分为三步走
2.1.1 环境安装
首先在这边安装最新的 IDE:
下载链接:https://developer.harmonyos.com/cn/develop/deveco-studio/#download
我的是 M1,所以我们下载这一个就可以

2.1.2 环境配置
下载完成之后,我们就开始配置开发环境。下载 SDK 及工具链,首次使用 DevEco Studio,工具的配置向导会引导您下载 SDK 及工具链。配置向导默认下载 API Version 9 的 SDK 及工具链,我们选择默认就好
下载 nodejs 和 ohpm,记得最好 HarmonyOS SDK 路径中不能包含中文字符。
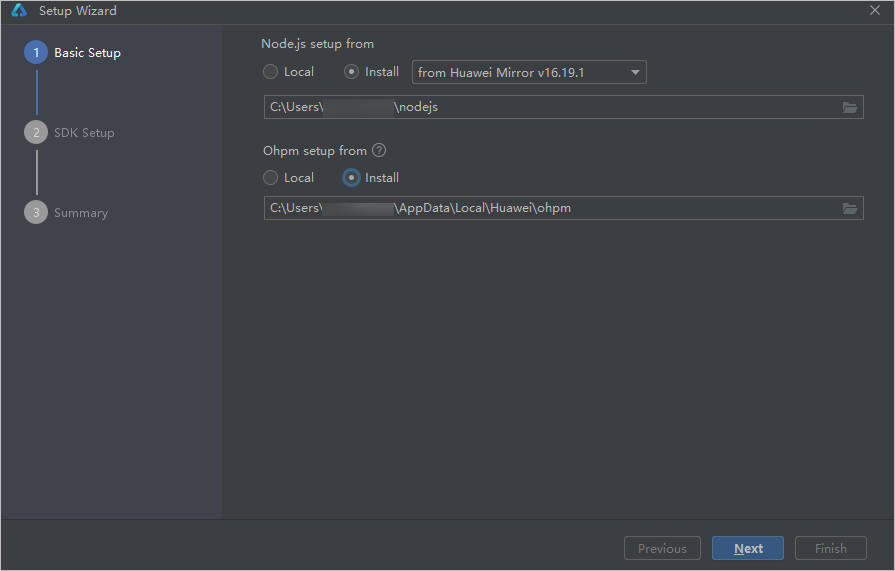
下载完成之后,我们下载 HarmonyOS SDK
在弹出的 SDK 下载信息页面,单击Next,并在弹出的License Agreement窗口,阅读 License 协议,需同意 License 协议后,单击Next。
目前最新的应该是 3.2.13.5。

确认设置项的信息,点击Next开始安装。

等待 Node.js、ohpm 和 SDK 下载完成后,单击Finish,界面会进入到 DevEco Studio 欢迎页。
2.1.3 创建 HelloWord
1.在 DevEco Studio 的欢迎页,选择 Create Project 开始创建一个新工程。

2.根据工程创建向导,在 HarmonyOS 页签,选择“Empty Ability”模板,单击 Next。
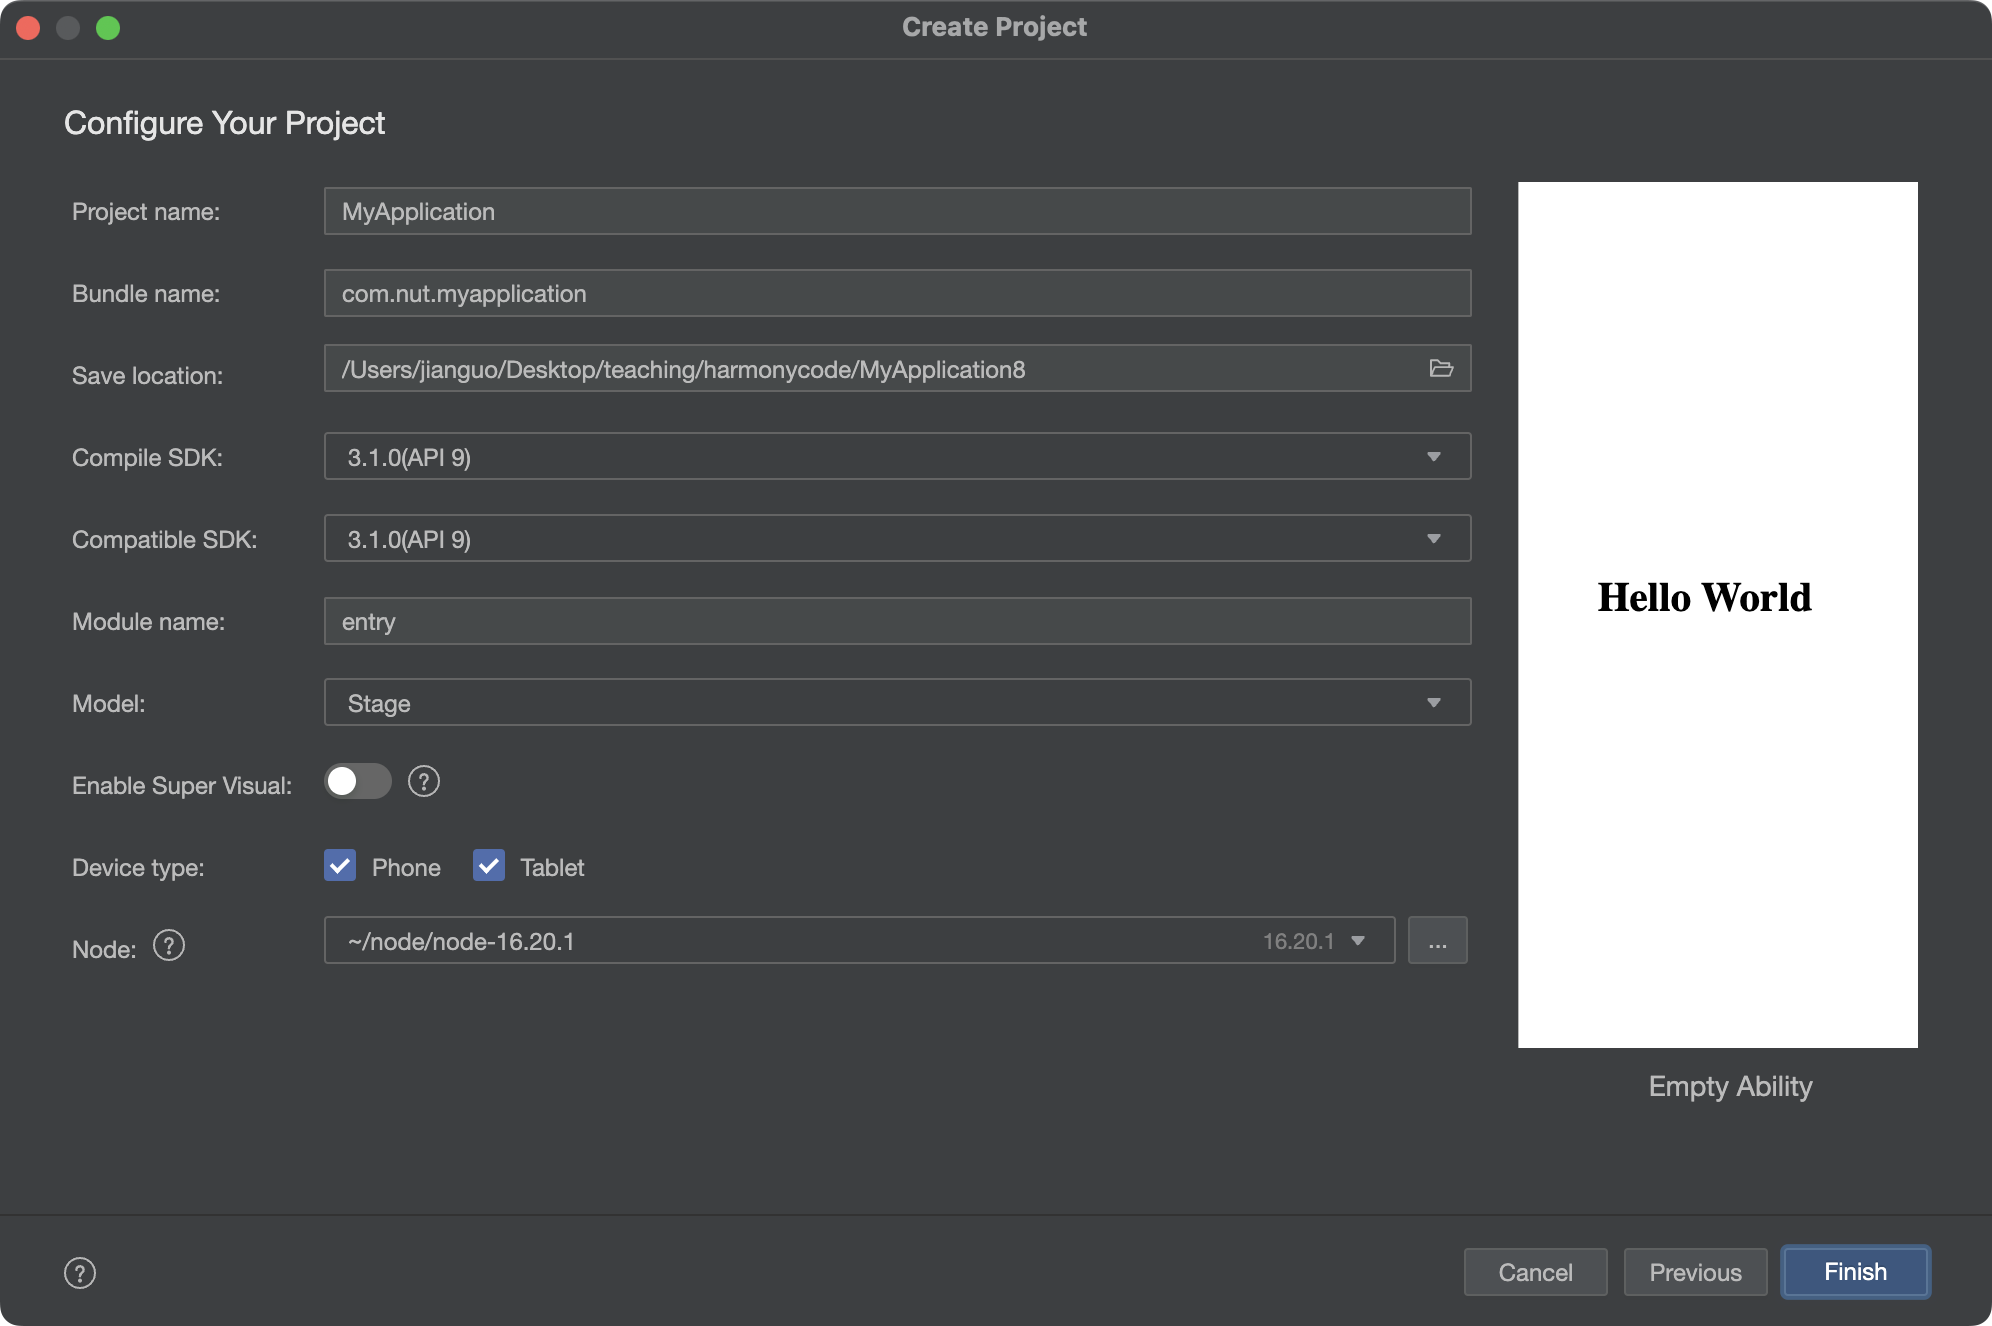
3.单击 Next,各个参数保持默认值即可,单击 Finish,
2.1.4 运行 Helloword
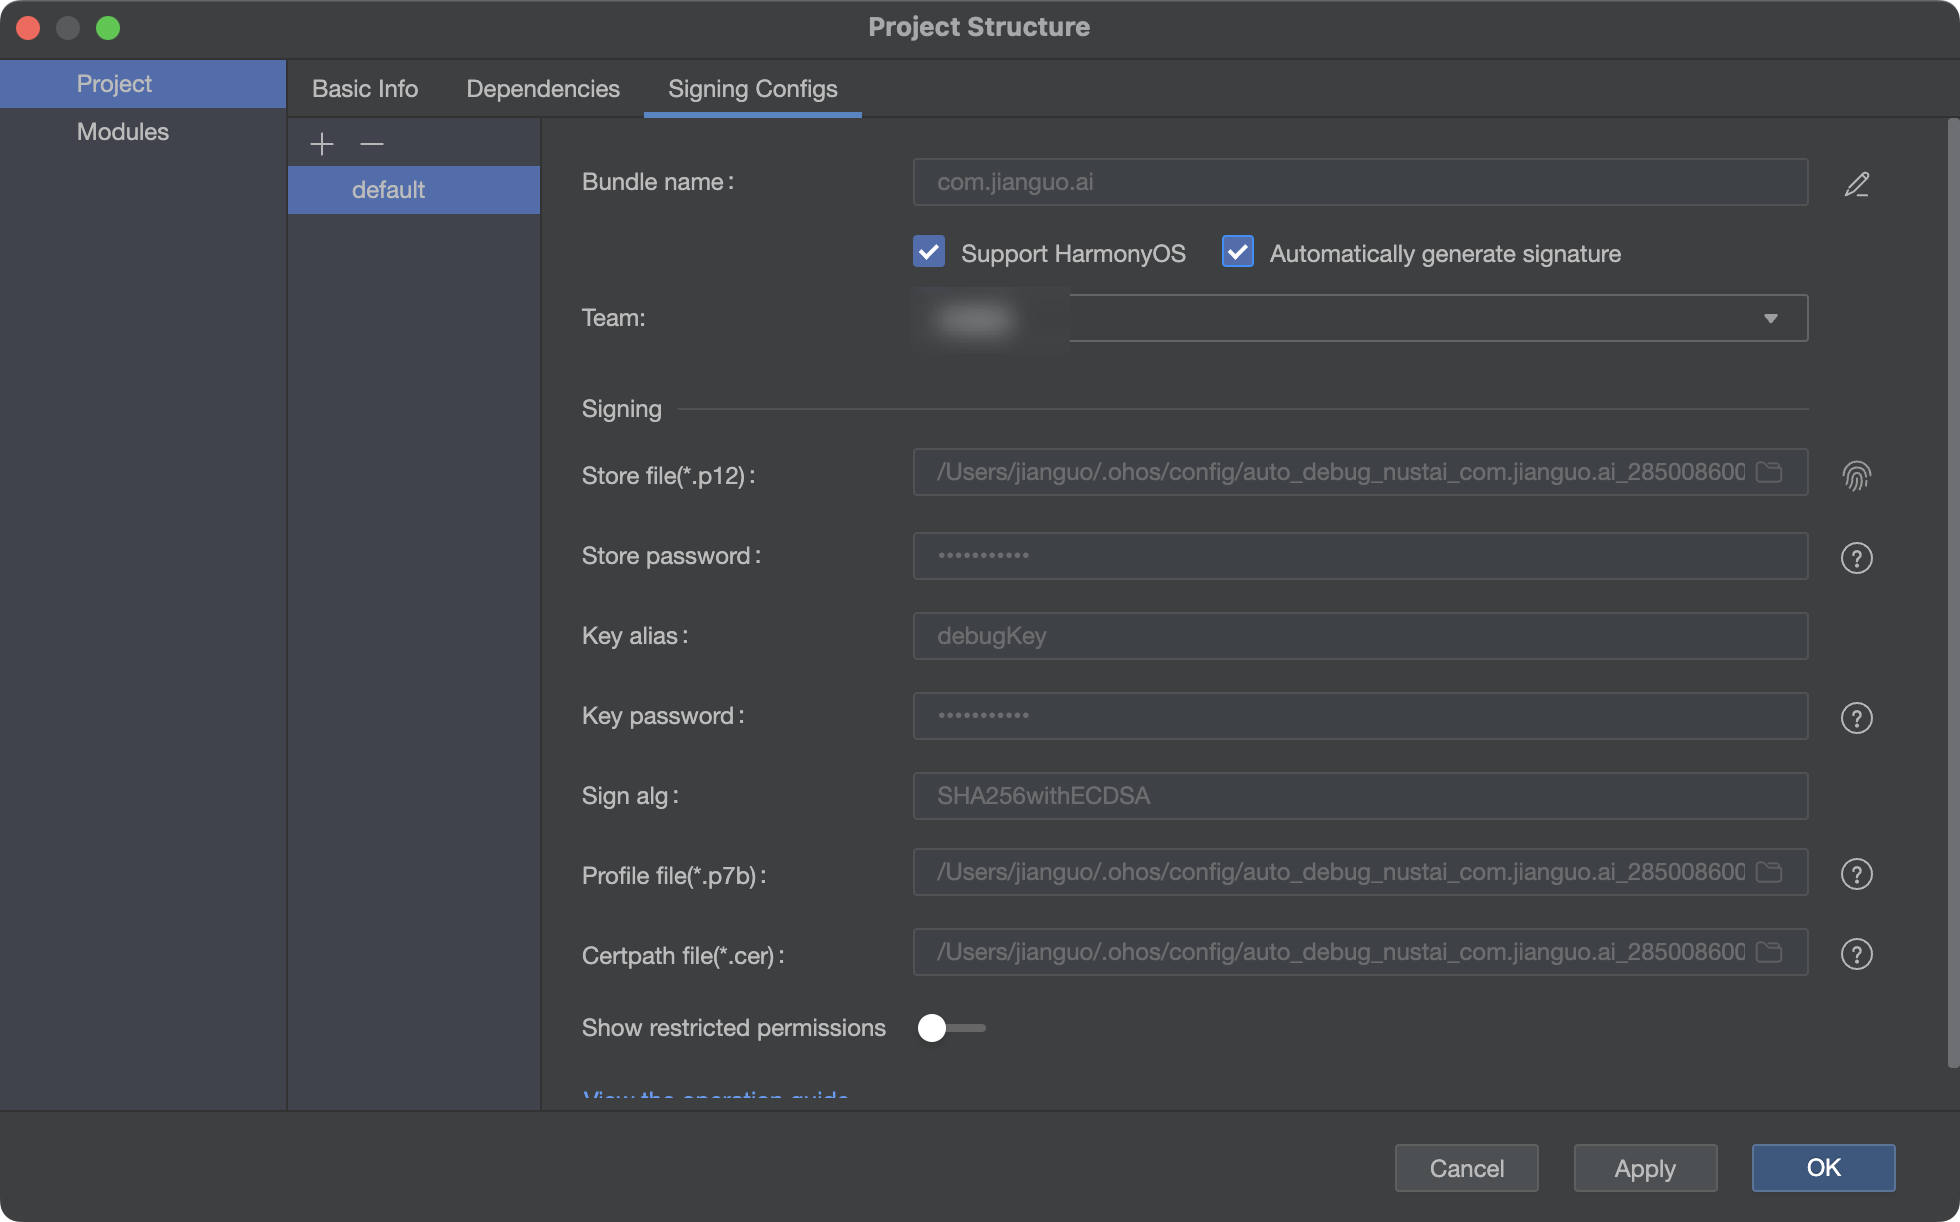
1.将搭载 HarmonyOS 手机与电脑连接。

2.单击 File>Project Structure >Project > SigningConfigs 界面勾选“支持 HarmonyOS,以及 Automatically generate signature”,等待自动签名完成即可,单击 OK。如右所示:。
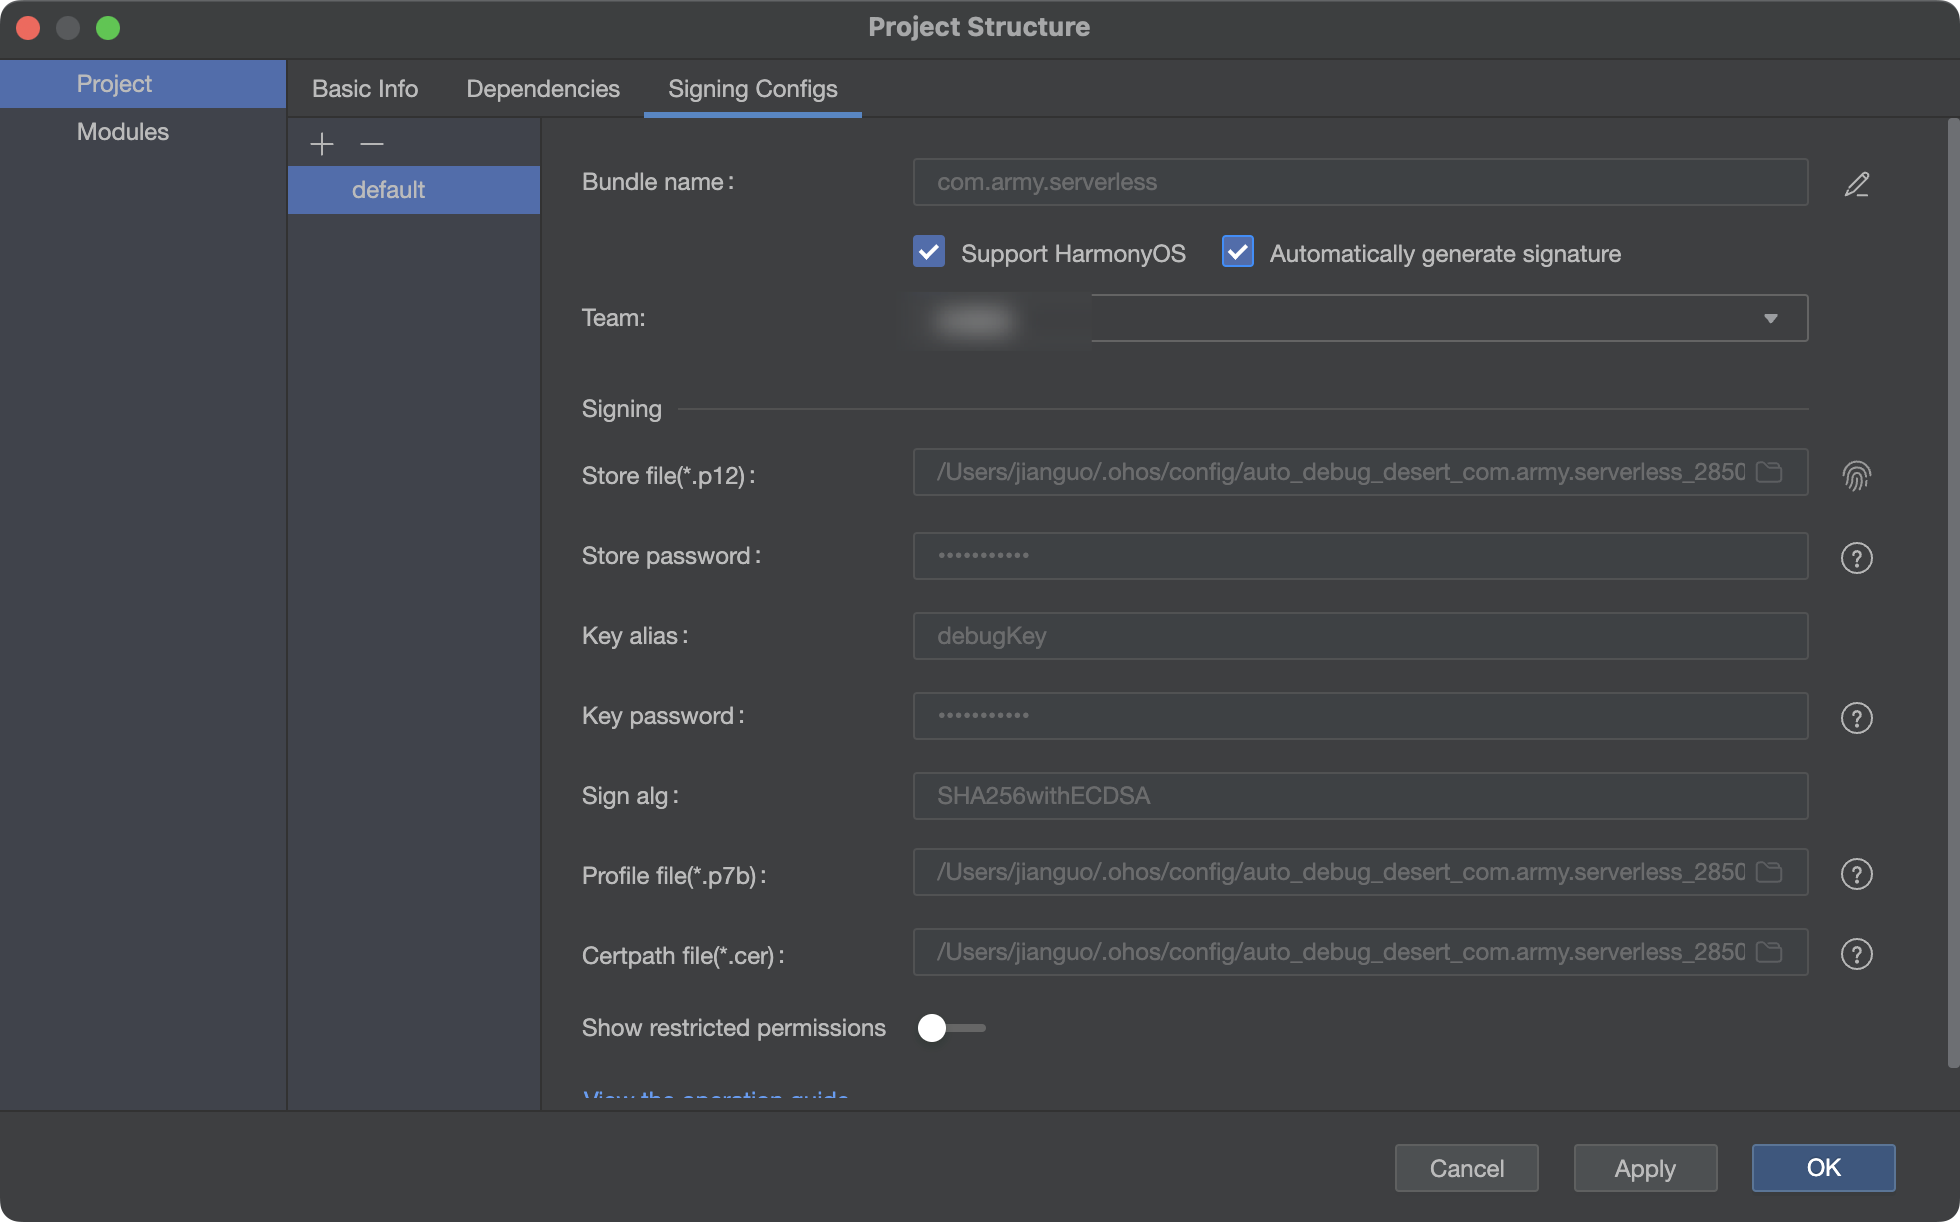
3.在编辑窗口右上角的工具栏,单击运行,等待编译完成即可便运行在设备上。
这个时候真机就可以看到 HelloWord。接下来我们就创建蜜蜂 AI 元服务。
2.2 创建蜜蜂 AI 元服务
这里我们的模版就不再选空模板了,而是直接选择最后一个端云一体化模版

然后其他的就按照上面的配置就可以。完成项目的配置。
这里有个区别就是我们需要关联云资源。所以我们创建的应用包名要牢记,这个要在后面我们云端配置的时候使用。
为工程关联云开发所需的资源,即在 DevEco Studio 中选择您的华为开发者账号加入的开发者团队,将该团队在 AGC 的同包名应用关联到当前工程,具体操作如下:
- 若尚未登录 DevEco Studio,单击“Sign in”,拉起浏览器在弹出的账号登录页面,使用已实名认证的华为开发者账号完成登录。
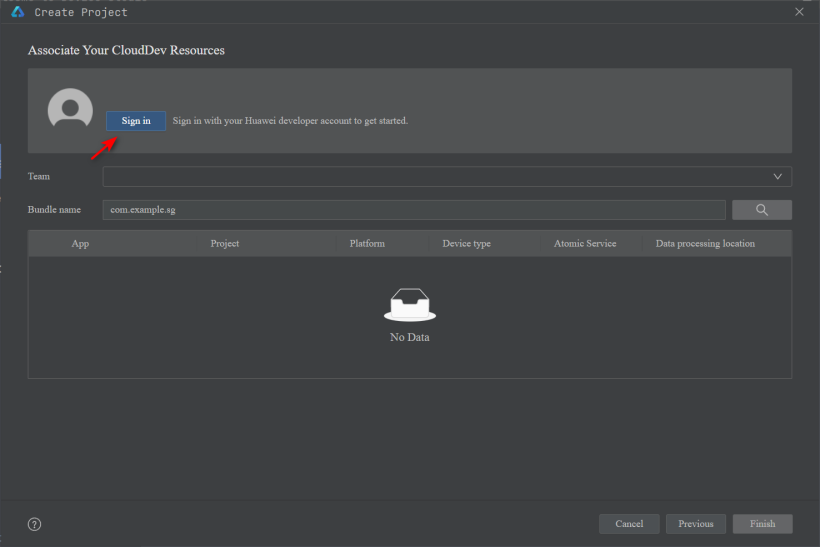
单击“Team”下拉框,选择开发团队。选中团队后,系统根据工程包名自动查询团队下的同包名应用。若为首次创建且团队下未创建同包名的应用,则提示需要在 AGC 平台创建应用。
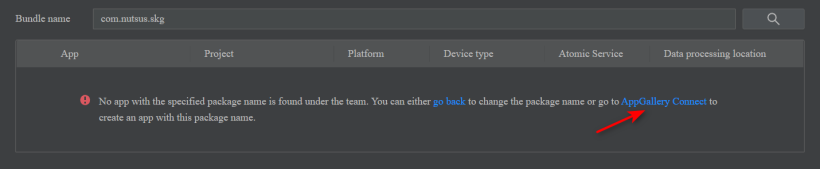
单击“AppGallery Connect”打开 AGC 应用创建向导,填写应用信息,单击“确认”按钮创建应用。
完成以上操作后,DevEco Studio 即可获取到同包名应用对应的项目信息。
2.3 AGC 配置
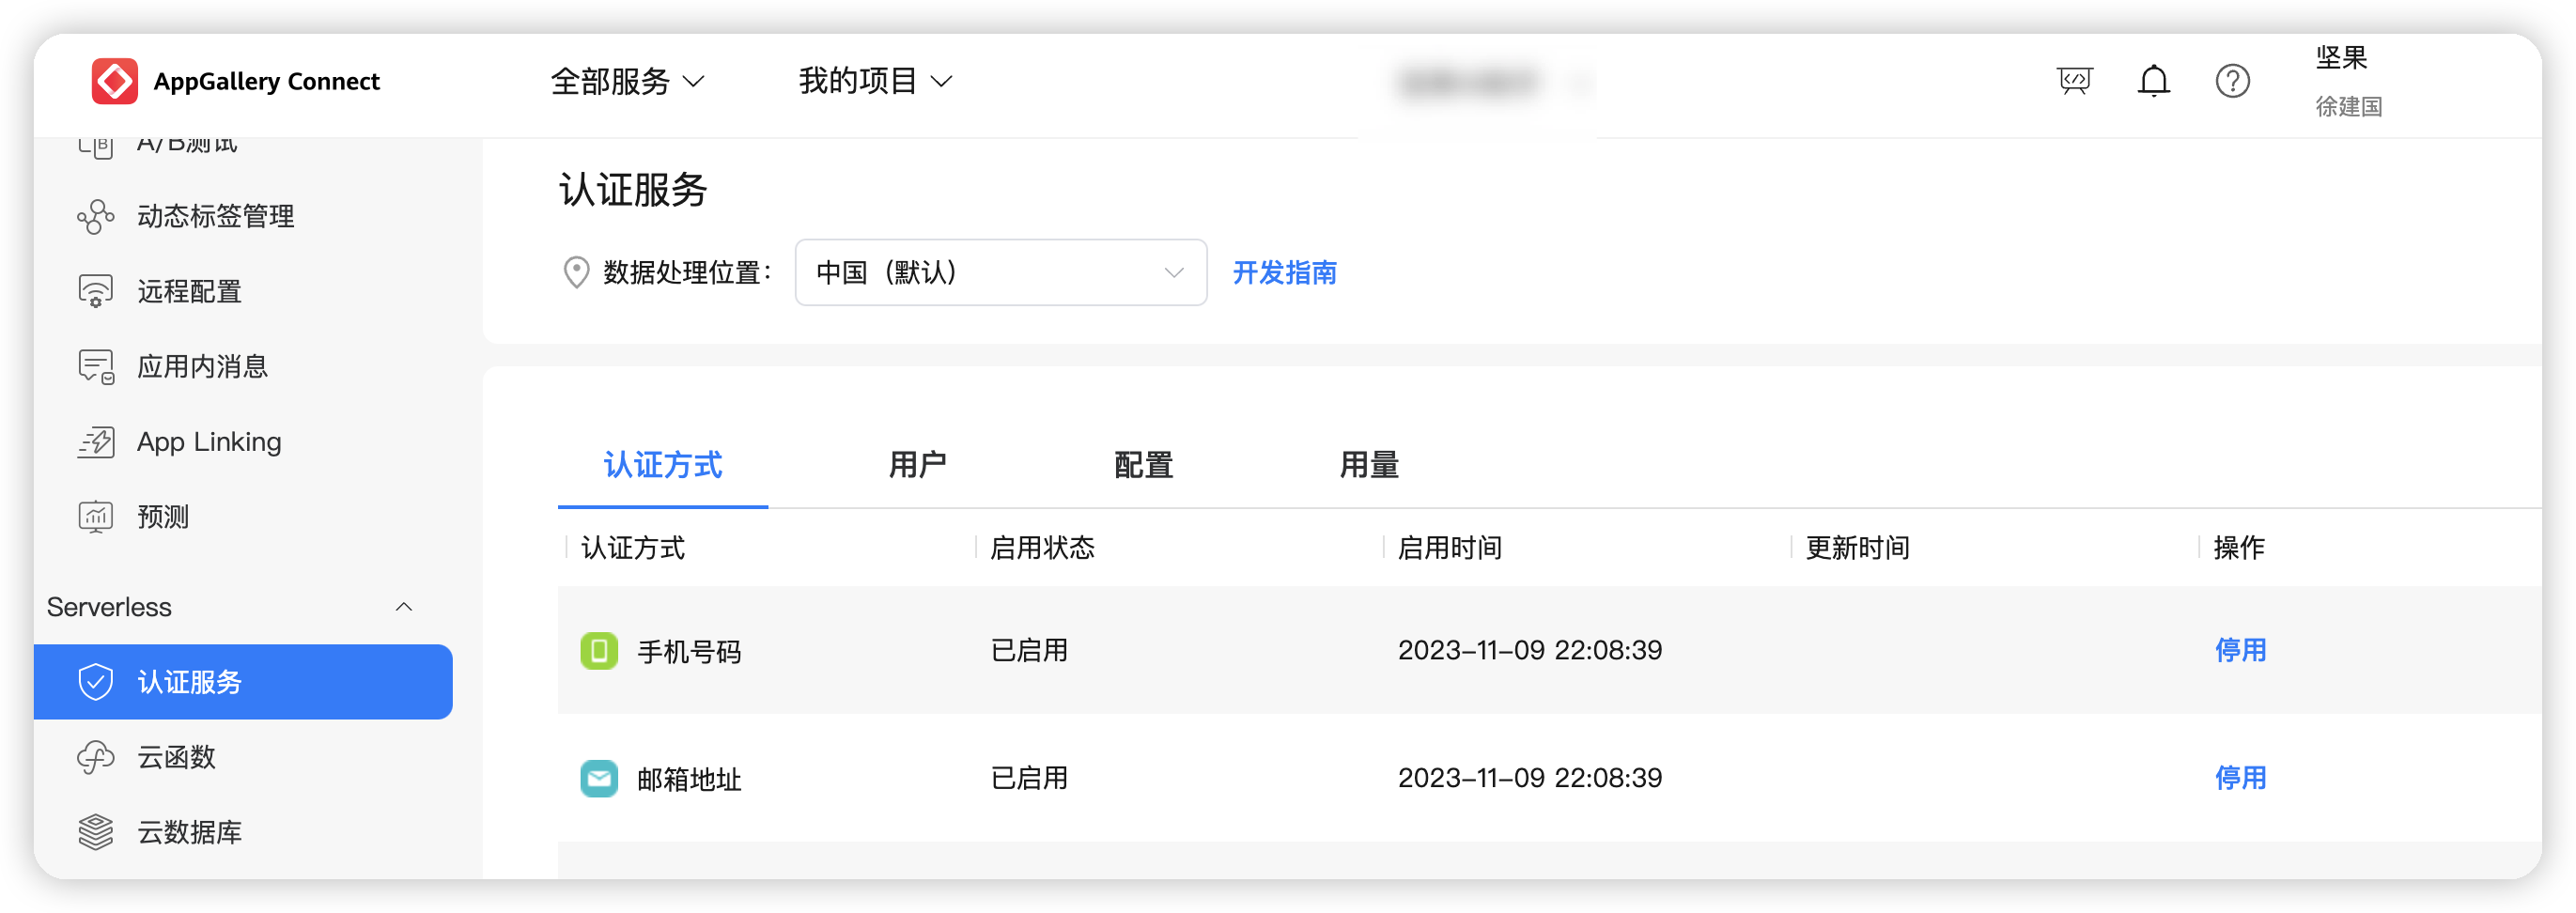
我们登陆云侧,创建元服务

然后我们开通手机登陆和邮箱登录服务。
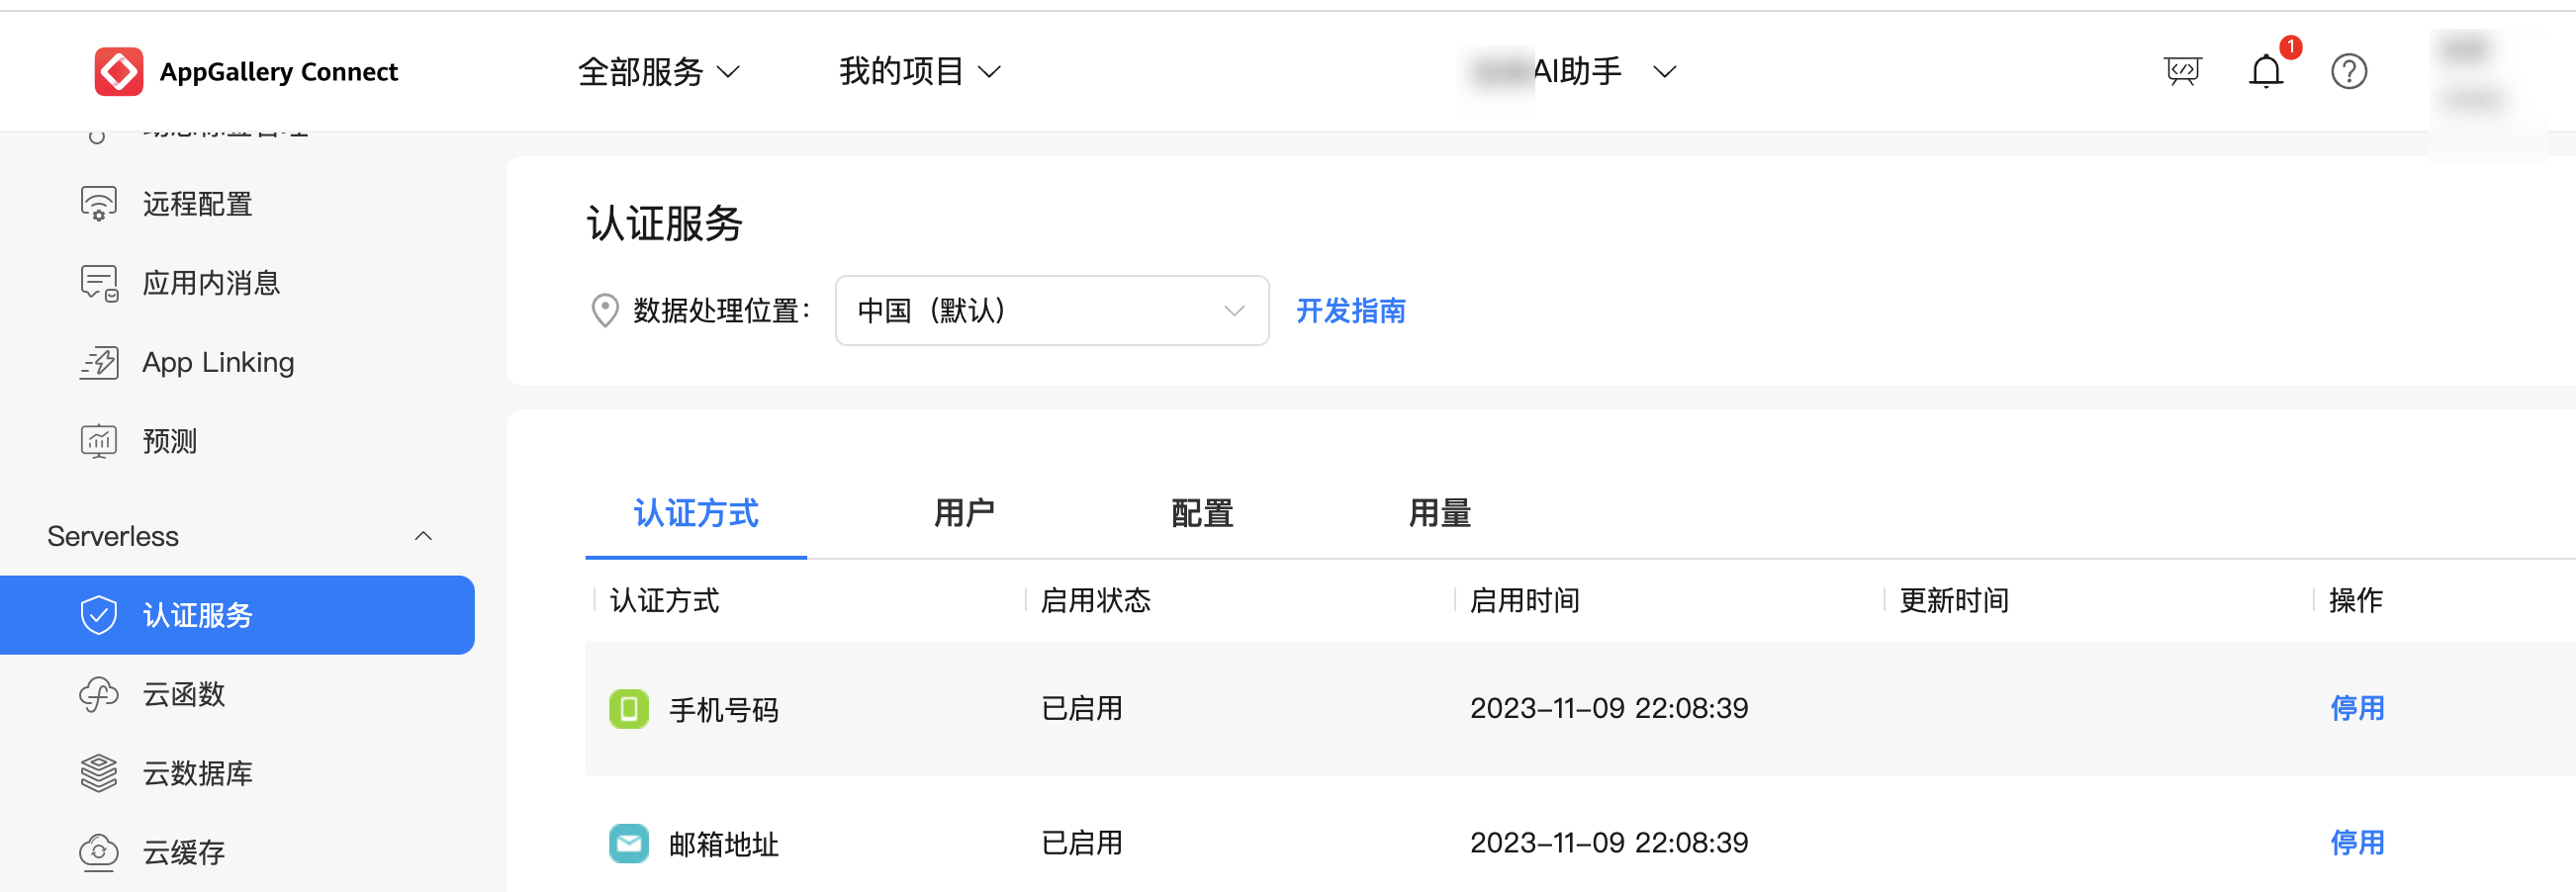
3. 实现登录
当前 AGC 认证服务为 HarmonyOS 应用/服务提供的登录认证方式有手机、邮箱两种方式。本工程使用“手机号码+验证码”的方式作为应用的登录入口。而且我们在前面已经开通。
在登陆这一块,用户首次登陆的时候,我们会首先利用首选项检查他的登陆状态。
首选项工具类
/*** 首选项操作类*/
import { PreferenceDBUtil } from '../utils/PreferencesDBUtil';const preDbService = new PreferenceDBUtil();
preDbService.getPreStorage();export const getDBPre = async (key: string) => {const value = await preDbService.getPreVal(key);return value;
};export const putDBPre = async (key: string, value: string) => {await preDbService.putPreData(key, value);
};
然后跳用调用AGConnectAuth.requestEmailVerifyCode申请验证码,在entry/src/main/ets/services/Auth.ts认证工具类中添加邮箱验证码获取方法。
import { MainPage } from "@hw-agconnect/auth-component-ohos"
import router from '@ohos.router'
import { LogUtil } from '../common/utils/LogUtil';
import { Constants } from '../common/Constants';
import { putPre } from '../common/service/PreService';
import { UserInfo } from '../common/UserInfo';@Entry
@Component
struct Index {@State icon: Resource = router.getParams()['icon'];@State isAgreement:boolean = router.getParams()['isAgreement'];@State agreementContent:string = router.getParams()['agreementContent'];@State onSuccess: Function = router.getParams()['onSuccess'];@State onError: Function = router.getParams()['onError'];build() {Column() {MainPage({icon: this.icon,agreement: {isAgreement: this.isAgreement,agreementContent: this.agreementContent,},onSuccess: async (user) => {LogUtil.info(`登录用户信息:${JSON.stringify(user)}`);const loginUser = user['user'];const userInfo: UserInfo = {uid: loginUser['uid'],email: loginUser['email'],phone: loginUser['phone'] === undefined ? "" : loginUser['phone'].split('-')[1],displayName: loginUser['displayName'] === undefined ? "" : loginUser['displayName'],photoUrl: loginUser['photoUrl'] === undefined ? "/common/imgs/ic_user.svg" : loginUser['photoUrl']}await putPre(Constants.LOGIN_USER_KEY, JSON.stringify(userInfo));router.back();},onError: (err) => {LogUtil.error(`登录用户信息:${JSON.stringify(err)}`);}})}}aboutToAppear() {}
}
未登录弹窗
/*** 未登录弹窗*/
import common from '@ohos.app.ability.common';
import router from '@ohos.router';
import { GlobalConstant } from '../common/constants/GlobalConstant';
@CustomDialog
export struct LoginTipDialogView {loginTipCtrl: CustomDialogController;build() {Column({ space: GlobalConstant.SIZE_8 }) {Row({ space: GlobalConstant.SIZE_4 }) {Image($r('app.media.ic_tip')).width(GlobalConstant.SIZE_32).height(GlobalConstant.SIZE_32)Text('温馨提示').fontSize($r('app.float.font_size_24')).fontColor($r('app.color.tip_color')).fontWeight(FontWeight.Bolder)}.width(GlobalConstant.PAGE_FULL).height(GlobalConstant.SIZE_64).padding({ left: GlobalConstant.SIZE_16 })Text('您还未登录,请登录后体验功能!').height(GlobalConstant.SIZE_48).fontSize(Color.Black).fontSize($r('app.float.font_size_18')).fontWeight(FontWeight.Normal)Row({ space: GlobalConstant.SIZE_8 }) {Button('退出', { type: ButtonType.Normal }).borderRadius(GlobalConstant.SIZE_4).backgroundColor($r('app.color.embellishment_color')).fontColor($r('app.color.text_color_9')).onClick(() => {const ctx = getContext(this) as common.UIAbilityContext;ctx.terminateSelf();})Button('去登录', { type: ButtonType.Normal }).borderRadius(GlobalConstant.SIZE_4).backgroundColor($r('app.color.embellishment_color')).fontColor($r('app.color.auxiliary_color')).onClick(() => {this.loginTipCtrl.close();router.pushUrl({params:{isAgreement: true,agreementContent: "",icon: "",type: ["HWID_VERIFY_CODE","PHONE"]},url: '@bundle:com.jianguo.ai/common/ets/LoginComponent/LoginPage',})})}.width(GlobalConstant.PAGE_FULL).justifyContent(FlexAlign.Center)}.width(GlobalConstant.PAGE_96).padding({ bottom: GlobalConstant.SIZE_20 }).borderRadius(GlobalConstant.SIZE_16).backgroundColor(Color.White)}
}
4.实现蜜蜂 AI 助手页面
我们这个应用主要的一个功能就是 AI 助手,所以这一块我们分为三块。
4.1 蜜蜂 AI 列表页
关于列表页,我们使用一个列表就可以
/*** 首页*/
import { ConfigConstant } from '../common/constants/ConfigConstant'
import { GlobalConstant } from '../common/constants/GlobalConstant'
import { AiAppConfig } from '../common/dto/AiAppConfig';
import router from '@ohos.router'
import { getDBPre } from '../common/api/PreDbService';
@Component
export struct HomeView {@State aiAppList: Array<AiAppConfig> = ConfigConstant.DEFAULT_AI_APP_LIST;}build() {Column() {List() {ForEach(this.aiAppList, (item: AiAppConfig) => {ListItem() {Row({ space: GlobalConstant.SIZE_8 }) {Row() {Image(item.avatar).width(GlobalConstant.SIZE_64).height(GlobalConstant.SIZE_64).borderRadius(GlobalConstant.SIZE_32)}.height(GlobalConstant.PAGE_FULL).layoutWeight(1)Column({ space: GlobalConstant.SIZE_16 }) {Text(item.name).fontSize($r('app.float.font_size_18'))Text(item.intro).fontSize($r('app.float.font_size_14')).fontColor($r('app.color.text_color_9'))}.height(GlobalConstant.PAGE_FULL).layoutWeight(3).justifyContent(FlexAlign.Center).alignItems(HorizontalAlign.Start)}.width(GlobalConstant.PAGE_96).height(GlobalConstant.SIZE_100).paddingStyle().borderRadius(GlobalConstant.SIZE_16).shadow({radius: GlobalConstant.SIZE_16,color: $r('app.color.main_color')}).onClick(() => {router.pushUrl({url: "pages/detail/index",params: {"AiAppConfig": item}})})}.width(GlobalConstant.PAGE_FULL).paddingStyle().borderRadius(GlobalConstant.SIZE_16)})}.listDirection(Axis.Vertical)}.width(GlobalConstant.PAGE_FULL).height(GlobalConstant.PAGE_FULL).padding(GlobalConstant.SIZE_8)}}
效果图

4.2 对话页
关键代码
build() {Column({ space: GlobalConstant.SIZE_8 }) {Stack({ alignContent: Alignment.Bottom }) {Column() {Column({ space: GlobalConstant.SIZE_4 }) {Text("蜜蜂AI助手").fontSize($r('app.float.font_size_16')).fontColor(Color.Black).fontWeight(FontWeight.Bolder)Text("介绍").fontSize($r('app.float.font_size_12')).fontColor($r('app.color.text_color_9')).fontWeight(FontWeight.Lighter)}.width(GlobalConstant.PAGE_FULL).justifyContent(FlexAlign.Center).padding({top: GlobalConstant.SIZE_4,bottom: GlobalConstant.SIZE_8})Scroll() {Column({ space: GlobalConstant.SIZE_8 }) {ForEach(this.chatContentArr, (chat: ChatInfo) => {if (chat.role === "assistant") {Row() {Row({ space: GlobalConstant.SIZE_8 }) {Image(chat.avatar).width(GlobalConstant.SIZE_24).height(GlobalConstant.SIZE_24)Row() {Text(chat.content).fontSize($r('app.float.font_size_14')).fontColor(Color.Black)}.width(chat.content.length > 15 ? GlobalConstant.PAGE_76 : 'auto').backgroundColor($r('app.color.embellishment_color')).padding({left: GlobalConstant.SIZE_16,right: GlobalConstant.SIZE_16,top: GlobalConstant.SIZE_8,bottom: GlobalConstant.SIZE_8}).borderRadius({topRight: GlobalConstant.SIZE_4,bottomLeft: GlobalConstant.SIZE_8,bottomRight: GlobalConstant.SIZE_4})}.justifyContent(FlexAlign.Start).alignItems(VerticalAlign.Top)}.width(GlobalConstant.PAGE_FULL).justifyContent(FlexAlign.Start)}if (chat.role === "user") {Row() {Row({ space: GlobalConstant.SIZE_8 }) {Row() {Text(chat.content).fontSize($r('app.float.font_size_14')).fontColor(Color.Black)}.width(chat.content.length > 15 ? GlobalConstant.PAGE_76 : 'auto').backgroundColor($r('app.color.tab_default_color')).padding({left: GlobalConstant.SIZE_16,right: GlobalConstant.SIZE_16,top: GlobalConstant.SIZE_8,bottom: GlobalConstant.SIZE_8}).borderRadius({topLeft: GlobalConstant.SIZE_4,bottomLeft: GlobalConstant.SIZE_4,bottomRight: GlobalConstant.SIZE_8})Image(chat.avatar).width(GlobalConstant.SIZE_24).height(GlobalConstant.SIZE_24)}.justifyContent(FlexAlign.End).alignItems(VerticalAlign.Top)}.width(GlobalConstant.PAGE_FULL).justifyContent(FlexAlign.End)}})}.width(GlobalConstant.PAGE_FULL)}.width(GlobalConstant.PAGE_96).scrollable(ScrollDirection.Vertical).flexShrink(1)}.width(GlobalConstant.PAGE_FULL).height(GlobalConstant.PAGE_FULL).padding({ bottom: GlobalConstant.SIZE_50 })Row({ space: GlobalConstant.SIZE_8 }) {TextInput({ placeholder: "请输入提示词...", text: this.inputValue }).height(GlobalConstant.SIZE_48).fontSize($r('app.float.font_size_16')).placeholderFont({ size: $r('app.float.font_size_16') }).placeholderColor($r('app.color.text_color_9')).borderRadius($r('app.float.size_8')).backgroundColor($r('app.color.card_bg_color')).flexShrink(1).onChange((value: string) => {this.inputValue = value;})Image($r('app.media.ic_send')).width(GlobalConstant.SIZE_32).height(GlobalConstant.SIZE_32).onClick(async () => {this.loadingCtrl.open();if (this.inputValue === "") {promptAction.showToast({message: "发送内容不能为空!"})return;}await this.getAiResult();})}.width(GlobalConstant.PAGE_FULL).padding({left: GlobalConstant.SIZE_8,right: GlobalConstant.SIZE_8}).backgroundColor($r('app.color.card_bg_color'))}.width(GlobalConstant.PAGE_FULL).height(GlobalConstant.PAGE_FULL)}.width(GlobalConstant.PAGE_FULL).height(GlobalConstant.PAGE_FULL)}
效果图
加载中

问答后

5. 服务卡片
5.1 服务卡片
服务卡片(以下简称“卡片”)是一种界面展示形式,可以将应用的重要信息或操作前置到卡片,以达到服务直达、减少体验层级的目的。卡片常用于嵌入到其他应用(当前卡片使用方只支持系统应用,如桌面)中作为其界面显示的一部分,并支持拉起页面、发送消息等基础的交互功能。
服务卡片架构
下图为服务卡片架构
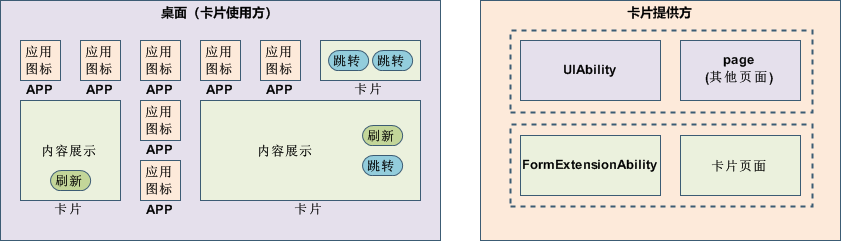
另外了解卡片概念有助于我们更好的使用服务卡片。
卡片的基本概念:
-
卡片使用方:如上图中的桌面,显示卡片内容的宿主应用,控制卡片在宿主中展示的位置。
-
应用图标:应用入口图标,点击后可拉起应用进程,图标内容不支持交互。
-
卡片:具备不同规格大小的界面展示,卡片的内容可以进行交互,如实现按钮进行界面的刷新、应用的跳转等。
-
-
卡片提供方:包含卡片的应用,提供卡片的显示内容、控件布局以及控件点击处理逻辑。
-
FormExtensionAbility:卡片业务逻辑模块,提供卡片创建、销毁、刷新等生命周期回调。
-
卡片页面:卡片 UI 模块,包含页面控件、布局、事件等显示和交互信息。
-
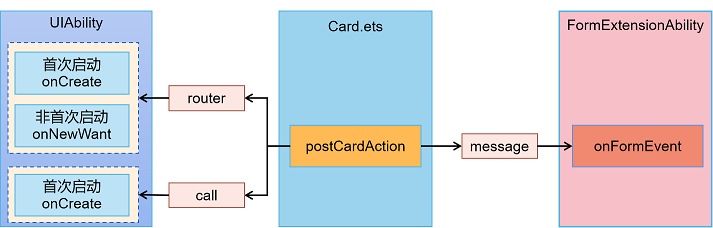
动态卡片事件能力说明
针对动态卡片,ArkTS 卡片中提供了 postCardAction()接口用于卡片内部和提供方应用间的交互,当前支持 router、message 和 call 三种类型的事件,仅在卡片中可以调用。后面我们也会用到这一块的内容。
5.2 服务卡片创建方式
创建工程时,选择 Atomic Service,默认自带卡片,也可以在创建工程后右键新建卡片。
另外就是我们可能不止一个卡片,所以,后续我们可以这样创建服务卡片。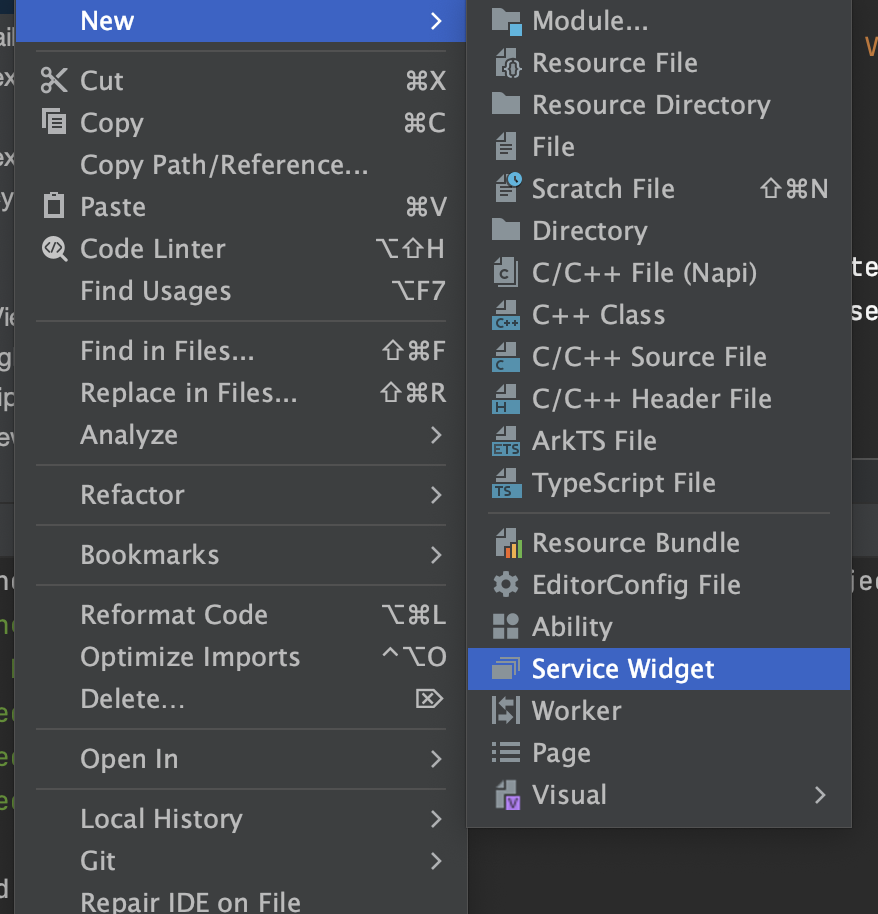
卡片相关的配置文件主要包含 FormExtensionAbility 的配置和卡片的配置两部分。
卡片需要在 module.json5 配置文件中的 extensionAbilities 标签下,配置 FormExtensionAbility 相关信息。FormExtensionAbility 需要填写 metadata 元信息标签,其中键名称为固定字符串“ohos.extension.form”,资源为卡片的具体配置信息的索引。
{"module": {..."extensionAbilities": [{"name": "EntryFormAbility","srcEntry": "./ets/entryformability/EntryFormAbility.ets","label": "$string:EntryFormAbility_label","description": "$string:EntryFormAbility_desc","type": "form","metadata": [{"name": "ohos.extension.form","resource": "$profile:form_config"}]}]}
}
卡片的具体配置信息。在上述 FormExtensionAbility 的元信息(“metadata”配置项)中,可以指定卡片具体配置信息的资源索引。例如当 resource 指定为$profile:form_config 时,会使用开发视图的 resources/base/profile/目录下的 form_config.json 作为卡片 profile 配置文件。内部字段结构说明如下表所示。
卡片 form_config.json 配置文件
| 属性名称 | 含义 | 数据类型 | 是否可缺省 |
|---|---|---|---|
| name | 表示卡片的名称,字符串最大长度为 127 字节。 | 字符串 | 否 |
| description | 表示卡片的描述。取值可以是描述性内容,也可以是对描述性内容的资源索引,以支持多语言。字符串最大长度为 255 字节。 | 字符串 | 可缺省,缺省为空。 |
| src | 表示卡片对应的 UI 代码的完整路径。当为 ArkTS 卡片时,完整路径需要包含卡片文件的后缀,如:“./ets/widget/pages/WidgetCard.ets”。当为 JS 卡片时,完整路径无需包含卡片文件的后缀,如:“./js/widget/pages/WidgetCard” | 字符串 | 否 |
| uiSyntax | 表示该卡片的类型,当前支持如下两种类型:- arkts:当前卡片为 ArkTS 卡片。- hml:当前卡片为 JS 卡片。 | 字符串 | 可缺省,缺省值为 hml |
| window | 用于定义与显示窗口相关的配置。 | 对象 | 可缺省,缺省值见表 2。 |
| isDefault | 表示该卡片是否为默认卡片,每个 UIAbility 有且只有一个默认卡片。- true:默认卡片。- false:非默认卡片。 | 布尔值 | 否 |
| colorMode | 表示卡片的主题样式,取值范围如下:- auto:跟随系统的颜色模式值选取主题。- dark:深色主题。- light:浅色主题。 | 字符串 | 可缺省,缺省值为“auto”。 |
| supportDimensions | 表示卡片支持的外观规格,取值范围:- 1 * 2:表示 1 行 2 列的二宫格。- 2 * 2:表示 2 行 2 列的四宫格。- 2 * 4:表示 2 行 4 列的八宫格。- 4 * 4:表示 4 行 4 列的十六宫格。 | 字符串数组 | 否 |
| defaultDimension | 表示卡片的默认外观规格,取值必须在该卡片 supportDimensions 配置的列表中。 | 字符串 | 否 |
| updateEnabled | 表示卡片是否支持周期性刷新(包含定时刷新和定点刷新),取值范围:- true:表示支持周期性刷新,可以在定时刷新(updateDuration)和定点刷新(scheduledUpdateTime)两种方式任选其一,当两者同时配置时,定时刷新优先生效。- false:表示不支持周期性刷新。 | 布尔类型 | 否 |
| scheduledUpdateTime | 表示卡片的定点刷新的时刻,采用 24 小时制,精确到分钟。> 说明:> updateDuration 参数优先级高于 scheduledUpdateTime,两者同时配置时,以 updateDuration 配置的刷新时间为准。 | 字符串 | 可缺省,缺省时不进行定点刷新。 |
| updateDuration | 表示卡片定时刷新的更新周期,单位为 30 分钟,取值为自然数。当取值为 0 时,表示该参数不生效。当取值为正整数 N 时,表示刷新周期为 30*N 分钟。> 说明:> updateDuration 参数优先级高于 scheduledUpdateTime,两者同时配置时,以 updateDuration 配置的刷新时间为准。 | 数值 | 可缺省,缺省值为“0”。 |
| formConfigAbility | 表示卡片的配置跳转链接,采用 URI 格式。 | 字符串 | 可缺省,缺省值为空。 |
| metadata | 表示卡片的自定义信息,参考 Metadata 数组标签。 | 对象 | 可缺省,缺省值为空。 |
| dataProxyEnabled | 表示卡片是否支持卡片代理刷新,取值范围:- true:表示支持代理刷新。- false:表示不支持代理刷新。设置为 true 时,定时刷新和下次刷新不生效,但不影响定点刷新。 | 布尔类型 | 可缺省,缺省值为 false。 |
| isDynamic | 表示此卡片是否为动态卡片(仅针对 ArkTS 卡片生效)。- true:为动态卡片 。- false:为静态卡片。 | 布尔类型 | 可缺省,缺省值为 true。 |
| transparencyEnabled | 表示是否支持卡片使用方设置此卡片的背景透明度(仅对系统应用的 ArkTS 卡片生效。)。- true:支持设置背景透明度 。- false:不支持设置背景透明度。 | 布尔类型 | 可缺省,缺省值为 false。 |
{"forms": [{"uiSyntax": "arkts","isDefault": true,"defaultDimension": "1*2","scheduledUpdateTime": "00:00","src": "./ets/jianguoaizhushoutuijian/jianguoaizhushoutuijian.ets","name": "jianguoaizhushoutuijian","description": "蜜蜂AI助手推荐","window": {"designWidth": 720,"autoDesignWidth": true},"supportDimensions": ["1*2"],"updateEnabled": true,"updateDuration": 0},{"uiSyntax": "arkts","isDefault": false,"defaultDimension": "2*2","src": "./ets/jianguoaizhushou/jianguoaizhushou.ets","name": "jianguoaizhushou","description": "蜜蜂AI助手,帮你所帮","window": {"designWidth": 720,"autoDesignWidth": true},"supportDimensions": ["2*2"],"updateEnabled": false,"updateDuration": 0},{"name": "poetry","description": "蜂蜜AI助手助你学妙语.","src": "./ets/poetry/pages/PoetryCard.ets","uiSyntax": "arkts","window": {"designWidth": 720,"autoDesignWidth": true},"colorMode": "auto","isDefault": false,"updateEnabled": false,"scheduledUpdateTime": "10:30","updateDuration": 1,"defaultDimension": "2*4","supportDimensions": ["2*4"]},{"name": "history","description": "蜂蜜AI助手历史记录","src": "./ets/history/pages/HistoryCard.ets","uiSyntax": "arkts","window": {"designWidth": 720,"autoDesignWidth": true},"colorMode": "auto","isDefault": false,"updateEnabled": false,"scheduledUpdateTime": "10:30","updateDuration": 1,"defaultDimension": "4*4","supportDimensions": ["4*4"]}]
}
5.3 实现 2*2/2*4/4*4 服务卡片
1-2 卡片
首先我们来看 1-2 卡片的实现。
@Entry
@Component
struct Jianguoaizhushoutuijian {private readonly PAGE_FULL: string = "100%";private readonly SIZE_4: number = 4;build() {Row({ space: this.SIZE_4 }) {Image('/common/imgs/ic_user.svg').width($r('app.float.size_32')).height($r('app.float.size_32'))Column() {Text('蜜蜂AI助手').fontSize($r('app.float.font_size_14')).fontColor($r('app.color.main_color')).fontWeight(FontWeight.Bolder)Text('知识百科/文本翻译/...').fontSize($r('app.float.font_size_12')).fontColor($r('app.color.text_color_9'))}.height(this.PAGE_FULL).justifyContent(FlexAlign.Center).alignItems(HorizontalAlign.Start)}.width(this.PAGE_FULL).height(this.PAGE_FULL).padding({left: $r('app.float.size_8'),right: $r('app.float.size_8')}).onClick(() => {postCardAction(this, {"action": "router","abilityName": "EntryAbility","params": {}});})}
}
效果
实现效果如图所示

原理
我可以用 router 来进行跳转,默认不传递任何参数,就会跳转到首页。
.onClick(() => {postCardAction(this, {"action": "router","abilityName": "EntryAbility","params": {}});})

2-4 的卡片
我们来看妙语集这一个 2-4 卡片的实现。
完整代码
const storage = new LocalStorage();
@Entry(storage)
@Component
struct PoetryCard {readonly PAGE_FULL: string = "100%";readonly PRE_96: string = "96%";readonly SIZE_40: number = 40;readonly SIZE_30: number = 30;readonly SIZE_20: number = 20;readonly SIZE_16: number = 16;readonly SIZE_8: number = 8;readonly SIZE_4: number = 4;@LocalStorageProp("poetry") poetry: any = {content: "秀樾横塘十里香,水花晚色静年芳。",author: "蔡松年",origin: "鹧鸪天·赏荷",category: "古诗文-四季-夏天"};build() {Column() {Row({ space: this.SIZE_8 }) {Image("/common/imgs/ic_ai_home.svg").width(this.SIZE_20).height(this.SIZE_20).fillColor($r('app.color.text_font_color'))Text('妙语集').fontSize($r('app.float.font_size_14')).fontColor($r('app.color.text_font_color'))}.width(this.PAGE_FULL).height(this.SIZE_40).linearGradient({angle: 45,colors: [[$r('app.color.main_color'), 0.1], [$r('app.color.auxiliary_color'), 1.0]]}).padding({left: this.SIZE_16,right: this.SIZE_16})Column() {Stack({ alignContent: Alignment.TopEnd }) {Column({ space: this.SIZE_8 }) {Text(this.poetry['origin']).fontSize($r('app.float.font_size_18')).fontWeight(FontWeight.Bolder).fontColor($r('app.color.text_color_title'))Text(this.poetry['author']).fontSize($r('app.float.font_size_14')).fontWeight(FontWeight.Medium).fontColor($r('app.color.text_color_9'))Text(this.poetry['content']).fontSize($r('app.float.font_size_16')).fontColor($r('app.color.text_color_title'))}.width(this.PRE_96).height(this.PRE_96).justifyContent(FlexAlign.Center)Button({ type: ButtonType.Capsule }) {Image($r('app.media.ic_refreshing')).width(this.SIZE_20).height(this.SIZE_20).fillColor(Color.White)}.width(this.SIZE_30).height(this.SIZE_30).backgroundColor($r('app.color.tip_color')).onClick(() => {postCardAction(this, {'action': 'message','params': {'function': 'refreshing'}})})}}.width(this.PAGE_FULL).flexShrink(1).padding({top: this.SIZE_4, bottom: this.SIZE_8})}.width(this.PAGE_FULL).height(this.PAGE_FULL)}
}
效果

原理
我们是如何实现数据刷新的呢?
我们首先判断返回的 functionName,如果是 refreshing,那么我们就去请求网络接口,并完成数据的显示和刷新。具体的关键代码如下所示。
if (functionName === "refreshing") {fetchGetPoetry().then((ret) => {let formData = {poetry: {}}LogUtil.info(`widget refreshing: ${ret}`);const result = JSON.parse(ret as string);if (result.code === 200) {const poetry: PoetryDto = result['data'];formData.poetry = poetry;}let formBD = formBindingData.createFormBindingData(formData);formProvider.updateForm(formId, formBD);})}

4-4 的卡片
完整代码
@Entry
@Component
struct HistoryCard {readonly PAGE_FULL: string = "100%";readonly PRE_96: string = "96%";readonly SIZE_81: number = 81;readonly SIZE_64: number = 64;readonly SIZE_48: number = 48;readonly SIZE_32: number = 32;readonly SIZE_24: number = 24;readonly SIZE_16: number = 16;readonly SIZE_8: number = 8;readonly SIZE_4: number = 4;readonly DEFAULT_AI_APP_LIST: Array<AiAppConfig> = [{appId: "6548c7fdeb28cf9c75531f66",chatId: "",name: "知识百科小助手",avatar: "/common/imgs/ic_wiki.svg",intro: "知识百科小助手。"},{appId: "65488134eb28cf9c75530e48",chatId: "",name: "节日小助手",avatar: "/common/imgs/ic_festival.svg",intro: "节日小助手。"},{appId: "65487d64eb28cf9c75530cd2",chatId: "",name: "文本翻译助手",avatar: "/common/imgs/ic_document.svg",intro: "文本翻译助手。"},{appId: "654ed429ab7249585cd2cab7",chatId: "",name: "产品名称助手",avatar: "/common/imgs/ic_product.svg",intro: "产品名称助手。"},{appId: "654ed4c3ab7249585cd2caf4",chatId: "",name: "道歉信助手",avatar: "/common/imgs/ic_sorry.svg",intro: "道歉信助手。"}];build() {Column({ space: this.SIZE_8 }) {Row({ space: this.SIZE_4 }) {Image($r('app.media.ic_history')).width(this.SIZE_24).height(this.SIZE_24).fillColor($r('app.color.main_color'))Text('查看历史数据').fontSize($r('app.float.font_size_16')).fontColor($r('app.color.main_color')).fontWeight(FontWeight.Bolder)}.width(this.PAGE_FULL).height(this.SIZE_48).padding({ left: this.SIZE_16 })Column() {GridRow({columns: 3,gutter: { x: this.SIZE_4, y: this.SIZE_4 }}) {ForEach(this.DEFAULT_AI_APP_LIST, (item: AiAppConfig) => {GridCol() {Column({ space: this.SIZE_8 }) {Image(item.avatar).width(this.SIZE_32).height(this.SIZE_32).fillColor($r('app.color.main_color'))Text(item.name).fontSize($r('app.float.font_size_12')).fontColor($r('app.color.auxiliary_color')).fontWeight(FontWeight.Bold)}.width(this.PAGE_FULL).height(this.SIZE_81).justifyContent(FlexAlign.Center).onClick(() => {postCardAction(this, {'action': 'router','abilityName': 'HistoryAbility','params': {'targetPage': 'history','aiApp': item}})})}.borderRadius(this.SIZE_8).padding({left: this.SIZE_4,right: this.SIZE_4,top: this.SIZE_8,bottom: this.SIZE_4}).shadow({radius: this.SIZE_8,color: $r('app.color.tab_default_color')})})}}.width(this.PRE_96).justifyContent(FlexAlign.Center).alignItems(HorizontalAlign.Center).flexShrink(1)}.width(this.PAGE_FULL).height(this.PAGE_FULL)}
}/*** AI应用配置*/
interface AiAppConfig {appId: string;  // AI应用AppIdchatId: string; // 会话窗口IDname: string; // AI应用名称avatar: string; // AI应用LOGOintro?: string;  // AI应用介绍
}interface ChatHistory {chat: AiAppConfig;total: number;
}
效果

原理
在卡片中使用postCardAction接口的 router 能力,能够快速拉起卡片提供方应用的指定 UIAbility,因此 UIAbility 较多的应用往往会通过卡片提供不同的跳转按钮,实现一键直达的效果。
通常使用按钮控件来实现页面拉起,
@Entry
@Component
struct WidgetCard {build() {Column() {Button('跳转').onClick(() => {console.info('Jump to EntryAbility funA');postCardAction(this, {action: 'router',abilityName: 'EntryAbility', // 只能跳转到当前应用下的UIAbilityparams: {targetPage: 'funA' // 在EntryAbility中处理这个信息}});})}.width('100%').height('100%').justifyContent(FlexAlign.SpaceAround)}
}
-
在 UIAbility 中接收 router 事件并获取参数,根据传递的 params 不同,选择拉起不同的页面。
import UIAbility from '@ohos.app.ability.UIAbility';
import window from '@ohos.window';
import Want from '@ohos.app.ability.Want';
import Base from '@ohos.base';
import AbilityConstant from '@ohos.app.ability.AbilityConstant';let selectPage: string = '';
let currentWindowStage: window.WindowStage | null = null;export default class EntryAbility extends UIAbility {// 如果UIAbility第一次启动,在收到Router事件后会触发onCreate生命周期回调onCreate(want: Want, launchParam: AbilityConstant.LaunchParam) {// 获取router事件中传递的targetPage参数console.info('onCreate want:' + JSON.stringify(want));if (want.parameters?.params !== undefined) {let params: Record<string, string> = JSON.parse(want.parameters?.params.toString());console.info('onCreate router targetPage:' + params.targetPage);selectPage = params.targetPage;}}// 如果UIAbility已在后台运行,在收到Router事件后会触发onNewWant生命周期回调onNewWant(want: Want, launchParam: AbilityConstant.LaunchParam) {console.info('onNewWant want:' + JSON.stringify(want));if (want.parameters?.params !== undefined) {let params: Record<string, string> = JSON.parse(want.parameters?.params.toString());console.info('onNewWant router targetPage:' + params.targetPage);selectPage = params.targetPage;}if (currentWindowStage != null) {this.onWindowStageCreate(currentWindowStage);}}onWindowStageCreate(windowStage: window.WindowStage) {let targetPage: string;// 根据传递的targetPage不同,选择拉起不同的页面switch (selectPage) {case 'funA':targetPage = 'pages/FunA';break;case 'funB':targetPage = 'pages/FunB';break;default:targetPage = 'pages/Index';}if (currentWindowStage === null) {currentWindowStage = windowStage;}windowStage.loadContent(targetPage, (err: Base.BusinessError) => {if (err && err.code) {console.info('Failed to load the content. Cause: %{public}s',JSON.stringify(err));return;}});}
}
6 总结
通过蜜蜂 AI 助手元服务的开发,我们体验到了端云一体化带来的便捷,尤其注册登陆这一块,有了云端的接入,我们可以很快的加入。另外在项目里我们还用到了低码能力,不用一行代码,就完成了手机号登陆的功能。
本次鸿蒙和 AI 的结合,给了我新的体验。大家也可以自行尝试下 HarmonyOS 的开发,会给你带来不一样的体验。
这篇关于HarmonyOS 开发实例—蜜蜂 AI 助手的文章就介绍到这儿,希望我们推荐的文章对编程师们有所帮助!


