本文主要是介绍EST-100身份证社保卡签批屏按捺终端PC版web版本http协议接口文档,支持web网页开发对接使用,希望对大家解决编程问题提供一定的参考价值,需要的开发者们随着小编来一起学习吧!
| <!DOCTYPE html> | |
| <html lang="zh-CN"> | |
| <head> | |
| <meta charset="UTF-8"> | |
| <meta name="viewport" content="width=device-width,initial-scale=1.0"> | |
| <title>演示DEMO</title> | |
| <script type="text/javascript" src="jquery-1.12.4.js"></script> | |
| <style type="text/css"> | |
| .mdiv div { | |
| text-align: center; | |
| } | |
| .mdiv>div { | |
| display: inline-block; | |
| box-sizing: border-box; | |
| /*height: 8rem;*/ | |
| vertical-align: top; | |
| } | |
| .mdiv>div>div:first-child, | |
| .dtitle { | |
| background-color: #DDDDDD; | |
| padding: 5px 0px; | |
| margin: 0px 0px 15px 0px; | |
| text-align: center; | |
| } | |
| mdiv img { | |
| border: 1px solid gray; | |
| } | |
| button, | |
| select, | |
| input { | |
| box-sizing: border-box; | |
| width: 145px; | |
| font-size: 16px; | |
| padding: 5px; | |
| margin-left: 15px; | |
| margin-bottom: 25px; | |
| } | |
| </style> | |
| </head> | |
| <body> | |
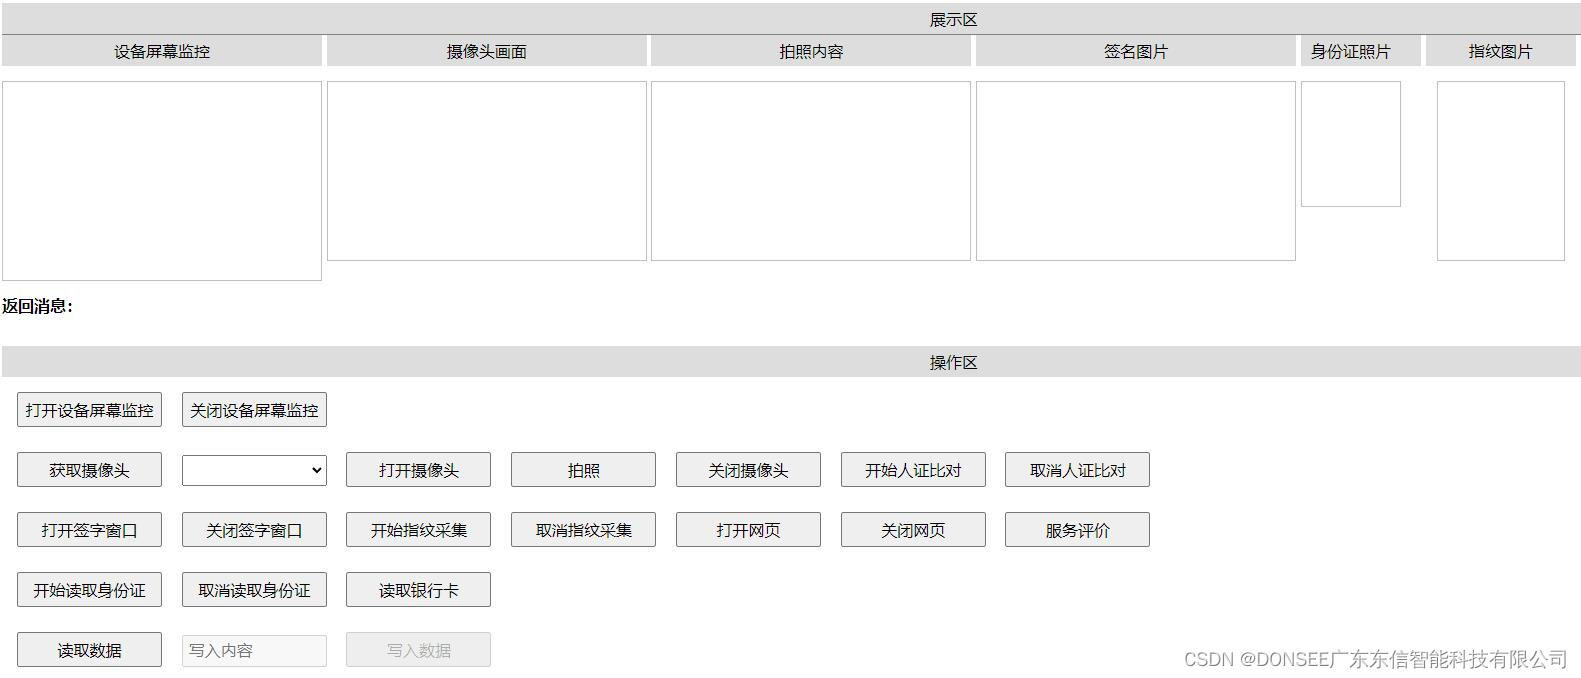
| <div class="dtitle" style="margin-bottom: 0px;border-bottom: 1px solid gray;">展示区</div> | |
| <div class='mdiv'> | |
| <div> | |
| <div>设备屏幕监控</div> | |
| <div> | |
| <img style="width: 320px;height:200px;" id="imgDeviceScreen" οnerrοr="monitorDeviceFail(this)"> | |
| </div> | |
| </div> | |
| <div> | |
| <div>摄像头画面</div> | |
| <div> | |
| <img style="width: 320px;height:180px;" id="imgCameraVideo" οnerrοr="openCameraFail(this)"> | |
| </div> | |
| </div> | |
| <div> | |
| <div>拍照内容</div> | |
| <div> | |
| <img style="width: 320px;height:180px;" id="imgCameraPhoto"> | |
| </div> | |
| </div> | |
| <div> | |
| <div>签名图片</div> | |
| <div> | |
| <img style="width: 320px;height:180px;" id="imgSignPic"> | |
| </div> | |
| </div> | |
| <div style="width: 120px;"> | |
| <div style="padding-right: 20px;">身份证照片</div> | |
| <div> | |
| <img style="width: 100px;height:126px;margin-right: 20px;" id="imgIDCard"> | |
| </div> | |
| </div> | |
| <div style="width: 150px;"> | |
| <div>指纹图片</div> | |
| <div> | |
| <img style="width: 128px;height:180px;" id="imgFingerPic"> | |
| </div> | |
| </div> | |
| </div> | |
| <div id="dmsg" style="margin-top: 10px; margin-bottom: 30px;font-weight: bold;">返回消息:</div> | |
| <div class="dtitle">操作区</div> | |
| <div> | |
| <button οnclick="monitorDevice()">打开设备屏幕监控</button> | |
| <button οnclick="stopMonitor()">关闭设备屏幕监控</button> | |
| <br> | |
| <button οnclick="getCamera()">获取摄像头</button> | |
| <select id="cameraSelect"></select> | |
| <button οnclick="openCamera()">打开摄像头</button> | |
| <button οnclick="takePhoto()">拍照</button> | |
| <button οnclick="closeCamera()">关闭摄像头</button> | |
| <button οnclick="openFaceVerify()">开始人证比对</button> | |
| <button οnclick="stopFaceVerify()">取消人证比对</button> | |
| <br> | |
| <button οnclick="openSign()">打开签字窗口</button> | |
| <button οnclick="stopSign()">关闭签字窗口</button> | |
| <button οnclick="openFinger()">开始指纹采集</button> | |
| <button οnclick="stopFinger()">取消指纹采集</button> | |
| <button οnclick="openWeb()">打开网页</button> | |
| <button οnclick="closeWeb()">关闭网页</button> | |
| <button οnclick="evaluation()">服务评价</button> | |
| <br> | |
| <button οnclick="openReadChinaIdCard()">开始读取身份证</button> | |
| <button οnclick="stopReadChinaIdCard()">取消读取身份证</button> | |
| <button οnclick="openReadBankCard()">读取银行卡</button> | |
| <br> | |
| <button οnclick="readDeviceData()">读取数据</button> | |
| <input type="text" name="DeviceNo" id="DeviceNo" placeholder="写入内容" disabled> | |
| <button οnclick="initDeviceData(DeviceNo.value)" disabled>写入数据</button> | |
| <br> | |
| </div> | |
| <script type="text/javascript"> | |
| jQuery.support.cors = true | |
| var selectElement = document.getElementById('cameraSelect') | |
| /** | |
| To 秋博君: | |
| 1、使用http服务,注意看每个函数里面的地址和参数,要做的和这个网页一样 | |
| 2、他们返回时用的 {code: int, message: string} 的形式,有时code=0表示成功,有时候code=1表示成功,你注意看ajax的success回调里面的判断 | |
| **/ | |
| function showMsg(msg) { | |
| $("#dmsg").text("返回消息:" + msg) | |
| } | |
| function openCameraFail(obj) { | |
| if (obj.src == null || obj.src.length == 0) return | |
| alert("打开摄像头失败0308") | |
| } | |
| function monitorDeviceFail(obj) { | |
| if (obj.src == null || obj.src.length == 0) return | |
| alert("获取屏幕监控失败,可能是服务器未启动") | |
| } | |
| //开启设备屏幕监控 | |
| function monitorDevice() { | |
| $("#imgDeviceScreen").attr("src", "http://127.0.0.1:38089/sign=stream&time=" + new Date().getTime()) | |
| } | |
| //关闭设备屏幕监控 | |
| function stopMonitor() { | |
| $.ajax({ | |
| type: "post", | |
| url: "http://127.0.0.1:38089/closewebontablet", | |
| dataType: "json", | |
| success: function (data) { | |
| /** {code:int , message:string} **/ | |
| showMsg(data.code == 1 ? "成功关闭设备屏幕监控" : "当前并没有展示设备屏幕监控") | |
| $("#imgDeviceScreen").attr('src', "") | |
| $("#imgDeviceScreen").removeAttr('src') | |
| } | |
| }) | |
| } | |
| //打开签字窗口 设备有:取消、重签、确定 按个按钮 | |
| function openSign() { | |
| $("#imgSignPic").attr("src", "") | |
| $.ajax({ | |
| type: "post", | |
| url: "http://127.0.0.1:38088/sign=start", | |
| dataType: "json", | |
| data: "{\"pos\": {\"top\":\"400\",\"left\":\"420\",\"width\":\"640\",\"height\":\"400\"}}", | |
| // header: { //这一段是上一个版本有,我感觉是没必要了 | |
| // 'Access-Control-Allow-Private-Network': 'true', | |
| // 'Access-Control-Request-Method': 'GET, POST', | |
| // 'Access-Control-Request-Headers': 'Content-Type' | |
| // }, | |
| success: function (data) { | |
| /** {code:int , message:string, status:int[1-取消了签名 2-完成签名 ], image:string[图片base64] } **/ | |
| if (data.code != 0) | |
| return showMsg("打开签字窗口失败, 返回代码 = " + data.code + ", 返回信息 = " + data.message) | |
| if (data.status != 2) | |
| return showMsg("签名被取消了") | |
| showMsg("签名成功") | |
| $("#imgSignPic").attr("src", "data:image/png;base64," + data.image) | |
| } | |
| }) | |
| } | |
| //关闭签字窗口 | |
| function stopSign() { | |
| $.ajax({ | |
| type: "post", | |
| url: "http://127.0.0.1:38088/sign=stop", | |
| dataType: "json", | |
| success: function (data) { | |
| /** 这里原来的DEMO就没有判断 **/ | |
| } | |
| }) | |
| } | |
| //开始指纹采集 | |
| function openFinger() { | |
| $("#imgFingerPic").attr("src", "") | |
| $.ajax({ | |
| type: "post", | |
| url: "http://127.0.0.1:38088/finger=record", | |
| dataType: "json", | |
| //data: params, | |
| success: function (data) { | |
| /** {code:int, message:string, status:int[1-取消了采集 2-完成了采集], FigPic:string[图片base64] } **/ | |
| if (data.code != 0) | |
| return showMsg("采集指纹失败, 返回代码 = " + data.code + ", 返回信息 = " + data.message) | |
| if (data.status != 2) | |
| return showMsg("指纹采集被取消了") | |
| showMsg("采集指纹成功") | |
| $("#imgFingerPic").attr("src", "data:image/jpeg;base64," + data.FigPic) | |
| } | |
| }) | |
| } | |
| //取消指纹采集 | |
| function stopFinger() { | |
| $.ajax({ | |
| type: "post", | |
| url: "http://127.0.0.1:38088/finger=stop", | |
| dataType: "json", | |
| success: function (data) { | |
| /** 这个是仿照关闭签字窗口添加的 **/ | |
| } | |
| }) | |
| } | |
| //在设备上打开网页 -这里是打开的测试页,要求在设备上从测试页打开签名要能用调用到签名、指纹也要能正常使用 | |
| // [前面的SDK有这个破问题,我感觉新版不会有这个问题,还是测试一下放心些] | |
| function openWeb() { | |
| var url = location.href | |
| myWindow = window.open(url, '_blank', 'height=800px, width=1280px, top=0, left=0, toolbar=no, location=no, directories=no, status=no, menubar=no, scrollbars=no, resizable=no, copyhistory=no') | |
| myWindow.focus() | |
| $.ajax({ | |
| type: "post", | |
| url: "http://127.0.0.1:38088/openwebontablet", | |
| dataType: "json", | |
| data: "{\"url\": \"" + url + "\"}", | |
| success: function (data) { | |
| /** {code:int , message:string} **/ | |
| showMsg(data.message) | |
| } | |
| }) | |
| } | |
| //关闭网页 | |
| function closeWeb() { | |
| $.ajax({ | |
| type: "post", | |
| url: "http://127.0.0.1:38088/sign=closebrowser", | |
| dataType: "json", | |
| //data: params, | |
| success: function (data) { | |
| /** {code:int , message:string} **/ | |
| showMsg(data.code == 1 ? "成功关闭网页" : "当前并没有展示网页") | |
| } | |
| }) | |
| } | |
| var cameraInfo = [] | |
| //获取摄像头 | |
| function getCamera() { | |
| $.ajax({ | |
| type: "post", | |
| url: "http://127.0.0.1:38088/camera=get", | |
| dataType: "json", | |
| // contentType: "application/json", | |
| success: function (data) { | |
| /** {code:int , message:string, camera:[{index:int, name:string, resolution:[{width:int, height:int},{width:int, height:int,....}]}, ...]} **/ | |
| //返回的resolution中摄像头支持的分辨率 | |
| console.log(JSON.stringify(data)) | |
| if (data.code != 0) | |
| return showMsg(data.message) | |
| showMsg(JSON.stringify(data)) | |
| cameraInfo = data.camera | |
| selectElement.innerHTML = '<span></span>' | |
| for (var i = 0; i < cameraInfo.length; i++) { | |
| var option = document.createElement('option') | |
| option.value = cameraInfo[i].index | |
| option.label = cameraInfo[i].name | |
| selectElement.appendChild(option) | |
| } | |
| } | |
| }) | |
| } | |
| //打开摄像头 | |
| function openCamera() { | |
| if (cameraInfo == null || cameraInfo.length == 0) | |
| return showMsg("未调用获取摄像头或未查找到摄像头信息") | |
| //直接以最小的分辨率打开摄像头 | |
| var index = selectElement.value | |
| var camera | |
| for (var i = 0; i < cameraInfo.length; i++) { | |
| if (i == index) { | |
| camera = cameraInfo[i] | |
| var width = camera.resolution[camera.resolution.length - 1].width | |
| var height = camera.resolution[camera.resolution.length - 1].height | |
| break | |
| } | |
| } | |
| //这里应该的img标签,可以用onerror事件来得到打开摄像头失败的事件 | |
| $("#imgCameraVideo").attr("src", "http://127.0.0.1:38088/camera=stream&index=" + index + "&width=" + width + "&height=" + height + "?" + new Date().getTime()) | |
| } | |
| //拍照 | |
| function takePhoto() { | |
| if (cameraInfo == null || cameraInfo.length == 0) { | |
| return showMsg("未调用获取摄像头或未查找到摄像头信息") | |
| } | |
| var index = selectElement.value | |
| $.ajax({ | |
| type: "post", | |
| url: "http://127.0.0.1:38088/camera=photo&index=" + index, | |
| dataType: "json", | |
| success: function (data) { | |
| /** {code:int , message:string, picture:string[图像base64,jpg格式]} **/ | |
| //返回的resolution中摄像头支持的分辨率 | |
| // console.log(JSON.stringify(data)) | |
| if (data.code != 0) { | |
| return showMsg(data.message) | |
| } | |
| $("#imgCameraPhoto").attr("src", "") | |
| $("#imgCameraPhoto").attr("src", "data:image/jpeg;base64," + data.picture) | |
| } | |
| }) | |
| } | |
| //关闭摄像头 | |
| function closeCamera() { | |
| if (cameraInfo == null || cameraInfo.length == 0) { | |
| return showMsg("未调用获取摄像头或未查找到摄像头信息") | |
| } | |
| $.ajax({ | |
| type: "post", | |
| url: "http://127.0.0.1:38088/camera=close&index=" + selectElement.value, | |
| dataType: "json", | |
| success: function (data) { | |
| /** {code:int , message:string} **/ | |
| if (data.code != 0) { | |
| return showMsg(data.message) | |
| } else { | |
| $("#imgCameraVideo").attr('src', "") | |
| $("#imgCameraVideo").removeAttr('src') | |
| return showMsg('摄像头已关闭') | |
| } | |
| } | |
| }) | |
| } | |
| //开始人证比对 | |
| function openFaceVerify() { | |
| $.ajax({ | |
| type: "post", | |
| url: "http://127.0.0.1:38088/method=startPersonVerify", | |
| dataType: "json", | |
| success: function (data) { | |
| /** {code:int , message:string, retData:{score:int[相似度], photo:string[base64拍照图], pic:string[base64身份证照片], ...其他身份证内容}} **/ | |
| showMsg(data.message) | |
| if (data.code != 0) return | |
| $("#imgCameraPhoto").attr("src", "data:image/jpeg;base64," + data.retData.photo) | |
| $("#imgIDCard").attr("src", "data:image/jpeg;base64," + data.retData.pic) | |
| } | |
| }) | |
| } | |
| //取消人证比对 | |
| function stopFaceVerify() { | |
| $.ajax({ | |
| type: "post", | |
| url: "http://127.0.0.1:38088/method=cancelPersonVerify", | |
| dataType: "json", | |
| success: function (data) { | |
| /** {code:int , message:string} **/ | |
| console.log(JSON.stringify(data)) | |
| //showMsg(JSON.stringify(data)); | |
| return showMsg(data.message) | |
| } | |
| }) | |
| } | |
| //开始读取身份证 提供一个界面提示,然后循环读取,读取到,或者网页上取消了,就返回 | |
| function openReadChinaIdCard() { | |
| $.ajax({ | |
| type: "post", | |
| url: "http://127.0.0.1:38088/method=startReadChinaIdCard", | |
| dataType: "json", | |
| success: function (data) { | |
| console.log(JSON.stringify(data)) | |
| /** {code:int , message:string, retData:{pic:string[base64身份证照片], ...其他身份证内容}} **/ | |
| if (data.code != 0) return showMsg(data.message) | |
| $("#imgIDCard").attr("src", "data:image/jpeg;base64," + data.retData.pic) | |
| retdata = data.retData | |
| delete retdata.pic | |
| showMsg(JSON.stringify(retdata)) | |
| } | |
| }) | |
| } | |
| //取消读取身份证 | |
| function stopReadChinaIdCard() { | |
| $.ajax({ | |
| type: "post", | |
| url: "http://127.0.0.1:38088/method=cancelReadChinaIdCard", | |
| dataType: "json", | |
| success: function (data) { | |
| console.log(JSON.stringify(data)) | |
| /** {code:int , message:string} **/ | |
| showMsg(JSON.stringify(data)) | |
| } | |
| }) | |
| } | |
| // 开始读取银行卡 | |
| function openReadBankCard() { | |
| $.ajax({ | |
| type: "post", | |
| url: "http://127.0.0.1:38088/method=startReadBankCard", | |
| dataType: "json", | |
| success: function (data) { | |
| console.log(JSON.stringify(data)) | |
| /** {code:int , message:string, data:string} **/ | |
| if (data.code != 0) return showMsg(data.message) | |
| showMsg(JSON.stringify(data)) | |
| } | |
| }) | |
| } | |
| //写数据 | |
| function initDeviceData(data) { | |
| $.ajax({ | |
| type: "post", | |
| url: "http://127.0.0.1:38088/deviceDataInit" + data, | |
| dataType: "json", | |
| success: function (data) { | |
| /** {code:int , message:string]} **/ | |
| //返回的resolution中摄像头支持的分辨率 | |
| console.log(JSON.stringify(data)) | |
| if (data.code != 0) | |
| return showMsg(data.message) | |
| showMsg(JSON.stringify(data)) | |
| } | |
| }) | |
| } | |
| //读数据 | |
| function readDeviceData() { | |
| $.ajax({ | |
| type: "post", | |
| url: "http://127.0.0.1:38088/readDeviceData", | |
| dataType: "json", | |
| success: function (data) { | |
| /** {code:int , message:string, data:string ]} **/ | |
| //返回的resolution中摄像头支持的分辨率 | |
| console.log(JSON.stringify(data)) | |
| if (data.code != 0) | |
| return showMsg(data.message) | |
| showMsg(JSON.stringify(data)) | |
| } | |
| }) | |
| } | |
| function evaluation() { | |
| $.ajax({ | |
| type: "post", | |
| url: "http://127.0.0.1:38088/evaluation", | |
| dataType: "json", | |
| success: function (data) { | |
| /** {code:int , message:string, data:string ]} **/ | |
| //评价信息 | |
| console.log(JSON.stringify(data)) | |
| if (data.code != 0) | |
| return showMsg(data.message) | |
| showMsg(JSON.stringify(data)) | |
| } | |
| }) | |
| } | |
| </script> | |
| </body> | |
| </html> | |
这篇关于EST-100身份证社保卡签批屏按捺终端PC版web版本http协议接口文档,支持web网页开发对接使用的文章就介绍到这儿,希望我们推荐的文章对编程师们有所帮助!


