本文主要是介绍[OCR]Python 3 下的文字识别CnOCR,希望对大家解决编程问题提供一定的参考价值,需要的开发者们随着小编来一起学习吧!
目录
1 CnOCR
2 安装
3 实践

1 CnOCR
CnOCR 是 Python 3 下的文字识别(Optical Character Recognition,简称OCR)工具包。
工具包支持简体中文、繁体中文(部分模型)、英文和数字的常见字符识别,支持竖排文字的识别。同时,自带了20+个训练好的识别模型,适用于不同应用场景,安装后即可直接使用。
同时,CnOCR也提供简单的训练命令供使用者训练自己的模型。

2 安装
安装cnocr的命令如下:
pip --default-timeout=100 install cnocr -i http://pypi.douban.com/simple --trusted-host pypi.douban.com下述的字体文件用于实践中的中文识别结果的展示。
①字体文件
SimSun:宋体
Microsoft YaHei:微软雅黑
FangSong:仿宋
KaiTi:楷体
STXihei:华文细黑
STSong:华文宋体
STKaiti:华文楷体
STFangsong:华文仿宋
SimHei:黑体
②下载地址
部分中文字体文件下载
链接: https://pan.baidu.com/s/1pCEreBBHPJKLmWPJmh4OPg 提取码: hope
3 实践
- ①代码
from cnocr import CnOcr
import matplotlib.pyplot as plt
from PIL import Image, ImageDraw, ImageFont
import cv2
import numpy as np
def get_bbox(array):"将结果中的position信息的四个点的坐标信息转换"x1 = array[0][0]y1 = array[0][1]pt1 = (int(x1), int(y1))x2 = array[2][0]y2 = array[2][1]pt2 = (int(x2), int(y2))return pt1, pt2
def dealImg(img):b, g, r = cv2.split(img)img_rgb = cv2.merge([r, g, b])return img_rgb
def create_blank_img(img_w, img_h):blank_img = np.ones(shape=[img_h, img_w], dtype=np.int8) * 255# blank_img[:, img_w - 1:] = 0blank_img = Image.fromarray(blank_img).convert("RGB")blank_img = blank_img.__array__()return blank_img
def Draw_OCRResult(blank_img, pt1, pt2, text):cv2.rectangle(blank_img, pt1, pt2, color=[255, 255, 0], thickness=3)data = Image.fromarray(blank_img)draw = ImageDraw.Draw(data)fontStyle = ImageFont.truetype("ChineseFonts/simsun.ttc", size=30, encoding="utf-8")(x, y) = pt1draw.text((x+5, y+5), text=text, fill=(0, 0, 0), font=fontStyle)blank_img = np.asarray(data)# cv2.putText(img, temp["text"], pt1, cv2.FONT_HERSHEY_SIMPLEX, 0.8, (0, 0, 0), 2)return blank_img
def _main(img_path):im = cv2.imread(img_path)img_h, img_w, _ = im.shapeblank_img = create_blank_img(img_w, img_h)# 所有参数都使用默认值ocr = CnOcr()result = ocr.ocr(img_path)# print(result)for temp in result:print(temp["text"])# print(temp["score"])pt1, pt2 = get_bbox(temp["position"])blank_img = Draw_OCRResult(blank_img, pt1, pt2, temp["text"])fig = plt.figure(figsize=(10, 10))im = dealImg(im)img = dealImg(blank_img)titles = ["img", "result"]images = [im, img]for i in range(2):plt.subplot(1, 2, i + 1), plt.imshow(images[i], "gray")plt.title("{}".format(titles[i]), fontsize=20, ha='center')plt.xticks([]), plt.yticks([])# plt.subplots_adjust(left=None, bottom=None, right=None, top=None, wspace=0.3, hspace=0)# plt.tight_layout()plt.show()fig.savefig('test_results.jpg', bbox_inches='tight')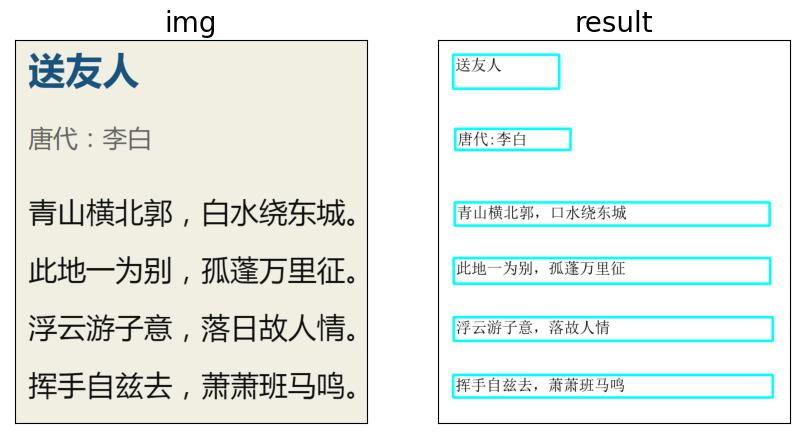
if __name__ == '__main__':_main("test.png")pass- ①结果图
- ②代码
from cnocr import CnOcr
from PIL import Image, ImageDraw, ImageFont
import cv2
import numpy as np
def get_bbox(array):"将结果中的position信息的四个点的坐标信息转换"x1 = array[0][0]y1 = array[0][1]pt1 = (int(x1), int(y1))x2 = array[2][0]y2 = array[2][1]pt2 = (int(x2), int(y2))return pt1, pt2
def dealImg(img):b, g, r = cv2.split(img)img_rgb = cv2.merge([r, g, b])return img_rgb
def create_blank_img(img_w, img_h):blank_img = np.ones(shape=[img_h, img_w], dtype=np.int8) * 255# blank_img[:, img_w - 1:] = 0blank_img = Image.fromarray(blank_img).convert("RGB")blank_img = blank_img.__array__()return blank_img
def Draw_OCRResult(blank_img, pt1, pt2, text):cv2.rectangle(blank_img, pt1, pt2, color=[255, 255, 0], thickness=3)data = Image.fromarray(blank_img)draw = ImageDraw.Draw(data)fontStyle = ImageFont.truetype("ChineseFonts/simsun.ttc", size=30, encoding="utf-8")(x, y) = pt1draw.text((x+5, y+5), text=text, fill=(0, 0, 0), font=fontStyle)blank_img = np.asarray(data)# cv2.putText(img, temp["text"], pt1, cv2.FONT_HERSHEY_SIMPLEX, 0.8, (0, 0, 0), 2)return blank_img
def _main(img_path):im = cv2.imread(img_path)img_h, img_w, _ = im.shapeblank_img = create_blank_img(img_w, img_h)# 所有参数都使用默认值ocr = CnOcr()result = ocr.ocr(img_path)# print(result)for temp in result:print(temp["text"])# print(temp["score"])pt1, pt2 = get_bbox(temp["position"])blank_img = Draw_OCRResult(blank_img, pt1, pt2, temp["text"])images = np.concatenate((im, blank_img), axis=1)cv2.imwrite('OCR_result.jpg', images)
if __name__ == '__main__':_main("test.png")pass- ②结果图
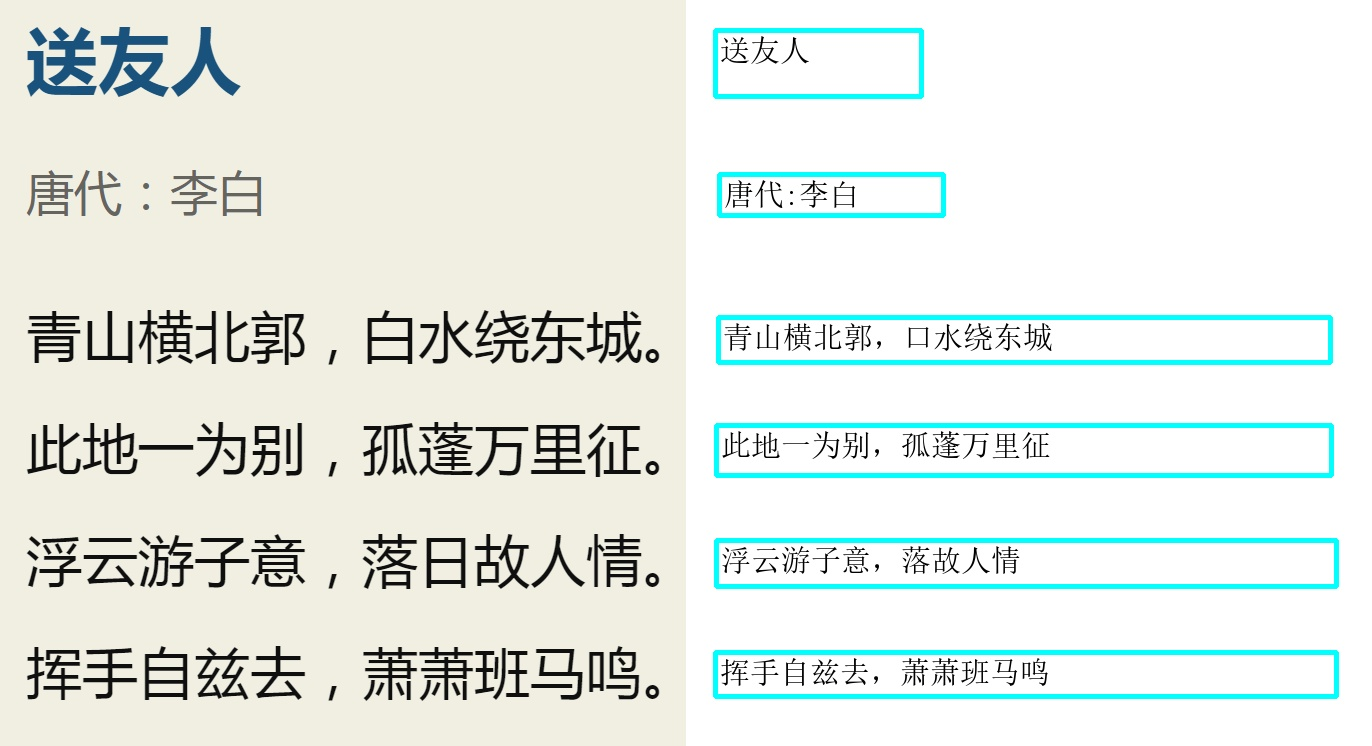
茫茫人海,遇见便是缘,愿君事事顺心,一切都好。 感恩遇见!
这篇关于[OCR]Python 3 下的文字识别CnOCR的文章就介绍到这儿,希望我们推荐的文章对编程师们有所帮助!


