本文主要是介绍【低照度图像增强系列(2)】Retinex(SSR/MSR/MSRCR)算法详解与代码实现,希望对大家解决编程问题提供一定的参考价值,需要的开发者们随着小编来一起学习吧!

前言
☀️ 在低照度场景下进行目标检测任务,常存在图像RGB特征信息少、提取特征困难、目标识别和定位精度低等问题,给检测带来一定的难度。
🌻使用图像增强模块对原始图像进行画质提升,恢复各类图像信息,再使用目标检测网络对增强图像进行特定目标检测,有效提高检测的精确度。
⭐本专栏会介绍传统方法、Retinex、EnlightenGAN、SCI、Zero-DCE、IceNet、RRDNet、URetinex-Net等低照度图像增强算法。
👑完整代码已打包上传至资源→低照度图像增强代码汇总资源-CSDN文库
目录
前言
🚀一、Retinex简介
🚀二、Retinex原理
🚀三、基于Retinex理论的增强算法
🎄3.1 SSR(Single Scale Retinex)单尺度Retinex算法
简介
原理
代码实现
🎄3.2 多尺度MSR(Multi-Scale Retinex)多尺度Retinex算法
简介
原理
代码实现
🎄3.3 MSRCR(Multi-Scale Retinex with Color Restoration)具有色彩恢复的多尺度Retinex算法
简介
原理
代码实现
🚀总结
🚀整体代码

🚀一、Retinex简介
Retinex是Edwin.H.Land于1963年提出的算法。该算法认为人眼可以感知近似一致的色彩信息,这种性质称为色彩恒定性。这种恒定性是视网膜(Retina)与大脑皮层(Cortex)所共同作用的结果。常见的算法包括:单尺度Retinex(SSR)算法、多尺度Retinex(MSR)算法和色彩恢复多尺度Retinex(MSRCR)算法,MSRCR算法是对SSR算法及MSR算法进行修正的一种算法。
物体的颜色是由物体对长波(红色)、中波(绿色)、短波(蓝色)光线的反射能力来决定的,而不是由反射光强度的绝对值来决定的,物体的色彩不受光照非均匀性的影响,具有一致性,即Retinex是以色感一致性(颜色恒常性)为基础的。
不同于传统的线性、非线性的只能增强图像某一类特征的方法,Retinex可以在动态范围压缩、边缘增强和颜色恒常三个方面达到平衡,因此可以对各种不同类型的图像进行自适应的增强。
发展历程:

🚀二、Retinex原理
- 基本思想:去除照射光影响,保留物体自身的反射属性。
- 核心思想:保留图像细节信息的前提下,调整图像的对比度和亮度。
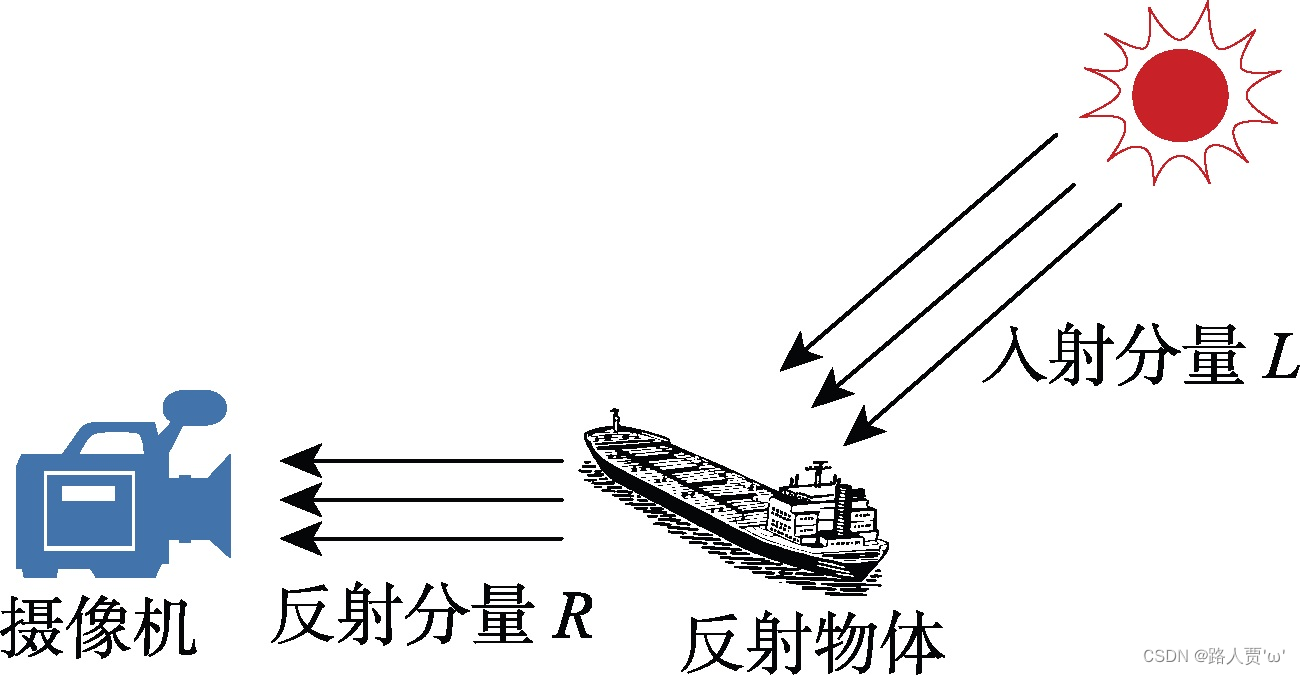
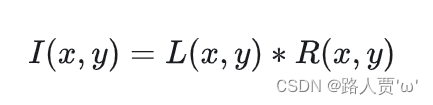
Retinex算法认为图像I(x, y)是由照度图像与反射图像组成。
- 前者指的是物体的入射分量的信息,用L(x, y) 表示;
- 后者指的是物体的反射部分,用R(x, y) 表示。
公式:
I(x, y) =R(x, y) * L(x, y)
式中: I(x,y)代表被观察或照相机接收到的图像信号;L(x,y)代表环境光的照射分量 ;R(x,y)表示携带图像细节信息的目标物体的反射分量 。
同时,由于对数形式与人类在感受亮度的过程属性最相近,因此将上述过程转换到对数域进行处理,这样做也将复杂的乘法转换为加法: i(x, y) = r(x, y) + l(x, y)
🚀三、基于Retinex理论的增强算法
🎄3.1 SSR(Single Scale Retinex)单尺度Retinex算法
简介
SSR (Singal Scale Retinex),即单尺度视网膜算法是 Retinex 算法中最基础的一个算法。运用的就是上面的方法,具体步骤如下:
- 输入原始图像 I(x,y) 和滤波的半径范围 sigma;
- 计算原始图像 I(x,y) 高斯滤波后的结果,得到 L(x,y);
- 按照公式计算,得到 Log[R(x,y)];
- 将得到的结果量化为 [0, 255] 范围的像素值,然后输出结果图像。
原理
图像I(x,y)可以看做是入射图像(也有人称之为亮度图像)L(x,y)和反射图像R(x,y)构成,入射光照射在反射物体上,通过反射物体的反射,形成反射光进入人眼。其原理图如下所示:
最后形成的图像可以如下公式表示:
等式两边取对数得:
![]()
L(x,y)由I(x,y)和一个高斯核的卷积来近似表示:
![]()
上式中*代表卷积,G(x,y)代表高斯核。
最后,将Log(R(x,y))量化为0-255范围的像素值:
![]()
代码实现
# SSR
import cv2
import numpy as npdef replaceZeroes(data):min_nonzero = np.min(data[np.nonzero(data)])  # 找到数组中最小的非零值data = np.where(data == 0, min_nonzero, data)  # 将数组中的零值替换为最小的非零值return data  # 返回替换后的数组def SSR(src_img, size):L_blur = cv2.GaussianBlur(src_img, (size, size), 0)  # 高斯函数img = replaceZeroes(src_img)  # 去除0  L_blur = replaceZeroes(L_blur)  # 去除0dst_Img = cv2.log(img / 255.0)  # 归一化取logdst_Lblur = cv2.log(L_blur / 255.0)  # 归一化取logdst_IxL = cv2.multiply(dst_Img, dst_Lblur)  # 乘  L(x,y)=S(x,y)*G(x,y)log_R = cv2.subtract(dst_Img, dst_IxL)  # 减  log(R(x,y))=log(S(x,y))-log(L(x,y))dst_R = cv2.normalize(log_R, None, 0, 255, cv2.NORM_MINMAX)  # 放缩到0-255log_uint8 = cv2.convertScaleAbs(dst_R)  # 取整return log_uint8def SSR_image(image):size = 3b_gray, g_gray, r_gray = cv2.split(image)  # 拆分三个通道# 分别对每一个通道进行 SSRb_gray = SSR(b_gray, size)g_gray = SSR(g_gray, size)r_gray = SSR(r_gray, size)result = cv2.merge([b_gray, g_gray, r_gray])  # 通道合并。return resultif __name__ == "__main__":input_img = cv2.imread('img_1.png', cv2.IMREAD_COLOR)  # 读取输入图像enhanced_img = SSR_image(input_img)  # 调用 SSR 函数得到增强后的图像cv2.imwrite('img_2.png', enhanced_img)  # 将增强后的图像保存为 img_2.png# 显示原始图像和增强后的图像cv2.imshow('Original Image', input_img)cv2.imshow('Enhanced(SSR) Image', enhanced_img)cv2.waitKey(0)cv2.destroyAllWindows()
- 实现效果:
- 参数调整:
主要调整是高斯模糊:
L_blur = cv2.GaussianBlur(src_img, (size, size), 0)
- src_img: 是输入图像,即要进行高斯模糊的图像。
- (size,size): 是高斯核的大小,其中
size是一个正整数。高斯核的大小决定了模糊的程度,size越大,模糊程度越高。 0:是高斯核的标准差,在 x 方向上。如果这个值为 0,则会根据高斯核的大小自动计算。
🎄3.2 多尺度MSR(Multi-Scale Retinex)多尺度Retinex算法
简介
MSR (Multi-Scale Retinex),即多尺度视网膜算法是在 SSR 算法的基础上提出的,采用多个不同的 sigma 值,然后将最后得到的不同结果进行加权取值。
优点是可以保持图像高保真度与对图像的动态范围进行压缩的同时,MSR也可实现色彩增强、颜色恒常性、局部动态范围压缩、全局动态范围压缩,也可以用于X光图像增强。
原理
对原始图像进行每个尺度的高斯滤波,得到模糊后的图像Li(x,y),其中小标i表示尺度数
然后对每个尺度下进行累加计算:

其中Weight(i)表示每个尺度对应的权重,要求各尺度权重之和必须为1,经典的取值为等权重。
基本的计算原理:

上式中,I为原始输入图像,G是滤波函数,一般为高斯函数,N为尺度的数量,W为每个尺度的权重,一般都为1/N, R表示在对数域的图像的输出。
代码实现
# MSR
import numpy as np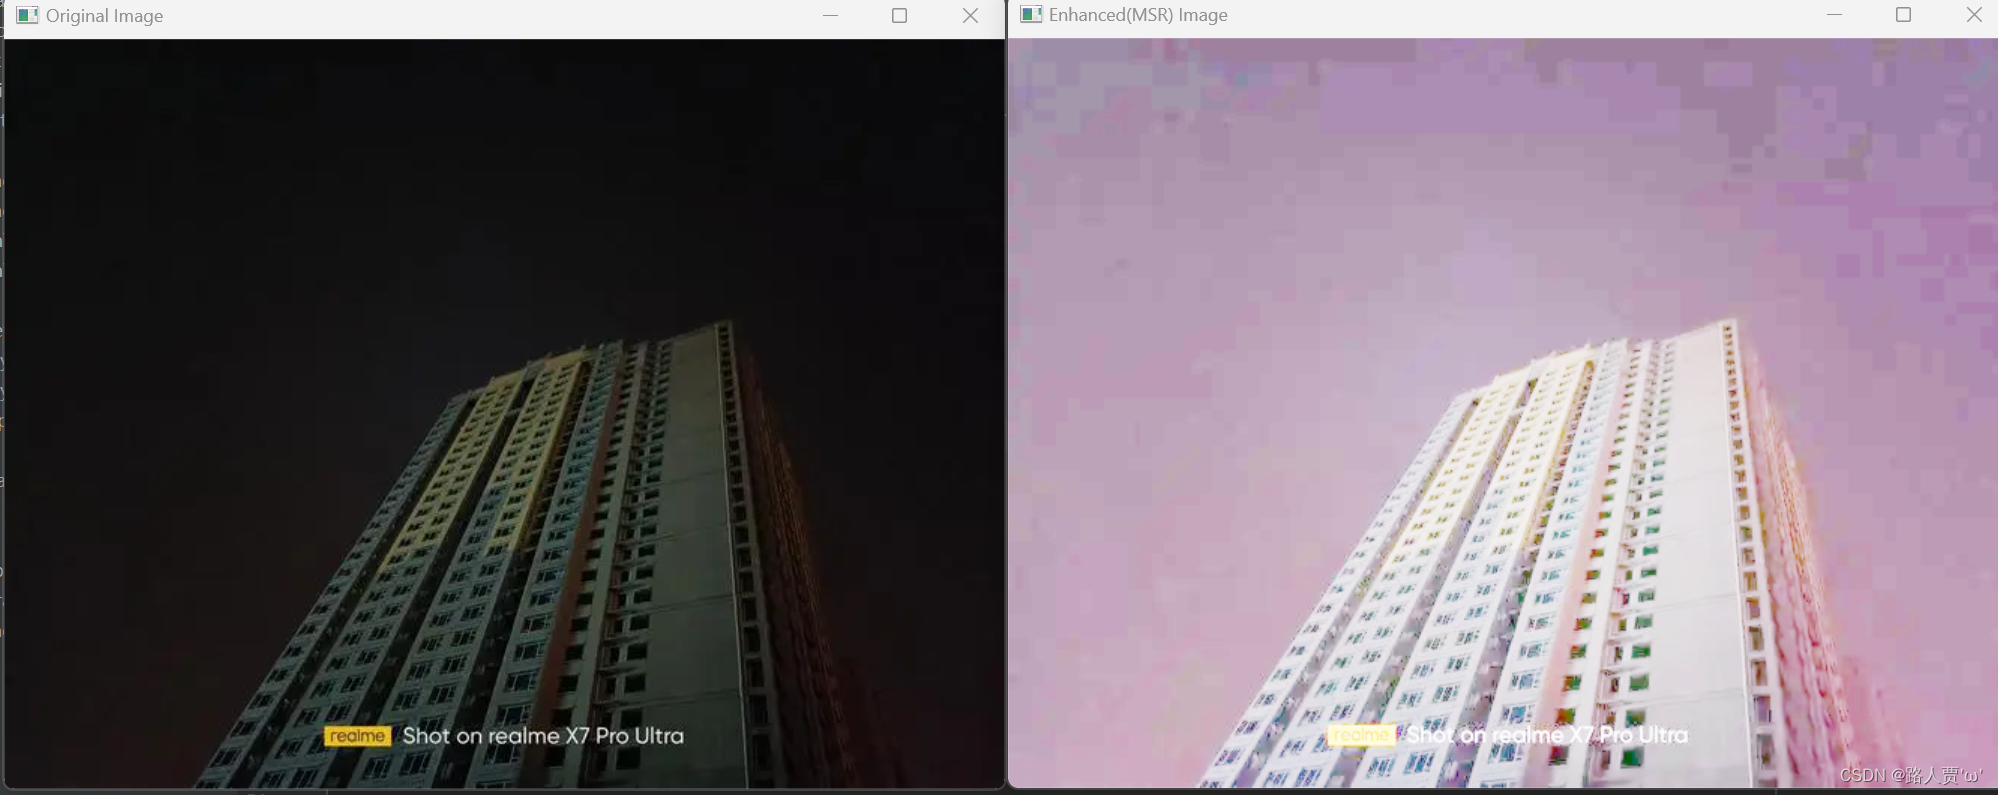
import cv2def replaceZeroes(data):min_nonzero = min(data[np.nonzero(data)])data[data == 0] = min_nonzeroreturn datadef MSR(img, scales):weight = 1 / 3.0scales_size = len(scales)h, w = img.shape[:2]log_R = np.zeros((h, w), dtype=np.float32)for i in range(scales_size):img = replaceZeroes(img)L_blur = cv2.GaussianBlur(img, (scales[i], scales[i]), 0)L_blur = replaceZeroes(L_blur)dst_Img = cv2.log(img / 255.0)dst_Lblur = cv2.log(L_blur / 255.0)dst_Ixl = cv2.multiply(dst_Img, dst_Lblur)log_R += weight * cv2.subtract(dst_Img, dst_Ixl)dst_R = cv2.normalize(log_R, None, 0, 255, cv2.NORM_MINMAX)log_uint8 = cv2.convertScaleAbs(dst_R)return log_uint8if __name__ == '__main__':img = 'img_1.png'scales = [15, 101, 301] #可调整的位置src_img = cv2.imread(img)b_gray, g_gray, r_gray = cv2.split(src_img)b_gray = MSR(b_gray, scales)g_gray = MSR(g_gray, scales)r_gray = MSR(r_gray, scales)result = cv2.merge([b_gray, g_gray, r_gray])cv2.imshow('Original Image', src_img)cv2.imshow('Enhanced(MSR) Image', result)cv2.waitKey(0)cv2.destroyAllWindows()- 实现效果:
(尺度因子为(15,101,301)时)

(尺度因子为(3,5,9)时)
- 参数调整:
主要调整是尺度因子:
scales = [3, 5, 9] #可调整的位置🎄3.3 MSRCR(Multi-Scale Retinex with Color Restoration)具有色彩恢复的多尺度Retinex算法
简介
在以上的两幅测试图像中,特别是第二幅,我们看到明显的偏色效果,这就是SSR和MSR普遍都存在的问题。
为此,研究者又开发出一种称之为带色彩恢复的多尺度视网膜增强算法(MSRCR,Multi-Scale Retinex with Color Restoration) ,具体讨论的过程详见《A Multiscale Retinex for Bridging the Gap Between Color Images and the Human Observation of Scenes》论文。
原理
在前面的增强过程中,图像可能会因为增加了噪声,而使得图像的局部细节色彩失真,不能显现出物体的真正颜色,整体视觉效果变差。
针对这一点不足,MSRCR在MSR的基础上,加入了色彩恢复因子C来调节由于图像局部区域对比度增强而导致颜色失真的缺陷。
论文中提出的算法步骤:
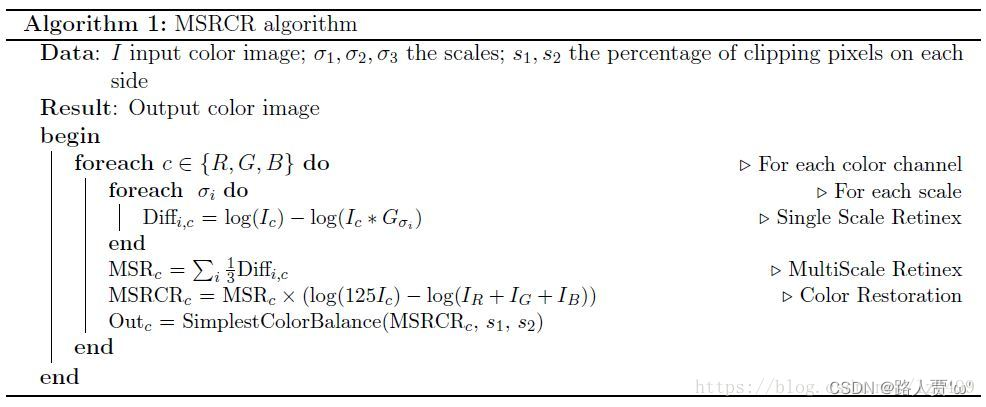

(注:如果是灰度图像,只需要计算一次即可,如果是彩色图像,如RGB三通道,则每个通道均需要如上进行计算。)
上式参数:
- G:增益Gain(一般取值:5)
- b:偏差Offset(一般取值:25)
- I (x, y):某个通道的图像
- C:某个通道的彩色回复因子,用来调节3个通道颜色的比例
- f(·):颜色空间的映射函数
- β:增益常数(一般取值:46)
- α:受控制的非线性强度(一般取值:125)
代码实现
import cv2
import numpy as np
import mathdef replaceZeroes(data):min_nonzero = min(data[np.nonzero(data)])data[data == 0] = min_nonzeroreturn datadef simple_color_balance(input_img, s1, s2):h, w = input_img.shape[:2]out_img = np.zeros([h, w])sort_img = input_img.copy()one_dim_array = sort_img.flatten() # 转化为一维数组sort_array = sorted(one_dim_array) # 对一维数组按升序排序per1 = int((h * w) * s1 / 100)minvalue = sort_array[per1]per2 = int((h * w) * s2 / 100)maxvalue = sort_array[(h * w) - 1 - per2]# 实施简单白平衡算法if (maxvalue <= minvalue):for i in range(h):for j in range(w):out_img[i, j] = maxvalueelse:scale = 255.0 / (maxvalue - minvalue)for m in range(h):for n in range(w):if (input_img[m, n] < minvalue):out_img[m, n] = 0elif (input_img[m, n] > maxvalue):out_img[m, n] = 255else:out_img[m, n] = scale * (input_img[m, n] - minvalue) # 映射中间段的图像像素out_img = cv2.convertScaleAbs(out_img)return out_imgdef MSRCR(img, scales, s1, s2):h, w = img.shape[:2]# print(h, w)scles_size = len(scales)img = np.array(img, dtype=np.float64)# print(img)log_R = np.zeros((h, w), dtype=np.float64)img_sum = np.add(img[:, :, 0], img[:, :, 1], img[:, :, 2])img_sum = replaceZeroes(img_sum)gray_img = []for j in range(3):img[:, :, j] = replaceZeroes(img[:, :, j])for i in range(0, scles_size):L_blur = cv2.GaussianBlur(img[:, :, j], (scales[i], scales[i]), 0)L_blur = replaceZeroes(L_blur)dst_img = cv2.log(img[:, :, j])dst_Lblur = cv2.log(L_blur)log_R += cv2.subtract(dst_img, dst_Lblur)MSR = log_R / 3.0'''img_sum_log = np.zeros((h, w))for i in range(0, h):for k in range(0, w):img_sum_log[i,k] = 125.0*math.log(img[i,k,j]) - math.log(img_sum[i,k])MSRCR = MSR * (img_sum_log[:, :])print(img_sum)# x = cv2.log(img_sum)'''MSRCR = MSR * (cv2.log(125.0 * img[:, :, j]) - cv2.log(img_sum))gray = simple_color_balance(MSRCR, s1, s2)gray_img.append(gray)return gray_imgif __name__ == '__main__':scales = [15, 101, 301]s1, s2 = 2, 3src_img = cv2.imread('img_1.png')src_img = cv2.cvtColor(src_img, cv2.COLOR_BGR2RGB)cv2.imshow('Original Image', src_img)MSRCR_Out = MSRCR(src_img, scales, s1, s2)result = cv2.merge([MSRCR_Out[0], MSRCR_Out[1], MSRCR_Out[2]])cv2.imshow('Enhanced(MSRCR) Image', result)cv2.waitKey(0)cv2.destroyAllWindows()- 实现效果:

- 参数调整:
同上~
🚀总结
基于Retinex理论形成的图像增强算法,其优势在于光源一般不会对图像中各像素的相对明暗关系造成影响,还能一定程度上改变光源影响下的图像质量,以提高图像增强效果让图像看起来更加清晰。
但是,基于Retinex理论的图像增强算法也并非是完美的:
SSR算法:无法同时提供丰富的动态范围压缩和颜色保真,经低尺度SSR算法增强后的图像存在光晕情况,而经高尺度SSR算法增强后的图像尽管可以消除光晕,但动态范围压缩效果不佳。
MSR 算法:弥补了SSR算法的不足,增强后图像细节更加突出,色彩更加丰富,但其增强过程可能会因噪声的增加而使图像局部区域色彩失真,最终影响整体视觉效果。
MSRCR算法:又进一步解决了MSR算法存在的这一问题,处理后的图像效果更佳,但计算过程过于复杂。
🚀整体代码
import numpy as np
from .tools import measure_time,eps,gauss_blur,simplest_color_balance### Frankle-McCann Retinex[2,3]
@measure_time
def retinex_FM(img,iter=4):'''log(OP(x,y))=1/2{log(OP(x,y))+[log(OP(xs,ys))+log(R(x,y))-log(R(xs,ys))]*}, seematlab code in https://www.cs.sfu.ca/~colour/publications/IST-2000/'''if len(img.shape)==2:img=img[...,None]ret=np.zeros(img.shape,dtype='uint8')def update_OP(x,y):nonlocal OPIP=OP.copy()if x>0 and y==0:IP[:-x,:]=OP[x:,:]+R[:-x,:]-R[x:,:]if x==0 and y>0:IP[:,y:]=OP[:,:-y]+R[:,y:]-R[:,:-y]if x<0 and y==0:IP[-x:,:]=OP[:x,:]+R[-x:,:]-R[:x,:]if x==0 and y<0:IP[:,:y]=OP[:,-y:]+R[:,:y]-R[:,-y:]IP[IP>maximum]=maximumOP=(OP+IP)/2for i in range(img.shape[-1]):R=np.log(img[...,i].astype('double')+1)maximum=np.max(R)OP=maximum*np.ones(R.shape)S=2**(int(np.log2(np.min(R.shape))-1))while abs(S)>=1: #iterations is slowfor k in range(iter):update_OP(S,0)update_OP(0,S)S=int(-S/2)OP=np.exp(OP)mmin=np.min(OP)mmax=np.max(OP)ret[...,i]=(OP-mmin)/(mmax-mmin)*255return ret.squeeze()### Single-Scale Retinex[4]
@measure_time
def retinex_SSR(img,sigma):'''log(R(x,y))=log(S(x,y))-log(S(x,y)*G(x,y))=log(S(x,y))-log(L(x,y)), i.e. r=s-l. S(x,y) and R(x,y) represent input image and retinex output image respectively, L(x,y):=S(x,y)*G(x,y) represents the lightness function, defined as the original image S operated with a gaussian filter G(named as center/surround function)implement ssr on single channel:1) read original image and convert to double(type) as S2) calc coefficient of G with sigma, i.e. normalize the gaussian kernel3) calc r by r=s-l and then convert r to R(from log to real)4) stretch the values of R into the range 0~255issue:we don't convert values from log domain to real domain in step 3 above, because it will bring terrible effect. In fact nobody does this, but the reason still remains unknownnote:gauss blur is the main operation of SSR, its time complexity is O(mnpq), m&n is the shape of image, p&q is the size of filter, we can use recursive gaussian filter(RGF), O(mn), to alternative it(see func fast_gauss_blur). Or transform from time domain to frequency domain using Fourier Transform to reduce complexity[4]'''if len(img.shape)==2:img=img[...,None]ret=np.zeros(img.shape,dtype='uint8')for i in range(img.shape[-1]):channel=img[...,i].astype('double')S_log=np.log(channel+1)gaussian=gauss_blur(channel,sigma)#gaussian=cv2.filter2D(channel,-1,get_gauss_kernel(sigma)) #conv may be slow if size too big#gaussian=cv2.GaussianBlur(channel,(0,0),sigma) #always slowerL_log=np.log(gaussian+1)r=S_log-L_logR=r #R=np.exp(r)?mmin=np.min(R)mmax=np.max(R)stretch=(R-mmin)/(mmax-mmin)*255 #linear stretchret[...,i]=stretchreturn ret.squeeze()### Multi-Scale Retinex[4]
@measure_time
def retinex_MSR(img,sigmas=[15,80,250],weights=None):'''r=∑(log(S)-log(S*G))w, MSR combines various SSR with different(or same) weights, commonly we select 3 scales(sigma) and equal weights, (15,80,250) is a good choice. If len(sigmas)=1, equal to SSRargs:sigmas: a listweights: None or a list, it represents the weight for each SSR, their sum should be 1, if None, the weights will be [1/t, 1/t, ..., 1/t], t=len(sigmas)'''if weights==None:weights=np.ones(len(sigmas))/len(sigmas)elif not abs(sum(weights)-1)<0.00001:raise ValueError('sum of weights must be 1!')ret=np.zeros(img.shape,dtype='uint8')if len(img.shape)==2:img=img[...,None]for i in range(img.shape[-1]):channel=img[...,i].astype('double')r=np.zeros_like(channel)for k,sigma in enumerate(sigmas):r+=(np.log(channel+1)-np.log(gauss_blur(channel,sigma,)+1))*weights[k]mmin=np.min(r)mmax=np.max(r)stretch=(r-mmin)/(mmax-mmin)*255ret[...,i]=stretchreturn ret.squeeze()def MultiScaleRetinex(img,sigmas=[15,80,250],weights=None,flag=True):'''equal to func retinex_MSR, just remove the outer for-loop. Practice has proven that when MSR used in MSRCR or Gimp, we should add stretch step, otherwise the result color may be dim. But it's up to you, if you select to neglect stretch, set flag as False, have fun'''if weights==None:weights=np.ones(len(sigmas))/len(sigmas)elif not abs(sum(weights)-1)<0.00001:raise ValueError('sum of weights must be 1!')r=np.zeros(img.shape,dtype='double')img=img.astype('double')for i,sigma in enumerate(sigmas):r+=(np.log(img+1)-np.log(gauss_blur(img,sigma)+1))*weights[i]if flag:mmin=np.min(r,axis=(0,1),keepdims=True)mmax=np.max(r,axis=(0,1),keepdims=True)r=(r-mmin)/(mmax-mmin)*255 #maybe indispensable when used in MSRCR or Gimp, make pic vibrantr=r.astype('uint8')return r'''old version
def retinex_MSRCR(img,sigmas=[12,80,250],s1=0.01,s2=0.01):alpha=125ret=np.zeros(img.shape,dtype='uint8')csum_log=np.log(np.sum(img,axis=2).astype('double')+1)msr=retinex_MSR(img,sigmas)for i in range(img.shape[-1]):channel=img[...,i].astype('double')r=(np.log(alpha*channel+1)-csum_log)*msr[...,i]stretch=simplest_color_balance(r,0.01,0.01)ret[...,i]=stretchreturn retdef retinex_gimp(img,sigmas=[12,80,250],dynamic=2):alpha=128gain=1offset=0ret=np.zeros(img.shape,dtype='uint8')csum_log=np.log(np.sum(img,axis=2)+1)msr=retinex_MSR(img,sigmas)for i in range(img.shape[-1]):channel=img[...,i].astype('double')r=gain*(np.log(alpha*channel+1)-csum_log)*msr[...,i]+offsetmean=np.mean(r)var=np.sqrt(np.sum((r-mean)**2)/r.size)mmin=mean-dynamic*varmmax=mean+dynamic*varstretch=(r-mmin)/(mmax-mmin)*255stretch[stretch>255]=255stretch[stretch<0]=0ret[...,i]=stretchreturn ret
'''### Multi-Scale Retinex with Color Restoration, see[4] Algorithm 1 in section 4
@measure_time
def retinex_MSRCR(img,sigmas=[12,80,250],s1=0.01,s2=0.01):'''r=βlog(αI')MSR, I'=I/∑I, I is one channel of image, ∑I is the sum of all channels, C:=βlog(αI') is named as color recovery factor. Last we improve previously used linear stretch: MSRCR:=r, r=G[MSRCR-b], then doing linear stretch. In practice, it doesn't work well, so we take another measure: Simplest Color Balance'''alpha=125img=img.astype('double')+1 #csum_log=np.log(np.sum(img,axis=2))msr=MultiScaleRetinex(img-1,sigmas) #-1r=(np.log(alpha*img)-csum_log[...,None])*msr#beta=46;G=192;b=-30;r=G*(beta*r-b) #deprecated#mmin,mmax=np.min(r),np.max(r)#stretch=(r-mmin)/(mmax-mmin)*255 #linear stretch is unsatisfactoryfor i in range(r.shape[-1]):r[...,i]=simplest_color_balance(r[...,i],0.01,0.01)return r.astype('uint8')@measure_time
def retinex_gimp(img,sigmas=[12,80,250],dynamic=2):'''refer to the implementation in GIMP, it improves the stretch operation based on MSRCR, introduces mean and standard deviation, and a dynamic parameter to eliminate chromatic aberration, experiments show that it works well. see source code in https://github.com/piksels-and-lines-orchestra/gimp/blob/master \/plug-ins/common/contrast-retinex.c'''alpha=128gain=1offset=0img=img.astype('double')+1 #csum_log=np.log(np.sum(img,axis=2))msr=MultiScaleRetinex(img-1,sigmas) #-1r=gain*(np.log(alpha*img)-csum_log[...,None])*msr+offsetmean=np.mean(r,axis=(0,1),keepdims=True)var=np.sqrt(np.sum((r-mean)**2,axis=(0,1),keepdims=True)/r[...,0].size)mmin=mean-dynamic*varmmax=mean+dynamic*varstretch=(r-mmin)/(mmax-mmin)*255stretch[stretch>255]=255stretch[stretch<0]=0return stretch.astype('uint8')### Multi-Scale Retinex with Chromaticity Preservation, see[4] Algorithm 2 in section 4
@measure_time
def retinex_MSRCP(img,sigmas=[12,80,250],s1=0.01,s2=0.01):'''compare to others, simple and very fast'''Int=np.sum(img,axis=2)/3Diffs=[]for sigma in sigmas:Diffs.append(np.log(Int+1)-np.log(gauss_blur(Int,sigma)+1))MSR=sum(Diffs)/3Int1=simplest_color_balance(MSR,s1,s2)B=np.max(img,axis=2)A=np.min(np.stack((255/(B+eps),Int1/(Int+eps)),axis=2),axis=-1)return (A[...,None]*img).astype('uint8')@measure_time
def retinex_AMSR(img,sigmas=[12,80,250]):'''see Proposed Method ii in "An automated multi Scale Retinex with Color Restoration for image enhancement"(doi: 10.1109/NCC.2012.6176791)'''img=img.astype('double')+1 #msr=MultiScaleRetinex(img-1,sigmas,flag=False) #y=0.05for i in range(msr.shape[-1]):v,c=np.unique((msr[...,i]*100).astype('int'),return_counts=True)sort_v_index=np.argsort(v)sort_v,sort_c=v[sort_v_index],c[sort_v_index] #plot histzero_ind=np.where(sort_v==0)[0][0]zero_c=sort_c[zero_ind]#_=np.where(sort_c[:zero_ind]<=zero_c*y)[0]if len(_)==0:low_ind=0else:low_ind=_[-1]_=np.where(sort_c[zero_ind+1:]<=zero_c*y)[0]if len(_)==0:up_ind=len(sort_c)-1else:up_ind=_[0]+zero_ind+1#low_v,up_v=sort_v[[low_ind,up_ind]]/100 #low clip value and up clip valuemsr[...,i]=np.maximum(np.minimum(msr[:,:,i],up_v),low_v)mmin=np.min(msr[...,i])mmax=np.max(msr[...,i])msr[...,i]=(msr[...,i]-mmin)/(mmax-mmin)*255msr=msr.astype('uint8')return msr'''step of color restoration, maybe all rightr=(np.log(125*img)-np.log(np.sum(img,axis=2))[...,None])*msrmmin,mmax=np.min(r),np.max(r)return ((r-mmin)/(mmax-mmin)*255).astype('uint8')'''
链接:https://pan.baidu.com/s/1JBhvwvhIixPHzoKkNI7WNg?pwd=j666
提取码:j666

这篇关于【低照度图像增强系列(2)】Retinex(SSR/MSR/MSRCR)算法详解与代码实现的文章就介绍到这儿,希望我们推荐的文章对编程师们有所帮助!


