本文主要是介绍OpenGL :LearnOpenGL笔记,希望对大家解决编程问题提供一定的参考价值,需要的开发者们随着小编来一起学习吧!
glfw
- https://github.com/JoeyDeVries/LearnOpenGL/blob/master/src/1.getting_started/1.1.hello_window/hello_window.cpp
#include <glad/glad.h>// 注: GLAD的include文件包含所需的OpenGL头文件(如GL/GL.h) ,因此确保在其他需要OpenGL的头文件 (如GLFW) 之前包含GLAD
#include <GLFW/glfw3.h>
#include <iostream>void framebuffer_size_callback(GLFWwindow* window, int width, int height);
void processInput(GLFWwindow *window);// settings
const unsigned int SCR_WIDTH = 800;
const unsigned int SCR_HEIGHT = 600;int main()
{// 设置主要和次要版本 glfw: initialize and configure// ------------------------------glfwInit();glfwWindowHint(GLFW_CONTEXT_VERSION_MAJOR, 3);glfwWindowHint(GLFW_CONTEXT_VERSION_MINOR, 3);glfwWindowHint(GLFW_OPENGL_PROFILE, GLFW_OPENGL_CORE_PROFILE);// 创建窗口对象 glfw window creation// --------------------GLFWwindow* window = glfwCreateWindow(SCR_WIDTH, SCR_HEIGHT, "LearnOpenGL", NULL, NULL);if (window == NULL){std::cout << "Failed to create GLFW window" << std::endl;glfwTerminate();return -1;}glfwMakeContextCurrent(window);glfwSetFramebufferSizeCallback(window, framebuffer_size_callback);// glad: load all OpenGL function pointers 在调用任何OpenGL的函数之前我们需要初始化GLAD// ---------------------------------------if (!gladLoadGLLoader((GLADloadproc)glfwGetProcAddress)){std::cout << "Failed to initialize GLAD" << std::endl;return -1;}    // render loop,GLFW退出前一直保持运行// -----------while (!glfwWindowShouldClose(window)){// 处理输入 input// -----processInput(window);/*这里可以放置渲染指令*/// 清屏并设置为固定颜色//glClearColor(0.2f, 0.3f, 0.3f, 1.0f);//glClear(GL_COLOR_BUFFER_BIT);// glfw: swap buffers and poll IO events (keys pressed/released, mouse moved etc.)// -------------------------------------------------------------------------------glfwSwapBuffers(window); // 交换颜色缓冲(它是一个储存着GLFW窗口每一个像素颜色值的大缓冲),它在这一迭代中被用来绘制,并且将会作为输出显示在屏幕上。glfwPollEvents();// 检查有没有触发什么事件(比如键盘输入、鼠标移动等)、更新窗口状态,并调用对应的回调函数(可以通过回调方法手动设置)}// 正确释放之前的分配的所有资源 glfw: terminate, clearing all previously allocated GLFW resources.// ------------------------------------------------------------------glfwTerminate();return 0;
}// process all input: query GLFW whether relevant keys are pressed/released this frame and react accordingly
// ---------------------------------------------------------------------------------------------------------
void processInput(GLFWwindow *window)
{if(glfwGetKey(window, GLFW_KEY_ESCAPE) == GLFW_PRESS)// 检查用户是否按下了返回键(Esc)(glfwSetWindowShouldClose(window, true);
}// 窗口大小改变的回调函数 glfw: whenever the window size changed (by OS or user resize) this callback function executes
// ---------------------------------------------------------------------------------------------
void framebuffer_size_callback(GLFWwindow* window, int width, int height)
{// make sure the viewport matches the new window dimensions; note that width and // height will be significantly larger than specified on retina displays.glViewport(0, 0, width, height);
}
你好,三角形
-
https://github.com/JoeyDeVries/LearnOpenGL/blob/master/src/1.getting_started/2.1.hello_triangle/hello_triangle.cpp
-
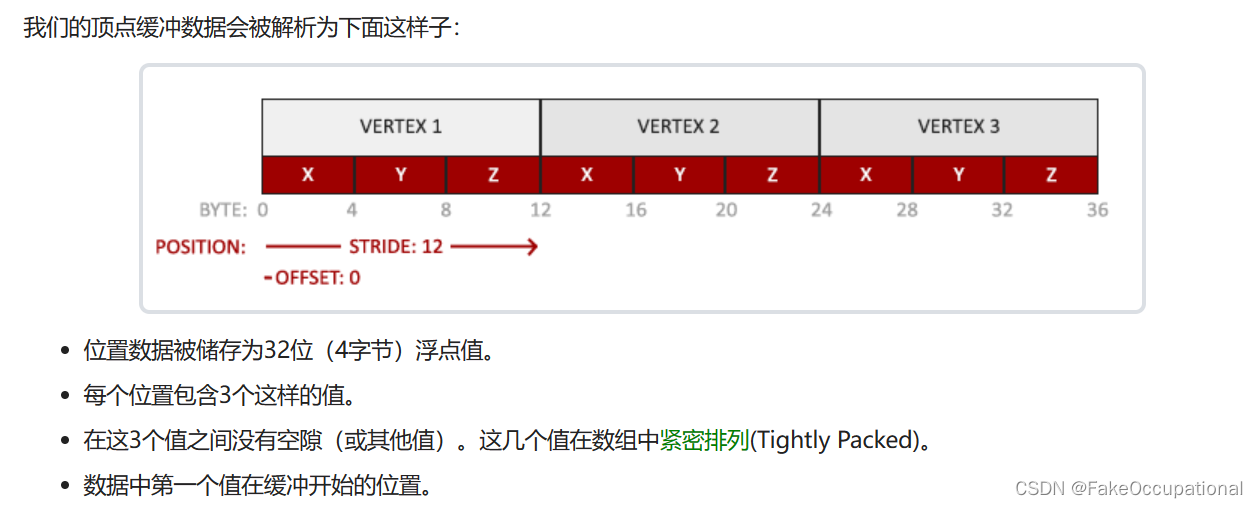
顶点缓冲对象:Vertex Buffer Object,VBO主要用于存储顶点数据,包括顶点的位置、颜色、法线等信息。VBO通过缓冲区对象将这些数据存储在GPU中,提高了数据传输的效率。
-
顶点数组对象:Vertex Array Object,VAO主要用于封装顶点数据的配置和状态。VAO记录了顶点属性指针、顶点属性的格式等配置信息,使得在渲染时可以更方便地切换和管理不同的顶点数据。
-
元素缓冲对象:Element Buffer Object,EBO 或 索引缓冲对象 Index Buffer Object,IBO
顶点着色器和片段着色器
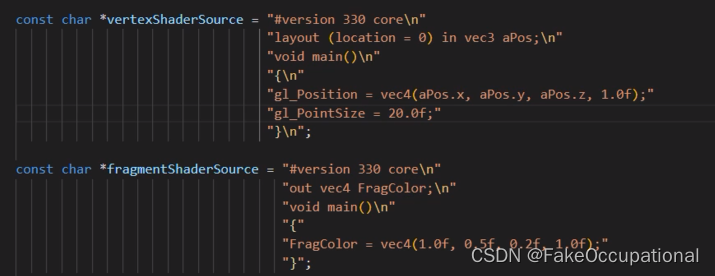
// 顶点着色器代码
const char *vertexShaderSource = "#version 330 core\n""layout (location = 0) in vec3 aPos;\n""void main()\n""{\n""   gl_Position = vec4(aPos.x, aPos.y, aPos.z, 1.0);\n""}\0";
#version 330 core: 指定GLSL的版本为3.30,并使用核心(core)profile。layout (location = 0) in vec3 aPos;: 定义了一个输入变量aPos,它是一个3D向量,表示顶点的位置,这个变量的位置索引为0。in vec3 aPos使用in关键字,在顶点着色器中声明所有的输入顶点属性(Input Vertex Attribute)。现在我们只关心位置(Position)数据,所以我们只需要一个顶点属性。由于每个顶点都有一个3D坐标,我们就创建一个vec3输入变量aPos。(location = 0)我们同样也通过layout (location = 0)设定了输入变量的位置值你后面会看到为什么我们会需要这个位置值。void main() {...}: 着色器的主函数,表示每个顶点的处理过程。在这里,它将输入的顶点位置赋值给gl_Position,这是顶点着色器的内置变量,表示顶点的最终位置,将gl_Position设置的值会成为该顶点着色器的输出。第四个维度和透视除法(Perspective Division)有关。
// 片段着色器代码 片段着色器所做的是计算像素最后的颜色输出
const char *fragmentShaderSource = "#version 330 core\n""out vec4 FragColor;\n""void main()\n""{\n""   FragColor = vec4(1.0f, 0.5f, 0.2f, 1.0f);\n""}\n\0";
out vec4 FragColor;: 定义了一个输出变量FragColor,它是一个4D向量,表示片段的颜色,第四维度为透明度。void main() {...}: 片段着色器的主函数,表示每个片段的处理过程。在这里,它将颜色值赋值给FragColor,这个颜色是橙色,由RGBA分量表示。
简化版code
// import部分
// ------------------------------------------------------------------
// settings
const unsigned int SCR_WIDTH = 800;
const unsigned int SCR_HEIGHT = 600;// 顶点着色器和片段着色器部分
// const char *vertexShaderSource =
// const char *fragmentShaderSource = int main()
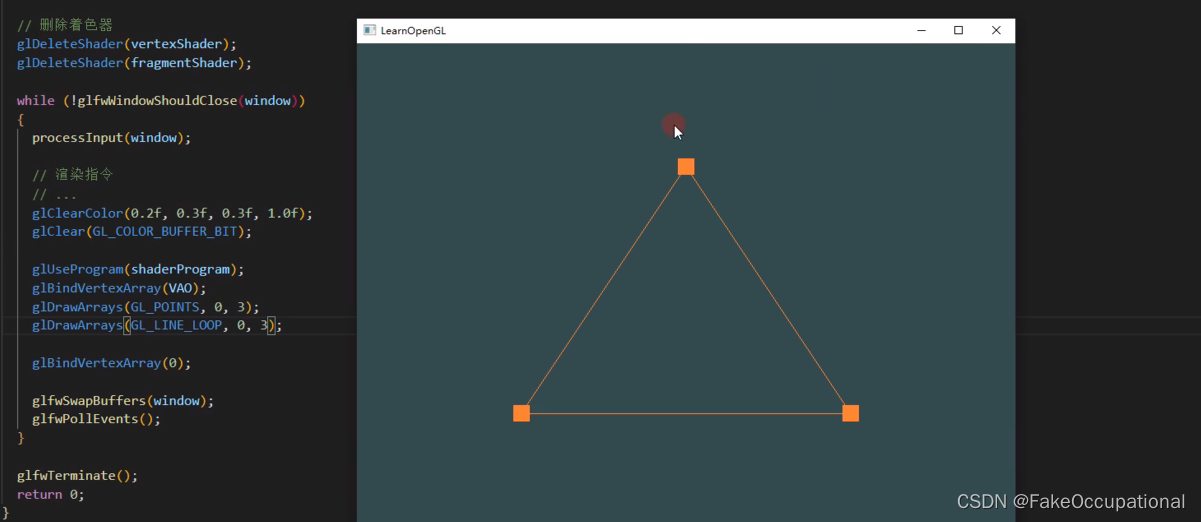
{// glfw窗口部分: initialize and configure// ------------------------------------------------------------------// glad加载部分: load all OpenGL function pointers// ------------------------------------------------------------------// build and compile our shader program// A 顶点着色器:创建顶点着色器+ 附加源码 +编译 unsigned int vertexShader = glCreateShader(GL_VERTEX_SHADER);glShaderSource(vertexShader, 1, &vertexShaderSource, NULL);// 着色器源码附加到着色器对象上glCompileShader(vertexShader);// check for shader compile errorsint success;char infoLog[512];glGetShaderiv(vertexShader, GL_COMPILE_STATUS, &success);if (!success){std::cout << "ERROR::SHADER::VERTEX::COMPILATION_FAILED\n" << std::endl;}// B 片段着色器 fragment shaderunsigned int fragmentShader = glCreateShader(GL_FRAGMENT_SHADER);glShaderSource(fragmentShader, 1, &fragmentShaderSource, NULL);glCompileShader(fragmentShader);// check for shader compile errorsglGetShaderiv(fragmentShader, GL_COMPILE_STATUS, &success);if (!success){glGetShaderInfoLog(fragmentShader, 512, NULL, infoLog);std::cout << "ERROR::SHADER::FRAGMENT::COMPILATION_FAILED\n" << infoLog << std::endl;}// C 连接 link shadersunsigned int shaderProgram = glCreateProgram();// 创建程序对象glAttachShader(shaderProgram, vertexShader);// 将刚才创建的顶点着色器附加到程序对象上glAttachShader(shaderProgram, fragmentShader); // 将刚才创建的片段着色器附加到程序对象上glLinkProgram(shaderProgram); //连接// 检测连接是否成功 check for linking errorsglGetProgramiv(shaderProgram, GL_LINK_STATUS, &success);if (!success) {glGetProgramInfoLog(shaderProgram, 512, NULL, infoLog);std::cout << "ERROR::SHADER::PROGRAM::LINKING_FAILED\n" << infoLog << std::endl;}glDeleteShader(vertexShader); // 删除着色器对象glDeleteShader(fragmentShader);// 顶点数据,最初始的输入,每个坐标的(x,y,z)的值都在-1到1 set up vertex data (and buffer(s)) and configure vertex attributesfloat vertices[] = {-0.5f, -0.5f, 0.0f, // left 0.5f, -0.5f, 0.0f, // right 0.0f, 0.5f, 0.0f // top }; // 创建VAO VBOunsigned int VBO, VAO;glGenVertexArrays(1, &VAO);glGenBuffers(1, &VBO);// 创建顶点缓冲对象,1为指定要生成的缓冲对象(包括顶点缓冲对象、索引缓冲对象等)的数量// bind the Vertex Array Object first, then bind and set vertex buffer(s), and then configure vertex attributes(s).glBindVertexArray(VAO);// 配置VBOglBindBuffer(GL_ARRAY_BUFFER, VBO);//把新创建的缓冲绑定到GL_ARRAY_BUFFER目标上glBufferData(GL_ARRAY_BUFFER, sizeof(vertices), vertices, GL_STATIC_DRAW);// 把之前定义的顶点数据复制到缓冲的内存中// 它的第一个参数是目标缓冲的类型:顶点缓冲对象当前绑定到GL_ARRAY_BUFFER目标上。第二个参数指定传输数据的大小(以字节为单位);用一个简单的sizeof计算出顶点数据大小就行。第三个参数是我们希望发送的实际数据。// 第四个参数指定了我们希望显卡如何管理给定的数据。它有三种形式:GL_STATIC_DRAW :数据不会或几乎不会改变。GL_DYNAMIC_DRAW:数据会被改变很多。GL_STREAM_DRAW :数据每次绘制时都会改变。三角形的位置数据不会改变,每次渲染调用时都保持原样,所以它的使用类型最好是GL_STATIC_DRAW。如果,比如说一个缓冲中的数据将频繁被改变,那么使用的类型就是GL_DYNAMIC_DRAW或GL_STREAM_DRAW,这样就能确保显卡把数据放在能够高速写入的内存部分。// 手动指定输入数据的哪一个部分对应顶点着色器的哪一个顶点属性,使用glVertexAttribPointer函数告诉OpenGL该如何解析顶点数据(应用到逐个顶点属性上)glVertexAttribPointer(0, 3, GL_FLOAT, GL_FALSE, 3 * sizeof(float), (void*)0);glEnableVertexAttribArray(0); //启用顶点属性,因为顶点属性默认是禁用的,0为顶点属性位置值// note that this is allowed, the call to glVertexAttribPointer registered VBO as the vertex attribute's bound vertex buffer object so afterwards we can safely unbindglBindBuffer(GL_ARRAY_BUFFER, 0); // You can unbind the VAO afterwards so other VAO calls won't accidentally modify this VAO, but this rarely happens. Modifying other// VAOs requires a call to glBindVertexArray anyways so we generally don't unbind VAOs (nor VBOs) when it's not directly necessary.glBindVertexArray(0); // uncomment this call to draw in wireframe polygons.//glPolygonMode(GL_FRONT_AND_BACK, GL_LINE);// render loop// -----------while (!glfwWindowShouldClose(window)){// input// -----processInput(window);// render// ------glClearColor(0.2f, 0.3f, 0.3f, 1.0f);glClear(GL_COLOR_BUFFER_BIT);// draw our first triangle ,调用之前ABC三个步骤中创建的程序对象glUseProgram(shaderProgram);// 要想使用VAO,要做的只是使用glBindVertexArray绑定VAO。从绑定之后起,我们应该绑定和配置对应的VBO和属性指针,之后解绑VAO供之后使用。当我们打算绘制一个物体的时候,我们只要在绘制物体前简单地把VAO绑定到希望使用的设定上就行了。glBindVertexArray(VAO); // seeing as we only have a single VAO there's no need to bind it every time, but we'll do so to keep things a bit more organizedglDrawArrays(GL_TRIANGLES, 0, 3); // 绘制 : glDrawArrays函数第一个参数是我们打算绘制的OpenGL图元的类型。由于我们在一开始时说过,我们希望绘制的是一个三角形,这里传递GL_TRIANGLES给它。第二个参数指定了顶点数组的起始索引,我们这里填0。最后一个参数指定我们打算绘制多少个顶点,这里是3(我们只从我们的数据中渲染一个三角形,它只有3个顶点长)// glBindVertexArray(0); // 解除绑定 no need to unbind it every time // glfw: swap buffers and poll IO events (keys pressed/released, mouse moved etc.)// -------------------------------------------------------------------------------glfwSwapBuffers(window);glfwPollEvents();}// optional: de-allocate all resources once they've outlived their purpose:// ------------------------------------------------------------------------glDeleteVertexArrays(1, &VAO);glDeleteBuffers(1, &VBO);glDeleteProgram(shaderProgram);// glfw: terminate, clearing all previously allocated GLFW resources.// ------------------------------------------------------------------glfwTerminate();return 0;
}
glVertexAttribPointer
每个顶点属性从一个VBO管理的内存中获得它的数据,而具体是从哪个VBO(程序中可以有多个VBO)获取则是通过在调用glVertexAttribPointer时绑定到GL_ARRAY_BUFFER的VBO决定的。
- 第五个参数:步长
EBO 和 glDrawElements
- https://github.com/JoeyDeVries/LearnOpenGL/blob/master/src/1.getting_started/2.2.hello_triangle_indexed/hello_triangle_indexed.cpp
绘制具有两个公共顶点的三角形的方法:
float vertices[] = {// 第一个三角形0.5f, 0.5f, 0.0f,   // 右上角0.5f, -0.5f, 0.0f,  // 右下角-0.5f, 0.5f, 0.0f,  // 左上角// 第二个三角形0.5f, -0.5f, 0.0f,  // 右下角-0.5f, -0.5f, 0.0f, // 左下角-0.5f, 0.5f, 0.0f   // 左上角
};
或者下面的EBO方式:
float vertices[] = {0.5f, 0.5f, 0.0f,   // 右上角0.5f, -0.5f, 0.0f,  // 右下角-0.5f, -0.5f, 0.0f, // 左下角-0.5f, 0.5f, 0.0f   // 左上角
};unsigned int indices[] = {// 注意索引从0开始! // 此例的索引(0,1,2,3)就是顶点数组vertices的下标,// 这样可以由下标代表顶点组合成矩形0, 1, 3, // 第一个三角形1, 2, 3  // 第二个三角形
};// EBO也是数据,所以使用起来和VBO有点类似
简化版code
// import部分
// ------------------------------------------------------------------
// settings
const unsigned int SCR_WIDTH = 800;
const unsigned int SCR_HEIGHT = 600;
// 顶点着色器和片段着色器部分
// const char *vertexShaderSource =
// const char *fragmentShaderSource = int main()
{// glfw窗口部分: initialize and configure// ------------------------------------------------------------------// glad加载部分: load all OpenGL function pointers// ------------------------------------------------------------------// build and compile our shader program,分为 A B C三个步骤// A 顶点着色器:创建顶点着色器+ 附加源码 +编译// ------------------------------------// B 片段着色器 fragment shader// ------------------------------------// C 连接 link shaders// ------------------------------------// set up vertex data (and buffer(s)) and configure vertex attributes// ------------------------------------------------------------------float vertices[] = {0.5f,  0.5f, 0.0f,  // top right0.5f, -0.5f, 0.0f,  // bottom right-0.5f, -0.5f, 0.0f,  // bottom left-0.5f,  0.5f, 0.0f   // top left };unsigned int indices[] = {  // note that we start from 0!0, 1, 3,  // first Triangle1, 2, 3   // second Triangle};unsigned int VBO, VAO, EBO;glGenVertexArrays(1, &VAO);glGenBuffers(1, &VBO);glGenBuffers(1, &EBO);// bind the Vertex Array Object first, then bind and set vertex buffer(s), and then configure vertex attributes(s).glBindVertexArray(VAO);glBindBuffer(GL_ARRAY_BUFFER, VBO);glBufferData(GL_ARRAY_BUFFER, sizeof(vertices), vertices, GL_STATIC_DRAW);glBindBuffer(GL_ELEMENT_ARRAY_BUFFER, EBO);glBufferData(GL_ELEMENT_ARRAY_BUFFER, sizeof(indices), indices, GL_STATIC_DRAW);glVertexAttribPointer(0, 3, GL_FLOAT, GL_FALSE, 3 * sizeof(float), (void*)0);glEnableVertexAttribArray(0);// note that this is allowed, the call to glVertexAttribPointer registered VBO as the vertex attribute's bound vertex buffer object so afterwards we can safely unbind// 注意,这是允许的,对glVertexAttribPointer的调用将VBO注册为顶点属性的绑定顶点缓冲区对象,这样之后我们就可以安全地解除绑定glBindBuffer(GL_ARRAY_BUFFER, 0); // remember: do NOT unbind the EBO while a VAO is active as the bound element buffer object IS stored in the VAO; keep the EBO bound.//glBindBuffer(GL_ELEMENT_ARRAY_BUFFER, 0);// You can unbind the VAO afterwards so other VAO calls won't accidentally modify this VAO, but this rarely happens. Modifying other// VAOs requires a call to glBindVertexArray anyways so we generally don't unbind VAOs (nor VBOs) when it's not directly necessary.glBindVertexArray(0); // uncomment this call to draw in wireframe polygons.//glPolygonMode(GL_FRONT_AND_BACK, GL_LINE);// 要想用线框模式绘制你的三角形,你可以通过glPolygonMode(GL_FRONT_AND_BACK, GL_LINE)函数配置OpenGL如何绘制图元。第一个参数表示我们打算将其应用到所有的三角形的正面和背面,第二个参数告诉我们用线来绘制。之后的绘制调用会一直以线框模式绘制三角形,直到我们用glPolygonMode(GL_FRONT_AND_BACK, GL_FILL)将其设置回默认模式。// render loop// -----------while (!glfwWindowShouldClose(window)){// input// -----processInput(window);// render// ------glClearColor(0.2f, 0.3f, 0.3f, 1.0f);glClear(GL_COLOR_BUFFER_BIT);// draw our first triangleglUseProgram(shaderProgram);glBindVertexArray(VAO); // seeing as we only have a single VAO there's no need to bind it every time, but we'll do so to keep things a bit more organized//glDrawArrays(GL_TRIANGLES, 0, 6);glDrawElements(GL_TRIANGLES, 6, GL_UNSIGNED_INT, 0);// glBindVertexArray(0); // no need to unbind it every time // glfw: swap buffers and poll IO events (keys pressed/released, mouse moved etc.)// -------------------------------------------------------------------------------glfwSwapBuffers(window);glfwPollEvents();}// optional: de-allocate all resources once they've outlived their purpose:// ------------------------------------------------------------------------glDeleteVertexArrays(1, &VAO);glDeleteBuffers(1, &VBO);glDeleteBuffers(1, &EBO);glDeleteProgram(shaderProgram);// glfw: terminate, clearing all previously allocated GLFW resources.// ------------------------------------------------------------------glfwTerminate();return 0;
}
练习
添加更多顶点到数据中,使用glDrawArrays,尝试绘制两个彼此相连的三角形
const char *vertexShaderSource =
const char *fragmentShaderSource =
int main()
{// glfw: initialize and configure// glfw window creation// glad: load all OpenGL function pointers// vertex shaderunsigned int vertexShader = glCreateShader(GL_VERTEX_SHADER);glShaderSource(vertexShader, 1, &vertexShaderSource, NULL);glCompileShader(vertexShader);// fragment shaderunsigned int fragmentShader = glCreateShader(GL_FRAGMENT_SHADER);glShaderSource(fragmentShader, 1, &fragmentShaderSource, NULL);glCompileShader(fragmentShader);// link shadersunsigned int shaderProgram = glCreateProgram();glAttachShader(shaderProgram, vertexShader);glAttachShader(shaderProgram, fragmentShader);glLinkProgram(shaderProgram);// set up vertex data (and buffer(s)) and configure vertex attributes// ------------------------------------------------------------------// add a new set of vertices to form a second triangle (a total of 6 vertices); the vertex attribute configuration remains the same (still one 3-float position vector per vertex)float vertices[] = {// first triangle-0.9f, -0.5f, 0.0f,  // left -0.0f, -0.5f, 0.0f,  // right-0.45f, 0.5f, 0.0f,  // top // second triangle0.0f, -0.5f, 0.0f,  // left0.9f, -0.5f, 0.0f,  // right0.45f, 0.5f, 0.0f   // top }; unsigned int VBO, VAO;glGenVertexArrays(1, &VAO);glGenBuffers(1, &VBO);glBindVertexArray(VAO);    // bind the Vertex Array Object first, then bind and set vertex buffer(s), and then configure vertex attributes(s).glBindBuffer(GL_ARRAY_BUFFER, VBO);glBufferData(GL_ARRAY_BUFFER, sizeof(vertices), vertices, GL_STATIC_DRAW);glVertexAttribPointer(0, 3, GL_FLOAT, GL_FALSE, 3 * sizeof(float), (void*)0);//0是位置,3是一个的大小,类型GL_FLOAT,normGL_FALSE,步长3 * sizeof(float),偏移(void*)0glEnableVertexAttribArray(0);// note that this is allowed, the call to glVertexAttribPointer registered VBO as the vertex attribute's bound vertex buffer object so afterwards we can safely unbindglBindBuffer(GL_ARRAY_BUFFER, 0); glBindVertexArray(0); // uncomment this call to draw in wireframe polygons.//glPolygonMode(GL_FRONT_AND_BACK, GL_LINE);// render loop// -----------while (!glfwWindowShouldClose(window)){// input// -----processInput(window);// render// ------glClearColor(0.2f, 0.3f, 0.3f, 1.0f);glClear(GL_COLOR_BUFFER_BIT);// draw our first triangleglUseProgram(shaderProgram);glBindVertexArray(VAO); // seeing as we only have a single VAO there's no need to bind it every time, but we'll do so to keep things a bit more organizedglDrawArrays(GL_TRIANGLES, 0, 6); // set the count to 6 since we're drawing 6 vertices now (2 triangles); not 3!// glBindVertexArray(0); // no need to unbind it every time // glfw: swap buffers and poll IO events (keys pressed/released, mouse moved etc.)// -------------------------------------------------------------------------------glfwSwapBuffers(window);glfwPollEvents();}// optional: de-allocate all resources once they've outlived their purpose:// ------------------------------------------------------------------------glDeleteVertexArrays(1, &VAO);glDeleteBuffers(1, &VBO);glDeleteProgram(shaderProgram);// glfw: terminate, clearing all previously allocated GLFW resources.// ------------------------------------------------------------------glfwTerminate();return 0;
}
创建相同的两个三角形,但对它们的数据使用不同的VAO和VBO
const char *vertexShaderSource =
const char *fragmentShaderSource =
int main()
{// glfw: initialize and configure// glfw window creation// glad: load all OpenGL function pointers// vertex shader// fragment shader// link shaders// set up vertex data (and buffer(s)) and configure vertex attributes// ------------------------------------------------------------------float firstTriangle[] = {-0.9f, -0.5f, 0.0f,  // left -0.0f, -0.5f, 0.0f,  // right-0.45f, 0.5f, 0.0f,  // top };float secondTriangle[] = {0.0f, -0.5f, 0.0f,  // left0.9f, -0.5f, 0.0f,  // right0.45f, 0.5f, 0.0f   // top };unsigned int VBOs[2], VAOs[2];glGenVertexArrays(2, VAOs); // we can also generate multiple VAOs or buffers at the same timeglGenBuffers(2, VBOs);// first triangle setup// --------------------glBindVertexArray(VAOs[0]);glBindBuffer(GL_ARRAY_BUFFER, VBOs[0]);glBufferData(GL_ARRAY_BUFFER, sizeof(firstTriangle), firstTriangle, GL_STATIC_DRAW);glVertexAttribPointer(0, 3, GL_FLOAT, GL_FALSE, 3 * sizeof(float), (void*)0);	// Vertex attributes stay the sameglEnableVertexAttribArray(0);// glBindVertexArray(0); // no need to unbind at all as we directly bind a different VAO the next few lines// second triangle setup// ---------------------glBindVertexArray(VAOs[1]);	// note that we bind to a different VAO nowglBindBuffer(GL_ARRAY_BUFFER, VBOs[1]);	// and a different VBOglBufferData(GL_ARRAY_BUFFER, sizeof(secondTriangle), secondTriangle, GL_STATIC_DRAW);glVertexAttribPointer(0, 3, GL_FLOAT, GL_FALSE, 0, (void*)0); //注:第五个参数为什么为0?because the vertex data is tightly packed we can also specify 0 as the vertex attribute's stride to let OpenGL figure it outglEnableVertexAttribArray(0);// glBindVertexArray(0); // not really necessary as well, but beware of calls that could affect VAOs while this one is bound (like binding element buffer objects, or enabling/disabling vertex attributes)// uncomment this call to draw in wireframe polygons.//glPolygonMode(GL_FRONT_AND_BACK, GL_LINE);// render loop// -----------while (!glfwWindowShouldClose(window)){// render// ------glClearColor(0.2f, 0.3f, 0.3f, 1.0f);glClear(GL_COLOR_BUFFER_BIT);glUseProgram(shaderProgram);// draw first triangle using the data from the first VAOglBindVertexArray(VAOs[0]);glDrawArrays(GL_TRIANGLES, 0, 3);// then we draw the second triangle using the data from the second VAOglBindVertexArray(VAOs[1]);glDrawArrays(GL_TRIANGLES, 0, 3);// glfw: swap buffers and poll IO events (keys pressed/released, mouse moved etc.)// -------------------------------------------------------------------------------glfwSwapBuffers(window);glfwPollEvents();}// optional: de-allocate all resources once they've outlived their purpose:// ------------------------------------------------------------------------glDeleteVertexArrays(2, VAOs);glDeleteBuffers(2, VBOs);glDeleteProgram(shaderProgram);// glfw: terminate, clearing all previously allocated GLFW resources.// ------------------------------------------------------------------glfwTerminate();return 0;
}
创建两个着色器程序,第二个程序使用一个不同的片段着色器,输出黄色;再次绘制这两个三角形,让其中一个输出为黄色
const char *vertexShaderSource = "#version 330 core\n""layout (location = 0) in vec3 aPos;\n""void main()\n""{\n""   gl_Position = vec4(aPos.x, aPos.y, aPos.z, 1.0);\n""}\0";
const char *fragmentShader1Source = "#version 330 core\n""out vec4 FragColor;\n""void main()\n""{\n""   FragColor = vec4(1.0f, 0.5f, 0.2f, 1.0f);\n""}\n\0";
const char *fragmentShader2Source = "#version 330 core\n""out vec4 FragColor;\n""void main()\n""{\n""   FragColor = vec4(1.0f, 1.0f, 0.0f, 1.0f);\n""}\n\0";int main()
{// glfw: initialize and configure// glfw window creation// glad: load all OpenGL function pointers// we skipped compile log checks this time for readability (if you do encounter issues, add the compile-checks! see previous code samples)unsigned int vertexShader = glCreateShader(GL_VERTEX_SHADER);unsigned int fragmentShaderOrange = glCreateShader(GL_FRAGMENT_SHADER); // the first fragment shader that outputs the color orangeunsigned int fragmentShaderYellow = glCreateShader(GL_FRAGMENT_SHADER); // the second fragment shader that outputs the color yellowunsigned int shaderProgramOrange = glCreateProgram();unsigned int shaderProgramYellow = glCreateProgram(); // the second shader programglShaderSource(vertexShader, 1, &vertexShaderSource, NULL);glCompileShader(vertexShader);glShaderSource(fragmentShaderOrange, 1, &fragmentShader1Source, NULL);glCompileShader(fragmentShaderOrange);glShaderSource(fragmentShaderYellow, 1, &fragmentShader2Source, NULL);glCompileShader(fragmentShaderYellow);// link the first program objectglAttachShader(shaderProgramOrange, vertexShader);glAttachShader(shaderProgramOrange, fragmentShaderOrange);glLinkProgram(shaderProgramOrange);// then link the second program object using a different fragment shader (but same vertex shader)// this is perfectly allowed since the inputs and outputs of both the vertex and fragment shaders are equally matched.glAttachShader(shaderProgramYellow, vertexShader);glAttachShader(shaderProgramYellow, fragmentShaderYellow);glLinkProgram(shaderProgramYellow);// set up vertex data (and buffer(s)) and configure vertex attributes// ------------------------------------------------------------------float firstTriangle[] = {-0.9f, -0.5f, 0.0f,  // left -0.0f, -0.5f, 0.0f,  // right-0.45f, 0.5f, 0.0f,  // top };float secondTriangle[] = {0.0f, -0.5f, 0.0f,  // left0.9f, -0.5f, 0.0f,  // right0.45f, 0.5f, 0.0f   // top };unsigned int VBOs[2], VAOs[2];glGenVertexArrays(2, VAOs); // we can also generate multiple VAOs or buffers at the same timeglGenBuffers(2, VBOs);// first triangle setup// --------------------glBindVertexArray(VAOs[0]);glBindBuffer(GL_ARRAY_BUFFER, VBOs[0]);glBufferData(GL_ARRAY_BUFFER, sizeof(firstTriangle), firstTriangle, GL_STATIC_DRAW);glVertexAttribPointer(0, 3, GL_FLOAT, GL_FALSE, 3 * sizeof(float), (void*)0);	// Vertex attributes stay the sameglEnableVertexAttribArray(0);// glBindVertexArray(0); // no need to unbind at all as we directly bind a different VAO the next few lines// second triangle setup// ---------------------glBindVertexArray(VAOs[1]);	// note that we bind to a different VAO nowglBindBuffer(GL_ARRAY_BUFFER, VBOs[1]);	// and a different VBOglBufferData(GL_ARRAY_BUFFER, sizeof(secondTriangle), secondTriangle, GL_STATIC_DRAW);glVertexAttribPointer(0, 3, GL_FLOAT, GL_FALSE, 0, (void*)0); // because the vertex data is tightly packed we can also specify 0 as the vertex attribute's stride to let OpenGL figure it outglEnableVertexAttribArray(0);// glBindVertexArray(0); // not really necessary as well, but beware of calls that could affect VAOs while this one is bound (like binding element buffer objects, or enabling/disabling vertex attributes)// uncomment this call to draw in wireframe polygons.//glPolygonMode(GL_FRONT_AND_BACK, GL_LINE);// render loop// -----------while (!glfwWindowShouldClose(window)){// render// ------glClearColor(0.2f, 0.3f, 0.3f, 1.0f);glClear(GL_COLOR_BUFFER_BIT);// now when we draw the triangle we first use the vertex and orange fragment shader from the first programglUseProgram(shaderProgramOrange);// draw the first triangle using the data from our first VAOglBindVertexArray(VAOs[0]);glDrawArrays(GL_TRIANGLES, 0, 3);	// this call should output an orange triangle// then we draw the second triangle using the data from the second VAO// when we draw the second triangle we want to use a different shader program so we switch to the shader program with our yellow fragment shader.glUseProgram(shaderProgramYellow);glBindVertexArray(VAOs[1]);glDrawArrays(GL_TRIANGLES, 0, 3);	// this call should output a yellow triangle// glfw: swap buffers and poll IO events (keys pressed/released, mouse moved etc.)// -------------------------------------------------------------------------------glfwSwapBuffers(window);glfwPollEvents();}// optional: de-allocate all resources once they've outlived their purpose:// ------------------------------------------------------------------------glDeleteVertexArrays(2, VAOs);glDeleteBuffers(2, VBOs);glDeleteProgram(shaderProgramOrange);glDeleteProgram(shaderProgramYellow);// glfw: terminate, clearing all previously allocated GLFW resources.// ------------------------------------------------------------------glfwTerminate();return 0;
}
GLSL-Uniform-layout
#version version_number   // 指定GLSL版本号
in type in_variable_name; // 输入变量声明,用于接收传入的数据
in type in_variable_name; // 可以有多个输入变量,输出变量声明,用于存储处理后的结果。`type` 表示变量的数据类型,`out_variable_name` 表示变量的名称。out type out_variable_name; // 输出变量声明,用于存储处理后的结果uniform type uniform_name; // Uniform变量声明,用于接收外部传入的全局数据。`type` 表示变量的数据类型
int main()
{// 主函数,处理图形操作// 处理输入变量并进行一些图形操作// ...// 将处理过的结果输出到输出变量out_variable_name = weird_stuff_we_processed;// 可以在这里进行更多的图形操作// 主函数返回一个整数值return 0;
}
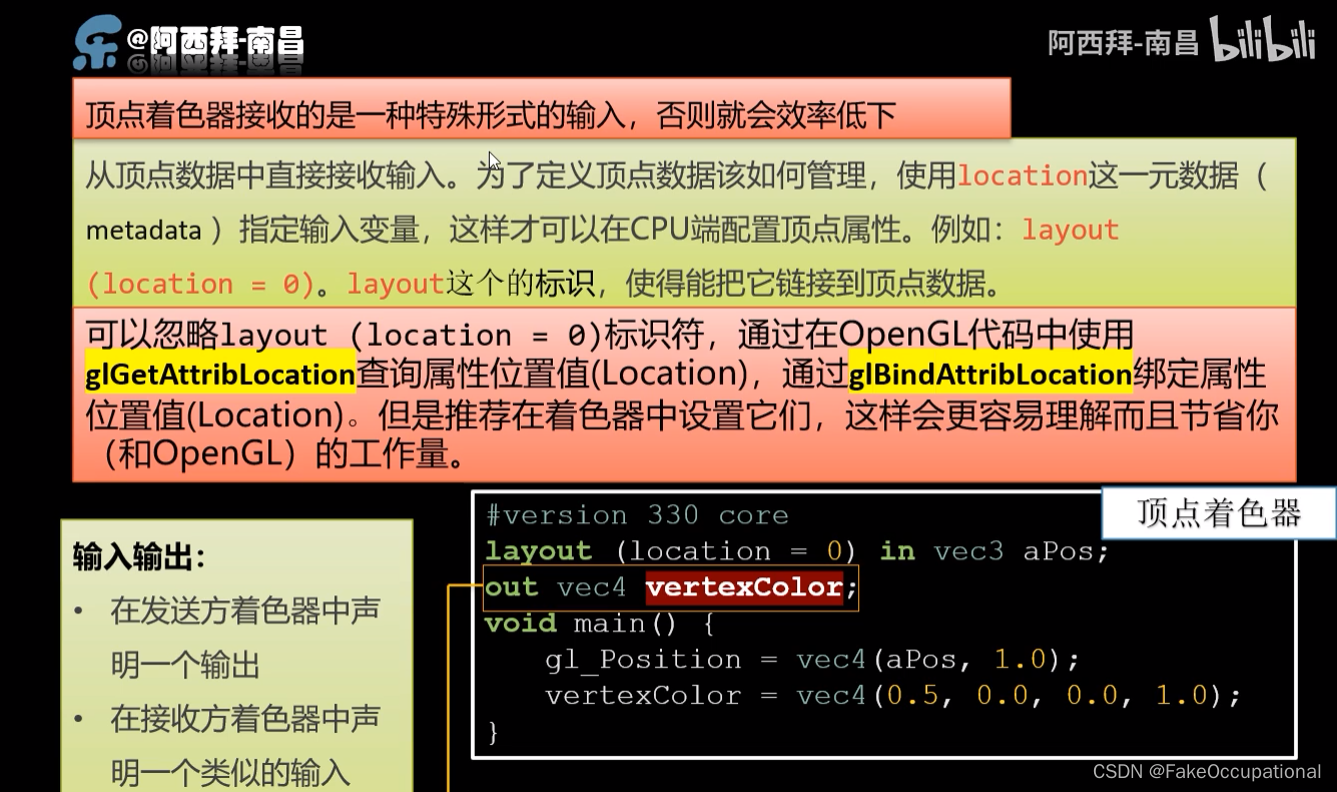
着色器中变量的传递
如果我们打算从一个着色器向另一个着色器发送数据,我们必须在发送方着色器中声明一个输出,在接收方着色器中声明一个类似的输入。当类型和名字都一样的时候,OpenGL就会把两个变量链接到一起,它们之间就能发送数据了(这是在链接程序对象时完成的)
// 顶点着色器
#version 330 core
layout (location = 0) in vec3 aPos; // 位置变量的属性位置值为0out vec4 vertexColor; // 为片段着色器指定一个颜色输出void main()
{gl_Position = vec4(aPos, 1.0); // 注意我们如何把一个vec3作为vec4的构造器的参数vertexColor = vec4(0.5, 0.0, 0.0, 1.0); // 把输出变量设置为暗红色
}
// 片段着色器
#version 330 core
out vec4 FragColor;in vec4 vertexColor; // 从顶点着色器传来的输入变量(名称相同、类型相同)void main()
{FragColor = vertexColor;
}
Uniform变量
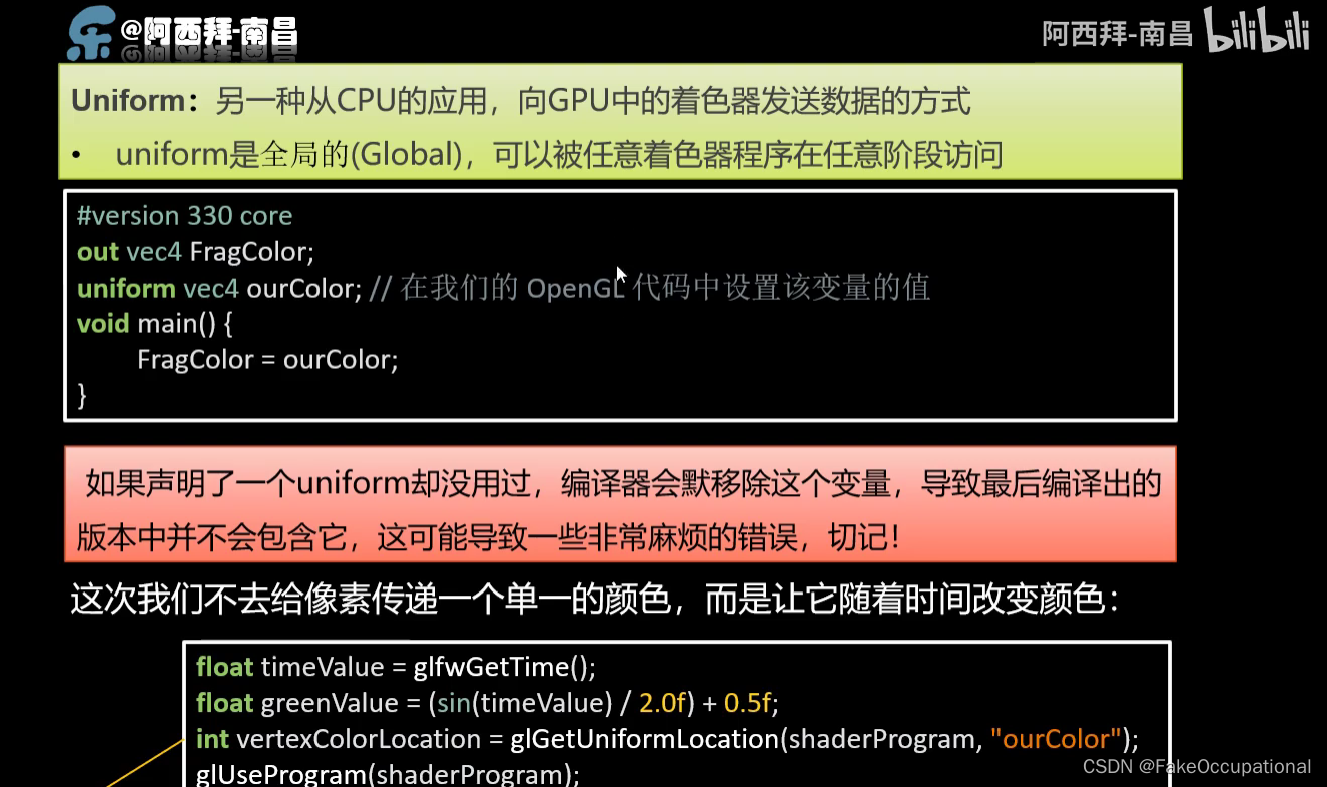
- 通过uniform变量实现动态改变颜色
const char *vertexShaderSource ="#version 330 core\n""layout (location = 0) in vec3 aPos;\n""void main()\n""{\n""   gl_Position = vec4(aPos, 1.0);\n""}\0";const char *fragmentShaderSource = "#version 330 core\n""out vec4 FragColor;\n""uniform vec4 ourColor;\n" //定义uniform变量"void main()\n""{\n""   FragColor = ourColor;\n""}\n\0";int main()
{// glfw: initialize and configure, glfw window creation, glad: load all OpenGL function pointers// vertex shader,fragment shader// set up vertex data (and buffer(s)) and configure vertex attributesfloat vertices[] = { 0.5f, -0.5f, 0.0f, -0.5f, -0.5f, 0.0f, 0.0f,  0.5f, 0.0f    };// VBO, VAO;// render loop// -----------while (!glfwWindowShouldClose(window)){// renderglClearColor(0.2f, 0.3f, 0.3f, 1.0f);glClear(GL_COLOR_BUFFER_BIT);// be sure to activate the shader before any calls to glUniformglUseProgram(shaderProgram);// update shader uniform// 获取当前时间double timeValue = glfwGetTime();// 使用正弦函数计算绿色分量,使其在范围[0, 1]之间float greenValue = static_cast<float>(sin(timeValue) / 2.0 + 0.5);// 获取着色器程序中 "ourColor" 变量的位置int vertexColorLocation = glGetUniformLocation(shaderProgram, "ourColor");// 将绿色分量作为着色器变量 "ourColor" 的第二个分量,设置其他分量为固定值// glUniform4f 函数用于设置vec4类型的uniform变量// 参数分别为:位置,红色分量,绿色分量,蓝色分量,透明度分量glUniform4f(vertexColorLocation, 0.0f, greenValue, 0.0f, 1.0f);// render the triangleglDrawArrays(GL_TRIANGLES, 0, 3);// glfw: swap buffers and poll IO events (keys pressed/released, mouse moved etc.)glfwSwapBuffers(window);glfwPollEvents();}// optional: de-allocate all resources once they've outlived their purpose:return 0;
}
着色器工具类的使用
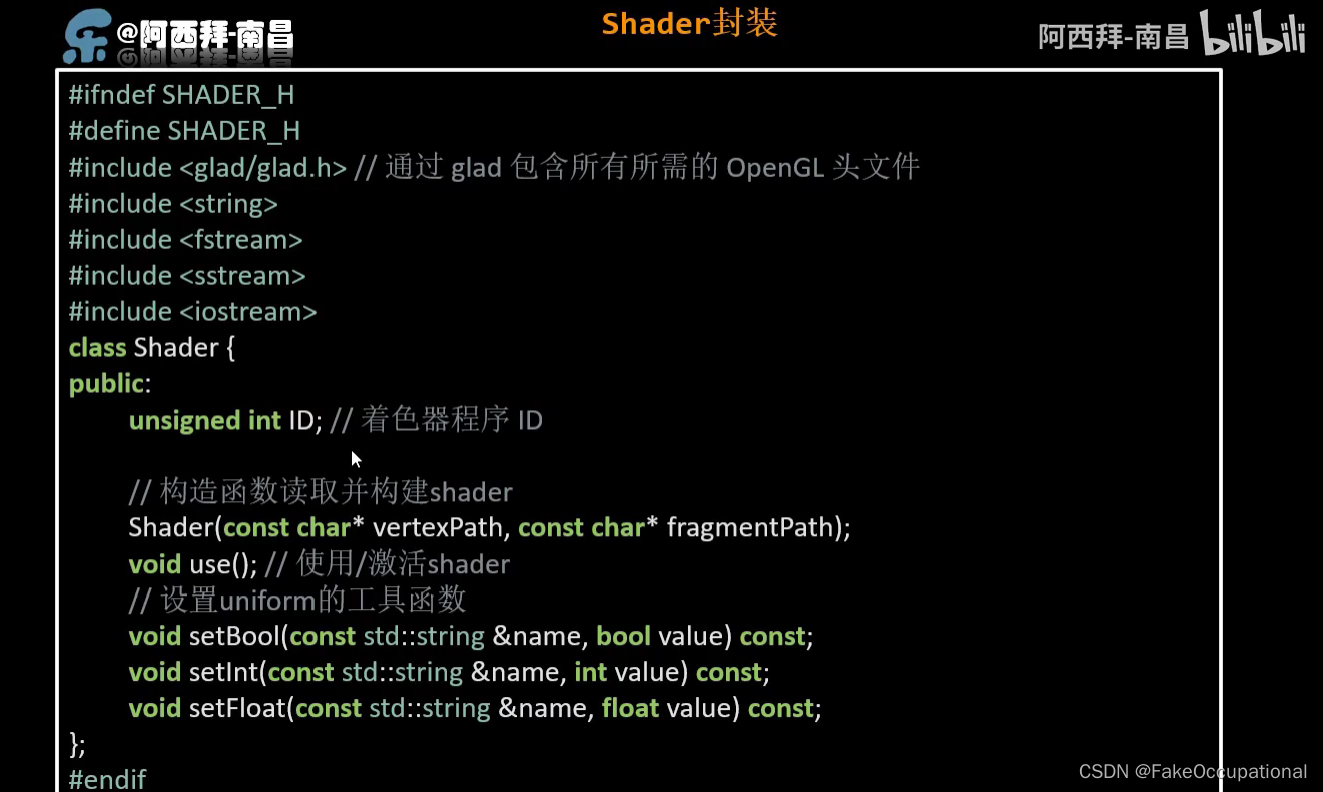
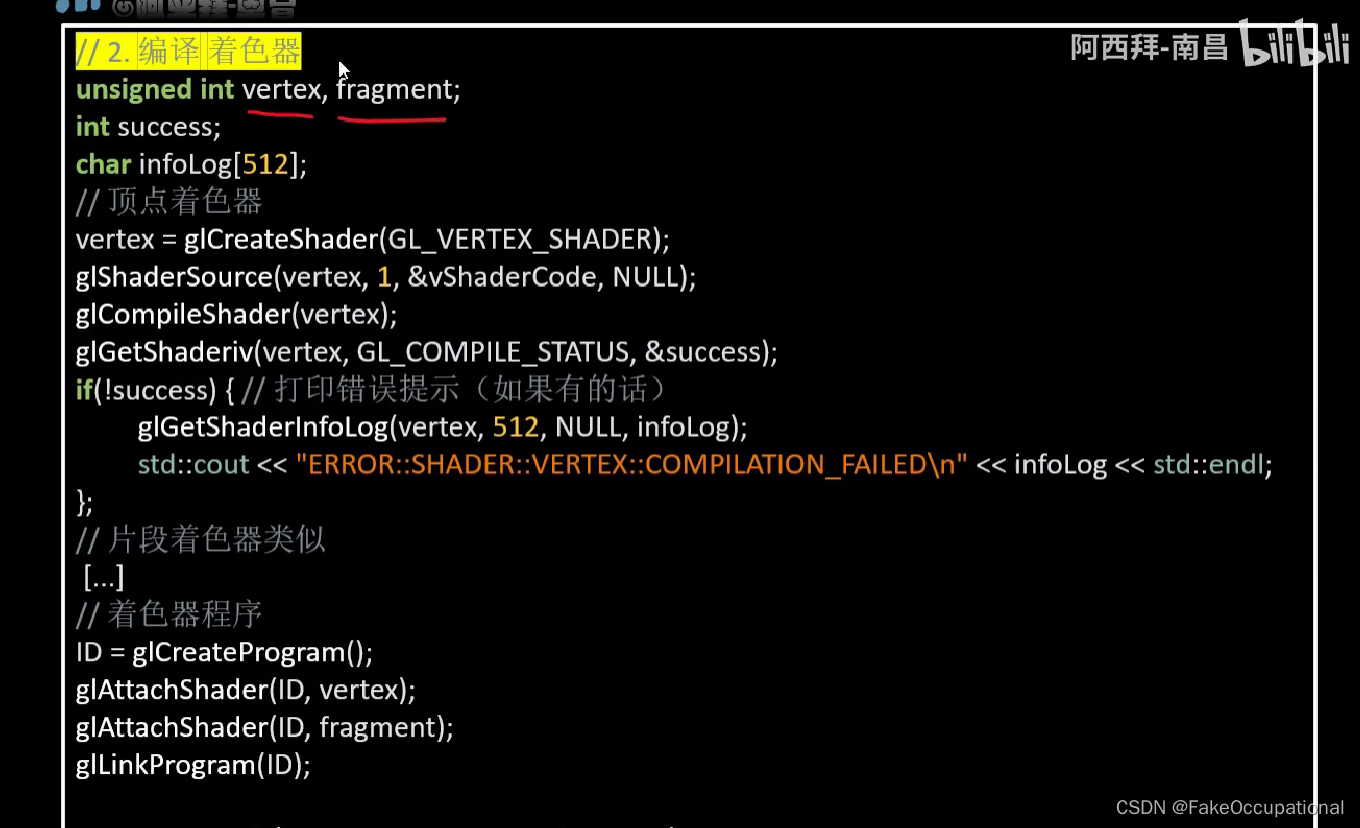
// 这段代码练习的第二题2会用到,其他的详见https://github1s.com/JoeyDeVries/LearnOpenGL/blob/master/includes/learnopengl/shader_s.hclass Shader {
public:// 其他成员函数和变量...// 设置浮点型 uniform 变量的方法void setFloat(const std::string& name, float value) const {// 获取 uniform 变量的位置int location = glGetUniformLocation(shaderProgram, name.c_str());// 如果找到了该 uniform 变量,则设置其值if (location != -1) {glUniform1f(location, value);} else {// 在实际应用中,你可能想要处理未找到 uniform 变量的情况// 在这里,我们简单地输出一条错误信息std::cerr << "Error: Uniform variable " << name << " not found in shader program." << std::endl;}}// 其他成员函数和变量...
};
练习
修改顶点着色器让三角形上下颠倒
// vertex.glgs
#version 330 core
layout (location = 0) in vec3 aPos;
layout (location = 1) in vec3 aColor;out vec3 ourColor;void main()
{gl_Position = vec4(aPos.x, -aPos.y, aPos.z, 1.0); // just add a - to the y positionourColor = aColor;
}
使用uniform定义一个水平偏移量,在顶点着色器中使用这个偏移量把三角形移动到屏幕右侧
// In your CPP file:
// ======================
float offset = 0.5f;
ourShader.setFloat("xOffset", offset);
// In your vertex shader:
// ======================
#version 330 core
layout (location = 0) in vec3 aPos;
layout (location = 1) in vec3 aColor;out vec3 ourColor;uniform float xOffset;void main()
{gl_Position = vec4(aPos.x + xOffset, aPos.y, aPos.z, 1.0); // add the xOffset to the x position of the vertex positionourColor = aColor;
}
使用out关键字把顶点位置输出到片段着色器,并将片段的颜色设置为与顶点位置相等(来看看连顶点位置值都在三角形中被插值的结果)。做完这些后,尝试回答下面的问题:为什么在三角形的左下角是黑的?:
// Vertex shader:
// ==============
#version 330 core
layout (location = 0) in vec3 aPos;
layout (location = 1) in vec3 aColor;// out vec3 ourColor;
out vec3 ourPosition;void main()
{gl_Position = vec4(aPos, 1.0); // ourColor = aColor;ourPosition = aPos;
}// Fragment shader:
// ================
#version 330 core
out vec4 FragColor;
// in vec3 ourColor;
in vec3 ourPosition;void main()
{FragColor = vec4(ourPosition, 1.0);    // note how the position value is linearly interpolated to get all the different colors
}/*
Answer to the question: Do you know why the bottom-left side is black?
-- --------------------------------------------------------------------
Think about this for a second: the output of our fragment's color is equal to the (interpolated) coordinate of
the triangle. What is the coordinate of the bottom-left point of our triangle? This is (-0.5f, -0.5f, 0.0f). Since the
xy values are negative they are clamped to a value of 0.0f. This happens all the way to the center sides of the
triangle since from that point on the values will be interpolated positively again. Values of 0.0f are of course black
and that explains the black side of the triangle.
*/
纹理
纹理与插值
给三角形添加纹理时,我们只要给顶点着色器传递这三个纹理坐标就行了,接下来它们会被传片段着色器中,它会为每个片段进行纹理坐标的插值。这个插值(或称为纹理过滤)有两种方式GL_NEAREST和GL_LINEAR。
float texCoords[] = {0.0f, 0.0f, // 左下角1.0f, 0.0f, // 右下角0.5f, 1.0f // 上中
};
多级渐远纹理
多级渐远纹理通常指的是使用纹理的不同层级(Mipmap级别)来处理远处的纹理映射,从而提高渲染性能和减少纹理锯齿效应。Mipmap是一组包含了原始纹理不同尺寸版本的纹理图像。
以下是使用多级渐远纹理的一般步骤:
-
生成Mipmap: 在加载纹理时,通常会生成Mipmap。Mipmap是原始纹理的一系列缩小版本,每个版本是前一个版本的一半大小,直到达到某个最小尺寸。
glGenerateMipmap(GL_TEXTURE_2D); -
设置纹理过滤方式: 在渲染时,可以设置纹理的过滤方式,以根据距离选择使用哪个Mipmap级别。常用的过滤方式有
GL_LINEAR_MIPMAP_LINEAR和GL_LINEAR_MIPMAP_NEAREST等。glTexParameteri(GL_TEXTURE_2D, GL_TEXTURE_MIN_FILTER, GL_LINEAR_MIPMAP_LINEAR); glTexParameteri(GL_TEXTURE_2D, GL_TEXTURE_MAG_FILTER, GL_LINEAR); -
使用Mipmap: 在片段着色器中,使用
texture2D函数来采样Mipmap级别的纹理。// 在片段着色器中采样Mipmap级别的纹理 vec4 color = texture2D(textureSampler, textureCoordinates);这里
texture2D会自动选择适当的Mipmap级别。
通过使用Mipmap,可以在远处的纹理上产生更平滑的效果,减少了纹理锯齿效应,并且在距离摄像机较远的情况下,使用较小的Mipmap级别可以减少对性能的影响。这对于提高渲染效果和性能是非常有益的,尤其是在纹理贴图被远离观察者的情况下。
stb_image.h
- https://github1s.com/JoeyDeVries/LearnOpenGL/blob/master/includes/stb_image.h
stb_image.h 是一个开源的、用于加载图像文件的单头文件库。这个头文件包含了一组函数,使得你可以轻松地在你的项目中加载常见的图像格式(如JPEG、PNG、BMP等)。
你可以在Sean Barrett的 GitHub 页面上找到这个库,该库提供了多个单头文件的实用工具。stb_image.h 可以在项目中直接包含,而无需编译。
以下是一个简单的例子,演示如何使用 stb_image.h 来加载一个图像文件:
#define STB_IMAGE_IMPLEMENTATION
#include "stb_image.h"int main() {// 加载图像int width, height, channels;unsigned char* image_data = stbi_load("image.jpg", &width, &height, &channels, 0);if (image_data) {// 处理图像数据// 释放图像数据的内存stbi_image_free(image_data);} else {// 加载失败}return 0;
}
在这个例子中,stbi_load 函数用于加载图像文件,函数的参数包括文件路径、图像的宽度、高度、通道数等信息。加载成功后,图像数据存储在 image_data 中,你可以在这里添加你自己的处理逻辑。最后,通过调用 stbi_image_free 来释放分配的图像数据内存。
请确保在使用 stb_image.h 之前,你的项目已经包含了 OpenGL 的头文件,并正确配置了图形库的链接。
生成纹理
顶点着色器 4.1.texture.vs
#version 330 core
layout (location = 0) in vec3 aPos;
layout (location = 1) in vec3 aColor;
layout (location = 2) in vec2 aTexCoord;out vec3 ourColor;
out vec2 TexCoord;void main()
{gl_Position = vec4(aPos, 1.0);ourColor = aColor;TexCoord = vec2(aTexCoord.x, aTexCoord.y);
}
片段着色器 4.1.texture.fs
#version 330 core
out vec4 FragColor;in vec3 ourColor;
in vec2 TexCoord;// texture sampler
uniform sampler2D texture1; // sampler2D 为采样类型void main()
{FragColor = texture(texture1, TexCoord); // texture()函数:texture(采样器,纹理图像,纹理坐标)
}
// https://github1s.com/JoeyDeVries/LearnOpenGL/blob/master/src/1.getting_started/4.1.textures/textures.cpp#L6
#include <glad/glad.h>
#include <GLFW/glfw3.h>
#include <stb_image.h>#include <learnopengl/filesystem.h>
#include <learnopengl/shader_s.h>#include <iostream>int main()
{// glfw: initialize and configure,glad: load all OpenGL function pointers// ---------------------------------------// build and compile our shader zprogram// ------------------------------------Shader ourShader("4.1.texture.vs", "4.1.texture.fs"); // set up vertex data (and buffer(s)) and configure vertex attributes// ------------------------------------------------------------------float vertices[] = {// positions          // colors           // texture coords0.5f,  0.5f, 0.0f,   1.0f, 0.0f, 0.0f,   1.0f, 1.0f, // top right0.5f, -0.5f, 0.0f,   0.0f, 1.0f, 0.0f,   1.0f, 0.0f, // bottom right-0.5f, -0.5f, 0.0f,   0.0f, 0.0f, 1.0f,   0.0f, 0.0f, // bottom left-0.5f,  0.5f, 0.0f,   1.0f, 1.0f, 0.0f,   0.0f, 1.0f  // top left };unsigned int indices[] = {  0, 1, 3, // first triangle1, 2, 3  // second triangle};unsigned int VBO, VAO, EBO;glGenVertexArrays(1, &VAO);glGenBuffers(1, &VBO);glGenBuffers(1, &EBO);glBindVertexArray(VAO);glBindBuffer(GL_ARRAY_BUFFER, VBO);glBufferData(GL_ARRAY_BUFFER, sizeof(vertices), vertices, GL_STATIC_DRAW);glBindBuffer(GL_ELEMENT_ARRAY_BUFFER, EBO);glBufferData(GL_ELEMENT_ARRAY_BUFFER, sizeof(indices), indices, GL_STATIC_DRAW);glVertexAttribPointer(0, 3, GL_FLOAT, GL_FALSE, 8 * sizeof(float), (void*)0);    glEnableVertexAttribArray(0); // position attributeglVertexAttribPointer(1, 3, GL_FLOAT, GL_FALSE, 8 * sizeof(float), (void*)(3 * sizeof(float)));    glEnableVertexAttribArray(1);// color attributeglVertexAttribPointer(2, 2, GL_FLOAT, GL_FALSE, 8 * sizeof(float), (void*)(6 * sizeof(float)));    glEnableVertexAttribArray(2); // texture coord attribute// load and create a texture // 生成纹理 感觉和生成VAO,VBO类似unsigned int texture;glGenTextures(1, &texture);glBindTexture(GL_TEXTURE_2D, texture); //绑定到2D目标之上 all upcoming GL_TEXTURE_2D operations now have effect on this texture object// 设置纹理属性 set the texture wrapping parametersglTexParameteri(GL_TEXTURE_2D, GL_TEXTURE_WRAP_S, GL_REPEAT);  glTexParameteri(GL_TEXTURE_2D, GL_TEXTURE_WRAP_T, GL_REPEAT);	// set texture wrapping to GL_REPEAT (default wrapping method)glTexParameteri(GL_TEXTURE_2D, GL_TEXTURE_MIN_FILTER, GL_LINEAR_MIPMAP_LINEAR);glTexParameteri(GL_TEXTURE_2D, GL_TEXTURE_MAG_FILTER, GL_LINEAR); // set texture filtering parameters//加载图片   load image, create texture and generate mipmapsint width, height, nrChannels;unsigned char *data = stbi_load(FileSystem::getPath("resources/textures/container.jpg").c_str(), &width, &height, &nrChannels, 0);// The FileSystem::getPath(...) is part of the GitHub repository so we can find files on any IDE/platform; replace it with your own image path.if (data){   // 加载图片数据生成纹理glTexImage2D(GL_TEXTURE_2D, 0, GL_RGB, width, height, 0, GL_RGB, GL_UNSIGNED_BYTE, data);glGenerateMipmap(GL_TEXTURE_2D);//生成多级渐远纹理}else{std::cout << "Failed to load texture" << std::endl;}stbi_image_free(data);//生成纹理后释放数据// render loop// -----------while (!glfwWindowShouldClose(window)){// renderglClearColor(0.2f, 0.3f, 0.3f, 1.0f);glClear(GL_COLOR_BUFFER_BIT);// bind TextureglBindTexture(GL_TEXTURE_2D, texture);// render containerourShader.use();glBindVertexArray(VAO);glDrawElements(GL_TRIANGLES, 6, GL_UNSIGNED_INT, 0);// glfw: swap buffers and poll IO events (keys pressed/released, mouse moved etc.)// -------------------------------------------------------------------------------glfwSwapBuffers(window);glfwPollEvents();}// terminate, clearing all resources.return 0;
}
- 注:我们还可以把得到的纹理颜色与顶点颜色混合,来获得更有趣的效果。我们只需把纹理颜色与顶点颜色在片段着色器中相乘来混合二者的颜色:
FragColor = texture(ourTexture, TexCoord) * vec4(ourColor, 1.0);
纹理单元
-
配置两个纹理单元,并激活使用https://github1s.com/JoeyDeVries/LearnOpenGL/blob/master/src/1.getting_started/4.2.textures_combined/textures_combined.cpp
-
片段着色器中有两个纹理采样器
#version 330 core
out vec4 FragColor;in vec3 ourColor;
in vec2 TexCoord;// texture samplers
uniform sampler2D texture1;
uniform sampler2D texture2;void main()
{// linearly interpolate between both textures (80% container, 20% awesomeface)FragColor = mix(texture(texture1, TexCoord), texture(texture2, TexCoord), 0.2);// 使用mix函数
}
int main()
{// glfw: initialize and configure    +   glad: load all OpenGL function pointers// build and compile our shader zprogram// ------------------------------------Shader ourShader("4.2.texture.vs", "4.2.texture.fs");// set up vertex data (and buffer(s)) and configure vertex attributes// ------------------------------------------------------------------float vertices[] = {// positions          // colors           // texture coords0.5f,  0.5f, 0.0f,   1.0f, 0.0f, 0.0f,   1.0f, 1.0f, // top right0.5f, -0.5f, 0.0f,   0.0f, 1.0f, 0.0f,   1.0f, 0.0f, // bottom right-0.5f, -0.5f, 0.0f,   0.0f, 0.0f, 1.0f,   0.0f, 0.0f, // bottom left-0.5f,  0.5f, 0.0f,   1.0f, 1.0f, 0.0f,   0.0f, 1.0f  // top left };unsigned int indices[] = {0, 1, 3, // first triangle1, 2, 3  // second triangle};unsigned int VBO, VAO, EBO;glGenVertexArrays(1, &VAO);glGenBuffers(1, &VBO);glGenBuffers(1, &EBO);glBindVertexArray(VAO);glBindBuffer(GL_ARRAY_BUFFER, VBO);glBufferData(GL_ARRAY_BUFFER, sizeof(vertices), vertices, GL_STATIC_DRAW);glBindBuffer(GL_ELEMENT_ARRAY_BUFFER, EBO);glBufferData(GL_ELEMENT_ARRAY_BUFFER, sizeof(indices), indices, GL_STATIC_DRAW);//  glVertexAttribPointer : position attribute+color attribute+texture coord attribute// load and create a texture // -------------------------unsigned int texture1, texture2;// texture 1// ---------glGenTextures(1, &texture1);glBindTexture(GL_TEXTURE_2D, texture1); // set the texture wrapping parametersglTexParameteri(GL_TEXTURE_2D, GL_TEXTURE_WRAP_S, GL_REPEAT);	// set texture wrapping to GL_REPEAT (default wrapping method)glTexParameteri(GL_TEXTURE_2D, GL_TEXTURE_WRAP_T, GL_REPEAT);// set texture filtering parametersglTexParameteri(GL_TEXTURE_2D, GL_TEXTURE_MIN_FILTER, GL_LINEAR);glTexParameteri(GL_TEXTURE_2D, GL_TEXTURE_MAG_FILTER, GL_LINEAR);// 加载图片int width, height, nrChannels;stbi_set_flip_vertically_on_load(true); //防止图像上下颠倒 tell stb_image.h to flip loaded texture's on the y-axis.unsigned char *data = stbi_load(FileSystem::getPath("resources/textures/container.jpg").c_str(), &width, &height, &nrChannels, 0);if (data){glTexImage2D(GL_TEXTURE_2D, 0, GL_RGB, width, height, 0, GL_RGB, GL_UNSIGNED_BYTE, data);glGenerateMipmap(GL_TEXTURE_2D);}else{std::cout << "Failed to load texture" << std::endl;}stbi_image_free(data);// texture 2// ---------glGenTextures(1, &texture2);glBindTexture(GL_TEXTURE_2D, texture2);// set the texture wrapping parametersglTexParameteri(GL_TEXTURE_2D, GL_TEXTURE_WRAP_S, GL_REPEAT);	// set texture wrapping to GL_REPEAT (default wrapping method)glTexParameteri(GL_TEXTURE_2D, GL_TEXTURE_WRAP_T, GL_REPEAT);// set texture filtering parametersglTexParameteri(GL_TEXTURE_2D, GL_TEXTURE_MIN_FILTER, GL_LINEAR);glTexParameteri(GL_TEXTURE_2D, GL_TEXTURE_MAG_FILTER, GL_LINEAR);// load image, create texture and generate mipmapsdata = stbi_load(FileSystem::getPath("resources/textures/awesomeface.png").c_str(), &width, &height, &nrChannels, 0);if (data){// note that the awesomeface.png has transparency and thus an alpha channel, so make sure to tell OpenGL the data type is of GL_RGBAglTexImage2D(GL_TEXTURE_2D, 0, GL_RGBA, width, height, 0, GL_RGBA, GL_UNSIGNED_BYTE, data);glGenerateMipmap(GL_TEXTURE_2D);}else{std::cout << "Failed to load texture" << std::endl;}stbi_image_free(data);// tell opengl for each sampler to which texture unit it belongs to (only has to be done once)// -------------------------------------------------------------------------------------------ourShader.use(); // don't forget to activate/use the shader before setting uniforms!// either set it manually like so:glUniform1i(glGetUniformLocation(ourShader.ID, "texture1"), 0);// or set it via the texture classourShader.setInt("texture2", 1);// render loop// -----------while (!glfwWindowShouldClose(window)){glClearColor(0.2f, 0.3f, 0.3f, 1.0f);glClear(GL_COLOR_BUFFER_BIT);// 激活和绑定 : bind textures on corresponding texture unitsglActiveTexture(GL_TEXTURE0);glBindTexture(GL_TEXTURE_2D, texture1);glActiveTexture(GL_TEXTURE1);glBindTexture(GL_TEXTURE_2D, texture2);// render containerourShader.use();glBindVertexArray(VAO);glDrawElements(GL_TRIANGLES, 6, GL_UNSIGNED_INT, 0);// glfw: swap buffers and poll IO events (keys pressed/released, mouse moved etc.)// -------------------------------------------------------------------------------glfwSwapBuffers(window);glfwPollEvents();}// terminate, clearingreturn 0;
}
练习
修改片段着色器,仅让笑脸图案朝另一个方向看
#version 330 core
out vec4 FragColor;
in vec3 ourColor;
in vec2 TexCoord;uniform sampler2D ourTexture1;
uniform sampler2D ourTexture2;
void main()
{FragColor = mix(texture(ourTexture1, TexCoord), texture(ourTexture2, vec2(1.0 - TexCoord.x, TexCoord.y)), 0.2);// 或者 FragColor = mix(texture(ourTexture1, TexCoord), texture(ourTexture2, vec2( - TexCoord.x, TexCoord.y)), 0.2);
}
尝试用不同的纹理环绕方式,设定一个从0.0f到2.0f范围内的(而不是原来的0.0f到1.0f)纹理坐标。试试看能不能在箱子的角落放置4个笑脸
layout (location = 0) in vec3 aPos;
layout (location = 1) in vec3 aColor;
layout (location = 2) in vec2 aTexCoord;out vec3 ourColor;
out vec2 TexCoord;void main()
{gl_Position = vec4(aPos, 1.0);ourColor = aColor;TexCoord = vec2(aTexCoord.x, aTexCoord.y)*2.0f;//直接修改顶点着色器
}
尝试在矩形上只显示纹理图像的中间一部分,修改纹理坐标,达到能看见单个的像素的效果。尝试使用GL_NEAREST的纹理过滤方式让像素显示得更清晰
使用一个uniform变量作为mix函数的第三个参数来改变两个纹理可见度,使用上和下键来改变箱子或笑脸的可见度
几何数据生成类
plane_geometry
- https://github.com/widcardw/start-learning-opengl/tree/dev/src/10_use_plane_geometry
- PlaneGeometry planeGeometry(1.0, 1.0, 8, 8);,渲染时:
glBindVertexArray(planeGeometry.VAO);// glDrawElements(GL_TRIANGLES, planeGeometry.indices.size(), GL_UNSIGNED_INT, 0); //绘制平面glDrawElements(GL_POINTS, planeGeometry.indices.size(), GL_UNSIGNED_INT, 0);glDrawElements(GL_LINE_LOOP, planeGeometry.indices.size(), GL_UNSIGNED_INT, 0);
- 基类 BufferGeometry.h中有数据的传递和绑定
  unsigned int VBO, EBO;void setupBuffers(){glGenVertexArrays(1, &VAO);glGenBuffers(1, &VBO);glGenBuffers(1, &EBO);glBindVertexArray(VAO);// vertex attributeglBindBuffer(GL_ARRAY_BUFFER, VBO);glBufferData(GL_ARRAY_BUFFER, vertices.size() * sizeof(Vertex), &vertices[0], GL_DYNAMIC_DRAW);// indixesglBindBuffer(GL_ELEMENT_ARRAY_BUFFER, EBO);glBufferData(GL_ELEMENT_ARRAY_BUFFER, indices.size() * sizeof(unsigned int), &indices[0], GL_STATIC_DRAW);// 设置顶点属性指针// PositionglEnableVertexAttribArray(0);glVertexAttribPointer(0, 3, GL_FLOAT, GL_FALSE, sizeof(Vertex), (void *)0);// NormalglEnableVertexAttribArray(1);glVertexAttribPointer(1, 3, GL_FLOAT, GL_FALSE, sizeof(Vertex), (void *)offsetof(Vertex, Normal));// TexCoordsglEnableVertexAttribArray(2);glVertexAttribPointer(2, 2, GL_FLOAT, GL_FALSE, sizeof(Vertex), (void *)offsetof(Vertex, TexCoords));glBindBuffer(GL_ARRAY_BUFFER, 0);glBindVertexArray(0);}
};
- 具体创建的代码(创建具体顶点位置着色数值的代码)
// https://github1s.com/widcardw/start-learning-opengl/blob/dev/include/geometry/PlaneGeometry.h
#ifndef PLANE_GEOMETRY
#define PLANE_GEOMETRY#include <geometry/BufferGeometry.h> // 包含 BufferGeometry 头文件using namespace std;class PlaneGeometry : public BufferGeometry
{
public:// 构造函数,用于创建平面几何体PlaneGeometry(float width = 1.0, float height = 1.0, float wSegment = 1.0, float hSegment = 1.0){// 计算平面的一半宽度和一半高度float width_half = width / 2.0f;float height_half = height / 2.0f;// 定义网格的行数和列数float gridX1 = wSegment + 1.0f;float gridY1 = hSegment + 1.0f;// 计算每个网格片段的宽度和高度float segment_width = width / wSegment;float segment_height = height / hSegment;Vertex vertex; // 定义一个顶点对象// 生成顶点的位置、法线和纹理坐标for (int iy = 0; iy < gridY1; iy++){float y = iy * segment_height - height_half;for (int ix = 0; ix < gridX1; ix++){float x = ix * segment_width - width_half;// 设置顶点的位置、法线和纹理坐标vertex.Position = glm::vec3(x, -y, 0.0f);vertex.Normal = glm::vec3(0.0f, 0.0f, 1.0f);vertex.TexCoords = glm::vec2(ix / wSegment, 1.0f - (iy / hSegment));// 将顶点添加到几何体的顶点列表中this->vertices.push_back(vertex);}}// 生成三角形的索引for (int iy = 0; iy < hSegment; iy++){for (int ix = 0; ix < wSegment; ix++){float a = ix + gridX1 * iy;float b = ix + gridX1 * (iy + 1);float c = (ix + 1) + gridX1 * (iy + 1);float d = (ix + 1) + gridX1 * iy;// 添加顶点索引到几何体的索引列表中this->indices.push_back(a);this->indices.push_back(b);this->indices.push_back(d);this->indices.push_back(b);this->indices.push_back(c);this->indices.push_back(d);}}// 调用基类 BufferGeometry 的 setupBuffers 方法,设置顶点和索引缓冲区this->setupBuffers();}
};#endif
sphere_geometry(和plane_geometry类似,暂略)
box_geometry(和plane_geometry类似,暂略)
Assimp
Open Asset Import Library 是一个库,用于将各种 3D 文件格式加载为共享的内存格式。它支持 40 多种用于导入的文件格式和越来越多的用于导出的文件格式选择。
- 加载模型
Model ourModel("./static/model/cerberus/Cerberus.obj");绘制模型ourModel.Draw(ourShader);其中ourShader对象来自Shader ourShader("./shader/vertex.glsl", "./shader/fragment.glsl");
Model: 使用Assimp来加载模型,并将它转换至多个Mesh对象
#ifndef MODEL_H
#define MODEL_H#include <assimp/Importer.hpp>
#include <assimp/scene.h>
#include <assimp/postprocess.h>#include <string>
#include <fstream>
#include <sstream>
#include <iostream>
#include <map>
#include <vector>
using namespace std;
unsigned int TextureFromFile(const char *path, const string &directory, bool gamma = false);
class Model
{
public:vector<Texture> textures_loaded; // stores all the textures loaded so far, optimization to make sure textures aren't loaded more than once.vector<Mesh> meshes; // 一个Mesh对象的vector数组string directory;bool gammaCorrection;Model(string const &path, bool gamma = false) : gammaCorrection(gamma){loadModel(path);}void Draw(Shader &shader)// Draw函数没有什么特别之处,基本上就是遍历了所有网格,并调用它们各自的Draw函数{for (unsigned int i = 0; i < meshes.size(); i++)meshes[i].Draw(shader);}private:void loadModel(string const &path){// read file via ASSIMPAssimp::Importer importer;const aiScene *scene = importer.ReadFile(path, aiProcess_Triangulate | aiProcess_GenSmoothNormals | aiProcess_FlipUVs | aiProcess_CalcTangentSpace);// process ASSIMP's root node recursivelyprocessNode(scene->mRootNode, scene);}// 层序遍历node*的所有节点,并添加到vector<meshes>中,会调用processMesh函数void processNode(aiNode *node, const aiScene *scene){// process each mesh located at the current nodefor (unsigned int i = 0; i < node->mNumMeshes; i++){// the node object only contains indices to index the actual objects in the scene.// the scene contains all the data, node is just to keep stuff organized (like relations between nodes).aiMesh *mesh = scene->mMeshes[node->mMeshes[i]];meshes.push_back(processMesh(mesh, scene));}// after we've processed all of the meshes (if any) we then recursively process each of the children nodesfor (unsigned int i = 0; i < node->mNumChildren; i++){processNode(node->mChildren[i], scene);}}Mesh processMesh(aiMesh *mesh, const aiScene *scene) //从 aiMesh 中提取顶点、索引和纹理等数据,以创建一个自定义的 Mesh 对象。{// data to fillvector<Vertex> vertices;vector<unsigned int> indices;vector<Texture> textures;// 遍历网格的顶点 walk through each of the mesh's verticesfor (unsigned int i = 0; i < mesh->mNumVertices; i++){Vertex vertex;glm::vec3 vector; // we declare a placeholder vector since assimp uses its own vector class that doesn't directly convert to glm's vec3 class so we transfer the data to this placeholder glm::vec3 first.// positionsvector.x = mesh->mVertices[i].x;vector.y = mesh->mVertices[i].y;vector.z = mesh->mVertices[i].z;vertex.Position = vector;// normalsif (mesh->HasNormals()){vector.x = mesh->mNormals[i].x;vector.y = mesh->mNormals[i].y;vector.z = mesh->mNormals[i].z;vertex.Normal = vector;}// texture coordinatesif (mesh->mTextureCoords[0]) // does the mesh contain texture coordinates?{glm::vec2 vec;// a vertex can contain up to 8 different texture coordinates. We thus make the assumption that we won't// use models where a vertex can have multiple texture coordinates so we always take the first set (0).vec.x = mesh->mTextureCoords[0][i].x;vec.y = mesh->mTextureCoords[0][i].y;vertex.TexCoords = vec;// tangentvector.x = mesh->mTangents[i].x;vector.y = mesh->mTangents[i].y;vector.z = mesh->mTangents[i].z;vertex.Tangent = vector;// bitangentvector.x = mesh->mBitangents[i].x;vector.y = mesh->mBitangents[i].y;vector.z = mesh->mBitangents[i].z;vertex.Bitangent = vector;}elsevertex.TexCoords = glm::vec2(0.0f, 0.0f);vertices.push_back(vertex);}// 遍历网格的面(三角形) now wak through each of the mesh's faces (a face is a mesh its triangle) and retrieve the corresponding vertex indices.for (unsigned int i = 0; i < mesh->mNumFaces; i++){aiFace face = mesh->mFaces[i];// retrieve all indices of the face and store them in the indices vectorfor (unsigned int j = 0; j < face.mNumIndices; j++)indices.push_back(face.mIndices[j]);}// process materialsaiMaterial *material = scene->mMaterials[mesh->mMaterialIndex];// we assume a convention for sampler names in the shaders. Each diffuse texture should be named// as 'texture_diffuseN' where N is a sequential number ranging from 1 to MAX_SAMPLER_NUMBER.// Same applies to other texture as the following list summarizes:// diffuse: texture_diffuseN// specular: texture_specularN// normal: texture_normalN// 1. diffuse mapsvector<Texture> diffuseMaps = loadMaterialTextures(material, aiTextureType_DIFFUSE, "texture_diffuse");textures.insert(textures.end(), diffuseMaps.begin(), diffuseMaps.end());// 2. specular mapsvector<Texture> specularMaps = loadMaterialTextures(material, aiTextureType_SPECULAR, "texture_specular");textures.insert(textures.end(), specularMaps.begin(), specularMaps.end());// 3. normal mapsstd::vector<Texture> normalMaps = loadMaterialTextures(material, aiTextureType_HEIGHT, "texture_normal");textures.insert(textures.end(), normalMaps.begin(), normalMaps.end());// 4. height mapsstd::vector<Texture> heightMaps = loadMaterialTextures(material, aiTextureType_AMBIENT, "texture_height");textures.insert(textures.end(), heightMaps.begin(), heightMaps.end());// return a mesh object created from the extracted mesh datareturn Mesh(vertices, indices, textures);}vector<Texture> loadMaterialTextures(aiMaterial *mat, aiTextureType type, string typeName){vector<Texture> textures;for (unsigned int i = 0; i < mat->GetTextureCount(type); i++){aiString str;mat->GetTexture(type, i, &str);// check if texture was loaded before and if so, continue to next iteration: skip loading a new texturebool skip = false;for (unsigned int j = 0; j < textures_loaded.size(); j++){if (std::strcmp(textures_loaded[j].path.data(), str.C_Str()) == 0){textures.push_back(textures_loaded[j]);skip = true; // a texture with the same filepath has already been loaded, continue to next one. (optimization)break;}}if (!skip){ // if texture hasn't been loaded already, load itTexture texture;texture.id = TextureFromFile(str.C_Str(), this->directory);texture.type = typeName;texture.path = str.C_Str();textures.push_back(texture);textures_loaded.push_back(texture); // store it as texture loaded for entire model, to ensure we won't unnecesery load duplicate textures.}}return textures;}
};// 从文件加载纹理,并返回OpenGL中的纹理ID。该函数使用了stb_image库来加载图像数据,并通过OpenGL函数来生成和配置2D纹理
unsigned int TextureFromFile(const char *path, const string &directory, bool gamma)
{ //---------------------------------------------return textureID;
}#endif
Mesh:
#ifndef MESH_H
#define MESH_H#include <glad/glad.h>
#include <glm/glm.hpp>
#include <glm/gtc/matrix_transform.hpp>#include <tool/shader.h>#include <string>
#include <vector>using namespace std;#ifndef BUFFER_GROMETRY
struct Vertex
{glm::vec3 Position;	 // 顶点属性glm::vec3 Normal;		 // 法线glm::vec2 TexCoords; // 纹理坐标// 切线空间属性glm::vec3 Tangent;glm::vec3 Bitangent;
};
#endifstruct Texture
{unsigned int id;string type;string path;
};class Mesh
{
public:// mesh Datavector<Vertex> vertices;vector<unsigned int> indices;vector<Texture> textures;unsigned int VAO;Mesh(vector<Vertex> vertices, vector<unsigned int> indices, vector<Texture> textures){this->vertices = vertices;this->indices = indices;this->textures = textures;// now that we have all the required data, set the vertex buffers and its attribute pointers.setupMesh();}// render the meshvoid Draw(Shader &shader){// bind appropriate texturesunsigned int diffuseNr = 1;unsigned int specularNr = 1;unsigned int normalNr = 1;unsigned int heightNr = 1;for (unsigned int i = 0; i < textures.size(); i++){glActiveTexture(GL_TEXTURE0 + i); // active proper texture unit before binding// retrieve texture number (the N in diffuse_textureN)string number;string name = textures[i].type;if (name == "texture_diffuse")number = std::to_string(diffuseNr++);else if (name == "texture_specular")number = std::to_string(specularNr++); // transfer unsigned int to streamelse if (name == "texture_normal")number = std::to_string(normalNr++); // transfer unsigned int to streamelse if (name == "texture_height")number = std::to_string(heightNr++); // transfer unsigned int to stream// now set the sampler to the correct texture unitglUniform1i(glGetUniformLocation(shader.ID, (name + number).c_str()), i);// and finally bind the textureglBindTexture(GL_TEXTURE_2D, textures[i].id);}// draw meshglBindVertexArray(VAO);glDrawElements(GL_TRIANGLES, indices.size(), GL_UNSIGNED_INT, 0);glBindVertexArray(0);// always good practice to set everything back to defaults once configured.glActiveTexture(GL_TEXTURE0);}private:// render dataunsigned int VBO, EBO;void setupMesh(){// create buffers/arraysglGenVertexArrays(1, &VAO);glGenBuffers(1, &VBO);glGenBuffers(1, &EBO);glBindVertexArray(VAO);// load data into vertex buffersglBindBuffer(GL_ARRAY_BUFFER, VBO);// A great thing about structs is that their memory layout is sequential for all its items.// The effect is that we can simply pass a pointer to the struct and it translates perfectly to a glm::vec3/2 array which// again translates to 3/2 floats which translates to a byte array.glBufferData(GL_ARRAY_BUFFER, vertices.size() * sizeof(Vertex), &vertices[0], GL_STATIC_DRAW);glBindBuffer(GL_ELEMENT_ARRAY_BUFFER, EBO);glBufferData(GL_ELEMENT_ARRAY_BUFFER, indices.size() * sizeof(unsigned int), &indices[0], GL_STATIC_DRAW);// set the vertex attribute pointers// vertex PositionsglEnableVertexAttribArray(0);glVertexAttribPointer(0, 3, GL_FLOAT, GL_FALSE, sizeof(Vertex), (void *)0);// vertex normalsglEnableVertexAttribArray(1);glVertexAttribPointer(1, 3, GL_FLOAT, GL_FALSE, sizeof(Vertex), (void *)offsetof(Vertex, Normal));// vertex texture coordsglEnableVertexAttribArray(2);glVertexAttribPointer(2, 2, GL_FLOAT, GL_FALSE, sizeof(Vertex), (void *)offsetof(Vertex, TexCoords));// vertex tangentglEnableVertexAttribArray(3);glVertexAttribPointer(3, 3, GL_FLOAT, GL_FALSE, sizeof(Vertex), (void *)offsetof(Vertex, Tangent));// vertex bitangentglEnableVertexAttribArray(4);glVertexAttribPointer(4, 3, GL_FLOAT, GL_FALSE, sizeof(Vertex), (void *)offsetof(Vertex, Bitangent));glBindVertexArray(0);}
};#endif
cg
- LearnOpenGL文档学习【完结】
- https://github.com/JoeyDeVries/LearnOpenGL/tree/master
- Glitter 是 OpenGL 的一个非常简单的样板,旨在作为 learnopengl.com 和 open.gl 教程的起点。
- OpenGL 动画
- https://joeydevries.com/#home
- up推荐的vscode插件:

- https://stackoverflow.com/questions/21652546/what-is-the-role-of-glbindvertexarrays-vs-glbindbuffer-and-what-is-their-relatio
这篇关于OpenGL :LearnOpenGL笔记的文章就介绍到这儿,希望我们推荐的文章对编程师们有所帮助!


