本文主要是介绍本地使用 docker 运行OpenSearch + Dashboard + IK 分词插件,希望对大家解决编程问题提供一定的参考价值,需要的开发者们随着小编来一起学习吧!
准备基础镜像
注意一定要拉取和当前 IK 分词插件版本一致的 OpenSearch 镜像:
https://github.com/aparo/opensearch-analysis-ik/releases
写这篇文章的时候 IK 最新版本 2.11.0, 而 dockerhub 上 OpenSearch 最新版是 2.11.1 如果版本不匹配的话是不能用的, 小版本号对不上也不行! 已经踩过坑了…
# 拉取对应版本的 opensearch/dashboard image
docker pull opensearchproject/opensearch:2.11.0
docker pull opensearchproject/opensearch-dashboards:2.11.0
额外注意事项
对于运行 Docker 的 Linux 系统环境需要提前修改一下系统配置 vm.max_map_count 的值, 否则后面运行容器的时候会出现下面错误:
Max virtual memory areas vm.max_map_count [65530] is too low, increase to at least [262144]
# 临时生效
sysctl -w vm.max_map_count=262144# 修改系统配置文件(重启后生效)
echo "vm.max_map_count=262144" >> /etc/sysctl.conf
自定义 Dockerfile 添加 IK 插件
先手动下载好 IK 插件的 ZIP 文件
mkdir ik-tmp && cd ik-tmpwget https://github.com/aparo/opensearch-analysis-ik/releases/download/2.11.0/opensearch-analysis-ik.zip# 创建 IK 配置文件
vim IKAnalyzer.cfg.xml
IKAnalyzer.cfg.xml 完整示例.
<?xml version="1.0" encoding="UTF-8"?>
<!DOCTYPE properties SYSTEM "http://java.sun.com/dtd/properties.dtd">
<properties><comment>IK Analyzer 扩展配置</comment><!--用户可以在这里配置自己的扩展字典 --><entry key="ext_dict">custom/mydict.dic;custom/single_word_low_freq.dic</entry><!--用户可以在这里配置自己的扩展停止词字典--><entry key="ext_stopwords">custom/ext_stopword.dic</entry><!--用户可以在这里配置远程扩展字典 --><entry key="remote_ext_dict">location</entry><!--用户可以在这里配置远程扩展停止词字典--><entry key="remote_ext_stopwords">http://xxx.com/xxx.dic</entry>
</properties>
vim Dockerfile
Dockerfile 内容:
FROM opensearchproject/opensearch:2.11.0COPY ./opensearch-analysis-ik.zip /tmp/
RUN /usr/share/opensearch/bin/opensearch-plugin install file:/tmp/opensearch-analysis-ik.zip
# 创建软链接修正 IK 配置和字典文件路径的问题, 不知道是不是 2.11.0 里面的 bug, 插件默认加载字典和配置文件的路径不太对
RUN ln -s /usr/share/opensearch/config/opensearch-analysis-ik /usr/share/opensearch/plugins/opensearch-analysis-ik/config
构建新的 Image:
docker build -t opensearch-with-ik:2.11.0 .
测试 Image
docker run --name opensearch-with-ik-test --rm -d -p 9200:9200 -p 9600:9600 -e "discovery.type=single-node" opensearch-with-ik:2.11.0curl -X GET https://localhost:9200/_cat/plugins?v -ku "admin:admin"
# 检查返回结果中包含 opensearch-analysis-ik 插件
name         component                            version
df8dea9d22fc opensearch-analysis-ik               unspecified# 停掉测试容器
docker stop opensearch-with-ik-test
创建 docker-compose.yaml
参考官方文档 https://opensearch.org/docs/latest/install-and-configure/install-opensearch/docker/ 稍作调整, 将 node 用到的 image 替换成我们前面做好的带着 IK 插件的镜像, 并映射 IK 配置文件.
version: '3'
services:opensearch-node1: # This is also the hostname of the container within the Docker network (i.e. https://opensearch-node1/)image: opensearch-with-ik:2.11.0 # Specifying the latest available image - modify if you want a specific versioncontainer_name: opensearch-node1environment:- cluster.name=opensearch-cluster # Name the cluster- node.name=opensearch-node1 # Name the node that will run in this container- discovery.seed_hosts=opensearch-node1,opensearch-node2 # Nodes to look for when discovering the cluster- cluster.initial_cluster_manager_nodes=opensearch-node1,opensearch-node2 # Nodes eligible to serve as cluster manager- bootstrap.memory_lock=true # Disable JVM heap memory swapping- "OPENSEARCH_JAVA_OPTS=-Xms512m -Xmx512m" # Set min and max JVM heap sizes to at least 50% of system RAMulimits:memlock:soft: -1 # Set memlock to unlimited (no soft or hard limit)hard: -1nofile:soft: 65536 # Maximum number of open files for the opensearch user - set to at least 65536hard: 65536volumes:- opensearch-data1:/usr/share/opensearch/data # Creates volume called opensearch-data1 and mounts it to the containerports:- 9200:9200 # REST API- 9600:9600 # Performance Analyzernetworks:- opensearch-net # All of the containers will join the same Docker bridge networkopensearch-node2:image: opensearch-with-ik:2.11.0 # This should be the same image used for opensearch-node1 to avoid issuescontainer_name: opensearch-node2environment:- cluster.name=opensearch-cluster- node.name=opensearch-node2- discovery.seed_hosts=opensearch-node1,opensearch-node2- cluster.initial_cluster_manager_nodes=opensearch-node1,opensearch-node2- bootstrap.memory_lock=true- "OPENSEARCH_JAVA_OPTS=-Xms512m -Xmx512m"ulimits:memlock:soft: -1hard: -1nofile:soft: 65536hard: 65536volumes:- opensearch-data2:/usr/share/opensearch/datanetworks:- opensearch-netopensearch-dashboards:image: opensearchproject/opensearch-dashboards:2.11.0 # Make sure the version of opensearch-dashboards matches the version of opensearch installed on other nodescontainer_name: opensearch-dashboardsports:- 5601:5601 # Map host port 5601 to container port 5601expose:- "5601" # Expose port 5601 for web access to OpenSearch Dashboardsenvironment:OPENSEARCH_HOSTS: '["https://opensearch-node1:9200","https://opensearch-node2:9200"]' # Define the OpenSearch nodes that OpenSearch Dashboards will querynetworks:- opensearch-netvolumes:opensearch-data1:opensearch-data2:networks:opensearch-net:
启动集群
docker-compose up -dCreating network "opensearch-cluster_opensearch-net" with the default driver
Creating volume "opensearch-cluster_opensearch-data1" with default driver
Creating volume "opensearch-cluster_opensearch-data2" with default driver
Creating opensearch-dashboards ... done
Creating opensearch-node1      ... done
Creating opensearch-node2      ... done
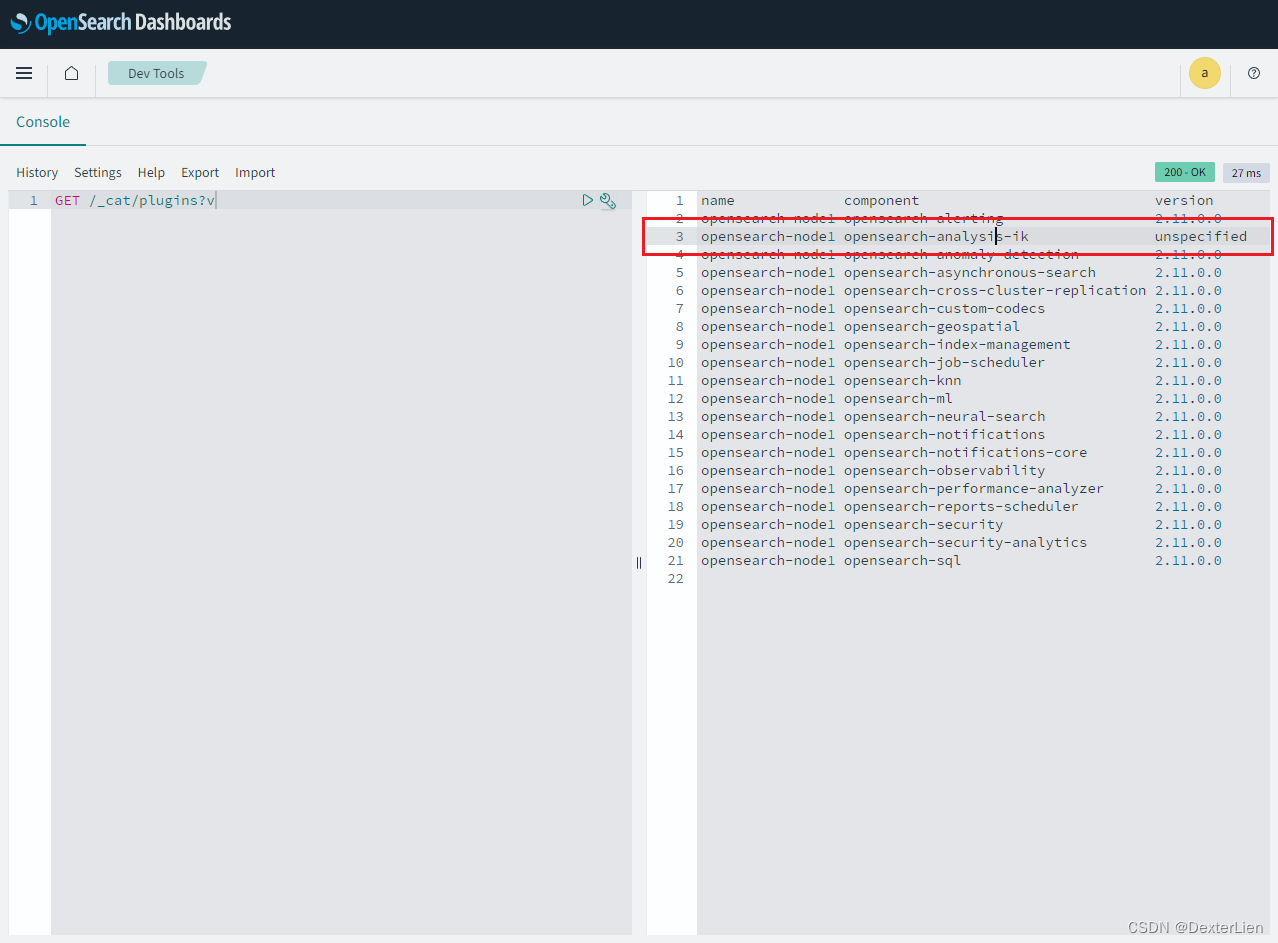
访问 Dashboard (Kibana) http://docker-host:5601/, 用户名密码都是默认的 admin, 再次确认插件识别出来了, 只是 version 显示不出来, 不知道是不是 bug 🤣 开了个 Issue 不知道会不会有人搭理
这篇关于本地使用 docker 运行OpenSearch + Dashboard + IK 分词插件的文章就介绍到这儿,希望我们推荐的文章对编程师们有所帮助!


