本文主要是介绍WPF ControlTemplate,希望对大家解决编程问题提供一定的参考价值,需要的开发者们随着小编来一起学习吧!
ControlTemplate:外观定制
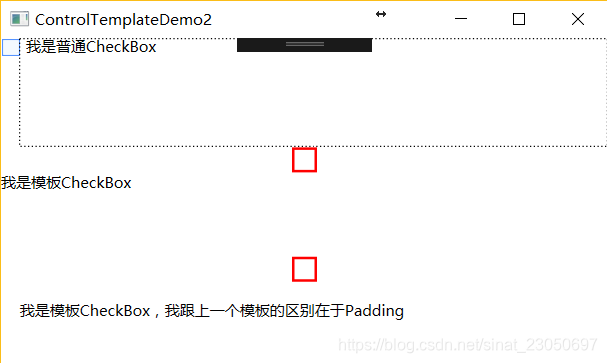
<Window.Resources><ControlTemplate x:Key="CheckBoxControlTemplate" TargetType="CheckBox"><StackPanel><Rectangle Name="breakRectangle" Stroke="Red" StrokeThickness="2" Width="20" Height="20"><Rectangle.Fill><!--默认Rectangle填充色为White--><SolidColorBrush Color="White"></SolidColorBrush></Rectangle.Fill></Rectangle><!--ContentPresenter 保留原控件属性--><ContentPresenter Margin="{TemplateBinding Padding}"></ContentPresenter></StackPanel></ControlTemplate>
</Window.Resources>
<Grid><Grid.RowDefinitions><RowDefinition Height="*"></RowDefinition><RowDefinition Height="*"></RowDefinition><RowDefinition Height="*"></RowDefinition></Grid.RowDefinitions><CheckBox Content="我是普通CheckBox"></CheckBox><CheckBox Grid.Row="1" Template="{StaticResource CheckBoxControlTemplate}" Content="我是模板CheckBox"></CheckBox><CheckBox Grid.Row="2" Template="{StaticResource CheckBoxControlTemplate}" Content="我是模板CheckBox,我跟上一个模板的区别在于Padding" Padding="15"></CheckBox>
</Grid>
Tips
<ContentPresenter Margin="{TemplateBinding Padding}"/>
ContentPresenter 保留原控件属性
TemplateBinding Padding,即绑定每个CheckBox自己的Margin,更灵活
效果

此时,点击Rectangle是没有效果的
ControlTemplate中使用触发器
<ControlTemplate.Triggers><Trigger Property="IsChecked" Value="True"><Setter TargetName="breakRectangle" Property="Fill" Value="Coral"></Setter></Trigger>
</ControlTemplate.Triggers>
Setter可以选择TargetName,即一个控件的触发器可以修改另一个控件的属性
效果

使用Brush
Brush一类画笔,需定义为对象才能使用
可以使用颜色、图片等等
<Window.Resources><ControlTemplate x:Key="CheckBoxControlTemplate" TargetType="CheckBox"><ControlTemplate.Resources><!--颜色--><SolidColorBrush x:Key="ColorBrush" Color="Pink"></SolidColorBrush><!--图片--><ImageBrush x:Key="ImageBrush" ImageSource="Images/cat.jpg"></ImageBrush></ControlTemplate.Resources><StackPanel><Rectangle Name="breakRectangle" Stroke="OrangeRed" StrokeThickness="2" Width="100" Height="100"><Rectangle.Fill><!--默认Rectangle填充色为White--><SolidColorBrush Color="White"></SolidColorBrush></Rectangle.Fill></Rectangle><!--ContentPresenter 保留原控件属性--><ContentPresenter Margin="{TemplateBinding Padding}"></ContentPresenter></StackPanel><ControlTemplate.Triggers><Trigger Property="IsChecked" Value="True"><Setter TargetName="breakRectangle" Property="Fill" Value="{StaticResource ImageBrush}"></Setter></Trigger><Trigger Property="IsChecked" Value="False"><Setter TargetName="breakRectangle" Property="Fill" Value="{StaticResource ColorBrush}"></Setter></Trigger></ControlTemplate.Triggers></ControlTemplate>
</Window.Resources>
<Grid><Grid.RowDefinitions><RowDefinition Height="0.5*"></RowDefinition><RowDefinition Height="0.5*"></RowDefinition><RowDefinition Height="*"></RowDefinition></Grid.RowDefinitions><Label Grid.Row="0" Content="没有选中时,CheckBox填充色为Pink"></Label><Label Grid.Row="1" Content="选中时,CheckBox填充为猫猫的图片"></Label><CheckBox Grid.Row="2" Template="{StaticResource CheckBoxControlTemplate}" Content="我是模板CheckBox"></CheckBox>
</Grid>
效果


可以对比在Style中嵌套Template的写法
StyleUseTemplate
其他例子
<Window.Resources><ControlTemplate x:Key="CheckBoxControlTemplate" TargetType="{x:Type CheckBox}"><Grid><TextBlock x:Name="textBlock1" HorizontalAlignment="Left" Margin="116,39,0,0" TextWrapping="Wrap" Text="TextBlock" VerticalAlignment="Top"/><ContentPresenter/></Grid><ControlTemplate.Triggers><Trigger Property="IsChecked" Value="True"><Setter TargetName="textBlock1" Property="Text" Value="CheckBox is checked."></Setter></Trigger><Trigger Property="IsChecked" Value="False"><Setter TargetName="textBlock1" Property="Text" Value="CheckBox is not checked."></Setter></Trigger></ControlTemplate.Triggers></ControlTemplate>
</Window.Resources>
<Grid><CheckBox Template="{StaticResource CheckBoxControlTemplate}" x:Name="checkBox1" Content="CheckBox" HorizontalAlignment="Left" Margin="137,59,0,0" VerticalAlignment="Top"></CheckBox>
</Grid>
对非内置属性的修改,用模板
用style识别不了textBlock1
直接写CheckBox 的Triggers识别不了IsChecked
示例代码
ControlTemplate
这篇关于WPF ControlTemplate的文章就介绍到这儿,希望我们推荐的文章对编程师们有所帮助!


