本文主要是介绍Android View.inflate 和 LayoutInflater.from(this).inflate 的区别,希望对大家解决编程问题提供一定的参考价值,需要的开发者们随着小编来一起学习吧!
前言
两个都是布局加载器,而View.inflate是对 LayoutInflater.from(context).inflate的封装,功能相同,案例使用了dataBinding。
View.inflate(context, layoutResId, root)
LayoutInflater.from(context).inflate(layoutResId, root, false)
区别
因为View.inflate(context,layoutResId,root) 比 LayoutInflater.from(context).inflate(layoutResId, root, attachToRoot) 少了一个attachToRoot参数(是否将layoutResId添加到某个View中,作为其子View)。
在使用View.inflate(context,layoutResId,root) 时,如果root(父View)是null,会导致layoutResId布局中声明的宽高 + 外边距参数,失效。
核心条件就是root(父View)是不是null。
案例
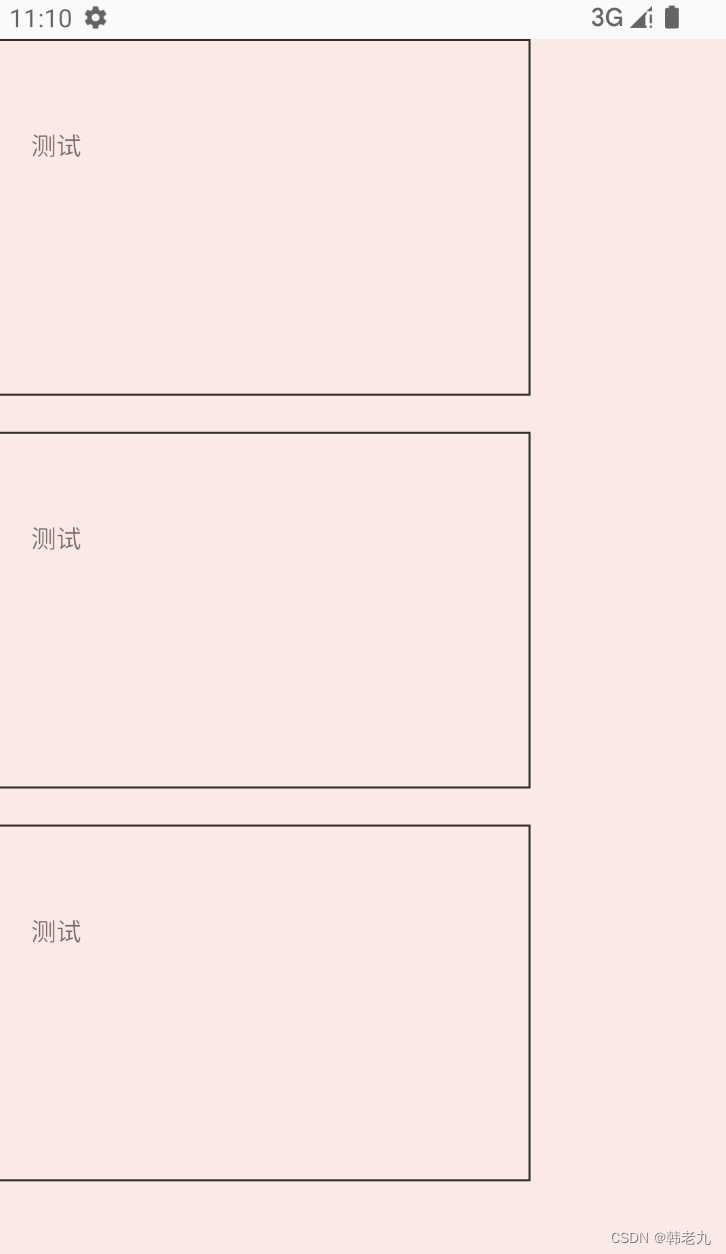
1、使用View.inflate(context,layoutResId,root) root不为null
private AppActivityMainBinding bind;@Overrideprotected void onCreate(Bundle savedInstanceState) {super.onCreate(savedInstanceState);bind = AppActivityMainBinding.bind(getLayoutInflater().inflate(R.layout.app_activity_main,null)); setContentView(bind.getRoot());// 子布局:R.layout.app_layout_text // 父布局:bind.boxView.inflate(this,R.layout.app_layout_text,bind.box);View.inflate(this,R.layout.app_layout_text,bind.box);View.inflate(this,R.layout.app_layout_text,bind.box);}2、使用LayoutInflater.from(context).inflate(layoutResId, root, attachToRoot) root不为null,且attachToRoot是true
private AppActivityMainBinding bind;@Overrideprotected void onCreate(Bundle savedInstanceState) {super.onCreate(savedInstanceState);bind = AppActivityMainBinding.bind(getLayoutInflater().inflate(R.layout.app_activity_main,null)); setContentView(bind.getRoot());// 子布局:R.layout.app_layout_text // 父布局:bind.boxLayoutInflater.from(this).inflate(R.layout.app_layout_text, bind.box, true);LayoutInflater.from(this).inflate(R.layout.app_layout_text, bind.box, true);LayoutInflater.from(this).inflate(R.layout.app_layout_text, bind.box, true);}两种方式效果相同,宽高 + 外边距 都有效
3、使用View.inflate(context,layoutResId,root) root为 null
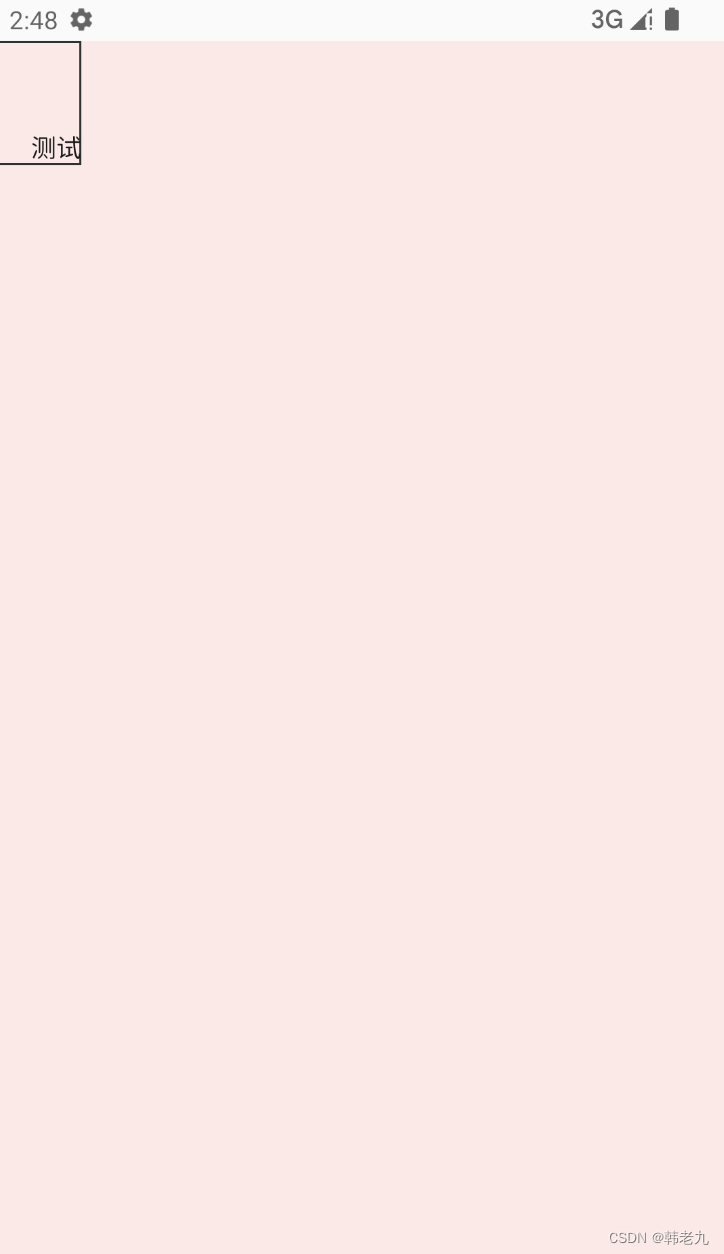
private AppActivityMainBinding bind;@Overrideprotected void onCreate(Bundle savedInstanceState) {super.onCreate(savedInstanceState);bind = AppActivityMainBinding.bind(getLayoutInflater().inflate(R.layout.app_activity_main,null)); setContentView(bind.getRoot());// 子布局:R.layout.app_layout_text // 父布局:bind.boxView view = View.inflate(this, R.layout.app_layout_text, null);View view2 = View.inflate(this, R.layout.app_layout_text, null);View view3 = View.inflate(this, R.layout.app_layout_text, null);bind.box.addView(view);bind.box.addView(view2);bind.box.addView(view3);}4、使用LayoutInflater.from(context).inflate(layoutResId, root, attachToRoot) root为 null,且attachToRoot是false
private AppActivityMainBinding bind;@Overrideprotected void onCreate(Bundle savedInstanceState) {super.onCreate(savedInstanceState);bind = AppActivityMainBinding.bind(getLayoutInflater().inflate(R.layout.app_activity_main,null)); setContentView(bind.getRoot());// 子布局:R.layout.app_layout_text // 父布局:bind.boxView view = LayoutInflater.from(this).inflate(R.layout.app_layout_text, null, false);View view2 = LayoutInflater.from(this).inflate(R.layout.app_layout_text, null, false);View view3 = LayoutInflater.from(this).inflate(R.layout.app_layout_text, null, false);bind.box.addView(view);bind.box.addView(view2);bind.box.addView(view3);}两种方式效果相同,宽高 + 外边距 都失效了,宽/高 变成wrap_content,一点要记住这点!!!是变成wrap_content。
至于为什么layoutResId布局宽度和父View一样,当子View失去自身LayoutParams(布局参数)后,父View会自动调整子View的宽高属性,下面会讲,先忽略。

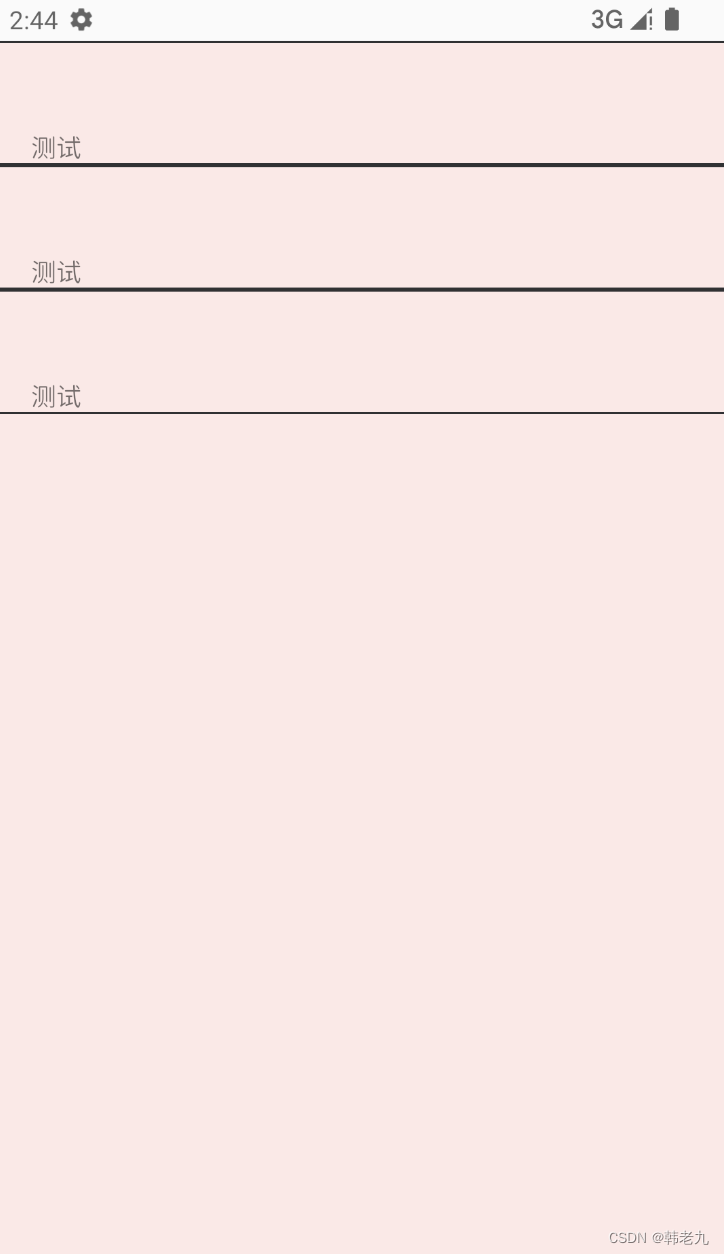
5、如果不想将layoutResId布局添加到父View中,同时又不想丢失layoutResId布局中声明的参数,LayoutInflater.from(context).inflate(layoutResId, root, attachToRoot)这样写可以做到,root不为null,但是attachToRoot为false
private AppActivityMainBinding bind;@Overrideprotected void onCreate(Bundle savedInstanceState) {super.onCreate(savedInstanceState);bind = AppActivityMainBinding.bind(getLayoutInflater().inflate(R.layout.app_activity_main,null)); setContentView(bind.getRoot());// 子布局:R.layout.app_layout_text // 父布局:bind.boxView view = LayoutInflater.from(this).inflate(R.layout.app_layout_text, bind.box, false);View view2 = LayoutInflater.from(this).inflate(R.layout.app_layout_text, bind.box, false);View view3 = LayoutInflater.from(this).inflate(R.layout.app_layout_text, bind.box, false);bind.box.addView(view);bind.box.addView(view2);bind.box.addView(view3);}效果
6、而View.inflate(context,layoutResId,root) 目前为止无法做到,因为它少了一个attachToRoot参数(是否将layoutResId添加到某个View中,作为其子View),以后说不准会有这个参数的重载方法。
7、案例文件:shape_border.xml
<?xml version="1.0" encoding="utf-8"?>
<shape xmlns:android="http://schemas.android.com/apk/res/android"><stroke android:color="@color/color_303133" android:width="1dp"/>
</shape>
8、案例文件:app_layout_text.xml
<?xml version="1.0" encoding="utf-8"?>
<TextView xmlns:android="http://schemas.android.com/apk/res/android"android:layout_width="300dp"android:layout_height="200dp"android:layout_marginBottom="20dp"android:background="@drawable/shape_border"android:paddingLeft="20dp"android:paddingTop="50dp"android:text="测试" />
9、案例文件:app_activity_main.xml
<?xml version="1.0" encoding="utf-8"?>
<layout xmlns:android="http://schemas.android.com/apk/res/android"xmlns:app="http://schemas.android.com/apk/res-auto"xmlns:tools="http://schemas.android.com/tools"><data></data><LinearLayoutandroid:id="@+id/box"android:orientation="vertical"android:background="@color/color_14F9230A"android:layout_width="match_parent"android:layout_height="match_parent"></LinearLayout></layout>
10、案例文件:AppMainActivity.Java
public class AppMainActivity extends AppCompatActivity {private AppActivityMainBinding bind;@Overrideprotected void onCreate(Bundle savedInstanceState) {super.onCreate(savedInstanceState);bind = AppActivityMainBinding.bind(getLayoutInflater().inflate(R.layout.app_activity_main,null));setContentView(bind.getRoot());// View.inflate(this,R.layout.app_layout_text,bind.box);// View.inflate(this,R.layout.app_layout_text,bind.box);// View.inflate(this,R.layout.app_layout_text,bind.box);// View view = View.inflate(this, R.layout.app_layout_text, null);// View view2 = View.inflate(this, R.layout.app_layout_text, null);// View view3 = View.inflate(this, R.layout.app_layout_text, null);// bind.box.addView(view);// bind.box.addView(view2);// bind.box.addView(view3);// LayoutInflater.from(this).inflate(R.layout.app_layout_text, bind.box, true);// LayoutInflater.from(this).inflate(R.layout.app_layout_text, bind.box, true);// LayoutInflater.from(this).inflate(R.layout.app_layout_text, bind.box, true);// View view = LayoutInflater.from(this).inflate(R.layout.app_layout_text, bind.box, false);// View view2 = LayoutInflater.from(this).inflate(R.layout.app_layout_text, bind.box, false);// View view3 = LayoutInflater.from(this).inflate(R.layout.app_layout_text, bind.box, false);// bind.box.addView(view);// bind.box.addView(view2);// bind.box.addView(view3);// View view = LayoutInflater.from(this).inflate(R.layout.app_layout_text, null, false);// View view2 = LayoutInflater.from(this).inflate(R.layout.app_layout_text, null, false);// View view3 = LayoutInflater.from(this).inflate(R.layout.app_layout_text, null, false);// bind.box.addView(view);// bind.box.addView(view2);// bind.box.addView(view3);}源码解析
View.inflate源码,还是调用的LayoutInflater.from(context).inflate。
public static View inflate(Context context, @LayoutRes int resource, ViewGroup root) {LayoutInflater factory = LayoutInflater.from(context);return factory.inflate(resource, root);}LayoutInflater.java源码
第一判断条件是root(父布局)是否为null,第二判断条件就是attachToRoot,View.inflate没有这个参数。
... ... View result = root;... ... if (root != null) {// Create layout params that match root, if suppliedparams = root.generateLayoutParams(attrs);if (!attachToRoot) {// Set the layout params for temp if we are not// attaching. (If we are, we use addView, below)temp.setLayoutParams(params);}}... ... return result;父View自动调整子View的宽高
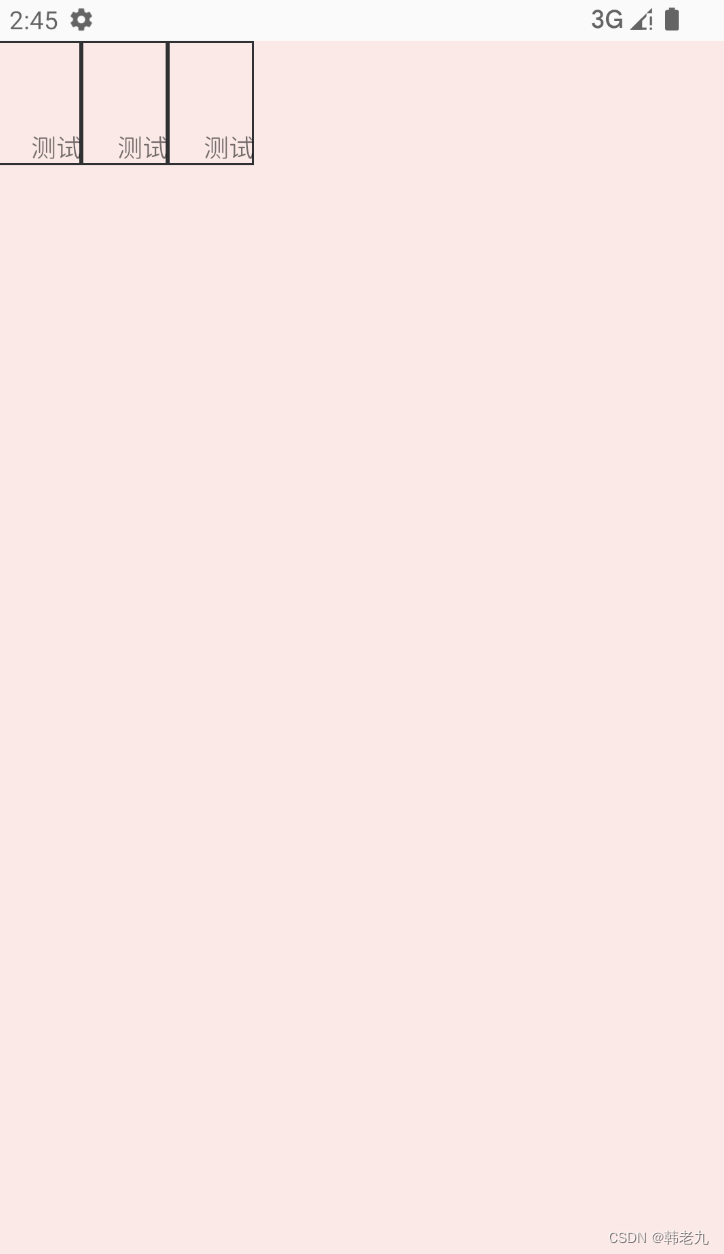
当子View 失去或没有 自身LayoutParams(布局参数)后,父View会自动调整子View的宽高。
布局类型不同,子View宽高值也不同,说几个常用布局:
FrameLayout:宽 / 高 都会变成match_parent

RelativeLayout 和 ConstraintLayout 一样,宽 / 高 都会变成wrap_content

LinearLayout 设置vertical(垂直方向):宽变成match_parent,高变成wrap_content
LinearLayout 设置horizontal(水平方向):宽 / 高 都会变成wrap_content
总结
只有在实例化layoutResId布局时,而又不想 作为子View、不想丢失声明的参数,它俩才会有使用区别。
顺便说一下返回值,layoutResId布局作为子View时,返回的是父布局View,反之返回的是layoutResId布局View,这一点它们是一样的。
View view = View.inflate(this, R.layout.app_layout_text, bind.box);Log.d("TAG","父布局LinearLayout:"+(view instanceof LinearLayout)); // trueLog.d("TAG","当前布局TextView:"+(view instanceof TextView)); // falseView view2 = View.inflate(this, R.layout.app_layout_text, null);Log.d("TAG","父布局LinearLayout:"+(view2 instanceof LinearLayout)); // falseLog.d("TAG","当前布局TextView:"+(view2 instanceof TextView)); // trueView view3 = LayoutInflater.from(this).inflate(R.layout.app_layout_text, bind.box, true);Log.d("TAG", "父布局LinearLayout:" + (view3 instanceof LinearLayout)); // trueLog.d("TAG", "当前布局TextView:" + (view3 instanceof TextView)); // falseView view4 = LayoutInflater.from(this).inflate(R.layout.app_layout_text, bind.box, false);Log.d("TAG", "父布局LinearLayout:" + (view4 instanceof LinearLayout)); // falseLog.d("TAG", "当前布局TextView:" + (view4 instanceof TextView)); // true这篇关于Android View.inflate 和 LayoutInflater.from(this).inflate 的区别的文章就介绍到这儿,希望我们推荐的文章对编程师们有所帮助!


