本文主要是介绍LoadBalancer将服务暴露到外部实现负载均衡purelb-layer2模式配置介绍,希望对大家解决编程问题提供一定的参考价值,需要的开发者们随着小编来一起学习吧!
目录
一.purelb简介
1.简介
2.purelb的layer2工作模式特点
二.layer2的配置演示
1.首先准备ipvs和arp配置环境
2.purelb部署开始
(1)下载purelb-complete.yaml文件并应用
(2)查看该有的资源是否创建完成并运行
(3)配置地址池
3.purelb测试
(1)创建deploy和service在主机进行访问测试
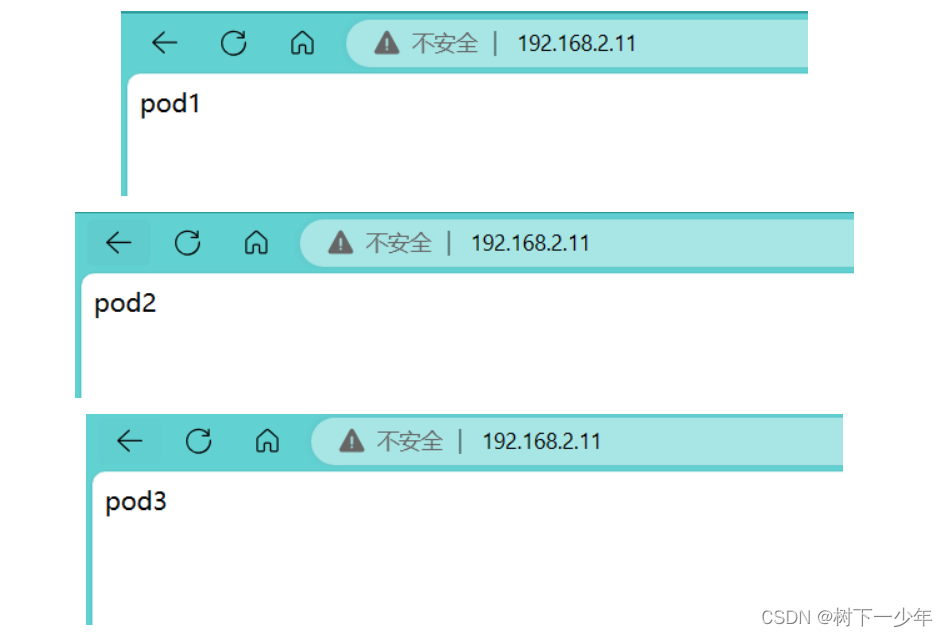
(2)浏览器测试
4.卸载purelb
一.purelb简介
1.简介
PureLB是一种负载均衡器,它的工作原理主要是用于在网络中分发和管理传入的请求,以便将请求有效地分配给后端服务。
2.purelb的layer2工作模式特点
purelb会在k8s集群受管节点上新建一个kube-lb0的虚拟网卡,这样我们可以看到集群的loadbalancervip,那么他也可以使用任意路由协议去实现ECMP(允许在具有相同cost开销的多条路径之间进行负载均衡和流量分发)。
同时purelb的layer2模式根据单个vip来选择节点,将多个vip分散到不同节点,尽量将流量均衡分开,避免某些节点负载失衡发生故障。
二.layer2的配置演示
1.首先准备ipvs和arp配置环境
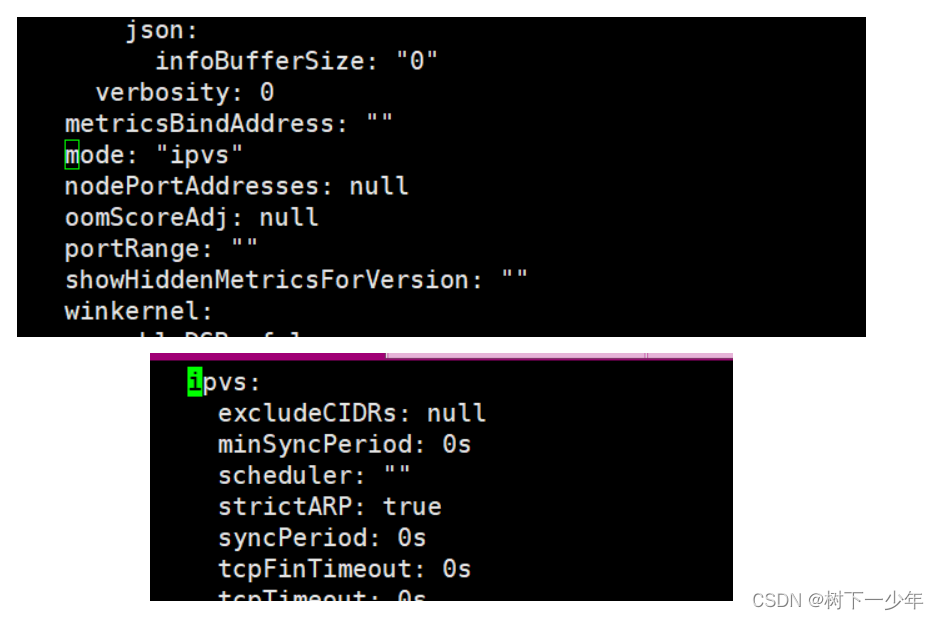
(1)开启ipvs并设置严格策略,将mode改为ipvs,将strictarp改为true
[root@k8s-master service]# kubectl edit configmap kube-proxy -n kube-system
configmap/kube-proxy edited
[root@k8s-master metallb]# kubectl rollout restart ds kube-proxy -n kube-system
[root@k8s-master metallb]# kubectl get configmap -n kube-system kube-proxy -o yaml | grep strictARPstrictARP: true
[root@k8s-master metallb]# kubectl get configmap -n kube-system kube-proxy -o yaml | grep modemode: "ipvs"
(2)修改完后保存并验证
[root@k8s-master service]# kubectl rollout restart ds kube-proxy -n kube-system
daemonset.apps/kube-proxy restarted
[root@k8s-master service]# kubectl get configmap -n kube-system kube-proxy -o yaml | grep strictARPstrictARP: true
[root@k8s-master service]# kubectl get configmap -n kube-system kube-proxy -o yaml | grep modemode: "ipvs"
(3)到这里我们就可以在受管节点(node)上看到新建了kube-lb0虚拟网卡
7: kube-lb0: <BROADCAST,NOARP,UP,LOWER_UP> mtu 1500 qdisc noqueue state UNKNOWN group default qlen 1000link/ether 12:00:b5:78:88:25 brd ff:ff:ff:ff:ff:ffinet6 fe80::1000:b5ff:fe78:8825/64 scope link valid_lft forever preferred_lft forever2.purelb部署开始
(1)下载purelb-complete.yaml文件并应用
链接:百度网盘 请输入提取码 提取码:epbx
文件中crd问题导致第一次会失败,应用两次后才能成功
[root@k8s-master service]# wget https://gitlab.com/api/v4/projects/purelb%2Fpurelb/packages/generic/manifest/0.0.1/purelb-complete.yaml
#内部不需要有更改
[root@k8s-master service]# kubectl apply -f purelb-complete.yaml
namespace/purelb created
customresourcedefinition.apiextensions.k8s.io/lbnodeagents.purelb.io created
customresourcedefinition.apiextensions.k8s.io/servicegroups.purelb.io created
serviceaccount/allocator created
serviceaccount/lbnodeagent created
role.rbac.authorization.k8s.io/pod-lister created
clusterrole.rbac.authorization.k8s.io/purelb:allocator created
clusterrole.rbac.authorization.k8s.io/purelb:lbnodeagent created
rolebinding.rbac.authorization.k8s.io/pod-lister created
clusterrolebinding.rbac.authorization.k8s.io/purelb:allocator created
clusterrolebinding.rbac.authorization.k8s.io/purelb:lbnodeagent created
deployment.apps/allocator created
daemonset.apps/lbnodeagent created
error: resource mapping not found for name: "default" namespace: "purelb" from "purelb-complete.yaml": no matches for kind "LBNodeAgent" in version "purelb.io/v1"
ensure CRDs are installed first
[root@k8s-master service]# kubectl apply -f purelb-complete.yaml
namespace/purelb unchanged   #创建了一个purelb的名称空间
customresourcedefinition.apiextensions.k8s.io/lbnodeagents.purelb.io configured
customresourcedefinition.apiextensions.k8s.io/servicegroups.purelb.io configured
serviceaccount/allocator unchanged
serviceaccount/lbnodeagent unchanged
role.rbac.authorization.k8s.io/pod-lister unchanged
clusterrole.rbac.authorization.k8s.io/purelb:allocator unchanged
clusterrole.rbac.authorization.k8s.io/purelb:lbnodeagent unchanged
rolebinding.rbac.authorization.k8s.io/pod-lister unchanged
clusterrolebinding.rbac.authorization.k8s.io/purelb:allocator unchanged
clusterrolebinding.rbac.authorization.k8s.io/purelb:lbnodeagent unchanged
deployment.apps/allocator unchanged
daemonset.apps/lbnodeagent unchanged
lbnodeagent.purelb.io/default created
(2)查看该有的资源是否创建完成并运行
[root@k8s-master service]# kubectl get deployments.apps,ds -n purelb
NAME READY UP-TO-DATE AVAILABLE AGE
deployment.apps/allocator 1/1 1 1 2m6s
NAME DESIRED CURRENT READY UP-TO-DATE AVAILABLE NODE SELECTOR AGE
daemonset.apps/lbnodeagent 2 2 2 2 2 kubernetes.io/os=linux 2m6s
[root@k8s-master service]# kubectl get crd | grep purelb
lbnodeagents.purelb.io 2023-12-04T08:18:07Z
servicegroups.purelb.io 2023-12-04T08:18:07Z
[root@k8s-master service]# kubectl api-resources | grep purelb.io #这要查看版本,后面创建地址时要用到
lbnodeagents lbna,lbnas purelb.io/v1 true LBNodeAgent
servicegroups sg,sgs purelb.io/v1 true ServiceGroup(3)配置地址池
这里我们使用192.168.2.11/24-192.168.2.19/24中间的地址
[root@k8s-master service]# cat pure-ip-pool.yaml
apiVersion: purelb.io/v1 #刚才查到的版本
kind: ServiceGroup #资源类型为ServiceGroup
metadata:name: my-purelb-ip-pool #这里指定的名称,在后面我们创建service要制定这个资源名称namespace: purelb
spec:local: #本地配置v4pool: #ipv4地址池subnet: "192.168.2.0/24" #指定子网范围,写和主机一个网段但没有使用的地址pool: "192.168.2.11-192.168.2.19" #指定地址范围aggregation: /32
[root@k8s-master service]# kubectl apply -f pure-ip-pool.yaml
servicegroup.purelb.io/my-purelb-ip-pool created
[root@k8s-master service]# kubectl get sg -n purelb -o wide
NAME AGE
my-purelb-ip-pool 22s
[root@k8s-master service]# kubectl describe sg my-purelb-ip-pool -n purelb
Name: my-purelb-ip-pool
Namespace: purelb
Labels: <none>
Annotations: <none>
API Version: purelb.io/v1
Kind: ServiceGroup
Metadata:Creation Timestamp: 2023-12-04T08:29:55ZGeneration: 1Resource Version: 2676UID: 6b564a29-2c6d-4a26-b5df-05aa253595f1
Spec:Local:v4pool:Aggregation: /32Pool: 192.168.2.11-192.168.2.19Subnet: 192.168.2.0/24
Events:Type Reason Age From Message---- ------ ---- ---- -------Normal Parsed 54s purelb-allocator ServiceGroup parsed successfully3.purelb测试
(1)创建deploy和service在主机进行访问测试
在创建service时的注意点比较多,如下
[root@k8s-master service]# vim service2.yaml
[root@k8s-master service]# cat service2.yaml
apiVersion: apps/v1
kind: Deployment
metadata:labels:name: my-nginxname: my-nginxnamespace: myns
spec:replicas: 3selector:matchLabels:name: my-nginx-deploytemplate:metadata:labels:name: my-nginx-deployspec:containers:- name: my-nginx-podimage: nginxports:- containerPort: 80
---
apiVersion: v1
kind: Service
metadata:name: my-nginx-servicenamespace: mynsannotations: #像openelb一样,要添加注解信息,指定我们创建的地址池purelb.io/service-group: my-purelb-ip-pool
spec:allocateLoadBalancerNodePorts: false #这个选项指定是否为服务分配负载均衡器的节点端口。如果设置为false,则不会自动分配节点端口,而是由用户手动指定。默认情况下,该选项为true,表示自动分配节点端口。externalTrafficPolicy: Cluster#这个选项指定了服务的外部流量策略。Cluster表示将外部流量分发到集群内的所有节点。其他可选值还有Local和Local,用于指定将外部流量分发到本地节点或者使用本地节点优先。internalTrafficPolicy: Cluster#这个选项指定了服务的内部流量策略。Cluster表示将内部流量限制在集群内,不会流出集群。其他可选值还有Local,表示只将内部流量限制在本地节点。ports:- port: 80protocol: TCPtargetPort: 80selector:name: my-nginx-deploytype: LoadBalancer #指定type为负载均衡类型
[root@k8s-master service]# kubectl apply -f service2.yaml
deployment.apps/my-nginx unchanged
service/my-nginx-service created
[root@k8s-master service]# kubectl get service -n myns
NAME TYPE CLUSTER-IP EXTERNAL-IP PORT(S) AGE
my-nginx-service LoadBalancer 10.105.214.92 192.168.2.11 80/TCP 12s
[root@k8s-master service]# kubectl get pods -n myns
NAME READY STATUS RESTARTS AGE
my-nginx-5d67c8f488-9lxdm 1/1 Running 0 73s
my-nginx-5d67c8f488-mxksb 1/1 Running 0 73s
my-nginx-5d67c8f488-nr6pb 1/1 Running 0 73s
[root@k8s-master service]# kubectl exec -it my-nginx-5d67c8f488-9lxdm -n myns -- /bin/sh -c "echo pod1 > /usr/share/nginx/html/index.html"
[root@k8s-master service]# kubectl exec -it my-nginx-5d67c8f488-mxksb -n myns -- /bin/sh -c "echo pod2 > /usr/share/nginx/html/index.html"
[root@k8s-master service]# kubectl exec -it my-nginx-5d67c8f488-nr6pb -n myns -- /bin/sh -c "echo pod3 > /usr/share/nginx/html/index.html"
[root@k8s-master service]# curl 192.168.2.11 #负载均衡实现
pod3
[root@k8s-master service]# curl 192.168.2.11
pod2
[root@k8s-master service]# curl 192.168.2.11
pod1
[root@k8s-master service]# curl 192.168.2.11
pod3
[root@k8s-master service]# curl 192.168.2.11
pod2
[root@k8s-master service]# curl 192.168.2.11
pod1
[root@k8s-master service]# curl 192.168.2.11
pod3
[root@k8s-master service]# curl 192.168.2.11
pod2
[root@k8s-master service]# curl 192.168.2.11
pod1(2)浏览器测试

4.卸载purelb
采用delete -f即可卸载
[root@k8s-master service]# kubectl delete -f service2.yaml
[root@k8s-master service]# kubectl delete -f pure-ip-pool.yaml
[root@k8s-master service]# kubectl delete -f purelb-complete.yaml
这篇关于LoadBalancer将服务暴露到外部实现负载均衡purelb-layer2模式配置介绍的文章就介绍到这儿,希望我们推荐的文章对编程师们有所帮助!


