本文主要是介绍Run Micro-ROS on almost any stm32,希望对大家解决编程问题提供一定的参考价值,需要的开发者们随着小编来一起学习吧!
Run Micro-ROS on almost any stm32 - Tech blog (guillaumebeuzeboc.github.io)
Run Micro-ROS on almost any stm32
19 Sep 2021 » c, cmake, stm32, micro-ros, clion
如果用的不是STM32F4,需要自己去生成micro_ros_stm32cubemx_utils库
Micro-ROS brings the ability to integrate microcontrollers into the ROS ecosystem. Having microcontrollers publishing topic directly into your ROS2 host could facilitate a lot of the integration. So far, Micro-ROS is only officially supporting a small amount of boards. Unfortunately, I didn’t have any stm32 board officially supported by Micro-ROS, so I decided to have a look at how to run Micro-ROS on the stm32 board I had at home. So I have a Nucleo-L476RG which is an ultra low power board. It has a lot of pins and configuration possibility, a Flash size of 1 MB and two RAMs (96 KB and 32 KB). In my case, I am going to use the UART to transmit my data (using the debugger UART to avoid additional wiring). Basically what we are going to do is that we are going to create a project with CUBEMX, configure it and adapt the CMakeLists in order to link with the static Micro-ROS library. In my case I will use Clion as an IDE but most of the CMake-compatible IDE should work (Clion has a nice stm32 plugins that facilitates a lot of things like uploading, debugging, etc.). Micro-ROS is not already expecting you to use CMake, it’s rather using plain Makefiles. But with just a few changes we will be able to use Cmake.
Install all you need
In this post, I am using Ubuntu 20.04 with ROS2 foxy already installed.
Micro ROS setup
Clone this repo GitHub - micro-ROS/micro_ros_setup at foxy and follow the instruction in order to build the Micro-ROS agent (interface between the UART and ROS2).
Micro_ros_stm32cubemx_utils
In order to generate the static library, we are going to need another repo micro_ros_stm32cubemx_utils GitHub - micro-ROS/micro_ros_stm32cubemx_utils at foxy. For this example, this repo as well as the CubeMX project are going to be located in one directory.
.
├── l476rg_test   # The CubeMX project explained right after
└── micro_ros_stm32cubemx_utils # the repo
Generate your project with CubeMX
UART
Within CubeMX I generated a project for my board: Nucleo-476RG. I activate the USART2 (the one connected to the debugger). Configure it for asynchronous and disable hardware control.

I left the default basic setup of it (115200 Bits/s, 8 Bits, None, 1). Check the “Global interrupt” checkbox under the NVIC Settings.

Make sure to enable to DMA for the corresponding UART. Both priorities must be set to very hight and RX direction must be set to Peripheral To Memory and TX one to Memory to Peripheral. Please also make sure that RX DMA Request settings Mode is set to Circular (Keep the Normal on for TX).

FreeRTOS
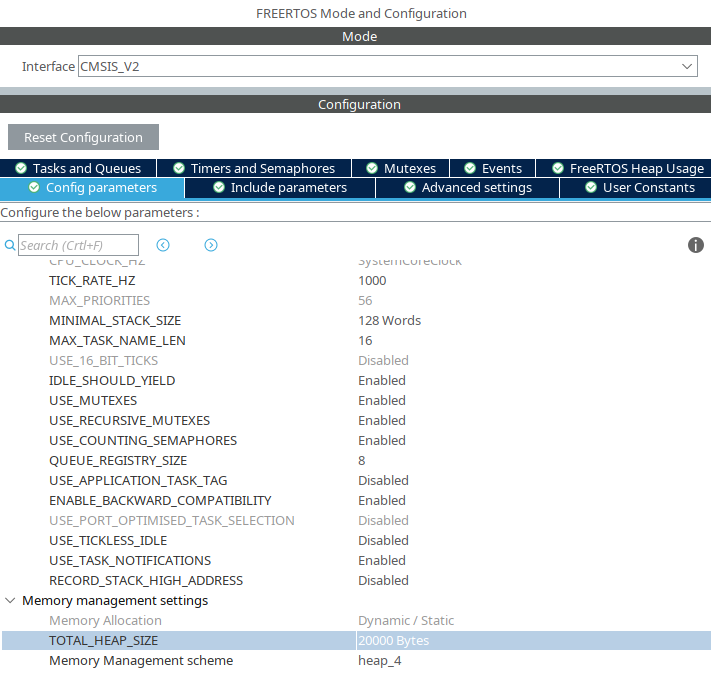
For our example, we will need FreeRTOS. We will simply need to configure a task (the default) for Micro-ROS. Activate FreeRTOS in CubeMX (I used CMSIS v2). Micro-ros will need at least 12 kB for its task, hence we need to increase the default TOTAL_HEAP_SIZE of FreeRTOS. I picked 20000 bytes for my test (but you can of course use 12000).

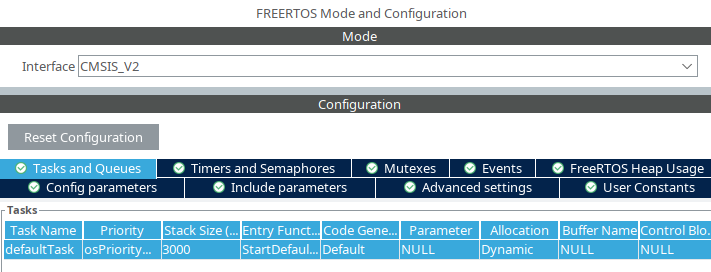
You must also create a task for your Micro-ROS. We are simply going to use the default one. And set a size of 3000 words (3000 words of 4 bytes is 12 kB).

Generate the project
Here I want to use Clion with Cmake hence I am going to generate my project for the SW4STM32 toolchain : Project Manage -> Project -> Toolchain / IDE; and select SW4STM32. Generate code in order to have the source files as well as the CMakeLists.txt.
Generate the Micro-ROS static library
Here we are going to use the micro_ros_stm32cubemx_utils repo that we downloaded before. This repository is using the Makefiles to extract the compilation flags in order to build the Micro-ROS static library. Unfortunately, so far it’s only extracting from files with .mk extension and in our case the file containing the flags (generated by Cmake) is called flags.make. Thus, we will have to make a little change to the repo. We will change the file microros_static_library_ide/library_generation/library_generation.sh by adding [a] and [e] line 13:
@@ -10,7 +10,7 @@ if [ -f "$BASE_PATH/libmicroros/libmicroros.a" ]; thenexit 0fi######## Trying to retrieve CFLAGS ########
-export RET_CFLAGS=$(find /project -type f -name *.mk -exec cat {} \; | python3 $BASE_PATH/library_generation/extract_flags.py)
+export RET_CFLAGS=$(find /project -type f -name *.m[a]k[e] -exec cat {} \; | python3 $BASE_PATH/library_generation/extract_flags.py)RET_CODE=$?if [ $RET_CODE = "0" ]; then
Once it’s done, from the directory containing the CubeMX project and the micro_ros_stm32cubemx_utils repo, launch
docker pull microros/micro_ros_static_library_builder:foxy &&\docker run --rm -v ${PWD}:/project --env MICROROS_LIBRARY_FOLDER=micro_ros_stm32cubemx_utils/microros_static_library_ide microros/micro_ros_static_library_builder:foxy`You should see the list of CFLAGS detected. In my case:
 Found CFLAGS:
-------------
-ffunction-sections -fdata-sections -mcpu=cortex-m4 -mfpu=fpv4-sp-d16 -mfloat-abi=hard -mthumb -Og
-------------
Make sure the options are the same that are on for your target, otherwise you could face some undefined var/functions or linking issues. This will take some time and after in the subfolder “libmicroros” containing an “include” folder and the library. In my case, I copied the libmicroros folder in my stm32 project root. I also included in it the extra_sources available in the “micro_ros_stm32cubemx_utils” repo.
Use the library
CMakeLists.txt
In order to use the library, we must add it and the headers in our CMakeLists.txt. We must first add the includes from Micro-ROS:
include_directories(Core/IncDrivers/STM32L4xx_HAL_Driver/IncDrivers/STM32L4xx_HAL_Driver/Inc/LegacyMiddlewares/Third_Party/FreeRTOS/Source/includeMiddlewares/Third_Party/FreeRTOS/Source/CMSIS_RTOS_V2Middlewares/Third_Party/FreeRTOS/Source/portable/GCC/ARM_CM4FDrivers/CMSIS/Device/ST/STM32L4xx/Include Drivers/CMSIS/Includelibmicroros/include)We also need to add the Micro-ROS extra_sources to the source file glob:
file(GLOB_RECURSE SOURCES "startup/*.*" "Middlewares/*.*" "Drivers/*.*" "Core/*.*" "libmicroros/extra_sources/*.*")And finally we need to link the Micro-ROS static library to our target
target_link_libraries(${PROJECT_NAME}.elf ${CMAKE_SOURCE_DIR}/libmicroros/libmicroros.a)Updating the main.c
Now that the CMakeLists.txt is ready, we can modify the main in order to publish our topic. We are basically going to use what is defined in https://github.com/micro-ROS/micro_ros_stm32cubemx_utils/blob/foxy/sample_main.c which is a full example of topic publishing. We will only have to modify the main.c (core/src) in our case.
First, we must include the necessary Micro-ROS layer includes, and our message type.
/* USER CODE BEGIN Includes */
#include <rcl/rcl.h>
#include <rcl/error_handling.h>
#include <rclc/rclc.h>
#include <uxr/client/transport.h>
#include <rmw_microros/rmw_microros.h>
#include <rcutils/stdatomic_helper/gcc/stdatomic.h>#include <std_msgs/msg/int32.h>
/* USER CODE END Includes */
We need to declare a bunch of methods that are actually defined in the extra_sources files (in our case in dma_transport.c and in microros_allocators.c)
/* USER CODE BEGIN 4 */
bool cubemx_transport_open(struct uxrCustomTransport * transport);
bool cubemx_transport_close(struct uxrCustomTransport * transport);
size_t cubemx_transport_write(struct uxrCustomTransport* transport, const uint8_t * buf, size_t len, uint8_t * err);
size_t cubemx_transport_read(struct uxrCustomTransport* transport, uint8_t* buf, size_t len, int timeout, uint8_t* err);void * microros_allocate(size_t size, void * state);
void microros_deallocate(void * pointer, void * state);
void * microros_reallocate(void * pointer, size_t size, void * state);
void * microros_zero_allocate(size_t number_of_elements, size_t size_of_element, void * state);
/* USER CODE END 4 */
Then we are going to change the code directly in our StartDefaultTask.
void StartDefaultTask(void *argument)
{/* USER CODE BEGIN 5 *//* Here we give our huart2 interface, and the 4 * transport functions*/rmw_uros_set_custom_transport(true,(void *) &huart2,cubemx_transport_open,cubemx_transport_close,cubemx_transport_write,cubemx_transport_read);/* Here you also give to the allocator the functions* that are going to be used in order to allocate memory etc.*/rcl_allocator_t freeRTOS_allocator = rcutils_get_zero_initialized_allocator();freeRTOS_allocator.allocate = microros_allocate;freeRTOS_allocator.deallocate = microros_deallocate;freeRTOS_allocator.reallocate = microros_reallocate;freeRTOS_allocator.zero_allocate =  microros_zero_allocate;if (!rcutils_set_default_allocator(&freeRTOS_allocator)) {printf("Error on default allocators (line %d)\n", __LINE__);}// Micro-ROS apprcl_publisher_t publisher;std_msgs__msg__Int32 msg;/* The support is the structure that is going to carry all* the information about your Micro-ROS instance * (context, allocator, clock , options)*/rclc_support_t support;// The allocator that we defined earlierrcl_allocator_t allocator;rcl_node_t node;allocator = rcl_get_default_allocator();//create init_optionsrclc_support_init(&support, 0, NULL, &allocator);// create noderclc_node_init_default(&node, "cubemx_node", "", &support);// create publisherrclc_publisher_init_default(&publisher,&node,ROSIDL_GET_MSG_TYPE_SUPPORT(std_msgs, msg, Int32),"cubemx_publisher");msg.data = 0;for(;;){rcl_ret_t ret = rcl_publish(&publisher, &msg, NULL);if (ret != RCL_RET_OK){printf("Error publishing (line %d)\n", __LINE__);NVIC_SystemReset(); // If we cannot publish we restart}msg.data++;osDelay(10);}/* USER CODE END 5 */
}
From this point, your code is ready to compile and ready to upload on the MCU. On my MCU compiled with debug mode, the publisher takes one to two second to start publishing. Once your MCU is running and connected to your computer, you will need the Micro-ROS agent. Make sure to source your Micro-ROS ws source microros_ws/install/local_setup.zsh and run the agent ros2 run micro_ros_agent micro_ros_agent serial --dev /dev/ttyACM0 (To identify your serial port, you can simply list your /dev/ and check which one appears when you connect your MCU). Your agent should display something like:
[1632668621.125343] info     | TermiosAgentLinux.cpp | init                     | running...             | fd: 3
[1632668621.125450] info     | Root.cpp           | set_verbose_level        | logger setup           | verbose_level: 4
[1632668621.126870] info     | Root.cpp           | create_client            | create                 | client_key: 0x5851F42D, session_id: 0x81
[1632668621.126911] info     | SessionManager.hpp | establish_session        | session established    | client_key: 0x5851F42D, address: 0
[1632668621.142403] info     | ProxyClient.cpp    | create_participant       | participant created    | client_key: 0x5851F42D, participant_id: 0x000(1)
[1632668621.157779] info     | ProxyClient.cpp    | create_topic             | topic created          | client_key: 0x5851F42D, topic_id: 0x000(2), participant_id: 0x000(1)
[1632668621.166655] info     | ProxyClient.cpp    | create_publisher         | publisher created      | client_key: 0x5851F42D, publisher_id: 0x000(3), participant_id: 0x000(1)
[1632668621.176929] info     | ProxyClient.cpp    | create_datawriter        | datawriter created     | client_key: 0x5851F42D, datawriter_id: 0x000(5), publisher_id: 0x000(3)
Here we see that a node connects and that it create a publisher. Now your MCU topic is available in your ROS2 and you can simply echo it.
:: ~ » ros2 topic echo /cubemx_publisher
data: 123
---
data: 124
---
.
.
.
You can find the complete example here: GitHub - Guillaumebeuzeboc/Micro-ROS-stm32-basic-pub
If you have any suggestion/question/remark please don’t hesitate to leave a comment.
Share this on → Tweet
这篇关于Run Micro-ROS on almost any stm32的文章就介绍到这儿,希望我们推荐的文章对编程师们有所帮助!


